Running a Job
Before you begin Before running a job, verify the following points:
- The MDM server must be running to start the job as Scheduler runs on the MDM server.
- The job details are specified on the Create New Job page.
- Ensure that the job is listed in the Current Jobs list.
- Ensure that you have selected the Node ID.
- Procedure
- Log in to Configurator.
- Click
Scheduling.
The Scheduling window is displayed with the Current Jobs and Create New Job options.
- To run a job on the Create New Job page:
- In the right pane, click
Create New Job to create a new scheduled job.
The Create New Job page is displayed in the left pane.
- Enter the job details. For information about job details, see Scheduling Jobs from the Configurator.
- Click Run.
Click Run. The Run Job dialog box is displayed. The Run Job dialog box is displayed.
- In the right pane, click
Create New Job to create a new scheduled job.
- Run a job on the Edit Job page:
- In the left pane, click
Current Job to modify the scheduled job.
The Current Job page is displayed in the left pane with a list of scheduled jobs. For more information about scheduling a job, see Scheduling Jobs from the Configurator.
- Click
Edit next to the job that you want to modify.
The Edit Job page is displayed. For information about modifying the job details, see Modifying Current Job.
- In the left pane, click
Current Job to modify the scheduled job.
- Click
Run.
The Run Job dialog box is displayed.
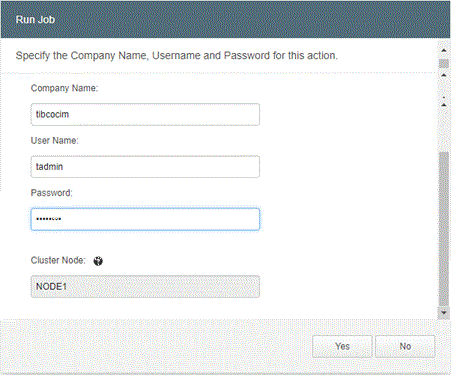
- Enter the super user credentials in the following fields:
- Company Name
- User Name
- Password
In the Cluster Node field, the selected cluster node is displayed, which is specified in . - Click
Yes to run the job.
The Selected Job saved and run successfully message is displayed. The job details and the related job policy files are saved in the CronSchedules.xml file and the job runs immediately.Attention: The TIBCO MDM server must be running to start the job. If the TIBCO MDM server is not running, only the job is added in CronSchedules.xml.