Adding an Upload and a Download File Transfers
To allow bidirectional file transfer, you need to add an upload and a download file transfers.
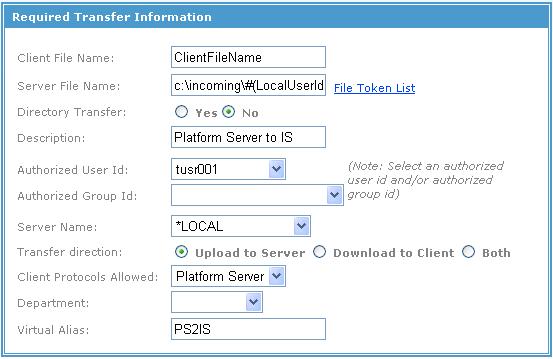
Adding an Upload File Transfer
For TIBCO MFT Internet Server, to accept a file transfer from TIBCO MFT Platform Server, you need to create an upload file definition.
Click to open the Add Transfer page. Then, configure the Required Transfer Information section with the information as follows. When you are done, click Add.
| Parameter | Description |
|---|---|
| Client File Name | Use a place holder, such as an asterisk mark (*). The file selected by the client will replace the value specified here. This can be anything. |
| Server File Name | Set the path and file name for the files that will be written. It is good practice to add the date and time file tokens to the server file name.
This will help differentiate the files as they come in. |
| Directory Transfer | Click No for the following example where only a single file will be sent. |
| Description | Add a short description. |
| Authorized User Id | Choose the user ID from the list that will be used to make this file transfer. |
| Server Name | Can be set to any server. This is set to *LOCAL for the following example. |
| Transfer Direction | Click Upload to Server. |
| Client Protocols Allowed | Select Platform Server. |
| Department | If you have a department for this transfer to be assigned, set it here if not leave it blank. |
| Virtual Alias | Add the alias that TIBCO MFT Platform Server user will use for transfers. |
The following figures shows the example:
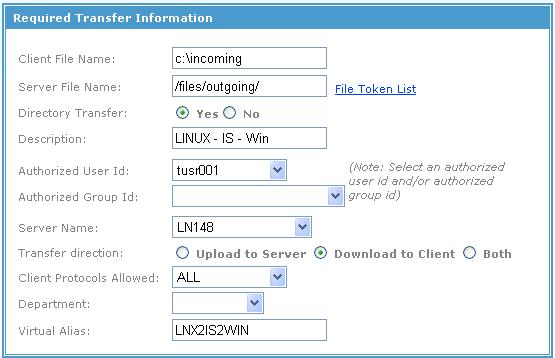
Adding a Download File Transfer
You can download files from TIBCO MFT Internet Server with TIBCO MFT Platform Server. To do this, you need to create a download file definition. In this example, you will configure a directory download from a LINUX server that has TIBCO® Managed File Transfer Platform Server for UNIX installed to download files using TIBCO Managed File Transfer (MFT) Platform Server for Windows through MFT.
| Parameter | Description |
|---|---|
| Client File Name | Use a place holder, such as an asterisk mark (*). The file selected by the client will replace the value specified here. This can be anything. |
| Server File Name | Configure the directory where all the files to be downloaded are located on the server. |
| Directory Transfer | Click Yes. |
| Description | Add a short description. |
| Authorized User Id | Choose the user ID from the list that will be used to make this file transfer. |
| Server Name | Configure the server containing the files that will be downloaded. |
| Transfer Direction | Click Download to Client. |
| Client Protocols Allowed | Select Platform Server. |
| Department | If you have a department for this transfer to be assigned, set it here if not leave it blank. |
| Virtual Alias | Add the alias that TIBCO MFT Platform Server user will use for transfers. |
The following figures shows the example: