Buttons
MFT Platform Server Administrator provides a toolbar to perform tasks for convenience. You can use the menus to perform same tasks as the buttons in the toolbar. By default, the toolbar is displayed in the MFT Platform Server Administrator window. If not, you can open it by clicking from the menu.
 to create a new window to view server and transfer information.
 to add a server to the Network window.
 to start a server.
 to stop a server.
View and Change Server Properties
Click
 to open the MFT Platform Server Properties panel, which contains configuration information about the selected server. When the panel is invoked, a query is issued to the server for the current settings which are returned and displayed in the panel. From this panel, you can modify the information.
If you do not have permission to start and stop the MFT Platform Server service, you cannot modify the information on the Server Properties (the panel appears as Read Only).
Configure SSL
Click
 to open the MFT Platform Server SSL Settings panel. You can modify the current SSL settings on this panel.
Configure Post Processing
Click
 to open the Post Processing panel. You can select the
Use Configured Post Processing check box to enable the Configure Post Processing feature, and then specify the name of the file to be used for the post processing.
to open the Post Processing panel. You can select the
Use Configured Post Processing check box to enable the Configure Post Processing feature, and then specify the name of the file to be used for the post processing.
 to view the current server and transfer information.
Create a New Transfer
Click
 to add a new transfer to the queue of the server you are working on. After selecting a transfer type, the Transfer Properties panel is displayed. You can specify all of the particulars of the file transfer that you want to add to the queue.
 to create a new transfer template.
 to create a new Directory Named Initiation entry.
View or Change Properties
Click
to view or change the parameters of a specific Transfer, Template, or Directory Named Initiation entry. The Properties panel is displayed. You can modify the properties on the Properties panel.
- If the job is active at the time of modification and it has been scheduled to execute only one time, your modifications will be denied.
- If the job is active and scheduled to execute more than once, your modifications will take effect the next time when the transfer becomes eligible.
- If the job is scheduled and it has not yet executed, your modifications will be effective immediately.
Any significant changes made to the MFT Platform Server queue view are logged to the event log.
Delete Selected Objects
Click
 to remove a non-active transfer, template, or Directory Named Initiation template.
Hold
Click
 to put a hold request on a transfer or Directory Named Initiation entry so that it cannot be dispatched. This action prevents the Schedule Dispatch Service from initiating the transfer until otherwise notified.
 to release a held transfer or Directory Named Initiation entry.
Abort
Click
 to abort a transfer. The Abort Transfer panel is displayed .
Select either of two options:
- Cancel transfer: Notifies the remote system that the transfer has been terminated.
- Terminate transfer immediately: Terminates the transfer and not notify the partner. In certain instances, this selection can stop a transfer that Cancel transfer cannot.
MFT Platform Server for Windows prompts you to confirm your selection. Upon confirmation, the program issues the abort command for each of the transfers selected.
View Items as Large Icons
Click
 to display a single large icon for each file transfer with its Transfer ID directly below it. The appearance of the icons depends on the file transfer type selected.
View Items as Small Icons
Click
 to display a single small icon for each file transfer with its Transfer ID directly next to it. The appearance of the icons depends on the file transfer type selected.
View Items in a List
Click
 to display a single small icon for each file transfer with its Transfer ID directly next to it. The way the icon appears differs depending upon the file transfer type selected.
 to view detailed information about the transfers in the Queue view. The fields varies depending on your selection in the Select Field View panel. By default, all the fields in the queue are displayed.
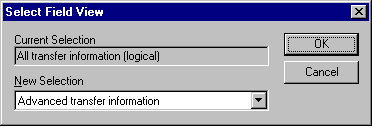
 to select which fields you want to view from a predefined group. The Select Field View panel is displayed.