Sample Transfer Using MFT Platform Server Administrator
You can use MFT Platform Server Administrator to do a simple file to file transfer.
You can also specify the direction of the file transfer by clicking 1. Send or 2. Receive in the File to File tab.
One way to get to the transfer GUI is to click the
New Transfer icon
 and then click
Advanced TCP Transfer. Then the
Transfer Properties on server dialog appears.
and then click
Advanced TCP Transfer. Then the
Transfer Properties on server dialog appears.
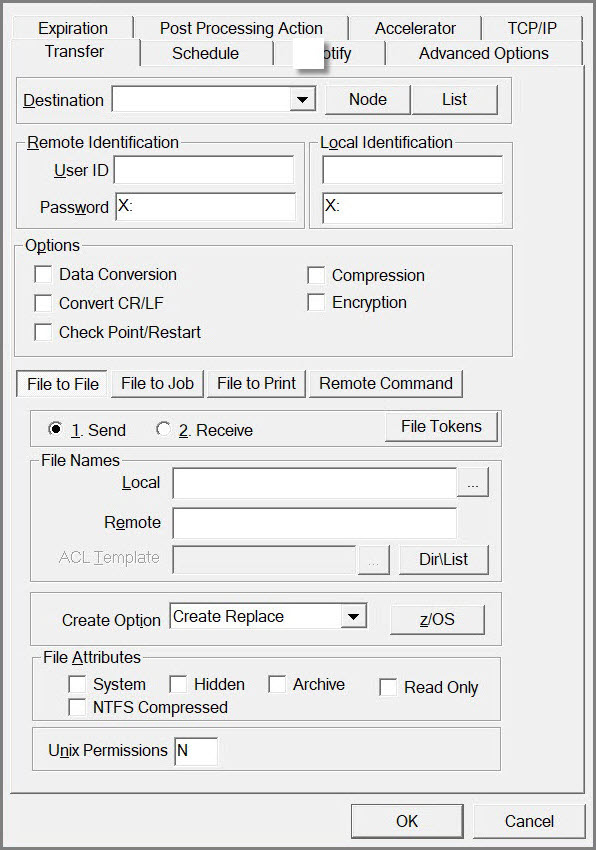
For simplicity, take a file to file transfer from Windows to a mainframe as an example. You can conduct configurations in the Transfer tab as follows:
- Destination: You can use the
Destination field to specify the remote system to which you send a file. The destination can be an IP name or address of the z/OS running on the mainframe. The specific field value depends on the remote system and the protocol that is used for the transfer. The value is kept in a drop-down list so that it can be used for future transfers.
You can also pre-define the remote system, which is referred to as a node. By clicking Node next to the Destination field, a list of all pre-defined nodes is available in the Available Nodes dialog. After you select a node from the list and click OK, the value in the Destination field is filled in automatically.
- Local Identification: In the Local Identification area, you can specify the user ID and password of a useron the local system. The transfer is submitted under the user and executes with the rights of the user. The entered password is shown as asterisks.
- Remote Identification: In the Remote Identification area, you can specify the user ID and password on the remote system. Therefore, if you send a file to the mainframe, place your mainframe user ID and password in this area. The entered password is shown as asterisks.
- Options: The
Options area contains the following check boxes:
- Data Conversion check box: has three additional fields so that data can be converted to or from ASCII or EBCDIC on a local or remote system.
- Check Point/Restart check box: has an additional parameter called Interval in the Check Point area of the Advanced Options tab. You can use the Interval parameter to specify the interval at which MFT Platform Server for Windows takes a checkpoint
- Convert CR/LF check box
- Compression check box: has an additional parameter called Type in the Compression area of the Advanced Options tab.
- Encryption check box: has an additional parameter called Method in the Encryption area of the Advanced Options tab.
- File to File: You need to conduct transfer configurations as required in the
File to File tab.
- 1. Send or 2. Receive: Click 1. Send or 2. Receive to specify the direction of a file to file transfer. In this example, click 1. Send to initiate a Send transfer.
- File Names: Specify the local file name and remote file name in the
File Names area.
- Local: Specify the name of a file to be sent on your local Windows machine in the
Local field.
You can also click
 next to the
Local field to select a file from your machine or network. This operation is particularly helpful in eliminating errors while typing the directory or file name.
next to the
Local field to select a file from your machine or network. This operation is particularly helpful in eliminating errors while typing the directory or file name.
- Remote: Specify a mainframe dataset name in the Remote field. The name can be an existing dataset or a new dataset name. In this example enter a new dataset name.
- ACL Template: The ACL Template field is available only when 2. Receive is selected. This field allows you to have the same security attributes on a file that you are receiving as the file entered in the ACL Template field.
- Dir\List: MFT Platform Server for Windows has the ability to transfer entire directories. You can click
 to check the options for directory transfers, such as the ability to scan subdirectories and stop on failure.
- Local: Specify the name of a file to be sent on your local Windows machine in the
Local field.
- Create Option: The Create Option parameter indicates whether a file exists. You have the option to create it if it does not exist, to replace it if it exists, to append to an existing file, and so on.
- z/OS: You can use the z/OS button next to the Create Options field to define attributes for the file that you send to the mainframe, such as the record format, record length, block size, allocation, and so on.
- File Attributes: You can use the check boxes in the File Attributes area to define attributes for the file that you receive to Windows.
You can specify all the information for a basic file transfer in the Transfer tab. However, more transfer options are in other tabs of the Transfer Properties on server dialog. The information includes scheduling, defining the compression to be used (when compression is selected on the main GUI panel), the port used with a TCP transfer.
After specifying all information for a file transfer, click
OK to initiate the transfer. You can then click the
New Transfer icon
to check the progress of the file transfer.