Changing the TIBCO HOME Directory
To change the current TIBCO HOME directory, perform the following steps:
- Procedure
-
Stop TIBCO® Managed File Transfer Platform Server for Windows.
-
Save your configuration files and log files (optional) in a folder outside of your current
TIBCO HOMEto reuse them in a new environment.Configuration files are typically located in the
TIBCO HOME\MFT Platform Serverfolder. Any file with the.cfgextension andftmssvr.pqfis a configuration file.The following is the list of configuration files:
AccessControl.cfgcfprofile.cfgopenssl.cnfCfalias.cfgcfrprofile.cfgopenssl.fips.cnfcfcos.cfgComtblg.classicSslauth.cfgCfgPostProc.cfgComtblg.cp037TRECVcflist.cfgComtblg.cp1047TSENDcfnode.cfgComtblg.datUninstall.silentftmssvr.pqfTransaction's
Log.txtfile and admin changesAdmin.txtfile are typically located in theTIBCO HOME\MFT Platform Server\Tracefolder.The following is the list of log files:
-
Log.txt.yyyymmdd -
Admin.txt.yyyymmdd
-
-
Uninstall TIBCO® Managed File Transfer Platform Server for Windows with
PreserverCurrentSetup = falseto remove all registry entries and configuration files.Note: WhenPreserveCurrentSetup=false, then all files from the currentTIBCO HOME\MFT Platform ServerandTIBCO HOME\MFT Platform Server\Tracefolders are removed during uninstallation. -
Install TIBCO® Managed File Transfer Platform Server for Windows, this creates new registry entries and configuration files. During the installation, select or create the new
TIBCO_HOMEdirectory that you want to use.The new default configuration files are installed in the new TIBCO HOME.
Note:PreserverCurrentSetupcan be true or false. -
Stop TIBCO® Managed File Transfer Platform Server for Windows and copy the configuration and log files that you have saved in Step 2.
-
Start TIBCO® Managed File Transfer Platform Server for Windows.
TIBCO® Managed File Transfer Platform Server for Windows is now ready to function in the new TIBCO HOME.
PreserverCurrentSetup= true, and then installed to a different TIBCO HOME. Perform the following steps:
Stop TIBCO® Managed File Transfer Platform Server for Windows.
Update the following registry entities with a new TIBCO HOME value:
Service
HKEY_LOCAL_MACHINE\SYSTEM\CurrentControlSet\Services\MFTPS\ImagePath
Application
HKEY_LOCAL_MACHINE\SOFTWARE\Proginet\CyberFusion Server\FusionRoot
Event Viewer
HKEY_LOCAL_MACHINE\SYSTEM\CurrentControlSet\Services\EventLog\Application\MFT Platform Server\EventMessageFile
Start TIBCO® Managed File Transfer Platform Server for Windows.
Troubleshooting
Case 1: Installation fails with error: "ANT Task: Create Service has failed"
Follow the procedure below if you receive this error while installing TIBCO® Managed File Transfer Platform Server for Windows using a domain user account.
Verify if the entered domain user account is valid for the machine. If it is not a valid domain user account, then exit the installation and reinstall TIBCO® Managed File Transfer Platform Server for Windows with the correct domain user account to troubleshoot the issue.
If the domain user account is valid and the installation fails, perform the following four tasks:
-
Reinstall TIBCO® Managed File Transfer Platform Server for Windows.
-
Restart the installation using a local system account. While installing, ignore the Upgrade/Reinstall Notice.

-
-
Change the TIBCO® Managed File Transfer Platform Server for Windows account from local system account to domain user account.
-
Run Service Control Manager as administrator.
-
Select the TIBCO MFT Platform Server service.
-
On the TIBCO MFT Platform Server Properties dialog, select the Log On tab.
-
On the Log On tab, select This account and enter a valid domain account.
Tip: Restart the TIBCO MFT Platform Server service to verify the domain account’s validity.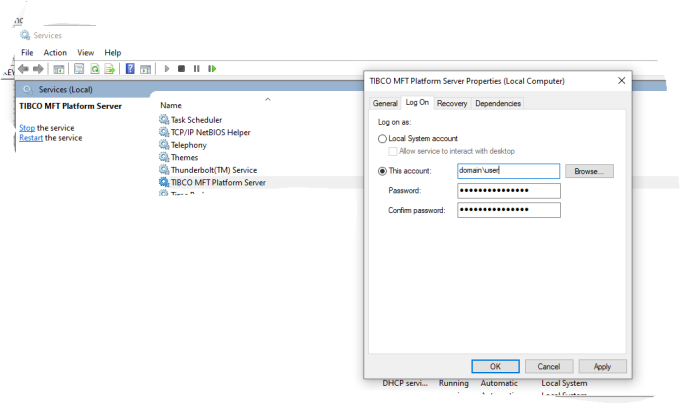
-
-
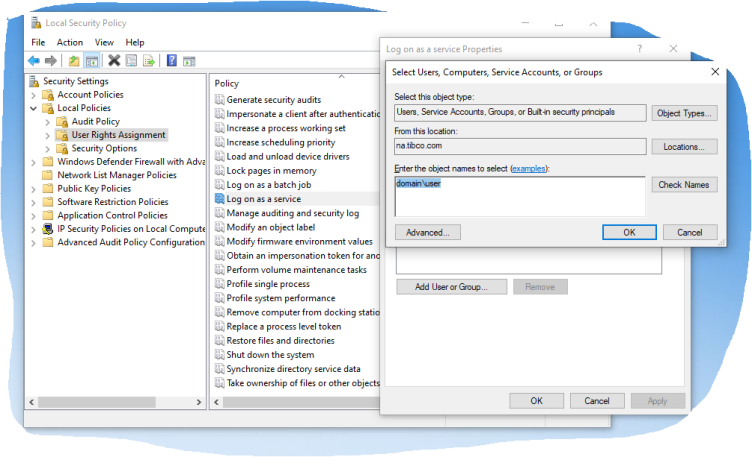
Assign necessary rights and access privileges to the domain account.
-
On your machine, go to Local Security Policy > Local Policies > User Rights Assignment.
-
Find and assign Log on as a service and Replace a process token level rights to the domain account.
-
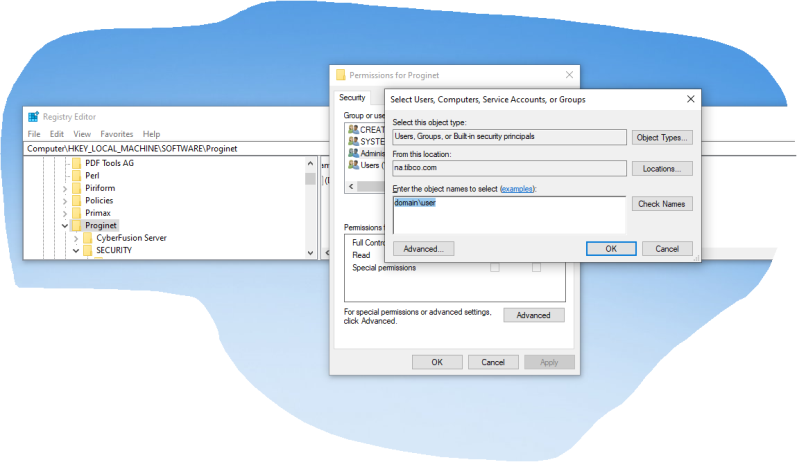
To assign registry access, open Regedit as administrator and go to
Computer\HKEY_LOCAL_MACHINE\SOFTWARE\Proginet. -
Select Properties > Permissions and assign Full Control.
-
-
Restart TIBCO® Managed File Transfer Platform Server for Windows.
-
Start TIBCO® Managed File Transfer Platform Server for Windows with the domain account using either the PSW GUI Manager application or from Services.
-
Case 2: Installation fails with error: "Another version of TIBCO(R) Managed File Transfer Platform Server for Windows has been detected in a different TIBCO HOME. The product is only allowed to be installed in one TIBCO HOME."
Follow the procedure below if you receive this error while installing TIBCO® Managed File Transfer Platform Server for Windows in a TIBCO HOME.
-
For versions 8.1.0 or higher
-
Open the registry entry
HKEY_LOCAL_MACHINE\SOFTWARE\Proginet\CyberFusion Server\FusionRootand set the value to${tibco_home}\MFT Platform Server${tibco_home} should be replaced with the actual
TIBCO_HOMEdirectory name. -
Install the product again.
-
-
For versions 8.0.1 or lower
-
Open the registry entry
HKEY_LOCAL_MACHINE\SYSTEM\CurrentControlSet\Services\MFTPS\ImagePathand set the value to${tibco_home}\MFT Platform Server\ftmssvr.exe${tibco_home} should be replaced with the actual
TIBCO_HOMEdirectory name.Note: If the value already is"${tibco_home}\MFT Platform Server\ftmssvr.exe"then remove the leading and trailing quotation mark ("). -
Install the product again.
-