
AKS Installation
INTRODUCTION
TIBCO® ModelOps is a cloud native model management and scoring environment supporting deployment of machine learning pipelines, models, and data source and sinks. It is installed onto your cloud infrastructure using the steps mentioned below. These instructions outline how to gather your cloud subscription information, download the necessary tools, create various Azure resources and then install the helm chart.
This guide’s intention is to help a user deploy ModelOps to Azure using Azure CLI commands. Novice users should not attempt this installation. It should be performed by (or under the direction of) the cloud infrastructure administrator. Where possible, additional reference information is linked for additional study, if so desired.
NOTE: As you follow the steps included here, any given command requires some number of values to be
set in order for the command to be run; any given command outputs a value that will be required in a
subsequent step. There is an appendix with a chart of all such required named values for reference.
This guide will outline when such a value is required as well as when such a value is emitted
and needs to be saved for future use. In this guide parameters are used to hold the values.
For instance, on Windows, to set a value use the set command such as this:
set aks=tmouser
then later $AKS will be used in a command such as:
az aks delete --yes --name=$AKS --resource-group=$CLUSTER_GROUP
Table of Contents
Overview of the installation steps
These are the installation steps that must be performed. These steps must be executed in this order.
- [RUN MODELOPS INSTALLER, UNPACK NECESSARY ITEMS] (#run-installer)
- REGISTER THE APPLICATION, OBTAIN REQUIRED SERVICE PRINCIPAL AND CLIENT SECRET
- [LOGIN TO AZURE CLI] (#login-azure)
- [CREATE GROUP] (#create-group)
- [CREATE ACR] (#create-acr)
- [OBTAIN AND ASSIGN REGISTRY ID] (#assign-registry-id)
- [MINIMUM ACCESS REQUIRED FOR AKS CLUSTER CREATION] (#minimum-cluster-access-roles)
- [CREATE AN AKS CLUSTER (with autoscale)] (#create-aks-cluster)
- [ADD NODE POOL (optional: for Statistica model scoring)] (#add-node-pool)
- [VERIFY NODES AND SHOW NODEGROUP] (#verify-nodes)
- [MINIMUM ACCESS REQUIRED FOR MODELOPS INSTALLATION ON AKS] (#minimum-modelops-access-roles)
- [CONFIGURE KUBECTL] (#configure-kubectl)
- [CREATE MODELOPS NAMESPACE] (#create-namespace)
- [INSTALL THE SECRETS] (#install-secrets)
- [INSTALL THE HELM CHART] (#install-helm-chart)
- [COPY MAVEN ARTIFACTS (using
kubectl)] (#copy-maven-artifacts) - [MONITOR INSTALLATION PROCESS (with
tkn)] (#monitor-installation) - [UPDATE DNS] (#update-dns)
PREREQUISITES
In order to accomplish the Azure command line installation, you need access to a number of resources and tools.
REQUIRED RESOURCES
-
The platform specific ModelOps installer
The Modelops installer contains platform specific helm charts and maven repositories which are required in subsequent steps. These will be available as a result of running the ModelOps installer (step 1)
-
An active subscription to an Azure account that has required access as listed below and includes Azure Active Directory (AAD) access.
See the following section for how to determine if you have AAD access.
REQUIRED TOOLS
Installation instructions for each is contained in the installation of prerequisites section of this document.
- Azure CLI Tools (Azure CLI Tools)
- Helm CLI Tools (Helm CLI tool)
- Kubectl (Kubectl)
- Tekton CLI tool (Tekton CLI tool)
AZURE PREREQUISITES
To obtain your account details, visit the subscriptions area of the Azure portal [Azure portal] (https://portal.azure.com/#blade/Microsoft_Azure_Billing/SubscriptionsBlade)
VALUES TO BE EXTRACTED FROM THIS STEP
- subscription_id
- DNS_ZONE
-
Subscription ID
Your subscriptions should be listed in the portal, and for each, the subscription ID is listed
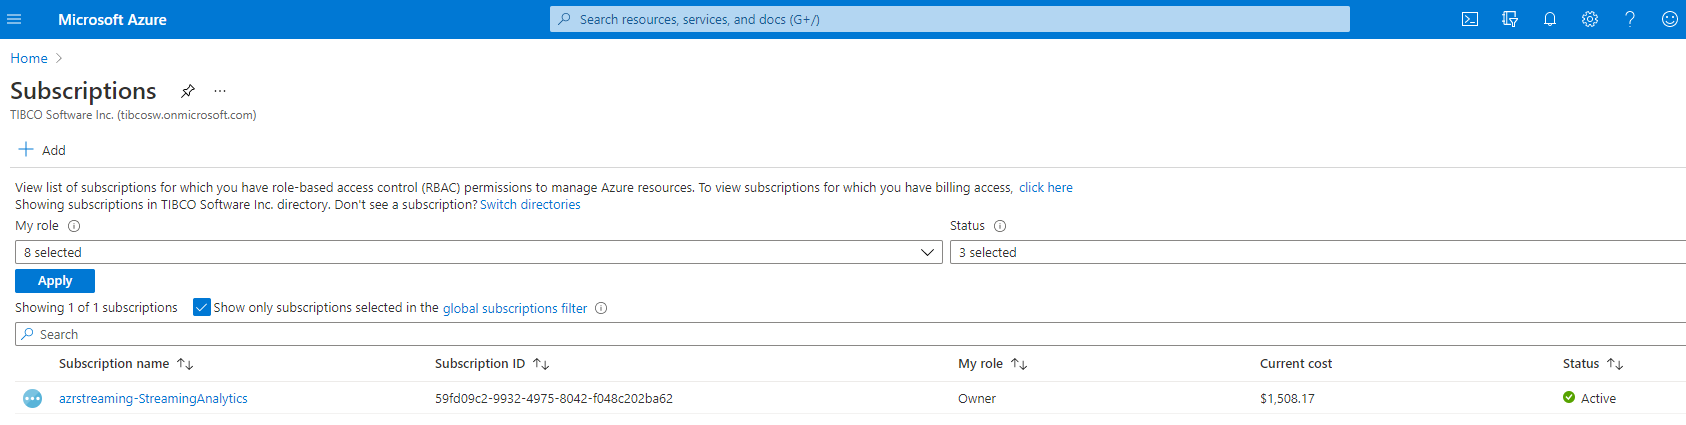
**Assign** to the variable name **subscription_id** the subscription ID you want to use.
This variable is required in an upcoming command line directive.  The subscription Id
is a hash-type value such as : 79fd09g4-3345-4975-3057-d048c402ba89
-
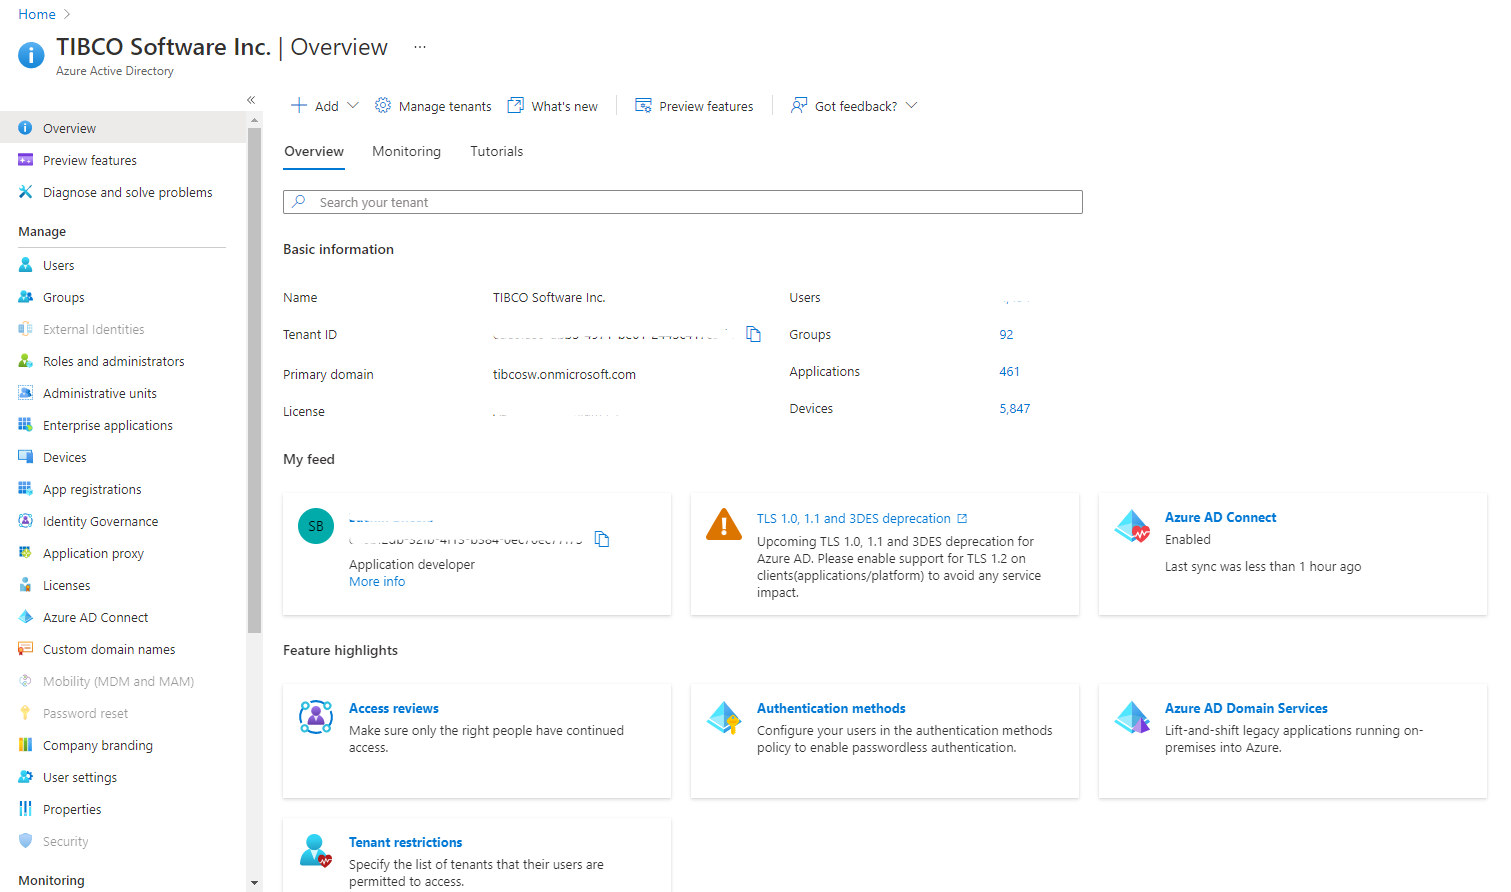
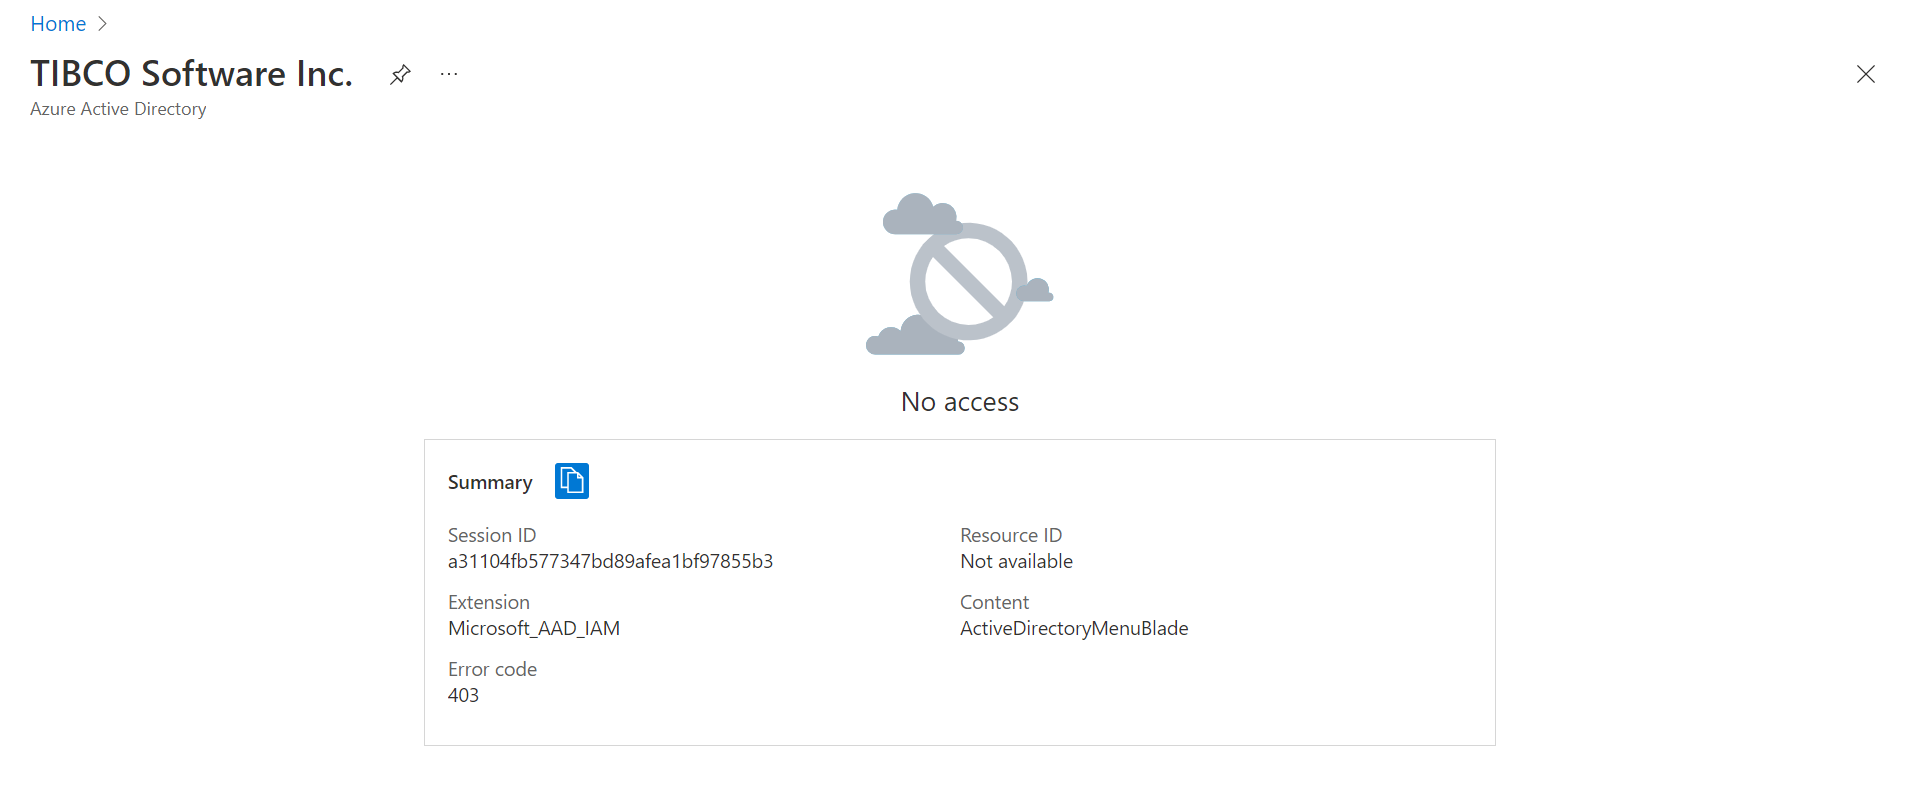
AZURE ACTIVE DIRECTORY (AAD) ACCESS
From the home area of the Azure portal, select Azure Active Directory If you have AAD access, you should expect to see results such as:
If you do not have AAD access, you should expect to see results such as:
3. DNS Zone (DNS Zone)
This zone will be the suffix appended to all hosts/urls created in your project. Your organization may have one or more. Within the Azure portal, search for “DNS zones to see if your organization has one.
Assign to the variable name DNS_ZONE the DNS zone you want to use. If you have none yet, you can create one. TIBCO DNS Zone Example: streamingaz.tibcocloud.com In this example streamingaz.tibcocloud.com is subzone of the parent domain tibcocloud.com.
INSTALLATION OF PREREQUISITES
Download and install Azure CLI tools (Azure CLI Tools)
If on Windows, download and run the .msi
If on macOS, install via:
brew install azure-cli
Download and install Helm (Helm CLI tool)
If on Windows, install Chocolatey (Chocolatey).
Use Chocolatey to install helm:
choco install kubernetes-helm
If on macOS, use brew
brew install helm
Install Kubectl (Kubectl)
To accomplish the Kubectl installation, use curl. cURL, which stands for client URL, is a command line tool that developers use to transfer data to and from a server. At the most fundamental, cURL lets you talk to a server by specifying the location (in the form of a URL) and the data you want to send.
curl -LO https://dl.k8s.io/release/v1.21.0/bin/windows/amd64/kubectl.exe
On macOS,
brew install kubectl
Download and Install Tekton CLI tool (Tekton CLI tool)
If on windows, this tool is installed via Chocolatey via this command:
choco install tektoncd-cli --confirm
If on macOS:
brew install tektoncd-cli
Download and Install Lens (Lens)
If on Windows:
run Lens-Setup-{version}.exe
By default, Lens is installed under
C:\users\{username}\AppData\Local\Programs\Lens
If on macOS:
brew install lens
INSTALLATION STEPS
RUN MODELOPS INSTALLER, UNPACK NECESSARY ITEMS
Run the installer for your platform. The installer names are:
| Platform | Name of the installer |
|---|---|
| Linux | TIB_modelops_1.3.0_linux_x86_64.archive-bin |
| macOS | TIB_modelops_1.3.0_macosx_x86_64.dmg or TIB_modelops_1.3.0_macosx_x86_64.archive-bin |
| Windows | TIB_modelops_1.3.0_win_x86_64.msi |
NOTE: As downloaded from the TIBCO distribution site, the ModelOps DMG installer is delivered in a single file stored in zip format.
Agree to the EULA.
Set location for installation (or accept default)
On Windows you may be asked to allow the app from an unknown publisher to make changes to your device. Select “Yes”.
The Modelops installer will place a Helm chart and Maven repository in the install directory. You will need both these artifacts when you deploy the product onto your cloud infrastructure. After the installation these items can be located in the following locations by default:
| Platform | Helm Chart |
|---|---|
| Linux | /opt/tibco/modelops/n.m/helm-charts/kubernetes-installer-1.1.0.tgz |
| macOS | ./TIBCO Streaming ModelOps /n.m/helm-charts/kubernetes-installer-1.1.0.tgz |
| Windows | C:\TIBCO\ modelops\n.m\helm-charts\kubernetes-installer-1.1.0.tgz |
NOTE: Here, modelops n.m represents the release version, where n represents major release and m represents minor release.
| Platform | Maven Repository |
|---|---|
| Linux | /opt/tibco/modelops/n.m/maven-repository-artifacts/modelops-repo-1.3.0-mavenrepo.zip |
| macOS | ./TIBCO Streaming ModelOps /n.m/maven-repository-artifacts/modelops-repo-1.3.0-mavenrepo.zip |
| Windows | C:\TIBCO\ modelops\n.m\maven-repository-artifacts\modelops-repo-1.3.0-mavenrepo.zip |
NOTE: The expected output from this step is modelops_home. It is the directory where ModelOps is installed on your machine. For instance, on Windows, it is C:\tibco\modelops\n.m. Users can assign to modelops_home either the default install or whatever value they provide.
REGISTER THE APPLICATION, OBTAIN REQUIRED SERVICE PRINCIPAL AND CLIENT SECRET
For ModelOps to run correctly, it needs to be registered.
As part of the registration process, you will need to provide a name. It is highly recommended that you name all your items according to this guideline:
Lower case alphanumeric characters, ‘-’ or ‘.’, and must start and end with an alphanumeric character
(e.g. ‘example.com’, regex used for validation is
'[a-z0-9]([-a-z0-9]*[a-z0-9])?(\.[a-z0-9]([-a-z0-9]*[a-z0-9])?)*')
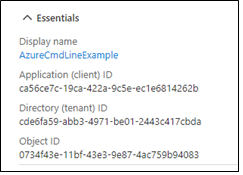
Once registered through the Azure portal, a service principal is automatically created in your home directory. Once registered, it needs a client secret. This allows it to access or modify resources. To create the service principal and client secret, you need Azure Active Directory access. Furthermore, your role within Azure must have sufficient privileges. The link below will take you to the official Azure docs and walk you through how to create the service principal and client secret (including how to check if your account has sufficient privileges). The steps require you to enter a name for your application. The application is ModelOps; however you can name it as you wish according to the naming convention restrictions listed above. The name is a display name, not an identifier. An application (client) ID is generated that uniquely identifies your app. Users of your application might see the display name when they use the app, for instance during sign-in.
Once registered, create the application secret (exercise option 2 in the Authentication section of the document).
IMPORTANT NOTE: in the steps below, when you create the client secret, you MUST record it. The secret value is never displayed again after you leave the page. In subsequent commands this value is required. It is referenced as CLIENT_SECRET_KEY; therefore, save this value in an environmental variable named CLIENT_SECRET_KEY.
To get the client secret key for the registered app, please refer here
When you register an application in the portal, an application object as well as a service principal object are automatically created in your home tenant.
- CLIENT_SECRET_KEY
- SERVICE_PRINCIPAL_ID (Application (client) ID)
- TENANT_ID (Directory (tenant) ID)
Other than the client secret, you can see the values in the portal. From Home, choose App registrations to find the following:
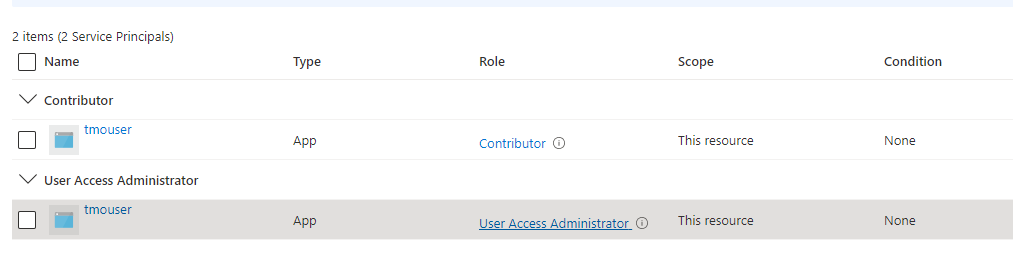
MINIMUM ACCESS REQUIRED FOR AKS CLUSTER CREATION
To create a AKS cluster, below are the 2 roles that needs to be added to the application/user at minimal.
- Contributor
- User Access Administrator
To determine if your application has this role, within the portal, from home traverse to subscriptions then choose IAM. You should see a list of items (users and applications). You may be listed more than once, so be sure to scroll through to see if the application has both the roles assigned.
If your application has required roles attached it will look as below.
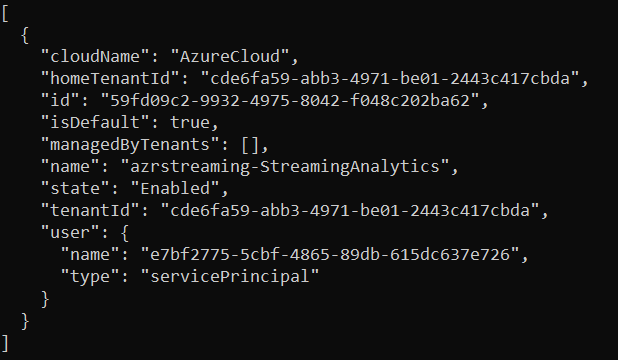
LOGIN TO AZURE CLI
From the command line where you have Azure CLI installed, issue the following command, using the three parameters as extracted from the previous step:
az login \
        --service-principal \
        --username=$SERVICE_PRINCIPAL_ID \
        --password=$CLIENT_SECRET_KEY \
        --tenant=$TENANT_ID
Output of the above command is a listing such as:
CREATE GROUP
ADDITIONAL VALUES REQUIRED FOR THIS STEP
- group
Assign to a variable named group some value. You can name your group ($CLUSTER_GROUP) however you wish, keeping in mind the naming conventions above in step 2.
NAMING CONVENTION TIP: The ModelOps Engineering team uses a convention where the name and the resource-group name are identical. This affords the user the benefit of needing to remember one less name when entering any given command. For instance, the command for cleanup takes both the name and the resource-group name:
az aks delete \
--yes \
--name=<Name> \
--resource-group=<ResourceGroupName>
Then you could then pass the same name for both <Name> and <ResourceGroupName>:
az aks delete \
    –-yes \
    -–name=prodmodelops \
    –-resource-group=prodmodelops
-
location
Assign to location your region. Choose the location – this is the region your organization is hosted in Azure. You may choose your organization’s region based on locality and network latency, or because you have sovereignty requirements for data centers. Your organization’s default location is based on the closest Microsoft Azure region available. Example: eastus. For a list of all geographies, See https://azure.microsoft.com/en-us/global-infrastructure/geographies/#geographies
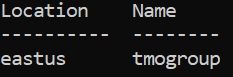
Once you have the group and location variables set, issue the following command:
az group create \
        --name=$CLUSTER_GROUP \
        --location=$CLUSTER_LOCATION \
        --output=table
Output of the above command is a table listing the location and the specified group name:
CREATE ACR
ADDITIONAL VALUES REQUIRED FOR THIS STEP
-
acr
Assign to acr the name of your Azure Container Registry(ACR). You can name your ACR as you wish, keeping in mind the naming conventions above in step 2.
Create the Azure Container Registry. This command will create the registry and in doing so, create a registry ID. You must supply the group name ($CLUSTER_GROUP) from the previous command. Once you have the acr variable set, issue the following command:
az acr create \
        --name=$AZURE_CONTAINER_REGISTRY \
        --resource-group=$CLUSTER_GROUP \
        --sku=basic \
        --output=table
Output of above command is a table:

OBTAIN AND ASSIGN REGISTRY ID
VALUES TO BE EXTRACTED FROM THIS STEP
- acr_registry_id
az acr show \
            --name=$AZURE_CONTAINER_REGISTRY \
            --query=id \
            --output=tsv
Assign the output of the above command to the parameter acr_registry_id.
CREATE AN AKS CLUSTER (with autoscale)
ADDITIONAL VALUES REQUIRED FOR THIS STEP
- AZURE_WINPASSWORD
- AZURE_WINUSER
The AZURE_WINPASSWORD and AZURE_WINUSER values set the admin credentials for any Windows Server containers created on the cluster and must meet Windows Server password requirements. If you don’t specify the windows-admin-password parameter, you will be prompted to provide a value.
Example: AZURE_WINPASSWORD=P@ssw0rd1234567!
Example: AZURE_WINUSER=azureuser
-
cluster
You can name your cluster as you wish, keeping in mind the naming conventions described in [registering the application] (#register-application). Failure to adhere to this convention will lead to an error such as this when the $CLUSTER_NAME parameter is used to name a DNS domain:
*a DNS-1123 subdomain must consist of lower case alphanumeric characters, ‘-’ or ‘.’, and must start and end with an alphanumeric character (e.g. ‘example.com’, regex used for validation is
'[a-z0-9]([-a-z0-9]*[a-z0-9])?(\.[a-z0-9]([-a-z0-9]*[a-z0-9])?)*')Assign values to AZURE_WINPASSWORD, AZURE_WINUSER, and cluster. Once you have those values set, issue the following command:
az aks create \
            --resource-group=$CLUSTER_GROUP \
            --service-principal=$SERVICE_PRINCIPAL_ID \
            --client-secret=$CLIENT_SECRET_KEY \
            --name=$CLUSTER_NAME \
            --max-pods=200 \
            --node-count 1 \
            --enable-cluster-autoscaler \
            --min-count=1 \
            --max-count=5 	\
            --no-ssh-key  	\
            --windows-admin-password=$AZURE_WINPASSWORD \
            --windows-admin-username=$AZURE_WINUSER \
            --vm-set-type=VirtualMachineScaleSets \
            --node-vm-size=Standard_B8ms  \
            --network-plugin=azure \
            --attach-acr=$AZURE_CONTAINER_REGISTRY \
            --output=table
This command will display a message such as
Running . .
And takes several minutes. When it completes, you will see a message such as:

ADD NODE POOL (optional: for Statistica model scoring)
NOTE: The name parameter (npwin) in the following command can be changed if you wish; however, please note it can only be a maximum 6 characters.
az aks nodepool add \
        --resource-group=$CLUSTER_GROUP \
        --cluster-name=$CLUSTER_NAME \
        --os-type=Windows \
        --name=npwin \
        --node-count=1 \
        --enable-cluster-autoscaler \
        --min-count=1 \
        --max-count=2 \
        --node-vm-size=Standard_B8ms \
        --node-taints=os=windows:NoSchedule \
        --output=table
This command will display a message such as
Running . .
And takes several minutes. When it completes, you will see a message such as:

VERIFY NODES AND SHOW NODEGROUP
VALUES TO BE EXTRACTED FROM THIS STEP
- nodegroup
Execute these commands to get the node group:
az aks get-credentials \
        --overwrite-existing \
        --resource-group=$CLUSTER_GROUP \
        --name=$CLUSTER_NAME
kubectl get node \
        -ocustom-columns=name:metadata.name,image:status.nodeInfo.osImage,cpu:status.capacity.cpu,memory:status.capacity.memory,status:.status.conditions[-1].type
Output from above command should be akin to this:

az aks show \
        --resource-group=$CLUSTER_GROUP \
        --name=$CLUSTER_NAME \
        --query=nodeResourceGroup \
        -o tsv
Output from above command should be akin to:

Assign the output of the above ‘show’ command to nodegroup
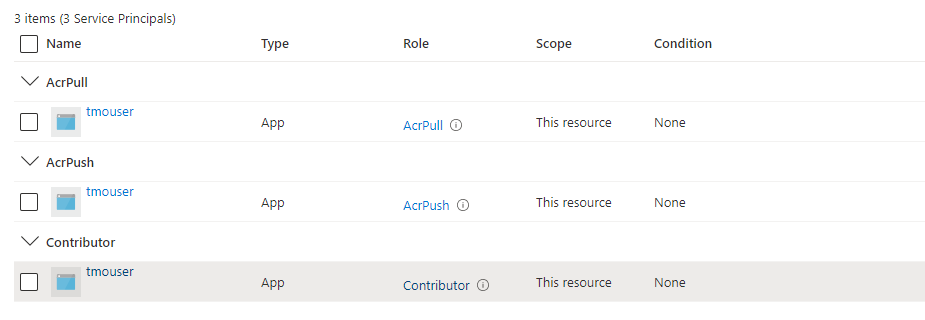
MINIMUM ACCESS REQUIRED FOR MODELOPS INSTALLATION ON AKS
To install modelops on AKS cluster, below are the 2 roles that needs to be added to the application/user at minimal.
- Contributor
- ACR PUSH
- ACR PULL
To determine if your application has this role, within the portal, from home traverse to subscriptions then choose IAM. You should see a list of items (users and applications). You may be listed more than once, so be sure to scroll through to see if the application has both the roles assigned.
If your application has required roles attached it will look as below.
CONFIGURE KUBECTL
az aks get-credentials \
        --overwrite-existing \
        --resource-group=$CLUSTER_GROUP \
        --name=$CLUSTER_NAME
Verify
kubectl get node
This command runs quickly and should produce output such as:

CREATE MODELOPS NAMESPACE
kubectl create namespace modelops
You should see a message: “namespace/modelops created”
INSTALL THE SECRETS
ADDITIONAL VALUES REQUIRED FOR THIS STEP
- ELASTIC_PW
- GIT_SERVER_PW
- NEXUS_SERVER_PW
- MODELOPS_SERVER_PW
- SCORING_ADMIN_PW
- ARTIFACT_MANAGEMENT_PW
- Oauth2 server details
- External DNS details
In order to avoid clear text passwords, Kubernetes provides a Secrets facility. So prior to installation, Kubernetes Secrets have to be created to contain the passwords required by ModelOps.
Assign each of the names above to some value, then issue the following commands to set up the secrets.
NOTE: Without secrets installed, the [helm installation] (#install-helm-chart) step will be in a wait mode and eventually time out.
Clear out any old secrets that may exist with this series of delete secret commands:
    kubectl delete secret git-server --namespace modelops
    kubectl delete secret nexus-server --namespace modelops
    kubectl delete secret modelops-server --namespace modelops
    kubectl delete secret scoring-admin --namespace modelops
    kubectl delete secret oauth2 --namespace modelops
    kubectl delete secret externaldns-config --namespace modelops
    kubectl delete secret artifact-management --namespace modelops
    kubectl delete secret artifact-management-env --namespace modelops
Create new secrets:
    kubectl create secret generic elasticsearch-es-elastic-user \
        --from-literal=elastic=$ELASTIC_PW \
        --namespace modelops --dry-run=client --output=yaml 2>/dev/null > secret.yaml
    kubectl apply --filename secret.yaml
    kubectl create secret generic git-server \
        --from-literal=modelops=$GIT_SERVER_PW \
        --namespace modelops
    kubectl create secret generic nexus-server \
        --from-literal=admin=$NEXUS_SERVER_PW \
        --namespace modelops
    kubectl create secret generic modelops-server \
        --from-literal=admin=$MODELOPS_SERVER_PW \
        --namespace modelops
    kubectl create secret generic scoring-admin \
        --from-literal=admin=$SCORING_ADMIN_PW \
        --namespace modelops
    kubectl create secret generic artifact-management \
        --from-literal=admin=$ARTIFACT_MANAGEMENT_PW \
        --namespace modelops
    kubectl create secret generic artifact-management-env --namespace modelops
NOTE: The Elasticsearch password is limited to alphanumeric, “.”, “_”, “~”, and “-” characters, i.e. it must conform to this regular expression (‘^[a-zA-Z0-9._~-]+$’)).
Auto update of public DNS is possible by enabling the (external DNS)[https://github.com/kubernetes-sigs/external-dns] component - without this the DNS will need to be updated manually. External DNS on azure requires a secret containing azure credentials that has permissions to update DNS (tenant id, subscription id, dns resource group and client secret.
kubectl create secret generic externaldns-config --from-literal=azure.json="{ \"tenantId\": \"$TENANT_ID\", \"subscriptionId\": \"$subscription_id\", \"resourceGroup\": \"$dns_group\", \"aadClientId\": \"$SERVICE_PRINCIPAL_ID\", \"aadClientSecret\": \"$CLIENT_SECRET_KEY\" }" --namespace modelops
The oauth2 secret depends on the type of authentication server used.
For Azure, the authentication server administrator should supply the Azure tenant id ($AZURE_TENANT_ID), app id ($AZURE_APP_ID) and client secret ($AZURE_CLIENT_SECRET). The secret is created with:
kubectl create secret generic oauth2 \
		--from-literal=TENANT_ID=$TENANT_ID \
		--from-literal=CLIENT_ID=$SERVICE_PRINCIPAL_ID \
		--from-literal=CLIENT_SECRET=$CLIENT_SECRET_KEY \
		--namespace modelops
For Cognito, the authentication server administrator should supply the Cognito region ($COGNITO_REGION), pool id ($COGNITO_POOL_ID), client id ($COGNITO_CLIENT_ID), client secret ($COGNITO_CLIENT_SECRET), and the domian ($COGNITO_DOMAIN). The secret is created with:
kubectl create secret generic oauth2 \
        --from-literal=REGION=$COGNITO_REGION \
        --from-literal=POOL_ID=$COGNITO_POOL_ID \
        --from-literal=CLIENT_ID=$COGNITO_CLIENT_ID \
        --from-literal=CLIENT_SECRET=$COGNITO_CLIENT_SECRET \
        --from-literal=DOMAIN=$COGNITO_DOMAIN \
        --namespace modelops
INSTALL THE HELM CHART
ADDITIONAL VALUES REQUIRED FOR THIS STEP
-
name
This is NOT the display name of the application registered at the beginning of this process. Rather, this is usually set to be the same as $CLUSTER_NAME
-
subscription_id
See the prerequisite steps above if you have not yet set this value.
-
domain
Assign to this the combination of existing parameters: $CLUSTER_NAME.$DNS_ZONE
-
network_exposure
Assign to this the string “ingress” (without the quotes)
-
oauth2_server_type
One of azure or cognito to use an external Oauth2 authentication server.
If you are NOT using oauth, then you should NOT set the oauth parameter (–set aks.oauth2=$OUTH2_SERVER_TYPE) while installing the helm chart.
Optional: If you wish to display the helm chart, run this command:
helm show values kubernetes-installer-1.1.0.tgz
Assign each of the names above to an appropriate value, then issue the following command:
helm upgrade \
        --install modelops $MODELOPS_HOME/helm-charts/kubernetes-installer-1.1.0.tgz \
        --atomic \
        --set cloud=aks \
		--set aks.externalDNS=azure \
        --set aks.containerRegistry=$AZURE_CONTAINER_REGISTRY.azurecr.io \
        --set aks.containerUsername=$SERVICE_PRINCIPAL_ID \
        --set aks.containerPassword=$CLIENT_SECRET_KEY \
        --set aks.azureTenantId=$TENANT_ID \
        --namespace modelops \
        --set aks.networkExposure=$NETWORK_EXPOSURE \
        --set aks.ingressDomain=$DOMAIN \
        --set aks.oauth2=$OUTH2_SERVER_TYPE \
        --timeout 10m0s
The above command will produce a series of lines of output, including a thank you, and ending with a note for how to track the progress of the installation pipeline. See [monitoring the installation] (#monitor-installation) for more details.
COPY MAVEN ARTIFACTS (using kubectl)
On Windows, you must change directory to the maven artifacts subdirectory of your model ops installation to run this command.
cd c:\tibco\modelops\n.m\maven-repository-artifacts
On Linux you can give a fully qualified path name to the mavenrepo.zip file.
If on Windows, change directory then issue the following command:
kubectl cp \
        modelops-repo-1.3.0-mavenrepo.zip \
        mavenrepo-0:/tmp/ \
        --namespace modelops
This command takes some time to run, and gives no output.
MONITOR INSTALLATION PROCESS (with tkn)
tkn pipelinerun logs bootstrap --follow --namespace modelops
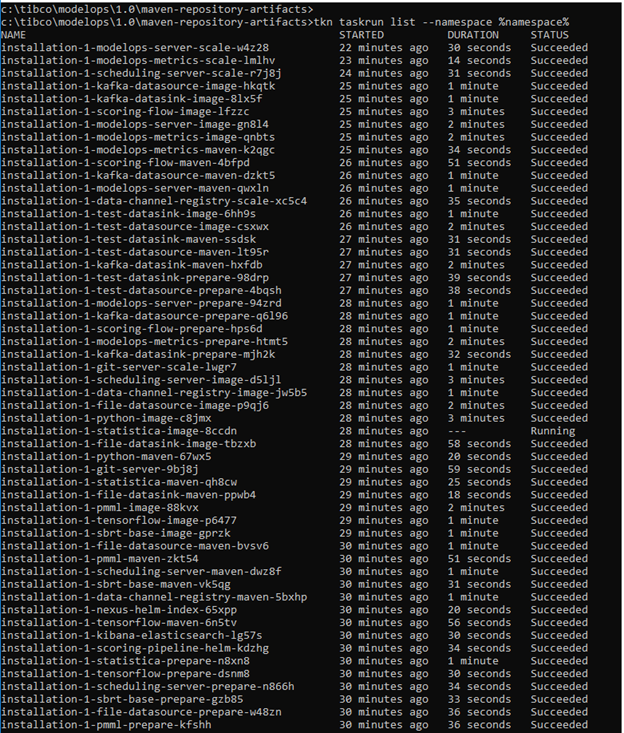
This pipelinerun command takes SOME time to complete and gives copious amounts of output. When this command completes, you can then ask to see the task list:
tkn taskrun list --namespace modelops
The task list should show as below:
UPDATE DNS
This step is only required if automatic updating of DNS is not enabled with the aks.externalDNS installation option.
VALUES TO BE EXTRACTED FROM THIS STEP
- ingress_lb_ip
ADDITIONAL VALUES REQUIRED FOR THIS STEP
- DNS_RESOURCE_GROUP
DNS_RESOURCE_GROUP is the name of the resource-group which was used to create a DNS zone. The resource group name must be unique within the Azure subscription Example: DNS_RESOURCE_GROUP=sbazclouddnszone.
Issue the following command:
kubectl get \
        service/nginx-ingress-ingress-nginx-controller \
        -o jsonpath='{.status.loadBalancer.ingress[0].ip}' \
        --namespace modelops
You should see output such as this:

Assign the output of the above command to INGRESS_LB_IP (without the quotes)
Example: set ingress_lb_ip=52.186.40.167
Once your ingress_lb_ip parameter is set, clear out old record-sets by issuing the following command:
az network dns record-set a delete \
        --yes \
        --resource-group=$DNS_RESOURCE_GROUP \
        --zone-name=$DNS_ZONE \
        --name=modelops-server.$CLUSTER_NAME
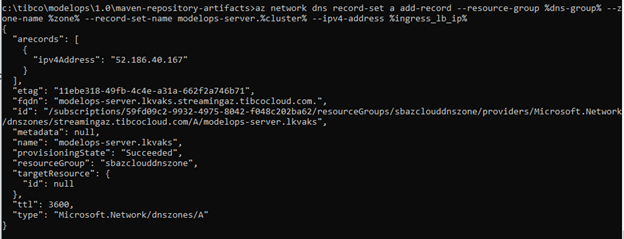
Assign a value to DNS_RESOURCE_GROUP and issue the following command to create new record-set:
az network dns record-set a add-record \
        --resource-group=$DNS_RESOURCE_GROUP \
        --zone-name=$DNS_ZONE \
        --record-set-name=modelops-server.$CLUSTER_NAME \
        --ipv4-address=$INGRESS_LB_IP
You should see output such as this:
If API v1 integration is required to Team Studio, the modelops-1 host should also be added to DNS in a similar way:
az network dns record-set a delete \
        --yes \
        --resource-group=$DNS_RESOURCE_GROUP \
        --zone-name=$DNS_ZONE \
        --name modelops-1.$CLUSTER_NAME
az network dns record-set a add-record \
        --resource-group=$DNS_RESOURCE_GROUP \
        --zone-name=$DNS_ZONE \
        --record-set-name=modelops-1.$CLUSTER_NAME \
        --ipv4-address=$INGRESS_LB_IP
SUMMARY
This section explains how to login to what was just installed. The output from the last step of the installation contains the FQDN(Fully qualified domain name) that is the URL that is to be used to access the installed modelops instance via a web browser. In simple terms FQDN would be modelops-server.$DOMAIN
Example: The URL to use to access the above install is:
"fqdn": "modelops-server.lkvaks.streamingaz.tibcocloud.com."
The username/password used to access the installed instance is configured in the step 13 [installing secrets] (#install-secrets). The following command is used to set username/password to the ModelOps instance :
kubectl create secret generic modelops-server \
		--from-literal=admin=$MODELOPS_SERVER_PW \
		--namespace modelops
In the above command username is admin and password is the value of the variable $MODELOPS_SERVER_PW
CLUSTER MANAGEMENT
This action will stop your control plane and agent nodes altogether, allowing you to save on all the compute costs, while maintaining all your objects and cluster state stored for when you start it again. You can then pick up right where you left off after a weekend, or only run your cluster while you run your batch jobs.
Limitations
When using the cluster start/stop feature, the following restrictions apply:
- This feature is only supported for Virtual Machine Scale Sets backed clusters.
- The cluster state of a stopped AKS cluster is preserved for up to 12 months. If your cluster is stopped for more than 12 months, the cluster state cannot be recovered.
- You can only start or delete a stopped AKS cluster. To perform any operation like scale or upgrade, start your cluster first.
- The customer provisioned PrivateEndpoints linked to private cluster need to be deleted and recreated again when you start a stopped AKS cluster.
Stop Cluster
You can use the az aks stop command to stop a running AKS cluster's nodes and control plane. The following example stops a cluster:
az aks stop --name $CLUSTER_NAME --resource-group=$CLUSTER_GROUP
Start Cluster
You can use the az aks start command to start a stopped AKS cluster's nodes and control plane. The cluster is
restarted with the previous control plane state and number of agent nodes.
The following example starts a cluster:
az aks start --name=$CLUSTER_NAME --resource-group=$CLUSTER_GROUP
You can use the below command to check the status of the cluster :
az aks show --name=$cluster --resource-group=$CLUSTER_GROUP --output=table
NOTE: If the provisioning State shows Starting that means your cluster hasn't fully started yet. It takes around 6-7 minutes for the cluster to completely provision into the Succeeded status which ensure that your cluster is up and running.
CLEANUP
Use of the Azure services costs money. If you are not using your services any longer, you should cleanup and remove them. For these delete commands to succeed, you must use the name and resource-group that you created in your creation steps. To check what names you have, you have two options:
a) log in via command line and issue the following command:
az aks list --output
The output from this option should look like this:

b) log into the portal and choose Kubernetes services:
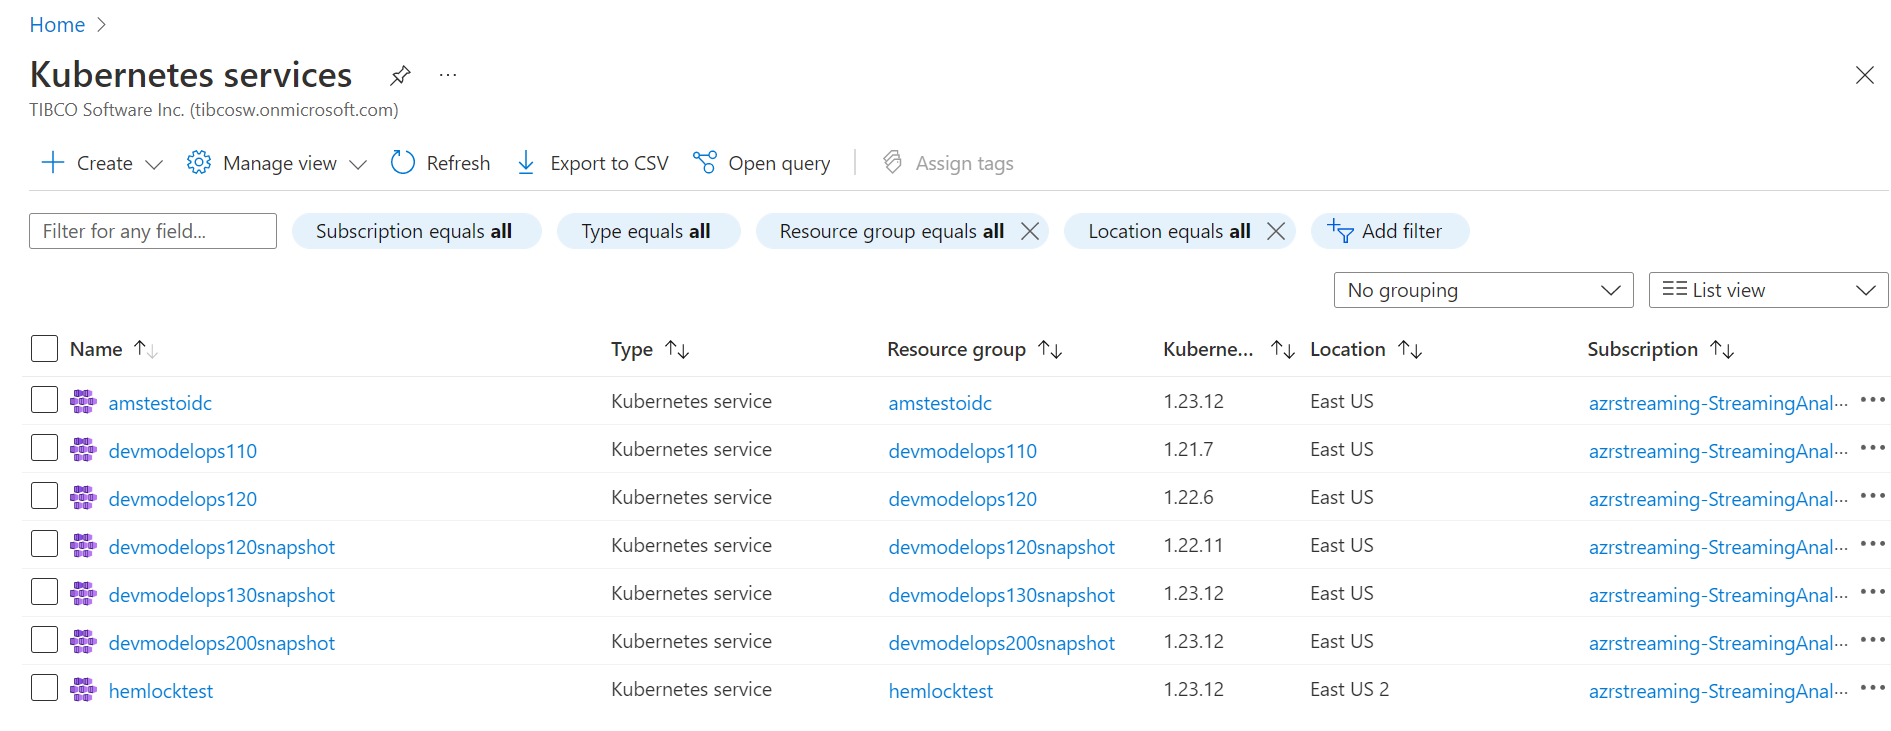
Once you have your name and resource-group name set correctly, to delete the azure resources issue the following commands:
    az aks delete --yes --name=$name --resource-group=$CLUSTER_GROUP
    az acr delete --yes --name=$name --resource-group=$CLUSTER_GROUP
    az group delete --yes --resource-group=$CLUSTER_GROUP
VARIABLE REFERENCE
| Variable | Source of Value | Description |
|---|---|---|
| SERVICE_PRINCIPAL_ID | It is an identity created for use with applications, hosted services, and automated tools to access Azure resources. | This value comes after registering an app as mentioned above. |
| CLIENT_SECRET_KEY | It is an authentication key string used to login to azure. | This value is generated by an user after an app registration. |
| TENANT_ID | It is the ID of the AAD directory in which the user created the application. | Open the Azure Portal>>Azure Active Directory>>Properties>>Directory ID. |
| AZURE_CONTAINER_REGISTRY | Azure Container Registry(ACR) which provides cloud-based container image building for platforms including Linux, Windows. Use Azure container registries with your existing container development and deployment pipelines, or use Azure Container Registry Tasks to build container images in Azure. | This is an user selected meaningful name which the user creates as explained below while creating ACR. |
| CLUSTER_NAME | Azure Kubernetes Service(AKS) is a managed Kubernetes service that lets users quickly deploy, scale and manage clusters. It reduces the complexity for deployment and core management tasks, including coordinating upgrades. The AKS control plane is managed by the Azure platform, and user only pay for the AKS nodes that run your applications. AKS is built on top of the open-source Azure Kubernetes Service Engine. | The user gives the cluster name while creating AKS. |
| CLUSTER_GROUP | It is a container that holds related resources for an Azure solution. In Azure, user logically group related resources such as storage accounts, virtual networks, and virtual machines (VMs) to deploy, manage, and maintain them as a single entity | The user gives the name to the resource group while creating the group. |
| NAMESPACE | Kubernetes resources, such as pods and Deployments, are logically grouped into a namespace. These groupings provide a way to logically divide an AKS cluster and restrict access to create, view, or manage resources. Users can create namespaces to separate business groups | At the time of namespace creation an user can give any value to the namespace eg development, production etc |
| CLUSTER_LOCATION | When the user create an organization, user can choose the region your organization is hosted in Azure. You may choose your organization's region based on locality and network latency, or because you have sovereignty requirements for data centers. Your organization's default location is based on the closest Microsoft Azure region available. | Eg: eastus |
| AZURE_WINPASSWORD and AZURE_WINUSER | These values set the admin credentials for any Windows Server containers created on the cluster and must meet Windows Server password requirements. If you don't specify the windows-admin-password parameter, you will be prompted to provide a value. | Eg: AZURE_WINPASSWORD=P@ssw0rd1234567! and AZURE_WINUSER=azureuser |
| DNS_RESOURCE_GROUP | dns_group is the name of the resource_group which was used to create a DNS zone. The resource group name must be unique within the Azure subscription. | eg: tmoazclouddnszone |
| SUBSCRIPTION_ID | subscription_id is a unique alphanumeric string that identifies your Azure subscription. It is listed in the portal and is a hash-type value. | eg: 79fd09g4-3345-4975-3057-d048c402ba89 |
| DNS_ZONE | Zone is the name of the DNS zone which was used to create a DNS zone. The DNS zone name can be any value that is not already configured on the Azure DNS servers. | A real-world value would be a domain that you bought from a domain name registrar. Eg: streamingabc.xyzcloud.com |
| DOMAIN | Domain is the public DNS exposed to access ModelOps service. | The DNS registered in DNS zone for the respective AKS. Eg: devmodelops.streamingaz.tibcocloud.com |
| NETWORK_EXPOSURE | It is the type in which user requires the k8s service to be exposed. | ModelOps is currently using “ingress”. Eg: ingress, loadBalancer, etc. |
| AZURE_TENANT_ID | Oauth2 Azure Active Directory tenant id. | Supplied by Azure Active Directory administrator (when adding secret to application). |
| AZURE_APP_ID | Oauth2 Azure Active Directory application id. | Supplied by Azure Active Directory administrator (when adding secret to application). |
| AZURE_CLIENT_SECRET | Oauth2 Azure Active Directory key. | Supplied by Azure Active Directory administrator (when adding secret to application). |
| COGNITO_REGION | Oauth2 AWS Cognito region. | Supplied by Cognito administrator (AWS region being used). |
| COGNITO_POOL_ID | Oauth2 AWS Cognito pool id. | Supplied by Cognito administrator (when creating a user pool). |
| COGNITO_CLIENT_ID | Oauth2 AWS Cognito client id. | Supplied by Cognito administrator (when creating an app client). |
| COGNITO_CLIENT_SECRET | Oauth2 AWS Cognito client secret. | Supplied by Cognito administrator (when creating an app client). |
| COGNITO_DOMAIN | Oauth2 AWS Cognito domain. | Supplied by Cognito administrator (when creating an app client). |
TROUBLESHOOTING REFERENCE
[Helm install failure on pre-install] (#install-helm-chart)
    Error: an error occurred while uninstalling the release. original install error:
    failed pre-install: timed out waiting for the condition: timed out waiting for the condition
This error indicates that a pre-install tasks failed - this part of the install process installs the operators, so chances are something failed in there. The command kubectl logs job/operators -n modelops should give some more info.
One possible cause of this error is a problem [installing secrets] (#install-secrets).
[Helm install failure] (#install-helm-chart)
    Error: rendered manifests contain a resource that already exists.  Unable to continue with install:
    Namespace "production" in namespace "" exists and cannot be imported into the current release:
    invalid ownership metadata; label validation error: missing key "app.kubernetes.io/managed-by": must be set to
    "Helm"; annotation validation error: missing key "meta.helm.sh/release-name": must be set to "modelops";
    annotation validation error: missing key "meta.helm.sh.release-namespace": must be set to "production"
This error is caused by using a namespace value of “production”.
The ModelOps product reserves these namespaces and thus those names are not available for use:
- development
- testing
- production
- datachannels
- modelops
[Copy Maven Artifacts] (#copy-maven-artifacts)
On Windows, without the change directory, you can expect this error:
error: modelops-repo-1.3.0-mavenrepo.zip doesn't exist in local filesystem
On Windows an attempt to give fully qualified path name to the mavenrep.zip on the C drive can expect this error:
error: one of src or dest must be a local file specification
[Role assignment error] (#assign-access-roles)
    ForbiddenError: The client '1dfe57f9-72dc-41d5-9051-96de088ce2ac' with object id
    '1dfe57f9-72dc-41d5-9051-96de088ce2ac' does not have authorization to perform action
    'Microsoft.Authorization/roleAssignments/write' over scope
    '/subscriptions/59fd09c2-9932-4975-8042-f048c202ba62/resourceGroups/MyTestGroup/providers/Microsoft.ContainerRegistry/registries/TmoCR/providers/Microsoft.Authorization/roleAssignments/773f6e08-7f00-4c30-9926-97f698716738'
    or the scope is invalid. If access was recently granted, please refresh your credentials.
This error is likely due to lack of access required. If you are trying to run the az role assignment command, you must have the required access. If you are certain you have the required access, ensure you have logged in as you before issuing the commands to assign the roles.
[Resolving DNS records] (#dns-zone)
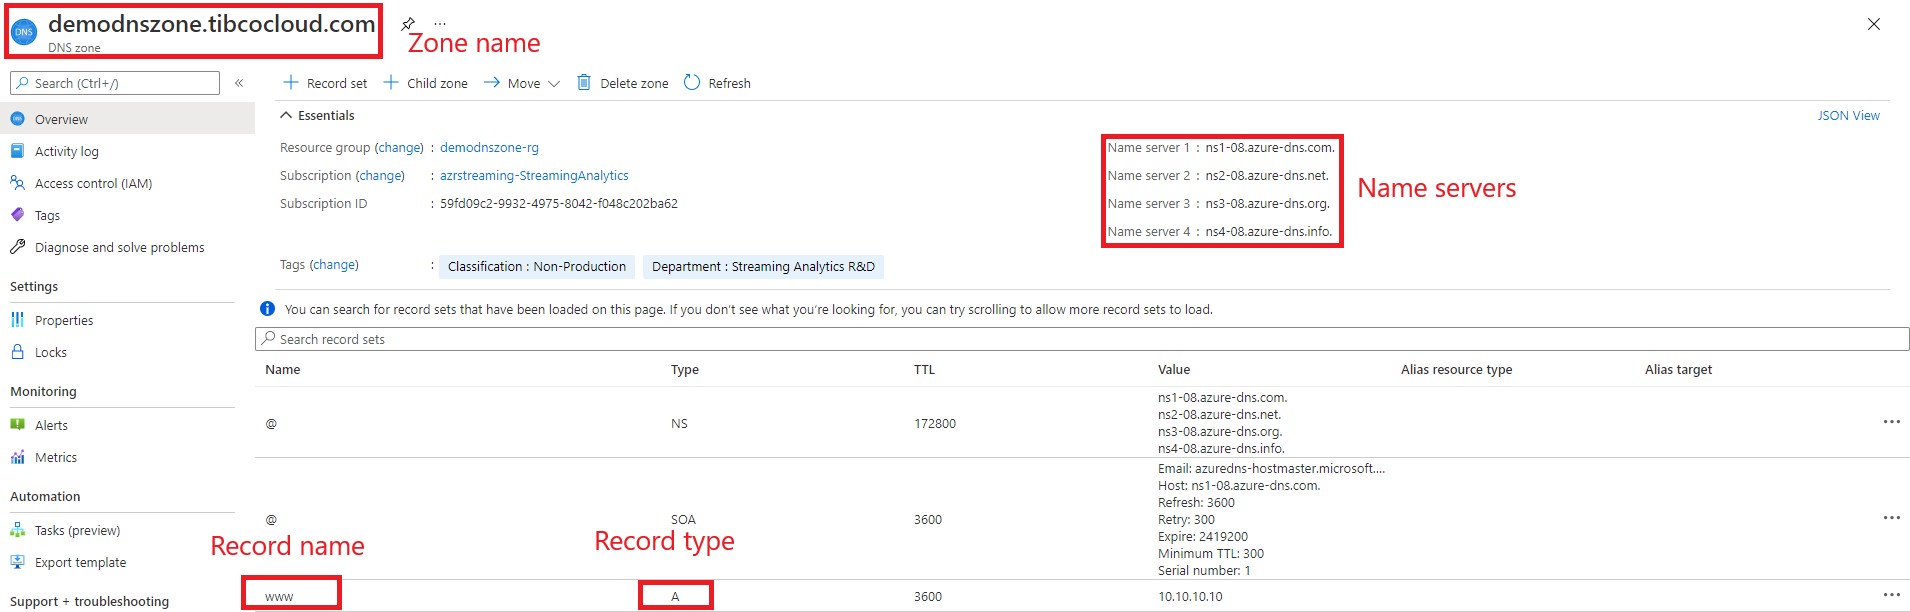
The following steps help you investigate why DNS resolution is failing for a DNS record in a zone hosted in Azure DNS.
- Confirm that the DNS records have been configured correctly in Azure DNS. Review the DNS records in the Azure portal, checking that the zone name, record name, and record type are correct.
- Be sure to specify the correct name servers for your DNS zone, as shown in the Azure portal.
- Check that the DNS name is correct (you have to specify the fully qualified name, including the zone name) and the record type is correct.
- Confirm that the DNS domain name has been correctly delegated to the Azure DNS name servers. More information on delegation can be found in the Microsoft Azure documentation available [here] (https://docs.microsoft.com/en-us/azure/dns/dns-domain-delegation).
Below image shows an example of a DNS Zone on an Azure portal :
HELM CHART REFERENCE
For ModelOps Artifact Manager specific sizing and other configurable values, see General Cloud Installation.
$ helm show values kubernetes-installer-1.1.0.tgz
#
# Default values for the chart
#

#
# cloud environment
#
cloud: docker-for-desktop

#
# image pull policy
#
pullpolicy:           "IfNotPresent"

#
# sizing
#
size: medium

#
# operator lifecycle manager specific settings
#
olm:
  operatorVersion:    "v0.17.0"

#
# tekton specific settings
#
tekton:
  operatorVersion:    "latest"

#
# nexus specific settings
#
nexus:
  operatorVersion:    "v0.6.0"
  internalPort:       80
  nodePort:           30020
  containerNodePort:  30030
  hostname:           "artifact-repository"
  maven:
    maven-proxy:
      url:            "https://repo1.maven.org/maven2/"
  pypi:
    pypi-proxy:
      url:            "https://pypi.org/"
  yum:
    yum-proxy:
      url:            "https://repo.almalinux.org/almalinux"

#
# The following values are defaulted depending on cloud type :
#
# installOLM - install the operator lifecycle manager
#
# containerRegistry - base URI of container registry.  Use the supplied one
#   if available.
#
# containerUsername/containerPassword - if set, used to access container registry
#
# networkExposure - mechanism to use to expose network
#
# createPVC - if true create persistent volume claim in helm chart, if false
#   the persistent volume claim must be created before installing the chart.
#
# selfSignedRegistry - if true then skip tls verification on registry
#
# httpRegistry - if true then use http registry
#
# roleBasedAccessControl - kubernetes or openshift
#
# windows - if true build windows container (currently statistica scoring server)
#
# dnsSuffix - AKS only, set azure annotation for pubic dns name, ie <container>-<dnsSuffix>.<region>.cloudapp.azure.com
#

docker-for-desktop:
  installOLM:         true
  installMetrics:     true
  installLogs:        true
  containerRegistry:  "localhost:5000"
  networkExposure:    "nodePort"
  createPVC:          true
  httpRegistry:       true
  selfSignedRegistry: false
  roleBasedAccessControl: "kubernetes"
  windows:            false
  ingressDomain:      "tobeset"

kind:
  installOLM:         true
  installMetrics:     true
  installLogs:        true
  containerRegistry:  "kind-registry:5000"
  networkExposure:    "ingress"
  createPVC:          true
  selfSignedRegistry: false
  httpRegistry:       true
  roleBasedAccessControl: "kubernetes"
  windows:            false
  ingressDomain:      "tobeset"

colima:
  installOLM:         true
  installMetrics:     true
  installLogs:        true
  containerRegistry:  "localhost:5000"
  networkExposure:    "nodePort"
  createPVC:          true
  httpRegistry:       true
  selfSignedRegistry: false
  roleBasedAccessControl: "kubernetes"
  windows:            false
  ingressDomain:      "tobeset"

openshift:
  installOLM:         false
  installMetrics:     true
  installLogs:        true
  containerRegistry:  "image-registry.openshift-image-registry.svc:5000/{{ .Release.Namespace }}"
  networkExposure:    "route"
  createPVC:          true
  selfSignedRegistry: true
  httpRegistry:       false
  roleBasedAccessControl: "openshift"
  windows:            false
  ingressDomain:      "tobeset"

aks:
  installOLM:         true
  installMetrics:     true
  installLogs:        true
  containerRegistry:  "myregistry.azurecr.io"
  containerUsername:  "azure appid"
  containerPassword:  "azure password"
  azureTenantId:      "azure tenantId"
  networkExposure:    "ingress"
  createPVC:          true
  selfSignedRegistry: false
  httpRegistry:       true
  roleBasedAccessControl: "kubernetes"
  windows:            true
  ingressDomain:      "tobeset"
  # oauth2:             "azure"

eks:
  installOLM:         true
  installMetrics:     true
  installLogs:        true
  containerRegistry:  "eks registry"
  region:             "region"
  networkExposure:    "ingress"
  createPVC:          true
  selfSignedRegistry: false
  httpRegistry:       true
  roleBasedAccessControl: "kubernetes"
  windows:            false
  ingressDomain:      "tobeset"
  # oauth2:             "cognito"

#
# sizing details
#
small:
  general:
    cpu: "2"
    memory: "400Mi"
  nexus:
    disk: "20Gi"
    memory: "2Gi"
  elasticsearch:
    disk: "10Gi"
    memory: "2Gi"
  prometheus:
    intervalDuration: "30s"
    diskGi: "10Gi"
    storage.tsdb.retention.size: "8GB"

medium:
  general:
    cpu: "2"
    memory: "400Mi"
  nexus:
    disk: "20Gi"
    memory: "2Gi"
  elasticsearch:
    disk: "50Gi"
    memory: "5Gi"
  prometheus:
    intervalDuration: "10s"
    diskGi: "50Gi"
    storage.tsdb.retention.size: "48GB"

large:
  general:
    cpu: "2"
    memory: "400Mi"
  nexus:
    disk: "20Gi"
    memory: "2Gi"
  elasticsearch:
    disk: "100Gi"
    memory: "10Gi"
  prometheus:
    intervalDuration: "10s"
    diskGi: "100Gi"
    storage.tsdb.retention.size: "98GB"

#
# hence the chart may be installed :
#
#   helm install modelops kubernetes-installer-[version].tgz --set cloud=openshift
#
# or override individual settings
#
#   helm install modelops kubernetes-installer-[version].tgz --set cloud=openshift --set openshift.createPVC=true
#

#
# Kubernetes DNS domain - not generally used but needed for windows work-arounds (see TMO-1156)
#
clusterName:              "svc.cluster.local"

#
# prometheus specific settings
#
# if storageClass is set, use storageClass in volumeClaimTemplate (otherwise system defult is used)
#
# See https://prometheus.io/docs/prometheus/latest/storage/#operational-aspects for retention time
#
prometheus:
  operatorVersion:    "30.0.1"
  nodePort:           30050
  storage.tsbd.retention.time:      "1y"
  storageClass:       ""
# see https://github.com/prometheus-operator/prometheus-operator/blob/master/Documentation/api.md#alertmanagerconfigspec
#  alerts:
#    route:
#      groupBy: ['job']
#      receiver: "test"
#    receivers:
#    - name: "test"
#      emailConfigs:
#      - to: plord@tibco.com
#        from: plord@tibco.com
#        smarthost: smtp-relay.gmail.com:587

#
# elasiticsearch specific settings
#
elasticsearch:
  operatorVersion:    "1.9.1"
  version:            "7.16.2"
  nodePort:           30070
  username:           "elastic"

#
# kibana specific settings
#
kibana:
  version:            "7.16.2"
  nodePort:           30080
  operatorVersion:    "1.9.1"

#
# ingress nginx specific settings
#
ingressnginx:
  version:            "4.0.1"

#
# cert manager specific settings
#
certmanager:
  version:            "v1.6.1"

#
# Oauth2
#
oauth2:

  azure:
    # oauth2 values for azure
    #
    # need a secret "oauth2" with
    #
    # TENANT_ID set to azure tenantid
    # CLIENT_ID set to azure application id
    # CLIENT_SECRET set to azure client secret
    #
    identityAttributeName:    "unique_name"
    roleAttributeName:        "roles"
    jwtAudience:              "${CLIENT_ID}"
    jwtIssuer:                "https://sts.windows.net/${TENANT_ID}/"
    jwksURL:                  "https://login.microsoftonline.com/common/discovery/keys"
    jwksCacheTimeoutSeconds:  "3600"
    ssoLogoutURL:             "https://login.microsoftonline.com/${TENANT_ID}/oauth2/logout?post_logout_redirect_uri=https://modelops-server.${MODELOPS_DOMAIN}/oauth2/sign_out"
    # oauth2-proxy settings - see https://oauth2-proxy.github.io/oauth2-proxy/docs/
    provider:                 "azure"
    emailclaim:               "unique_name"
    azuretenant:              "${TENANT_ID}"
    oidcissuerurl:            "https://sts.windows.net/${TENANT_ID}/"
    extrajwtissuers:          "https://login.microsoftonline.com/${TENANT_ID}/v2.0=${CLIENT_ID}"
    clientid:                 "${CLIENT_ID}"
    clientsecret:             "${CLIENT_SECRET}"
    whitelist:                "login.microsoftonline.com/${TENANT_ID}"

  cognito:
    # oauth2 values for amazon cognito
    #
    # need a secret "oauth2" with
    #
    # REGION set to cognito region
    # POOL_ID set to cognito pool id
    # CLIENT_ID set to cognito client id
    # CLIENT_SECRET set to cognito client secret
    # DOMAIN set to cognito domain
    #
    identityAttributeName:    "email"
    roleAttributeName:        "cognito:groups"
    jwtAudience:              "${CLIENT_ID}"
    jwtIssuer:                "https://cognito-idp.${REGION}.amazonaws.com/${POOL_ID}"
    jwksURL:                  "https://cognito-idp.${REGION}.amazonaws.com/${POOL_ID}/.well-known/jwks.json"
    jwksCacheTimeoutSeconds:  "3600"
    ssoLogoutURL:             "https://${DOMAIN}.auth.${REGION}.amazoncognito.com/logout?client_id=${CLIENT_ID}&logout_uri=https://modelops-server.${MODELOPS_DOMAIN}/oauth2/sign_out"
    # oauth2-proxy settings - see https://oauth2-proxy.github.io/oauth2-proxy/docs/
    provider:                 "oidc"
    emailclaim:               "email"
    oidcissuerurl:            "https://cognito-idp.${REGION}.amazonaws.com/${POOL_ID}"
    clientid:                 "${CLIENT_ID}"
    clientsecret:             "${CLIENT_SECRET}"
    whitelist:                "tibco-modelops.auth.${REGION}.amazoncognito.com"