Copyright © Cloud Software Group, Inc. All Rights Reserved


Chapter 1 The TIBCO Object Service Broker Administrator’s Workbench : Entry Points into the Supplied Tools

Entry Points into the Supplied Tools
There are three ways to access the tools provided on the workbench:
Example
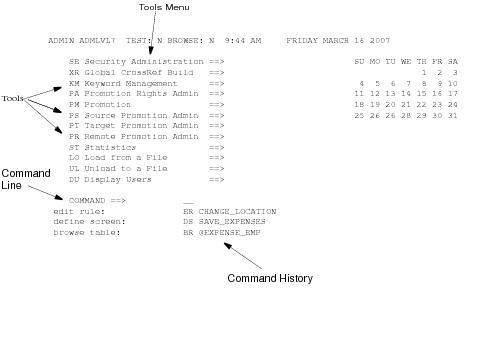
The following figure illustrates the various entry points into the supplied TIBCO Object Service Broker tools.
Tools Menu
To access a tool from the workbench tool menu, complete the following steps:
1.
2.
If the name of an object (rule, table, screen, and so on) is not typed, the Object Manager screen is invoked. Refer to TIBCO Object Service Broker Getting Started for more information on the Object Manager screen.
3.
Rules arguments or table parameters can be supplied with the rule or table name. If the necessary arguments or parameters are not supplied, a prompt screen appears.
4.
Workbench Tools
The following table lists the tools that appear on the @ADMIN workbench and provides a reference to where you can find out more information on a particular tool.
FLDMGR tool in the TIBCO Object Service Broker Shareable Tools
REFMAKER tool in TIBCO Object Service Broker Shareable Tools and TIBCO Object Service Broker Managing Deployment
KEYWORDMGR tool in TIBCO Object Service Broker Shareable Tools
LOAD tool in the TIBCO Object Service Broker Shareable Tools
UNLOAD tool in the TIBCO Object Service Broker Shareable Tools
DISPLAY_USERS tool in the TIBCO Object Service Broker Shareable Tools
Command Line
The pair of letters to the left of each tool name is an abbreviation for the tool. You use the command abbreviation in association with the command line.
To access a tool from the command line, complete the following steps:
1.
2.
3.
If the name of an object (rule, table, screen, and so on) is not provided, the Object Manager screen is invoked. Refer to TIBCO Object Service Broker Getting Started for more information on the Object Manager screen.
4.
Rules arguments or table parameters can be supplied with the rule or table name. If the necessary arguments or parameters are not supplied, a prompt screen appears.
5.
Command History Area
The command history area displays a list of previously executed commands. The list displays the last 50 commands issued and is scrollable. To scroll the information in the command history area, move the cursor into the field and press PF7 and PF8 to scroll vertically.
You can use the commands specified in the command history area to issue subsequent ones. To access a tool from the command history area, complete the following steps:
1.
2.
You can change the abbreviation, the object name, argument, or parameter by typing over it before execution.
3.
The item executes.

Copyright © Cloud Software Group, Inc. All Rights Reserved