Dashboard
An Order Management Dashboard is a graphical user interface that organizes and presents rich and enhanced information in a format that is easy to read and interpret. The Dashboard is the default view when the user accesses the Order Management.
Features of the dashboard include:
- An intuitive graphical display that is easy to navigate - A rich Graphical User Interface (GUI) with user/role security to manage/view orders.
- A logical structure that makes information easily accessible - Ability to view all orders through graphical Dashboard summary.
- Data displays that can be customized and categorized - Ability to drill down into order details by setting display preferences.
- Regular and frequent updates of dashboard information for accuracy and relevance - Ability to auto-refresh to display updated details for an order cancellation, amendment, suspension, and resumption.
- Information from multiple sources can be viewed simultaneously - Ability to manage, search, and filter lists of existing orders.
The Dashboard allows effective order management with a comprehensive operations view. The information displayed is a combination of text and graphical views, as:
- Current number of orders being processed.
- Current number of orders completed in the last 24 hrs.
- Current number of orders in the Execution state.
- Current number of orders error out in the last 24 hrs.
- Current number of orders amended in the last 24 hrs.
- Current number of suspended orders.
- Current number of orders in Jeopardy.
Charts
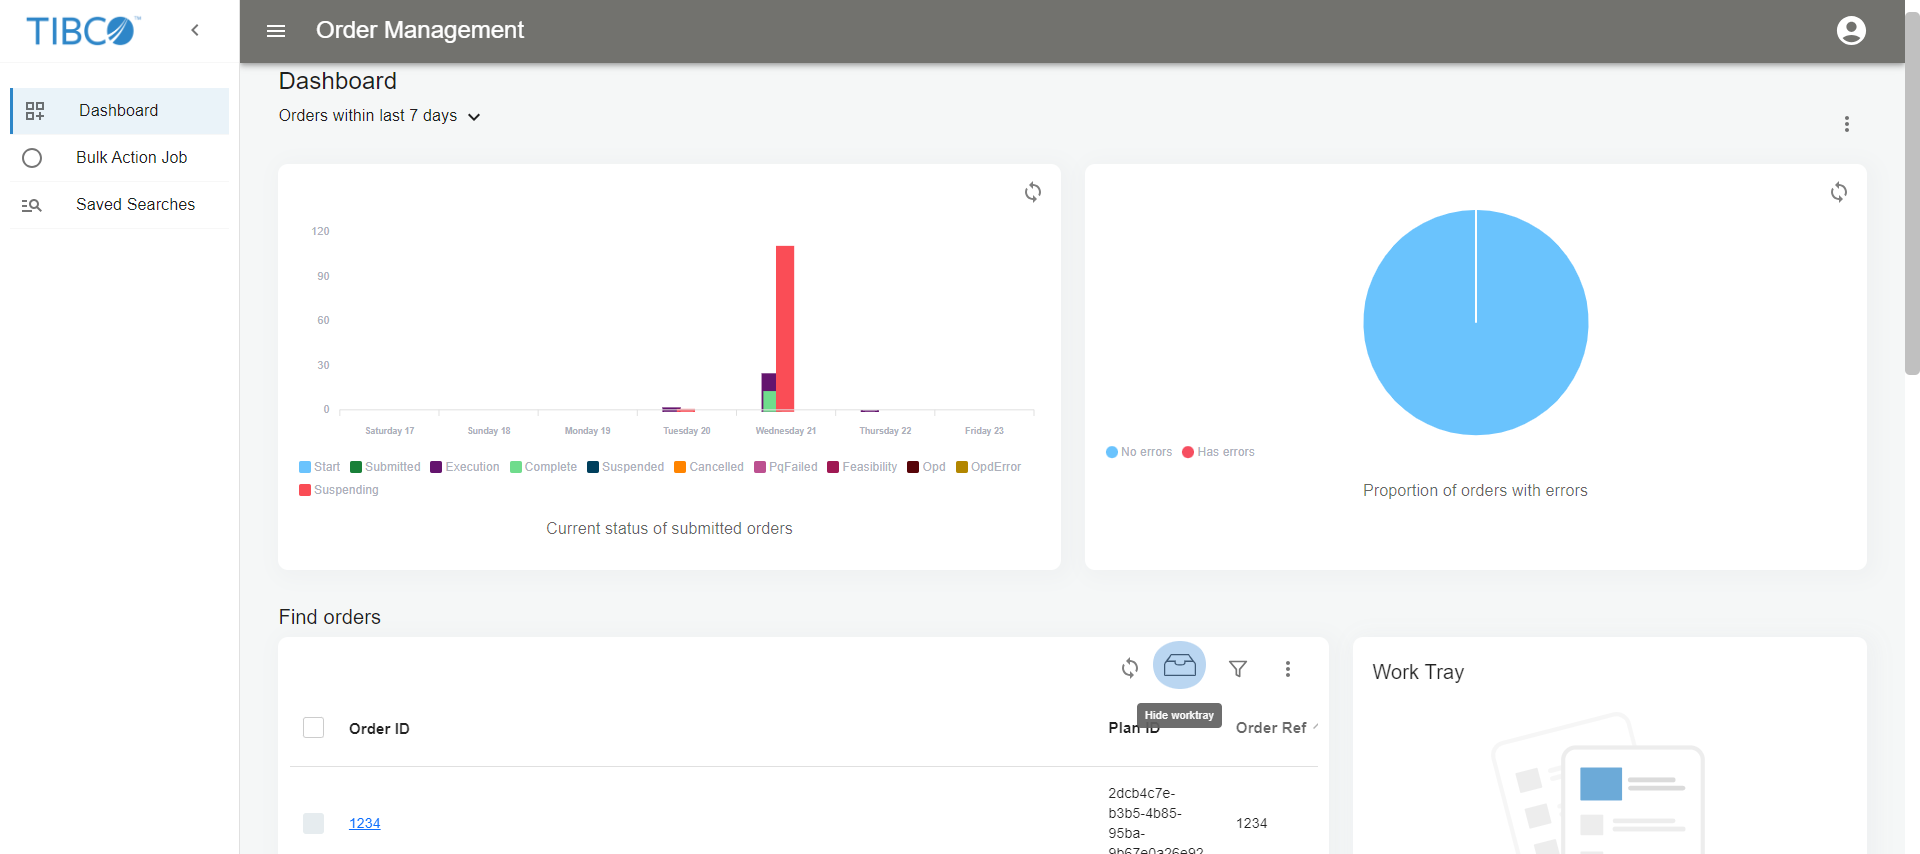
You can select the order date range from the dropdown options (such as 24 hours, 7 days, 15 days, 30 days, 90 days, and 365 days) below the Dashboard.
Click the vertical ellipsis icon  , Charts, and then choose the desired charts from the box. The orders are shown in the following charts:
-
Current status of submitted orders
Shows different status (such as Complete, Withdrawn) of the submitted orders -
Proportion of orders with errors
Shows the orders whose plan item statuses are in error or error handler state
Find Orders

Here orders are displayed with their associated criteria such as Order ID, Plan ID, Status and so on.
In this window, you can sort the orders to view them in an ascending or descending sequence of Order ID, Plan ID, Status and so on.
Example of orders shown in an ascending manner:
1)
12)
1253)
24)
7The order Id
125 is placed on the second line, although its numeric value is greater than 2 and 7.On the Find orders window, the following icons are present on the top-right corner:
![]() Refresh icon: To refresh the page.
Refresh icon: To refresh the page.
 Work Tray icon: To navigate to the work tray.
 Filter icon: To apply the search criteria by order level or plan level.
Vertical ellipsis icon: For settings
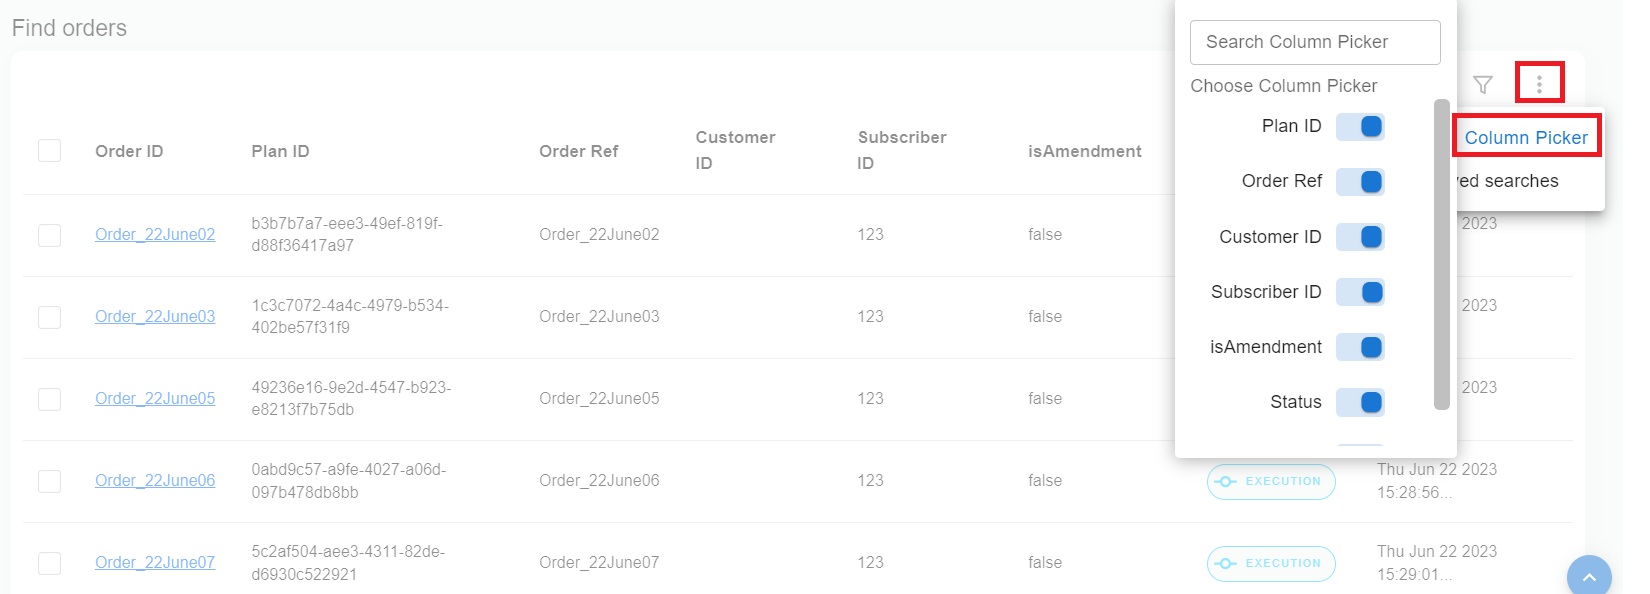
Click the vertical ellipsis icon , Column Picker, and then choose the desired columns from the box.
You can sort the orders to view them in an ascending or descending sequence of Order ID, Plan ID, Status and so on.
Filters
Initially, the entire orders are displayed here. You can create filters by clicking the Filter orders icon.
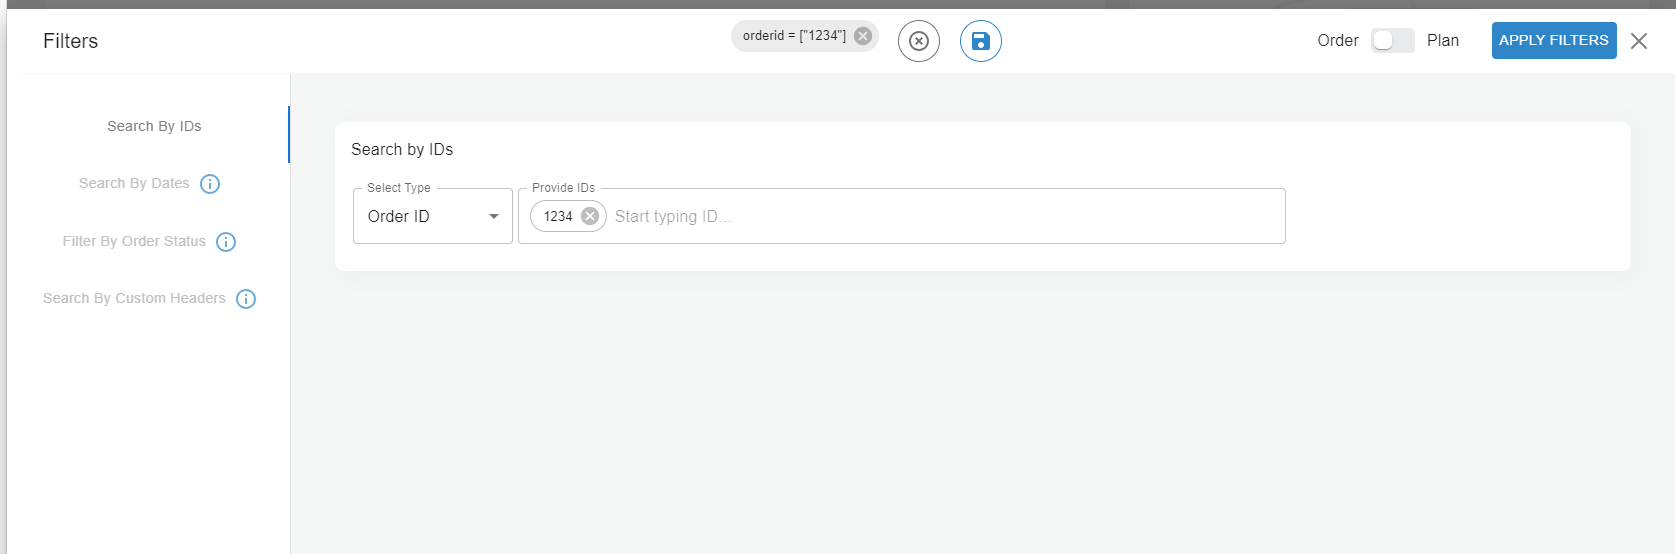
On the Filters window, you can toggle between Order and Plan level.
Order Level Search Criteria
The orders can be searched by using the following criteria:
Search By IDs
- Procedure
-
From the Select Type dropdown list, choose Order ID, Order Ref, Customer ID, or Subscriber ID as per your requirement.
-
Enter the details in the Provide IDs field.
Note: You can add multiple IDs by clicking add icon .
. -
Click the APPLY FILTERS button.
Note: When you use Search By IDs criteria, all other criteria are disabled.
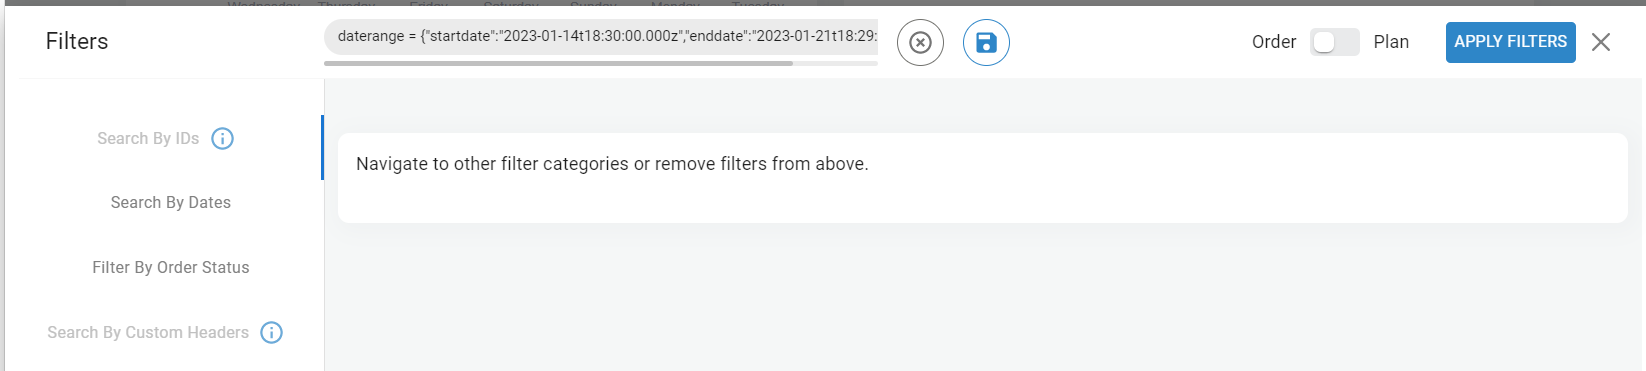
Search By Dates
- Procedure
-
On the Select Start and End date, choose Today, Yesterday, This Week, Last Week, or any other available option there as per your requirement.
-
Click the APPLY FILTERS button.
Note: You can use Search By Dates and Filter By Order Status criteria in a combination and all other criteria are disabled.ResultOrders are displayed with the applied filters on the Find orders window.
Filter By Order Status
- Procedure
-
On the Select order status, select the following checkboxes as per your requirement:
-
OPD
-
OPD Error
-
Execution
-
Completed
-
Suspending
-
Suspended
-
Canceled
-
Pre qualification failed
-
Feasibility
-
Blocked
-
-
Click the APPLY FILTERS button.
Note: You can use Search By Dates and Filter By Order Status criteria in a combination and all other criteria are disabled. You can also add multiple statuses in one filter criteria.ResultOrders are displayed with the applied filters on the Find orders window.
Search By Custom Headers
- Procedure
-
On the Order Headers or Order Lines, enter the details in the Name and Value fields.
Note: You can use either Order Headers or Order Lines at a time. You can add new rows of the headers by clicking the ADD icon.
icon. -
Click the APPLY FILTERS button.
Note: You can use Search By Dates and Filter By Order Status criteria in a combination and all other criteria are disabled.ResultOrders are displayed with the applied filters on the Find orders window.
Plan Level Search Criteria
The plans can be searched by using the following criteria:
Search By IDs
- Procedure
-
From the Select Type dropdown list, choose Plan ID, Order ID, Order Ref, Process component ID, or Process component Name as per your requirement.
-
Enter the details in the Provide IDs field.
Note: You can add multiple IDs separated by comma in this field. -
Click the APPLY FILTERS button.
Note: When you use Search By IDs criteria, all other criteria are disabled.ResultOrders are displayed with the applied filters on the Find orders window.
Search By Dates
- Procedure
-
On the Select Start and End date, choose Today, Yesterday, This Week, Last Week, or any other available option there as per your requirement.
-
Click the APPLY FILTERS button.
Note: You can use Search By Dates and Filter By Status criteria in a combination and all other criteria are disabled.ResultOrders are displayed with the applied filters on the Find orders window.
Filter By Status
- Procedure
-
Select the following Plan status or Plan item status checkboxes as per your requirement:
Note: You can use either Plan status or Plan item status at a time.Plan Status
-
Execution
-
Completed
-
Suspending
-
Suspended
-
Canceled
-
Withdraw
Plan Item Status
-
Pending
-
Execution
-
Completed
-
Suspended
-
Canceled
-
Error Handler
-
Error
-
-
Click the APPLY FILTERS button.
Note: You can use Search By Dates and Filter By Status criteria in a combination and all other criteria are disabled. You can also add multiple statuses in the search criteria.ResultOrders are displayed with the applied filters on the Find orders window.
Clearing and Saving a Search
To clear a search criteria, click the ![]() clear filters icon.
clear filters icon.
To save a search criteria, click the  save search icon.
Editing and Deleting Saved Search
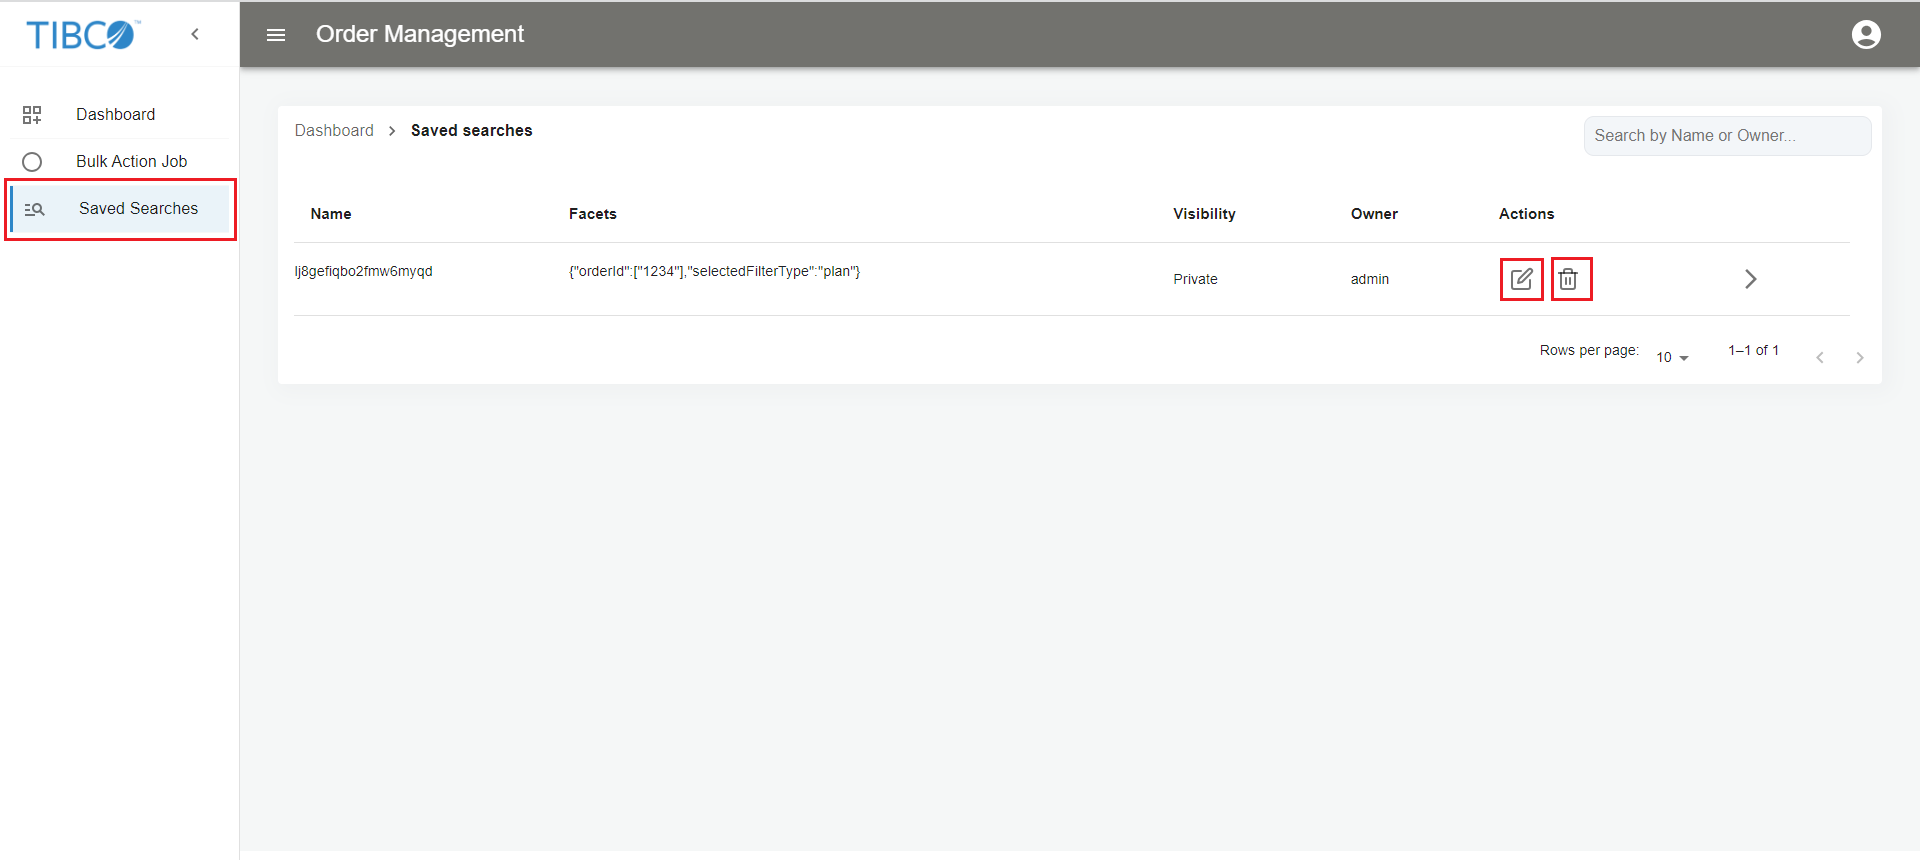
- Procedure
-
Click the Saved Searches tab on the left panel. A window opens showing all the saved search criteria.
-
Click the
 edit icon to modify or the
  delete icon to remove a search criteria.
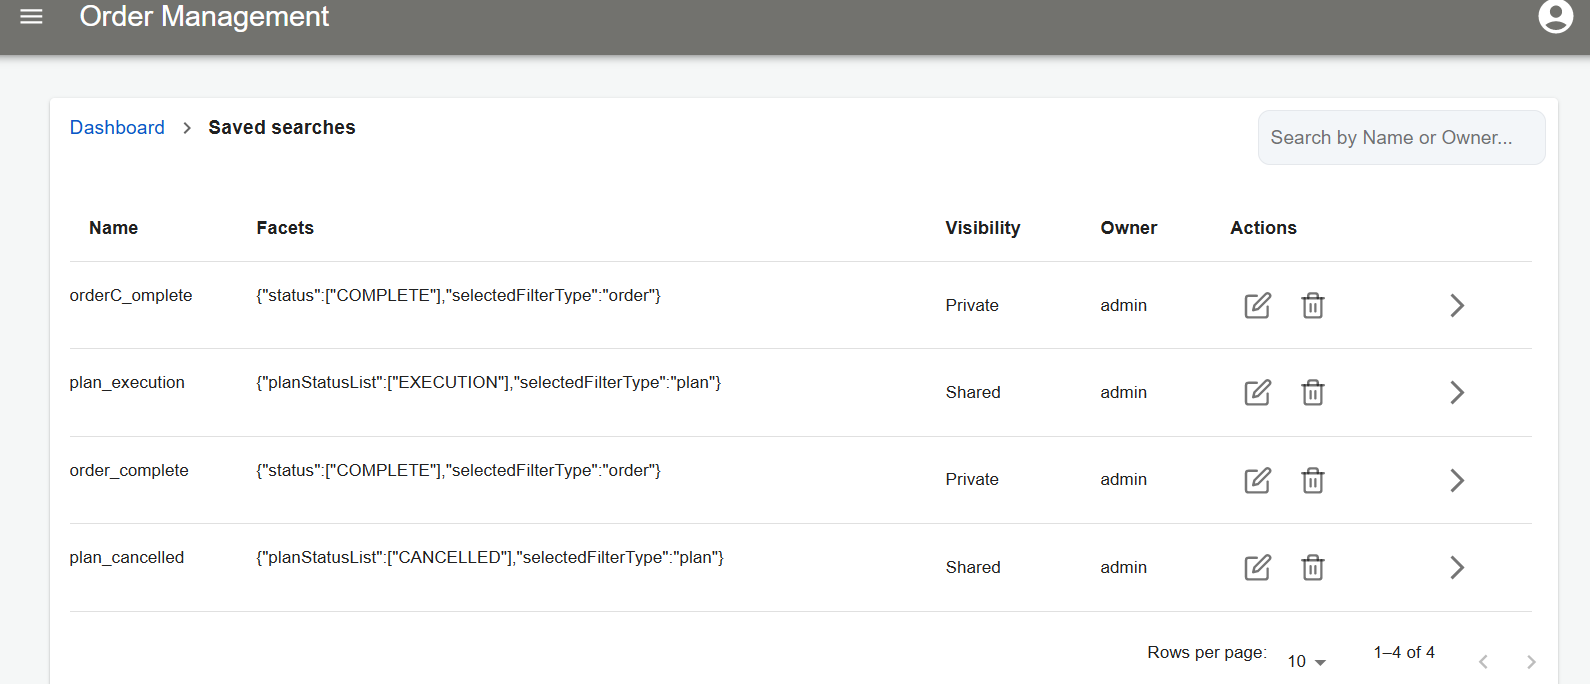 Note: Only the owner of the created criteria can edit or delete a search criteria.
Work Tray
Whenever you select a non-final state order from the Find orders window, the order is displayed on Worktray. This indicates that you are working on that particular order. Similarly, you can clear an order from Worktray.
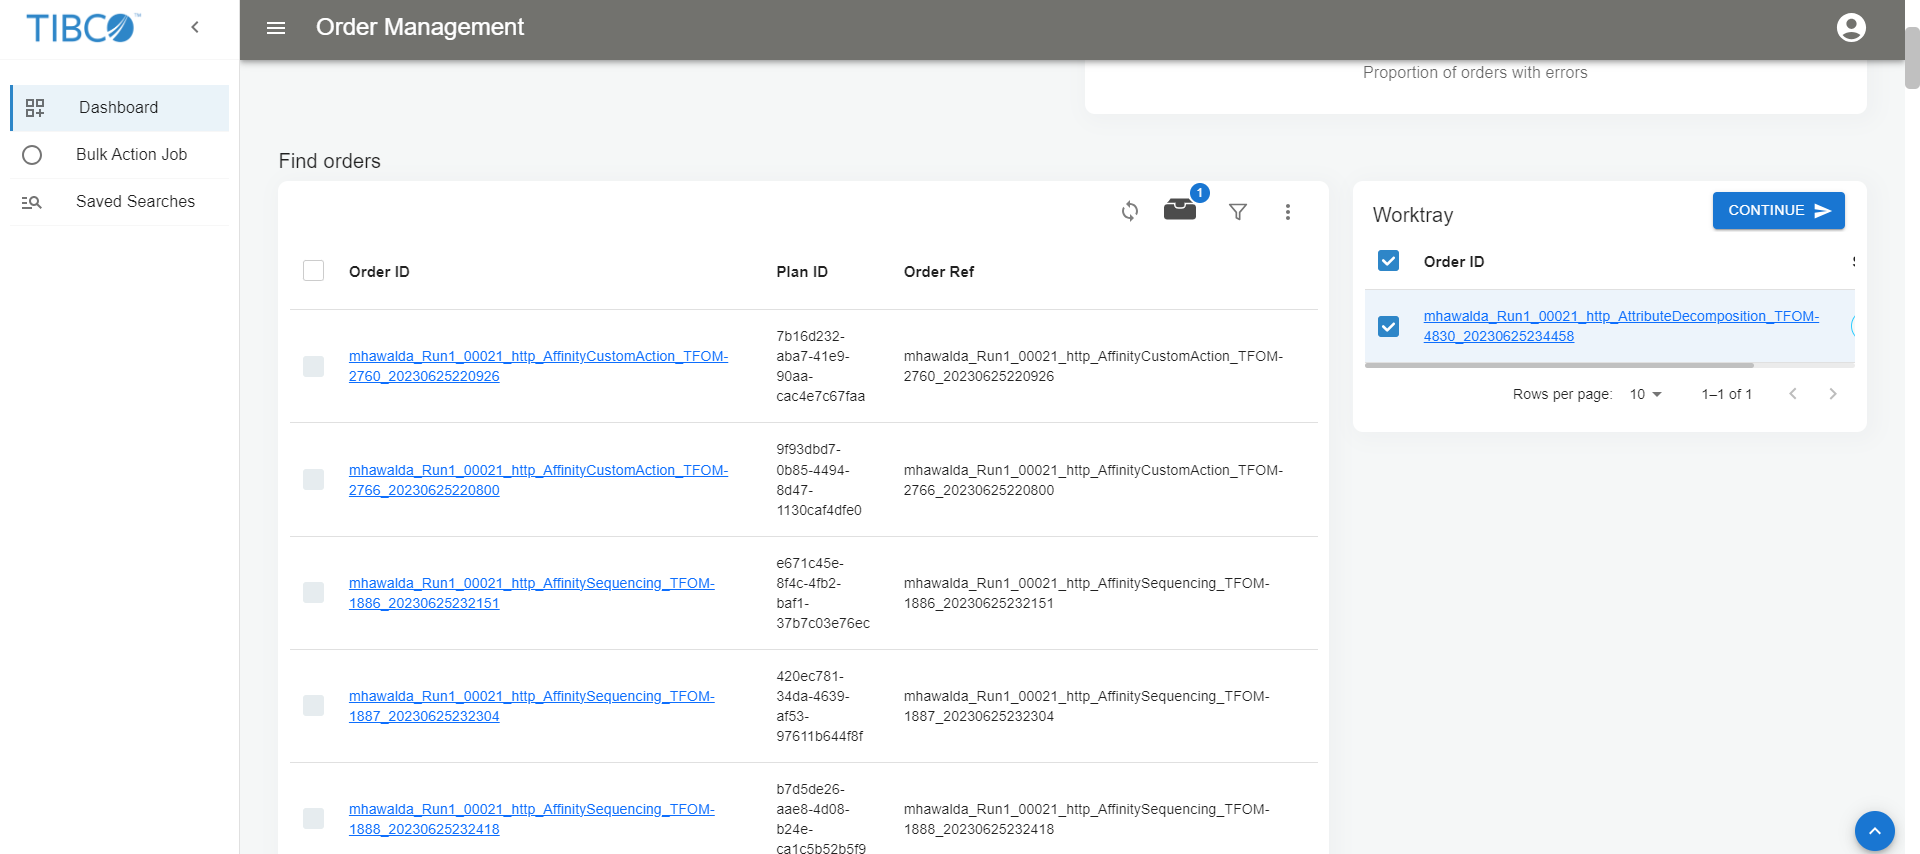
On the Worktray window, click CONTINUE. The orders are displayed in a new window.
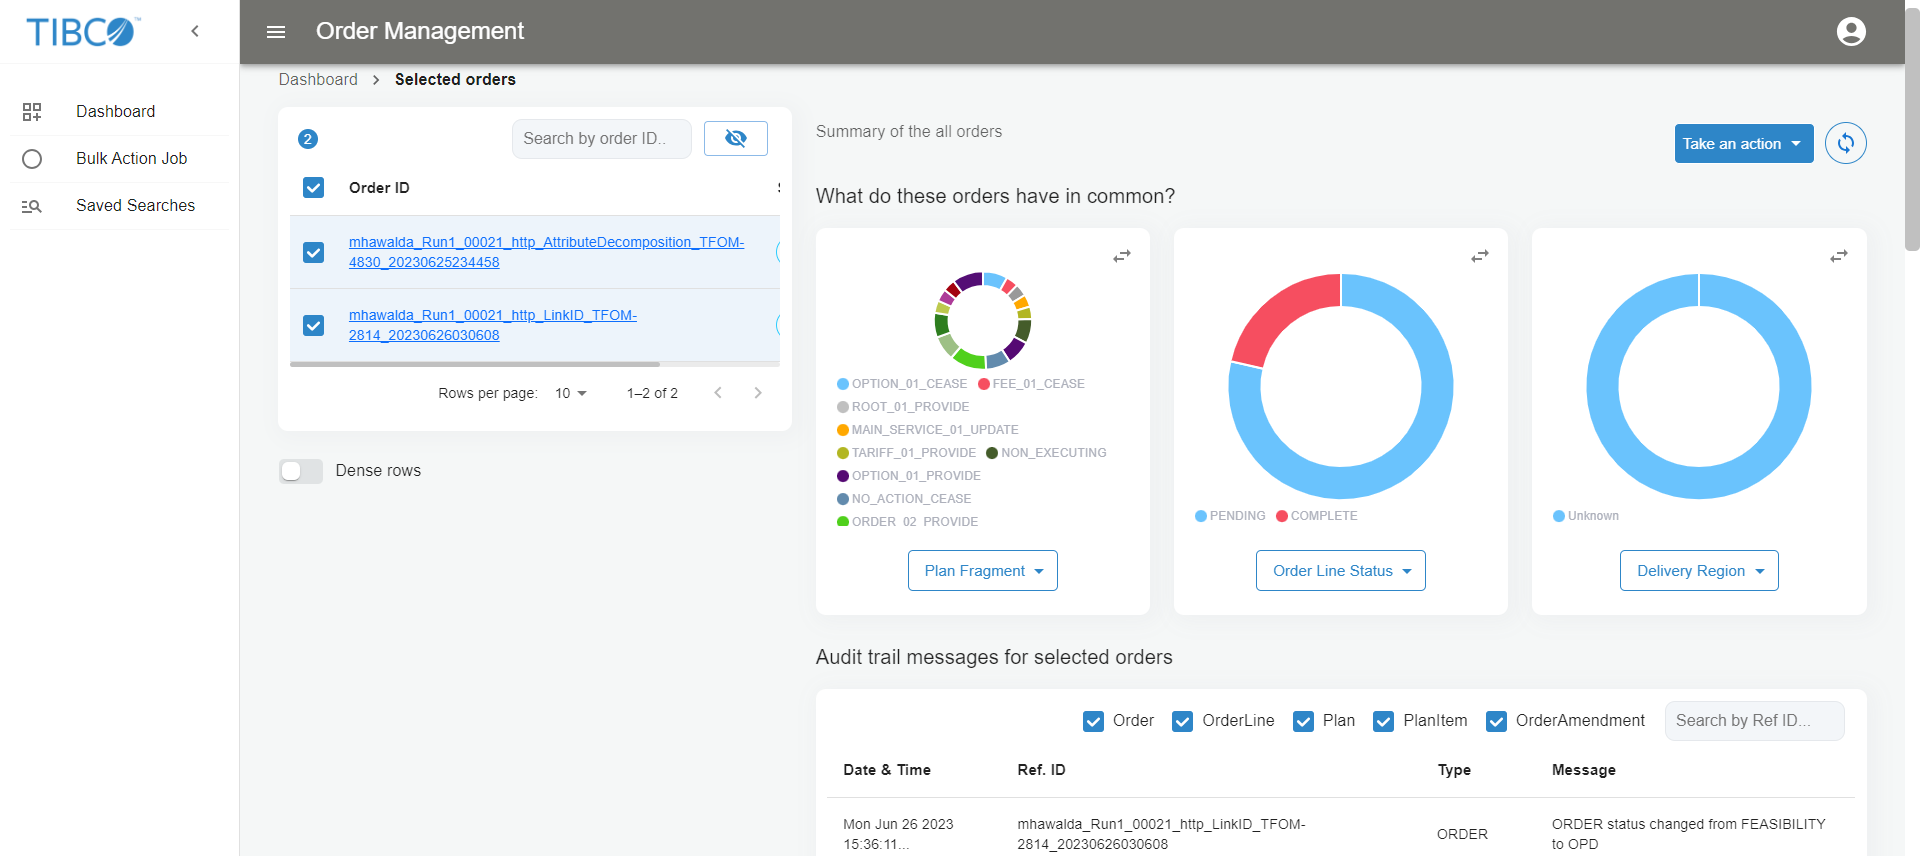
The orders chosen in the Selected orders window are reflected in the comparison Donut charts on the right.
The Take an action button has dropdown options as Cancel, Resume, Suspend, and Withdraw. Expand the Take an Action dropdown menu from the top-right corner and select the desired bulk action.
Click the refresh icon ![]() to synchronize the selected orders.
to synchronize the selected orders.
Once an action is applied, the action details can be viewed on the In progress jobs tab. The Job ID, Action, Job Details, and Orders fields are shown here.
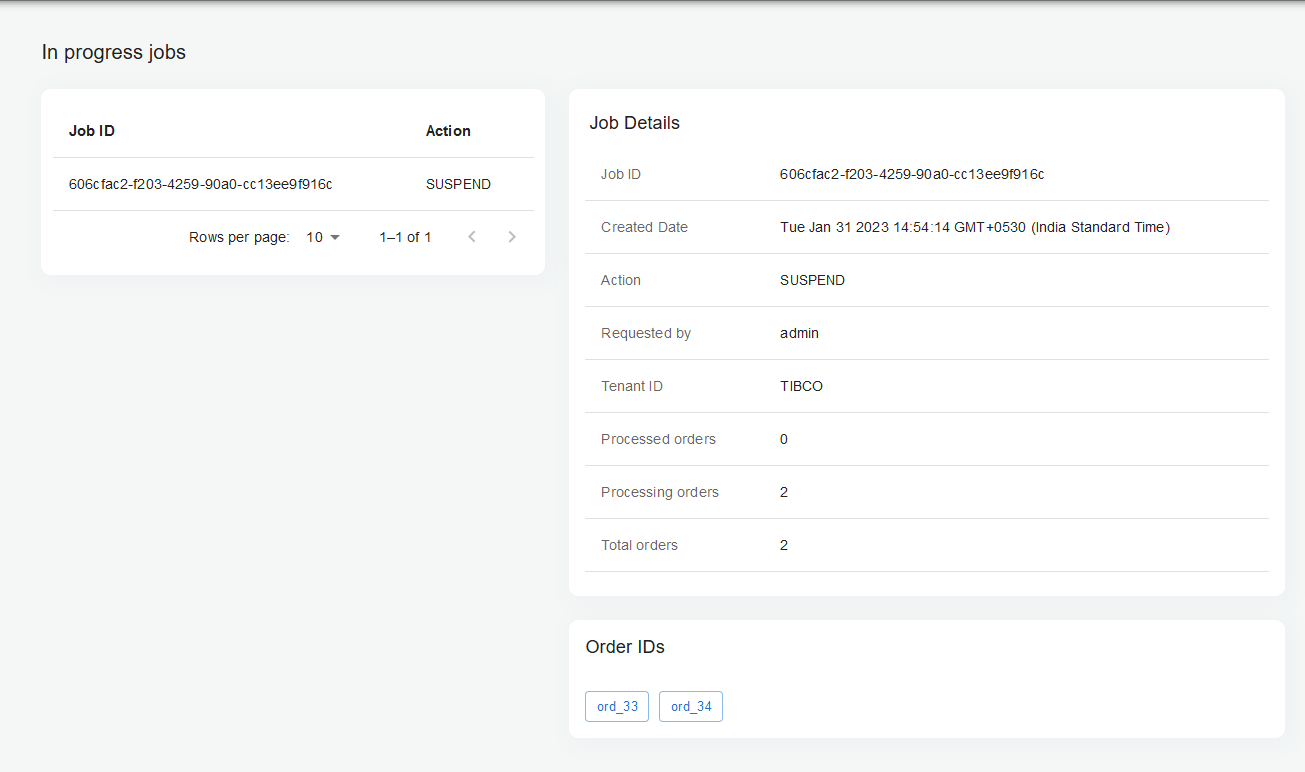
From the In progress jobs tab, you can view order details of a particular order by clicking the Order IDs hyperlink.
Orders
When you click the Order ID hyperlink, a new window opens with all the details about that particular order.
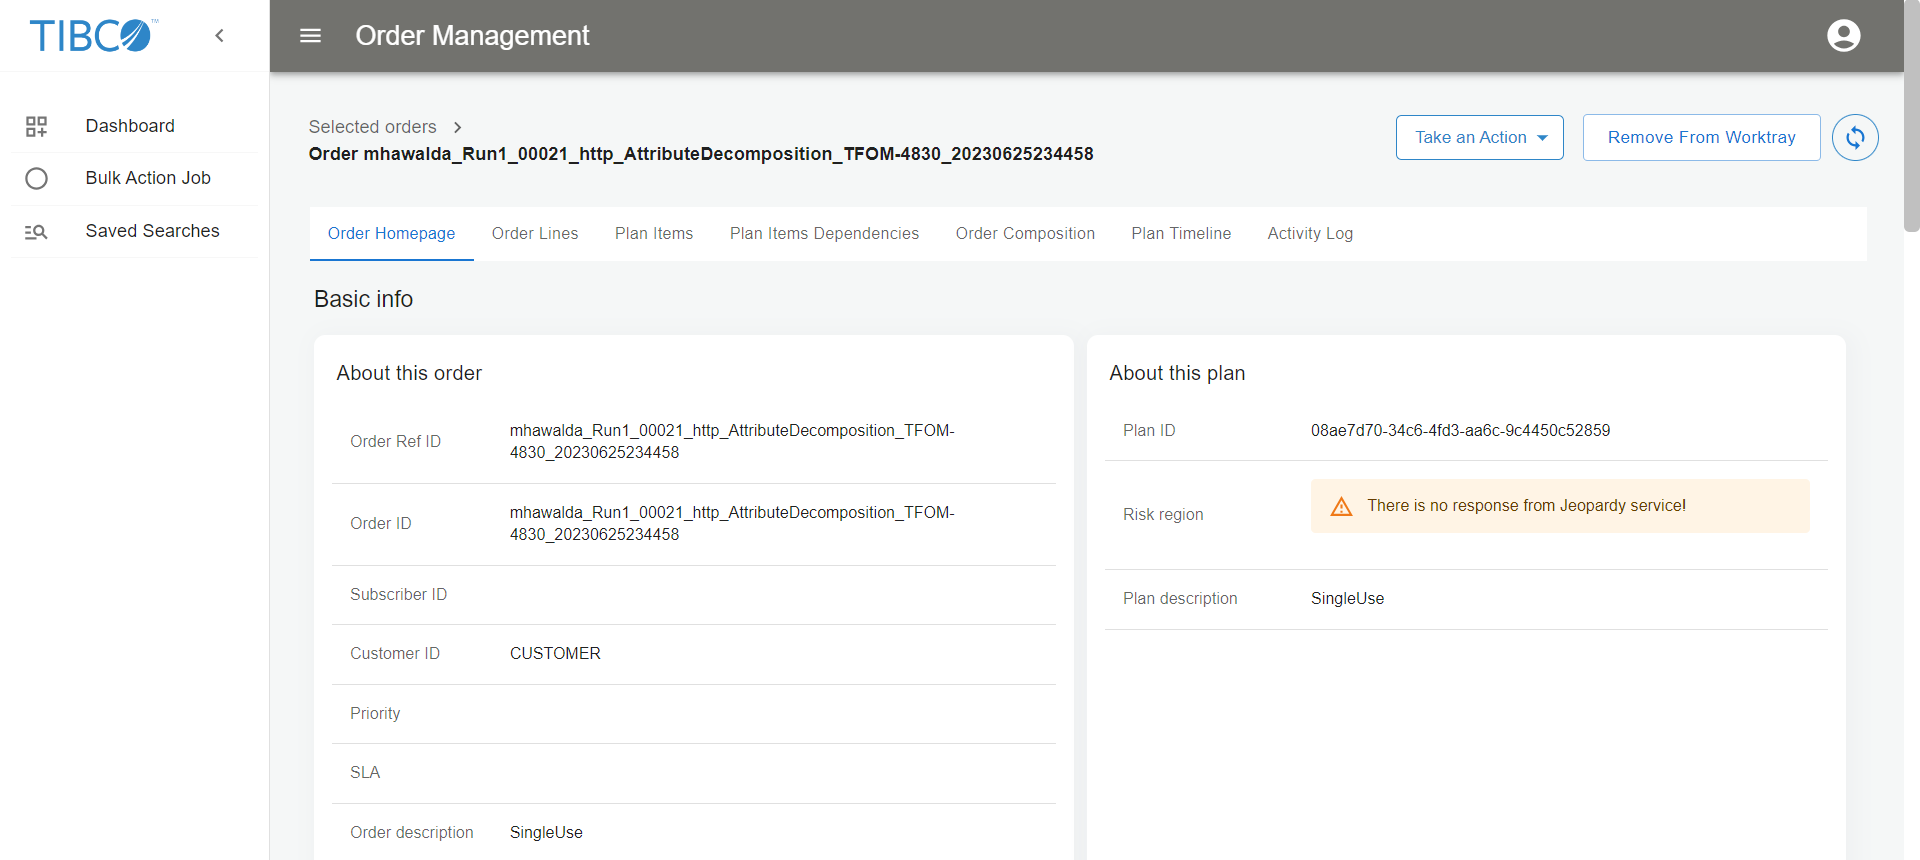
Order Homepage
The following information is available on the Order Homepage tab:
-
Basic info (order and plan)
-
Status (order and plan)
-
Location (invoice address and delivery address)
-
Dates (order and plan)
-
Custom headers
-
Plan
-
Amendments (all amendments with clickable links to navigate to the amended order)
Order Lines
The following information is available on the Order Lines tab:
-
Order Line
-
Order Line Details
-
Custom headers
-
Location (invoice address and delivery address)
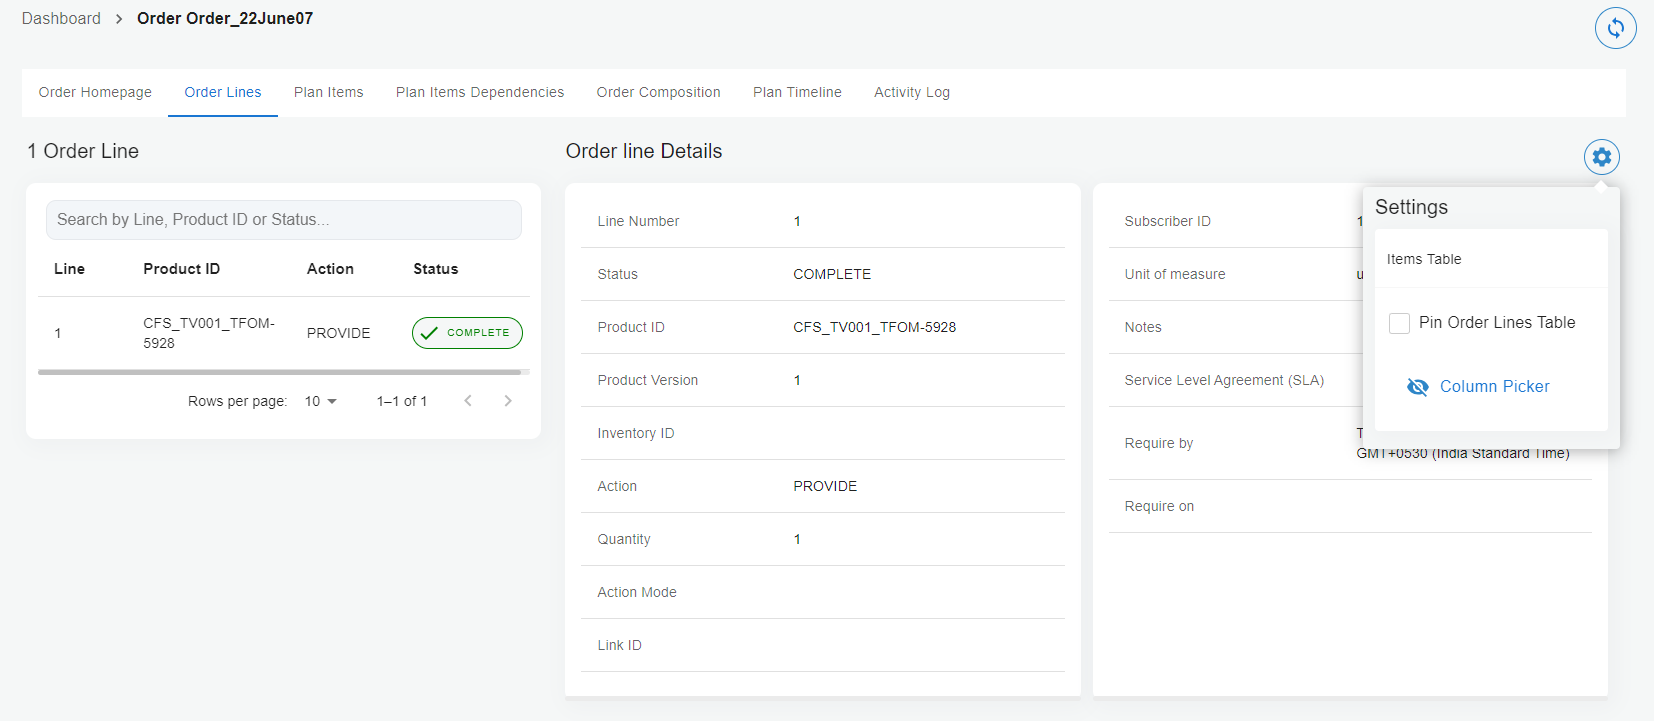
Click the settings icon ![]() and select the Pin Order Lines Table checkbox to make the order lines scrollable. By default, the order lines are shown across the pages. You can hide or show the desired columns from the Column Picker option.
and select the Pin Order Lines Table checkbox to make the order lines scrollable. By default, the order lines are shown across the pages. You can hide or show the desired columns from the Column Picker option.
You can search an order line by Line, Product ID, or Status on the search box.
Plan Items
The following information is available on the Plan Items tab:
-
Plan ID
-
Plan items Details
-
Process component information
-
Custom headers
-
Milestones (shows the dependencies if present)

Click the settings icon ![]() and select the Pin Plan Items table checkbox to make the plan items scrollable. By default, the plan items are shown across the pages. Similarly, you can select the Non executing plan items checkbox to show or hide the non-executing plan items. You can hide or show the desired columns from the Column Picker option.
and select the Pin Plan Items table checkbox to make the plan items scrollable. By default, the plan items are shown across the pages. Similarly, you can select the Non executing plan items checkbox to show or hide the non-executing plan items. You can hide or show the desired columns from the Column Picker option.
You can search a plan item by ID, Plan Item Name, or Status on the search box.
Plan Items Dependencies
The Plan Items Dependencies tab shows the dependencies between milestones in a graphical representation.
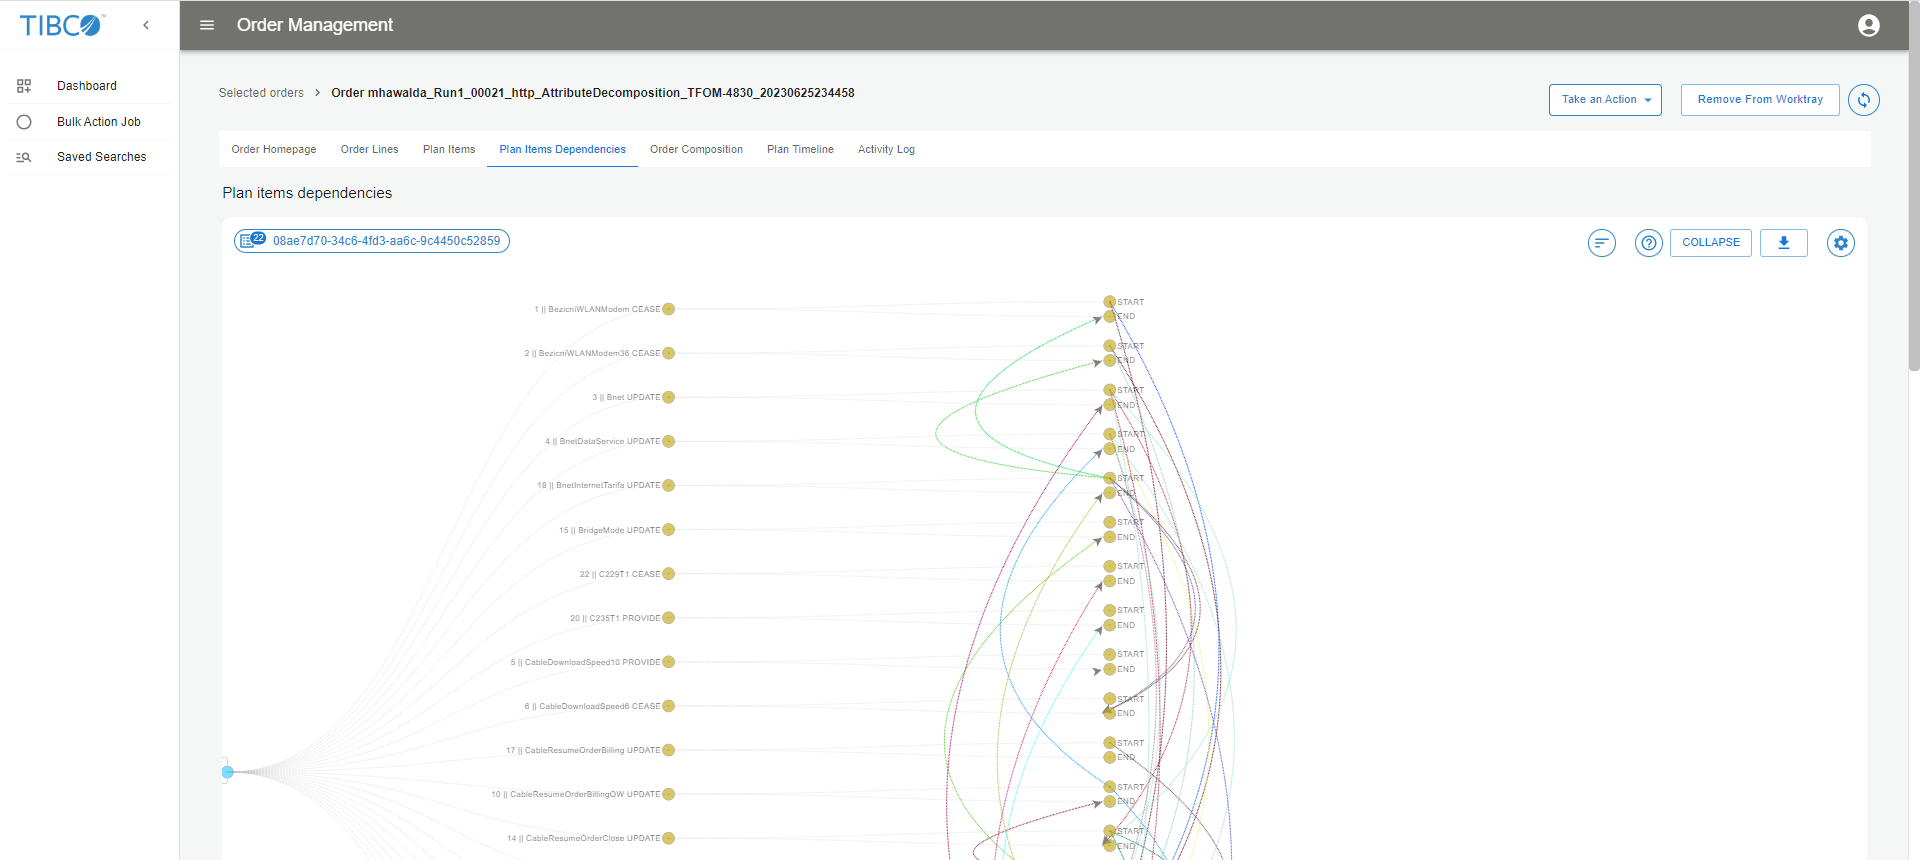
Click the sort icon  to sort the plan-items based on dependencies.
Click the help icon  to view the legend for the milestones (for example, START, PENDING, EXECUTION) with color coding.
Right-click on a node to view the complete details about the item.
Click the download icon  to save the dependency view as an image.
Click the settings icon  to show or hide various options as per your requirements.
Order Composition
The Order Composition tab shows how a particular order is decomposed into various items in a flow chart.
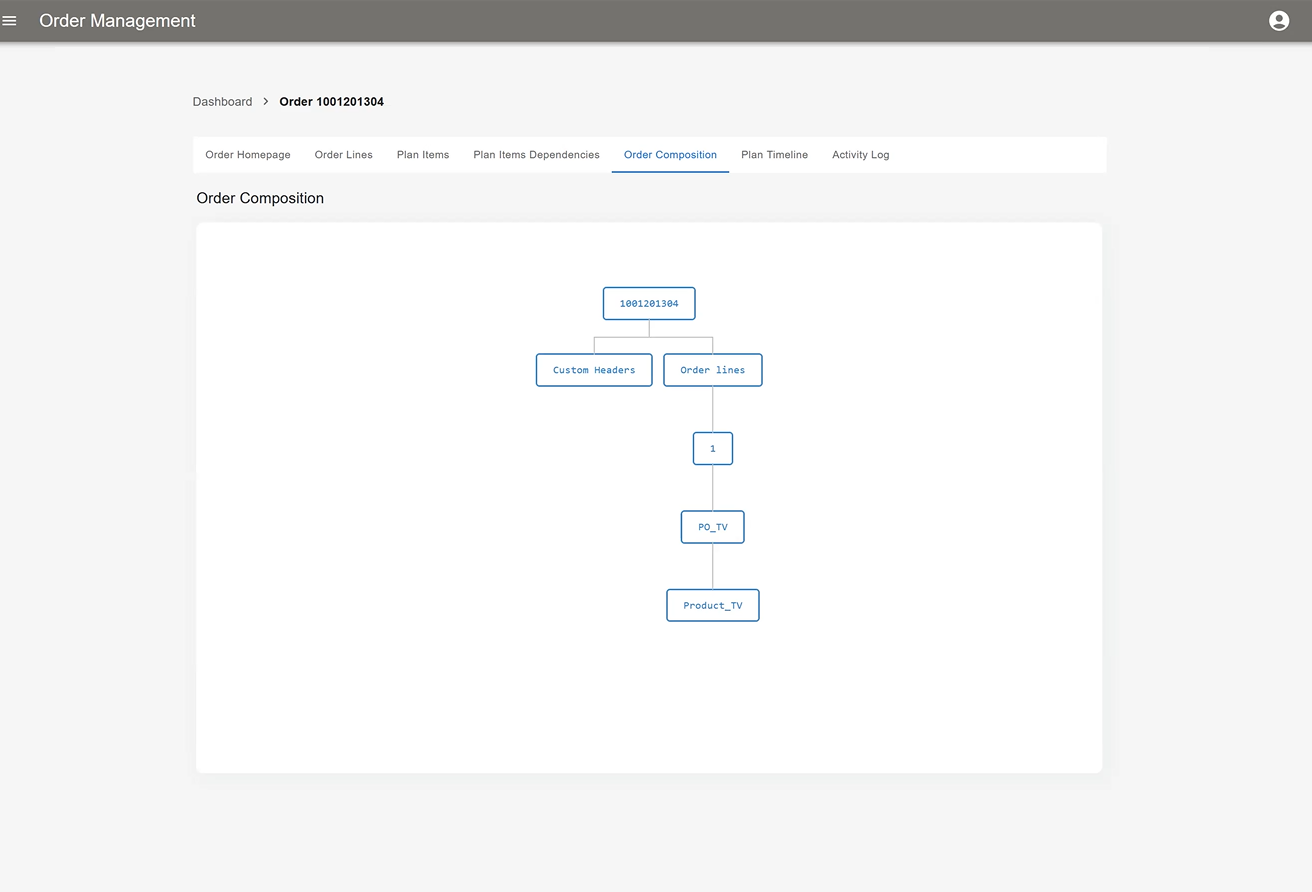
You can click an item to view more details.
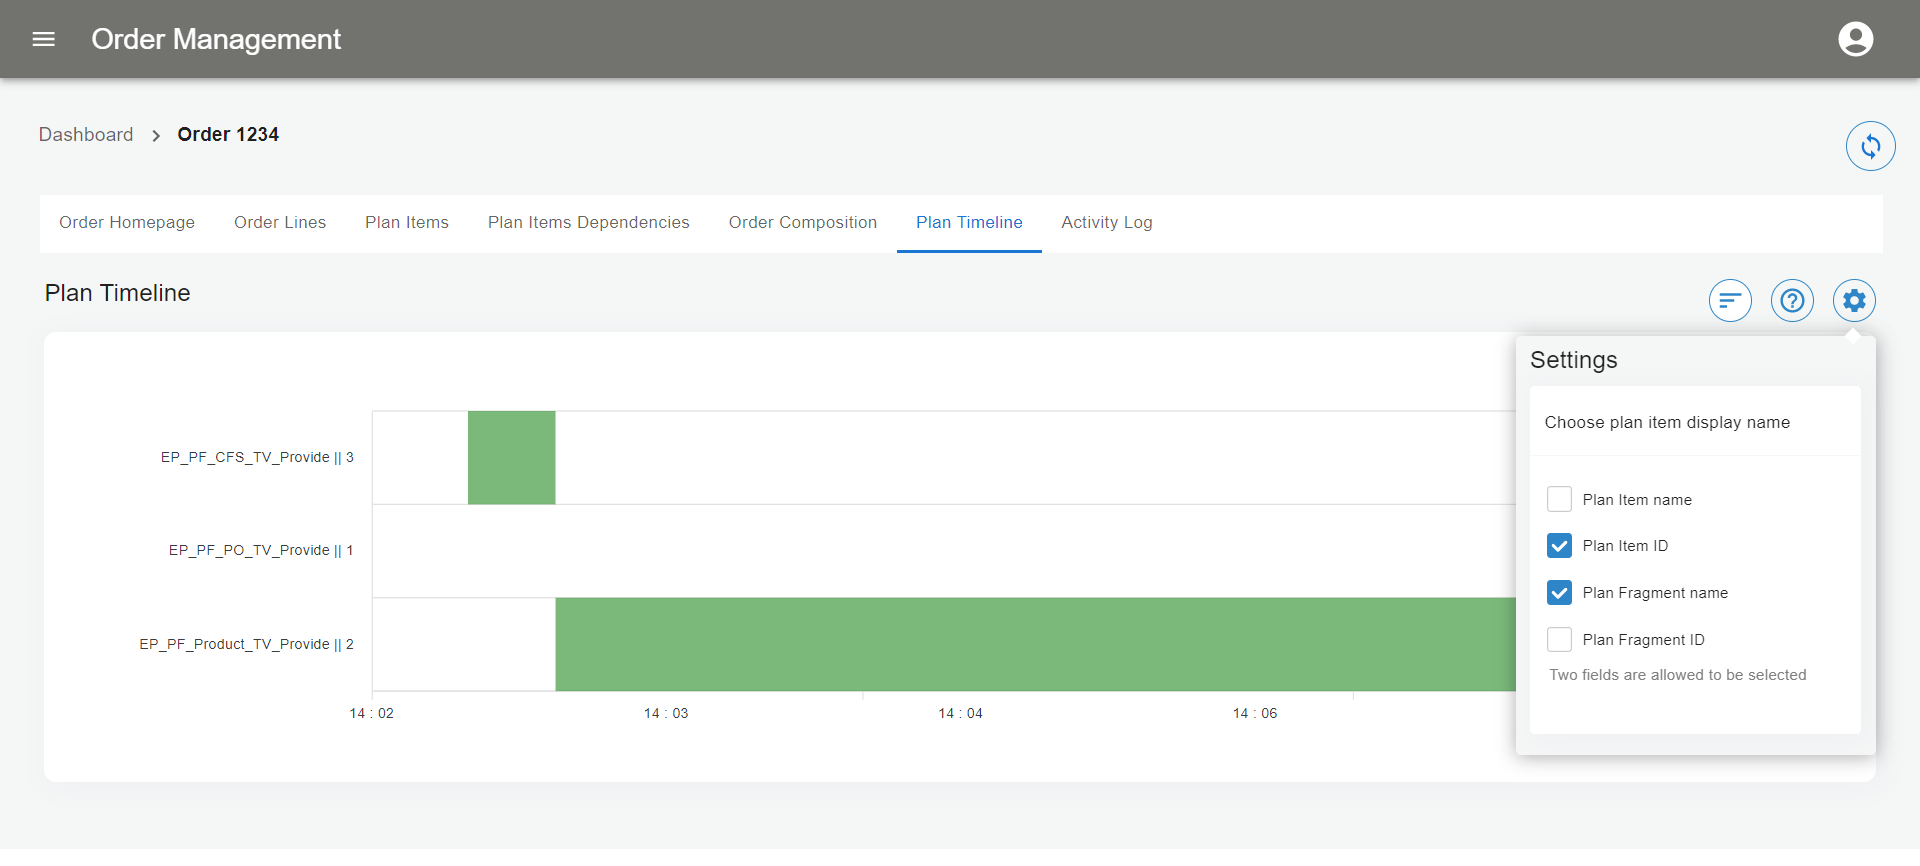
Plan Timeline
The Plan Timeline tab shows the timeline of a plan in a chart. You can choose the plan item display names from the settings icon.
Activity Log
The Activity Log tab shows various transitions of the order.
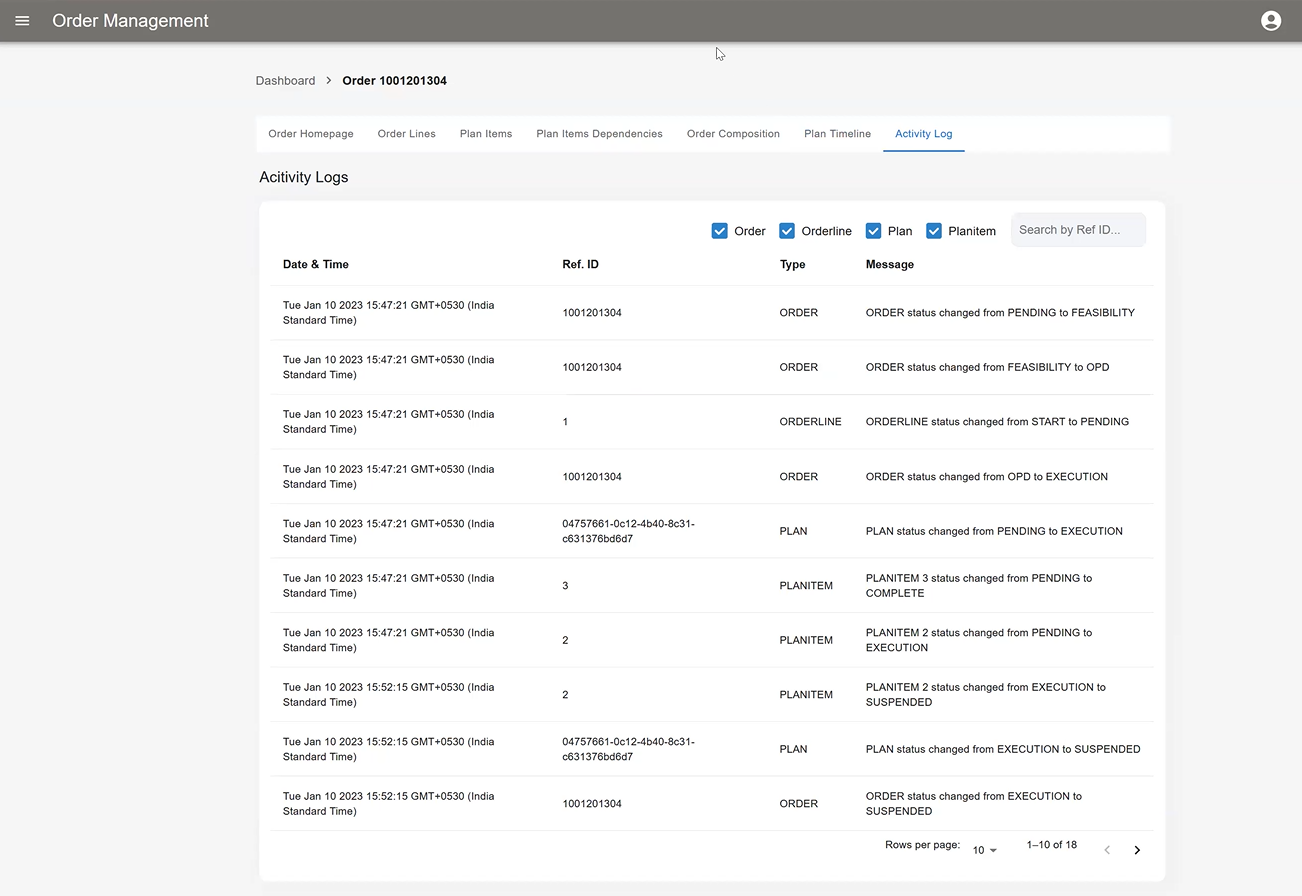
You can select or clear the checkboxes for Order, Orderline, Plan, or Planitem to view the related logs that you want. The log shows details such as Date & Time, Ref. ID, Type, and Message.
Audit trail messages for selected orders
Add non-final state orders in the Worktray from Find orders table and click CONTINUE.
On this window, audit trail messages for orders are displayed for the order, order line, plan, and plan item level.
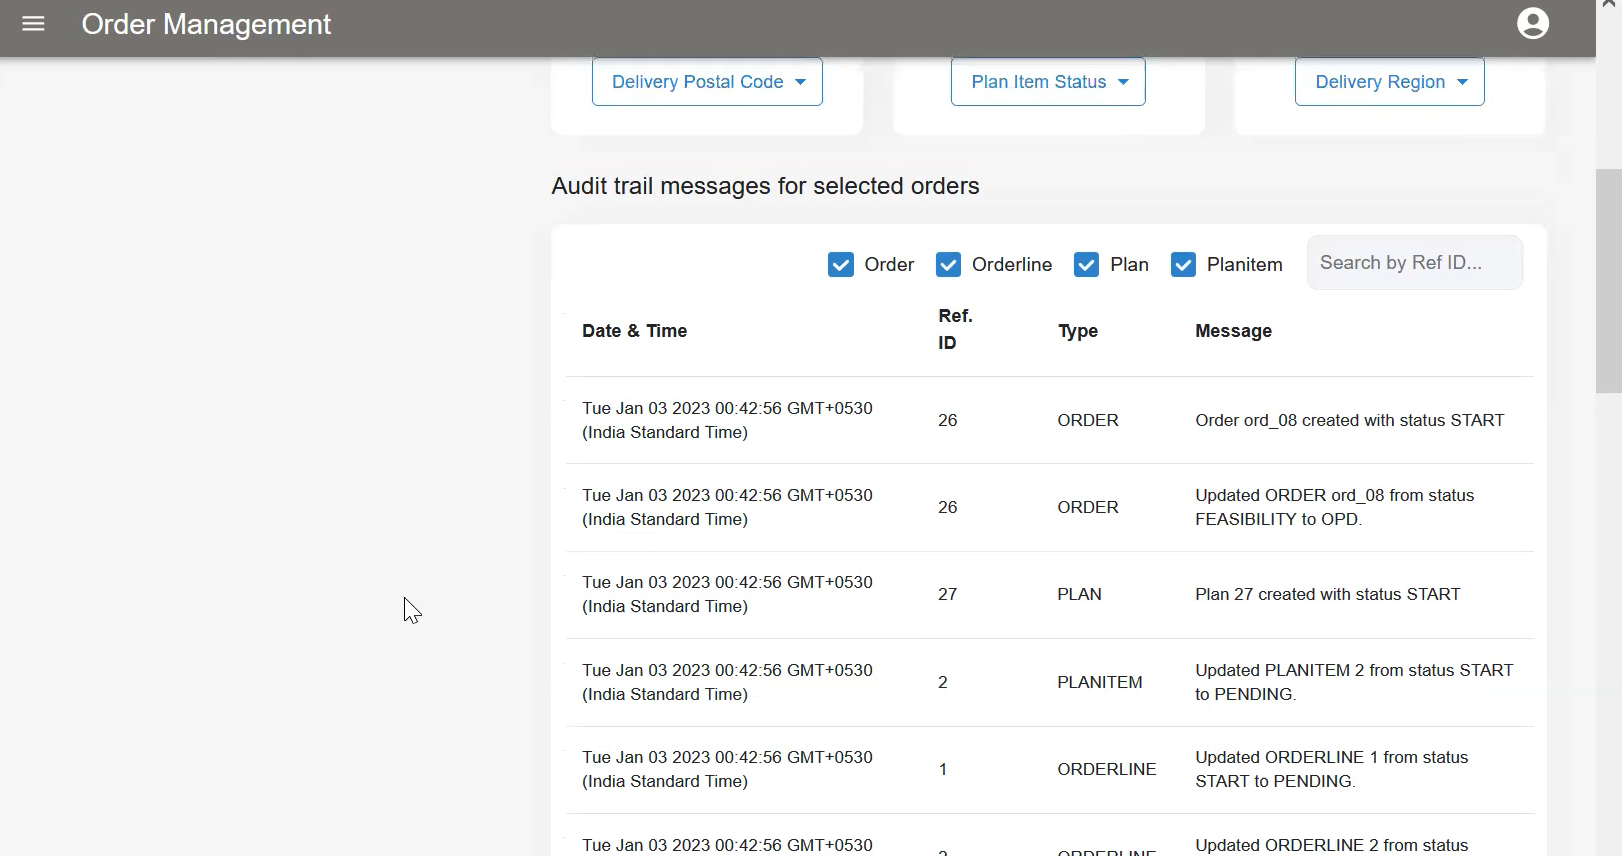
You can select the checkboxes against Order, Orderline, Plan, or Planitem to view orders related to that component and other orders are hidden. Also, orders can be searched with their order ID or order Ref on the search box.
Plan items
Add non-final state orders in the Worktray from Find orders table and click CONTINUE.
On this window, all the plan items are displayed that are chosen on the Selected orders window.
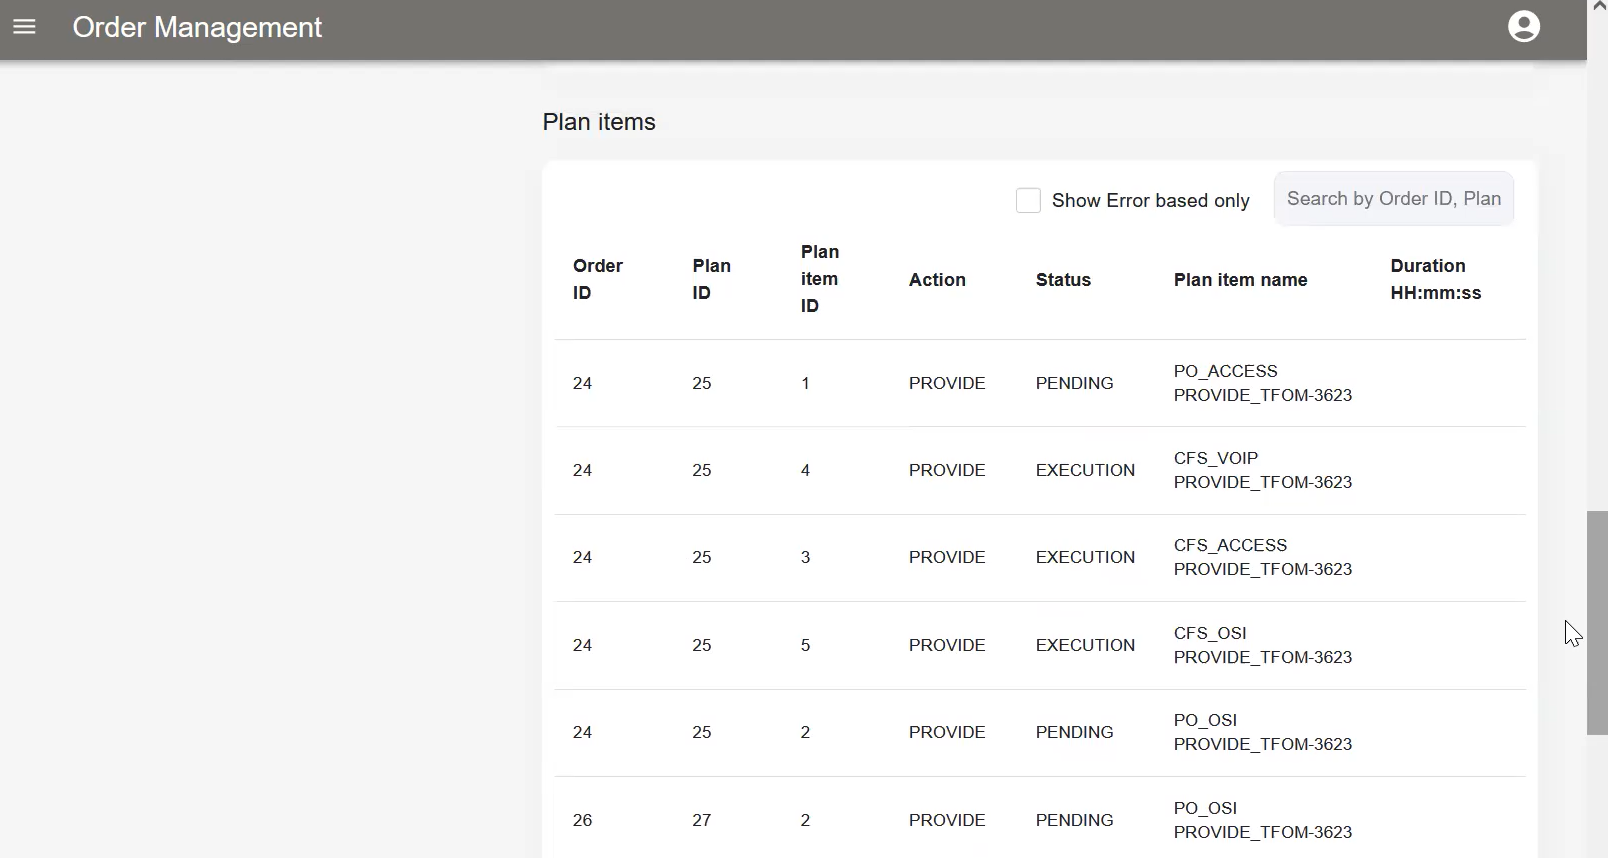
Also, plan items can be searched with their order ID or plan ID on the search box.
You can select the checkboxes against the Show error based only component to view the plan items with error state. When plan items with error states are filtered out, the Take an action button is enabled with the dropdown options as Retry, Resume, and Complete. You can take an action as required.