
Selection highlighting can be synchronized between ArcMap and another application that supports the OpenSpirit selection synchronization protocol. This feature was introduced to facilitate work flows between ArcMap and TIBCO's Spotfire application. Synchronization is accomplished by establishing a highlighting session between the two applications.
A highlighting session defines a link between a feature class in ArcMap and a data table in Spotfire. One or more feature class fields in ArcMap are associated with the same number of columns in a Spotfire data table. Once the highlighting session has been established selections in either application will cause the corresponding rows or features in the other application to be highlighted based on matching values in the associated columns and fields.
A highlighting session is initiated by clicking on the highlighting initiation button in the OpenSpirit ArcGIS Extension toolbar.
 A session can also be initiated by clicking on the highlighting button in the Spotfire Extension toolbar. The workflow is the same regardless of which application is used to initiate the session. The following description describes the workflow from the perspective of initiating the session from ArcMap.
Clicking on the highlighting initiation button in ArcMap causes a window to appear where you are asked which ArcMap feature class you wish to use for the highlighting session.
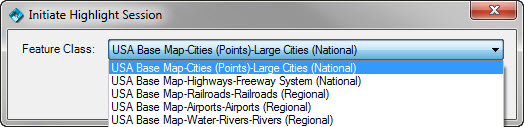
A Feature class must be selectable in ArcMap in order for it to appear in the feature class list. Select the feature class that you want to link to a Spotfire data table.
Click the Ok button after selecting the ArcMap feature class. This will broadcast a highlight session request event and change the highlighting initiation button to appear in the pending state  . The Spotfire application will respond to the request by opening a window that is used to select the data table that is to be linked along with the columns that will be used to determine a selection match.
The image below is the highlight session mapping window that appears in Spotfire when initiating the highlighting session from ArcMap. A similar window would appear in ArcMap if the session was initiated from Spotfire.
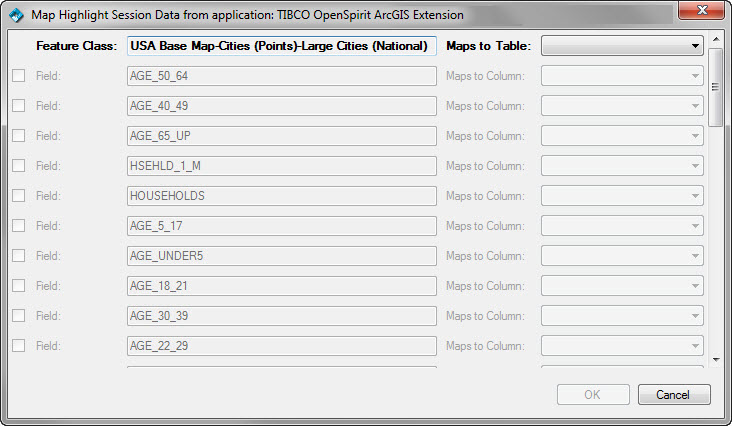
The left half of the mapping window shows the ArcMap feature class that was selected when initiating the highlighting session from ArcMap. Below the feature class name is a list of all the fields defined on the feature class.
A Spotfire data table selection drop down list appears to the right of the ArcMap feature class name. The drop down selector contains a list of all Spotfire data tables. Select the data table that you want to link to the ArcMap feature class.
A check box appears to the left of each ArcMap feature class field. Check the box next to all fields that will be used to determine a selection match. The Spotfire data table should be selected before checking boxes next to the fields.
A Spotfire column selection drop down list will be enabled next to each field that is checked. Select the column that you want to match against the ArcMap feature class field.
Click on the Ok button when you have selected all the field / column mappings. At least one field / column mapping must be selected to enable the Ok button.
Do not map more fields than are required to uniquely identify a match. The values of all mapped fields for all selected rows or features will be sent to the other application each time a selection changes. Selecting too many fields will significantly degrade the performance of the selection highlight synchronization.
The highlight session mapping window will go away and the highlighting session will be in effect. The highlighting session button will appear in the linked state  . Selecting features in the linked ArcMap feature class will cause Spotfire to highlight matching rows in the linked data table. Rows are matched based on comparing values using the field / column associations made during the session initiation.
Click on the highlighting button in either application to end the highlighting session. A confirmation window will appear which shows the feature class/data table linkage that is being used for the highlighting session. Click on the Disconnect button to end the highlighting session. Click on the Cancel button to dismiss the window and continue using the highlighting session.
