GitHub Apps
TIBCO Developer Hub can be configured to use GitHub Apps for backend authentication. It offers higher rate limits and that TIBCO Developer Hub function as an app instead of a bot or a user account. Refer to GitHub Docs to learn more about GitHub Apps integration. Also, you can learn more about GitHub Apps integration from Backstage Documentation.
Need of GitHub Apps
The GitHub API limits the rate to 5000 requests per hour, which can cause throttling issues, whereas GitHub Apps offer much higher rate limits (~12500 per hour).
Setting up GitHub Apps
To create a GitHub App and integrate it with the TIBCO Developer Hub, refer to the following procedure.
- Procedure
- Go to your individual or organization account and click Settings.
-
Select the Developer Settings, and click GitHub Apps. Then, click Register a New GitHub App, and authenticate yourself to view the GitHub Apps Form.
-
Use the form to customize the GitHub App. Fill out the details, such as your GitHub App name and the description. A homepage URL can be the URL of your GitHub App, or the URL of your TIBCO Developer Hub instance.
-
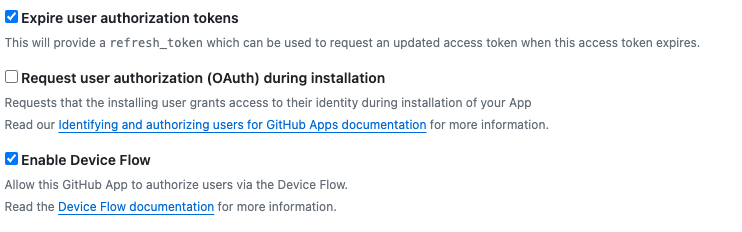
Click the Expire User Authentication Tokens and Enable Device Flow checkboxes.

-
Ignore the Webhook checkbox as support for Webhook is not required in the TIBCO Developer Hub.
-
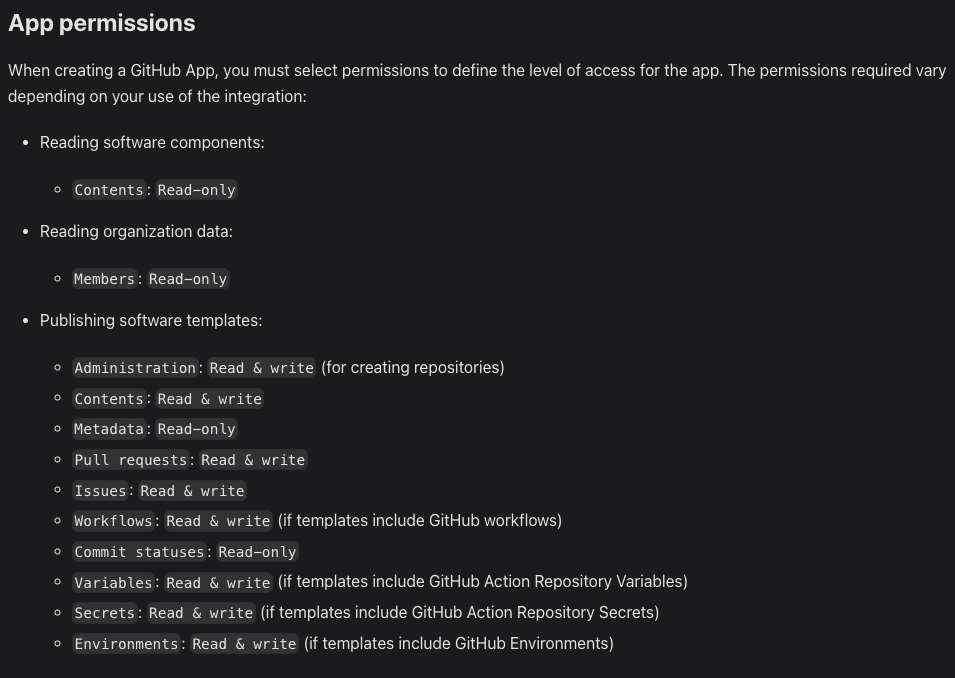
Select the list of Repository and Organization permissions as described in Backstage Documentation. You can also select other permissions as needed, but ensure to include these basic permissions.

-
Select the below option for security reasons.

-
Click Create GitHub App to view the homepage of your GitHub App.
-
Install the created GitHub App in an individual or organization account. For more information, see GitHub Docs.

Using GitHub Apps with TIBCO Developer Hub
To create Client secrets, go to your GitHub App and fetch these variables - GITHUB_WEBHOOK_SECRET (optional), GITHUB_APP_ID, GITHUB_APP_CLIENT_ID, and GITHUB_APP_CLIENT_SECRET. Then, generate a new client secret (GITHUB_APP_PRIVATE_KEY) and download the Private key. You can create a key if you are a first-time user or generate multiple keys as needed.
Applying Client Secrets to Your Data Plane
- Procedure
- Create the secrets file (for example -
tibco-hub-secrets.yaml). -
Open the
.PEMfile in any code editor and copy the private key. Then, add those values in the following configurations.
apiVersion: v1
kind: Secret
metadata:
  name: tibco-hub-secrets
type: Opaque
stringData:
  # replace with your values
  GITHUB_WEBHOOK_SECRET: ${GITHUB_WEBHOOK_SECRET}
  GITHUB_APP_ID: ${GITHUB_APP_ID}
  GITHUB_APP_CLIENT_ID: ${GITHUB_APP_CLIENT_ID}
  GITHUB_APP_CLIENT_SECRET: ${GITHUB_APP_CLIENT_SECRET}
  GITHUB_APP_PRIVATE_KEY: |
    -----BEGIN RSA PRIVATE KEY-----
    Your Secret Key goes here,
    Indentation is important.
    -----END RSA PRIVATE KEY-----
Run this command to apply the secret to your Data Plane:
kubectl apply -f tibco-hub-secrets.yaml -n <namespace>
Configuration While Provisioning
- Procedure
- Add the following code to the custom configuration file while provisioning your TIBCO Developer Hub instance. You can see the integrations part, where the new configuration is added to allow GitHub Apps in your instance.
-
If all the components and templates are loaded in your instance, the GitHub app is successfully integrated.
integrations:
  github:
    - host: github.com
      apps:
        - appId: ${GITHUB_APP_ID}
          clientId: ${GITHUB_APP_CLIENT_ID}
          clientSecret: ${GITHUB_APP_CLIENT_SECRET}
          webhookSecret: ${GITHUB_APP_WEBHOOK_SECRET}
          privateKey: |
            ${GITHUB_APP_PRIVATE_KEY}