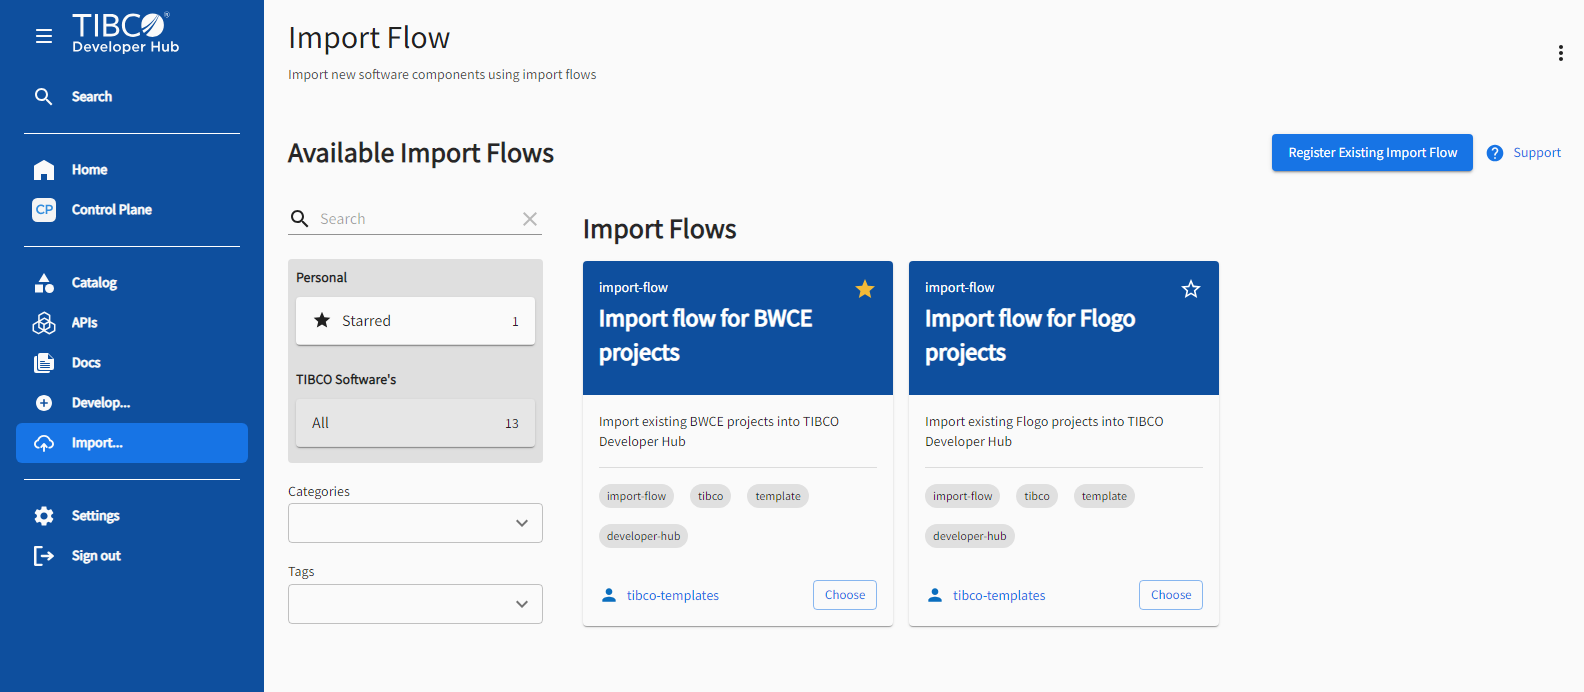
Import Flows
An import flow lets you take existing source code, help generate entities and import those into TIBCO Developer Hub. It is designed in such a way that you can decide your own level of granularity (details or abstractions used in the software design).
Import flows are the same as templates with the tags: import-flow. You can import new entities like components, templates, APIs, and more, in TIBCO Developer Hub using import flows.
On the upper-right corner of import flows, click the vertical ellipsis icon to view the following options:
To search for an available import flow, use the searching, sorting, and filtering options. You can star import flows to add favorites and locate those easily in Starred.
To change an import flow yaml file, choose an import flow and then click the vertical ellipsis icon from the upper-right corner of the import flow form, and click Edit Configuration.
Import flows use the following custom actions:
-
Extract Parameters (
tibco:extract-parameters)- When importing a project, thetibco:extract-parametershelps you get the information from the code. There are 4 ways of extracting parameters:-
XML (using JSONPath or xPath). See, xpath.
-
JSON (using JSONPath). See, JSONPath.
-
File (using RegEx). See, Regular Expressions.
-
Workspace (using RegEx) on the directory structure. See, Regular Expressions.
You can see this custom action in the Installed Actions.

Examples Sample Code Extract parameters when the extract type is XML. steps: - action: tibco:extract-parameters name: Extract parameters input: failOnError: true sourcePath: <Source path> extractParameters: extract_parameter: type: xml filePath: <File path relative to root> xPath: "<Xpath query (Refer: https://www.w3schools.com/xml/xpath_syntax.asp , https://www.npmjs.com/package/xpath)>"Output parameters when the extract type is XML, the value of the output parameter key is always an array. {"output":{"extract_parameter":["<Xpath query output>"]}}Extract parameters when the extract type is XML supporting jsonpath. steps: - action: tibco:extract-parameters name: Extract parameters input: failOnError: true sourcePath: <Source path> extractParameters: extract_parameter: type: xml filePath: <File path relative to root> jsonPath: "<jsonPath query (Refer: https://assertible.com/docs/guide/json-path, https://www.npmjs.com/package/jsonpath)>"Output parameters when the extract type is XML supporting jsonpath, the value of the output parameter key is always an array. {"output":{"extract_parameter":["<Jsonpath query output>"]}}Extract parameters when the extract type is JSON. steps: - action: tibco:extract-parameters name: Extract parameters input: failOnError: true sourcePath: <Source path> extractParameters: extract_parameter: type: json filePath: <File path relative to root> jsonPath: "<jsonPath query (Refer: https://assertible.com/docs/guide/json-path , https://www.npmjs.com/package/jsonpath)>"Output parameters when the extract type is JSON, the value of the output parameter key is always an array. {"output":{"extract_parameter":["<Jsonpath query output>"]}}Extract parameters when the extract type is a file. steps: - action: tibco:extract-parameters name: Extract parameters input: failOnError: true sourcePath: <Source path> extractParameters: extract_parameter: type: file filePath: <File path relative to root> regex: "<String or Regular expression to match in the file content (Refer: https://www.w3schools.com/jsref/jsref_match.asp)>"Output parameters when the extract type is the file, the value of the output parameter key is always an array. {"output":{"extract_parameter":["<Regular expression match output>"]}}Extract parameters when the extract type is workspace. steps: - action: tibco:extract-parameters name: Extract parameters input: failOnError: true sourcePath: <Source path> extractParameters: extract_parameter: type: workspace directoryPath: <Directory path relative to root> glob: "<Glob pattern to find the paths in the directory, optional, default is `**/*` (Refer: https://www.npmjs.com/package/glob)>" onlyName: <Boolean value, optional, default is false, if true will return only file or directory name instead of path> regex: "<String or Regular expression to match the file or directory path (Refer: https://www.w3schools.com/jsref/jsref_match.asp)>"Output parameters when the extract type is workspace, the value of the output parameter key is always an array. {"output":{"extract_parameter":["<Regular expression match output>"]}} -

-
Create YAML (
tibco:create-yaml)- When importing a project, thetibco:create-yamlcreates ayamlfile, so that you can create entities, such as components, APIs, templates, users, groups, domains, and systems.
You can see this custom action in the Installed Actions.
Example Sample Code Create a yamlfile with example outputStructure.steps: - action: tibco:create-yaml name: Create yaml file input: failOnError: true sourcePath: <Source path> outputFile: <output-file.yaml> outputStructure: apiVersion: backstage.io/v1alpha1 kind: "Component (You can change this to any TIBCO Developer Hub entity, ex: API, Resource, System)" metadata: name: <${{ steps.extract.output.extract_parameter_name[0]}}> description: <${{ steps.extract.output.extract_parameter_desc[0] }}> tags: - <Tag1> - <Tag2> annotations: github.com/project-slug: <${{ "https://" + (parameters.repoUrl | parseRepoUrl).host + "/" + (parameters.repoUrl | parseRepoUrl).owner + "/" + (parameters.repoUrl | parseRepoUrl).repo }}> backstage.io/techdocs-ref: dir:. links: - title: <Link title> url: <Link URL> spec: type: <Type of the application> lifecycle: production owner: <${{ parameters.owner }}>

Registering Existing Import Flows
You can register an existing import flow using Registering an Existing Component steps.
Then, prepare a yaml file where kind: template and ensure to add the following tag:
tags:
    - import-flow
Importing a Component Using Import Flows
If you provision the TIBCO Developer Hub without adding catalog location config, then you get the following three Import Flows by default. You can use these registered import flow to import a new software component.
These following examples can help you understand how the import flow works.
Import Flow for BusinessWorks Container Edition Projects
To import a BusinessWorks Container Edition project, create an import yaml file (for example, import-flow-bwce.yaml) where kind: template and ensure to add the following details:
-
Add this tag -
tags:
    - import-flow
Add steps and include the Installed Actions -
-
Extract Parameters -
- id: extract
  name: Extract Parameters
  action: tibco:extract-parameters
You can extract parameters in 4 ways -
-
XML (using JSONPath or xPath). See, xpath.
-
JSON (using JSONPath). See, JSONPath.
-
File (using RegEx). See, Regular Expressions.
-
Workspace (using RegEx) on the directory structure. See, Regular Expressions.
-
-
Create YAML -
  - id: createYaml
    name: Create YAML
    action: tibco:create-yaml
You can refer the following example to understand how to create an import yaml file for BusinessWorks Container Edition projects.
apiVersion: scaffolder.backstage.io/v1beta3
kind: Template
metadata:
  name: import-flow-bwce
  title: Import flow for BWCE projects
  description: Import existing BWCE projects into TIBCO Developer Hub
  tags:
    - import-flow
    - tibco
    - template
    - developer-hub
spec:
  owner: group:default/tibco-imported
  type: import-flow

  parameters:
    - title: Repository Location
      required:
        - repoUrl
      properties:
        repoUrl:
          title: GitHub repository with Existing BWCE Project
          type: string
          ui:field: RepoUrlPicker
          ui:options:
            allowedHosts:
              - github.com

    - title: Fill in some steps
      required:
        - application
        - owner
      properties:
        application:
          title: BWCE Application
          type: string
          description: Name of the BWCE Application to import
        owner:
          title: Owner
          type: string
          description: Owner of the template
          ui:field: OwnerPicker
          ui:options:
            allowedKinds:
              - Group

# The import flow consists out of 4 steps:
# 1. Fetch the project from GitHub
# 2. Generate the Component YAML
# 3. Commit the Component YAML file back to the GitHub project branch creating a pull request
# 4. Register the Component in the catalog

  steps:
    - id: fetch
      name: Fetch project
      action: fetch:plain
      input:
        url: ${{ "https://"  + (parameters.repoUrl | parseRepoUrl).host + "/" + (parameters.repoUrl | parseRepoUrl).owner + "/" +  (parameters.repoUrl | parseRepoUrl).repo }}

    - id: extract
      name: Extract Parameters
      action: tibco:extract-parameters
      input:
        failOnError: true
        extractParameters:
          bwce_project_name:
            type: xml
            filePath: ${{ parameters.application + "/" + parameters.application + ".application/.project" }}
            # For xml type extractParameters both json path and xpath are supported
            # jsonPath: $.projectDescription.name
            xPath: string(/projectDescription/name)
          bwce_project_description:
            type: xml
            filePath: ${{ parameters.application + "/" + parameters.application + ".application/.project" }}
            # For xml type extractParameters both json path and xpath are supported
            # jsonPath: $.projectDescription.comment
            xPath: string(/projectDescription/comment)

# extractParameters type json, file and workspace also supported
#          example_parameter1:
#            type: json
#            filePath: <File path>
#            jsonPath: <Json path>
#          example_parameter2:
#            type: file
#            filePath: <File path>
#            regex: <Regex>
#          example_parameter3:
#            type: workspace
#            onlyName: true
#            directoryPath: <Directory path>
#            regex: <Regex>

    - id: createYaml
      name: Create YAML
      action: tibco:create-yaml
      input:
# Add application name
        outputFile: ${{  parameters.application + '/'+ parameters.application + "-bwce-catalog-info.yaml" }}
 #      outputFile: "bwce-catalog-info.yaml"
        outputStructure:
          apiVersion: backstage.io/v1alpha1
          kind: Component
          metadata:
# Output of the Extract Parameters action step will always be an array, so we are using first item from the array
            name: ${{ steps.extract.output.bwce_project_name[0]}}
            description: ${{ steps.extract.output.bwce_project_description[0] }}
            tags:
              - bwce
            links:
              - title: TIBCO Business Works
                url: https://www.tibco.com/products/tibco-businessworks
            annotations:
              github.com/project-slug: ${{ "https://"  + (parameters.repoUrl | parseRepoUrl).host + "/" + (parameters.repoUrl | parseRepoUrl).owner + "/" +  (parameters.repoUrl | parseRepoUrl).repo }}
              backstage.io/techdocs-ref: dir:.
          spec:
            type: bwce
            lifecycle: production
            owner: ${{ parameters.owner }}

# The import flow debug step, enable it for debugging

#   - id: Log Debug
#     name: Debug Log
#     action: debug:log
#     input:
#       message: "Fetched the BWCE Skeleton template"
#       listWorkspace: true
#       bwce_project_name: ${{ steps.extract.output.bwce_project_name[0] }}
#       bwce_project_description: ${{ steps.extract.output.bwce_project_description[0] }}
#       repoUrl: ${{ parameters.repoUrl }}

    - id: cpr
      name: Create Pull Request in Current Repo
      action: publish:github:pull-request
      input:
        repoUrl: ${{ parameters.repoUrl }}
        update: true
        branchName: ${{ parameters.application.replace("/", ".") }}
        title: ${{ parameters.application }}
        description: This PR adds a Component YAML to this Repository.

# Optionally you can leave this step out, if your developer hub synchronize with the GitHub organization
# When the pull request is merged, the component will be registered by the GitHub catalog provider, below is the example configuration
# catalog:
#   providers:
#     github:
#       providerId:
#         organization: '<organization>'
#         catalogPath: '**/*catalog-info.yaml'
#         schedule:
#           frequency: { minutes: 30 }

    - id: register
      name: Register
      action: catalog:register
      input:
        catalogInfoUrl: ${{ "https://"  + (parameters.repoUrl | parseRepoUrl).host + "/" + (parameters.repoUrl | parseRepoUrl).owner + "/" +  (parameters.repoUrl | parseRepoUrl).repo + "/blob/" + parameters.application.replace("/", ".") + "/" + parameters.application + "/" + parameters.application +"-bwce-catalog-info.yaml" }}

  output:
    links:
# If you are not using register step above, remove the below Open in catalog link.
      - title: Open in catalog
        icon: catalog
        entityRef: ${{ steps.register.output.entityRef }}
      - title: Repository (Pull Request)
        url: ${{ steps.cpr.output.remoteUrl }}
After creating the import yaml file, follow the registering existing import flows steps to register the import-flow-bwce.yaml file.
yaml file based on your requirements. The previously mentioned requirements are an example demonstration of how to import BusinessWorks Container Edition projects in the import flows. To import new software components from BusinessWorks Container Edition projects, use the following procedure.
- Procedure
- Navigate to Import.
- Click Choose to select the import flow for BusinessWorks Container Edition projects.
- Fill out the following form details, such as host (GitHub), owner (GitHub organization name), repository name, and click Next.
- Add the application name, and repository owner name and click Review. Review all the details and click Create.
- Import flow runs based on the steps defined in the
yamlfile, for example, Extract Parameters, Create YAML, and more. - When running steps, a pull request gets created in the current (GitHub) repository.
- After completing the import flow run, your (BusinessWorks Container Edition) component gets registered in the catalog. Click Open in catalog to see the registered component. To view the created pull request in the current repository, click Repository (Pull Request).
- To stop the run of import flow during the run, click Cancel. To rerun the import flow, click Start Over.
- To check the running logs of import flow, click Shows Logs. Click Hide Logs to hide the import flow logs. You can also see the import flow run in the Task List. These options are also available on the upper-right corner if you click the vertical ellipsis icon. Click the Hide/Show Button bar to hide or show these options.


Import Flow for Flogo Projects
To import a Flogo project, create an import yaml file (for example, import-flow-flogo.yaml) where kind: template and ensure to add the following details:
-
Add this tag -
tags:
    - import-flow
Add steps and include the Installed Actions -
-
Extract Parameters -
- id: extract
  name: Extract Parameters
  action: tibco:extract-parameters
You can extract parameters in 4 ways -
-
XML (using JSONPath or xPath). See, xpath.
-
JSON (using JSONPath). See, JSONPath.
-
File (using RegEx). See, Regular Expressions.
-
Workspace (using RegEx) on the directory structure. See, Regular Expressions.
-
-
Create YAML -
  - id: createYaml
    name: Create YAML
    action: tibco:create-yaml
You can refer the following example to understand how to create an import yaml file for Flogo projects.
apiVersion: scaffolder.backstage.io/v1beta3
kind: Template
metadata:
  name: import-flow-flogo
  title: Import flow for Flogo projects
  description: Import existing Flogo projects into TIBCO Developer Hub
  tags:
    - import-flow
    - tibco
    - template
    - developer-hub
spec:
  owner: group:default/tibco-imported
  type: import-flow

  parameters:
    - title: Repository Location
      required:
        - repoUrl
      properties:
        repoUrl:
          title: GitHub repository with Existing Flogo Project
          type: string
          ui:field: RepoUrlPicker
          ui:options:
            allowedHosts:
              - github.com

    - title: Fill in some steps
      required:
        - application
        - owner
      properties:
        application:
          title: Flogo Application
          type: string
          description: Name of the Flogo Application to import
        owner:
          title: Owner
          type: string
          description: Owner of the template
          ui:field: OwnerPicker
          ui:options:
            allowedKinds:
              - Group

# The import flow consists out of 4 steps:
# 1. Fetch the project from GitHub
# 2. Generate the Component YAML
# 3. Commit the Component YAML file back to the GitHub project branch creating a pull request
# 4. Register the Component in the catalog

  steps:
    - id: fetch
      name: Fetch project
      action: fetch:plain
      input:
        url: ${{ "https://"  + (parameters.repoUrl | parseRepoUrl).host + "/" + (parameters.repoUrl | parseRepoUrl).owner + "/" +  (parameters.repoUrl | parseRepoUrl).repo }}

    - id: extract
      name: Extract Parameters
      action: tibco:extract-parameters
      input:
        failOnError: true
        extractParameters:
          flogo_project_name:
            type: json
            filePath: ${{ parameters.application }}
            jsonPath: $.name
          flogo_project_description:
            type: json
            filePath: ${{ parameters.application }}
            jsonPath: $.description

# extractParameters type xml, file and workspace also supported
#         example_parameter1:
#           type: xml
#           filePath: <File path>
#           xPath: <xpath>
#         example_parameter2:
#           type: file
#           filePath: <File path>
#           regex: <Regex>
#         example_parameter3:
#           type: workspace
#           onlyName: true
#           directoryPath: <Directory path>
#           regex: <Regex>

    - id: createYaml
      name: Create YAML
      action: tibco:create-yaml
      input:
        # Add application name
        # outputFile: flogo-catalog-info.yaml
        outputFile: ${{ parameters.application + "-flogo-catalog-info.yaml" }}
        # outputFile: "catalog-info-flogo.yaml"
        outputStructure:
          apiVersion: backstage.io/v1alpha1
          kind: Component
          metadata:
            name: ${{ steps.extract.output.flogo_project_name[0]}}
            description: ${{ steps.extract.output.flogo_project_description[0] }}
            tags:
              - flogo
            links:
              - title: TIBCO Flogo Enterprise
                url: https://docs.tibco.com/products/tibco-flogo-enterprise
            annotations:
              github.com/project-slug: ${{ "https://"  + (parameters.repoUrl | parseRepoUrl).host + "/" + (parameters.repoUrl | parseRepoUrl).owner + "/" +  (parameters.repoUrl | parseRepoUrl).repo }}
              backstage.io/techdocs-ref: dir:.
          spec:
            type: flogo
            lifecycle: production
            owner: ${{ parameters.owner }}

# The import flow debug step, enable it for debugging

#   - id: Log Debug
#     name: Debug Log
#     action: debug:log
#     input:
#       message: "Fetched the Flogo Skeleton template"
#       listWorkspace: true
#       flogo_project_name: ${{ steps.extract.output.flogo_project_name[0] }}
#       flogo_project_description: ${{ steps.extract.output.flogo_project_description[0] }}
#       repoUrl: ${{ parameters.repoUrl }}

    - id: cpr
      name: Create Pull Request in Current Repo
      action: publish:github:pull-request
      input:
        repoUrl: ${{ parameters.repoUrl }}
        update: true
        branchName: ${{ parameters.application.replace("/", ".") }}
        title: ${{ parameters.application }}
        description: This PR adds a Component YAML file to this Repository.

# Optionally you can leave this step out, if your developer hub synchronize with the GitHub organization
# When the pull request is merged, the component will be registered by the GitHub catalog provider, below is the example configuration
# catalog:
#   providers:
#     github:
#       providerId:
#         organization: '<organization>'
#         catalogPath: '**/*catalog-info.yaml'
#         schedule:
#           frequency: { minutes: 30 }

    - id: register
      name: Register
      action: catalog:register
      input:
        catalogInfoUrl: ${{ "https://"  + (parameters.repoUrl | parseRepoUrl).host + "/" + (parameters.repoUrl | parseRepoUrl).owner + "/" +  (parameters.repoUrl | parseRepoUrl).repo + "/blob/" + parameters.application.replace("/", ".") + '/' + parameters.application + "-flogo-catalog-info.yaml" }}

  output:
    links:
# If you are not using register step above, remove the below Open in catalog link.
      - title: Open in catalog
        icon: catalog
        entityRef: ${{ steps.register.output.entityRef }}
      - title: Repository (Pull Request)
        url: ${{ steps.cpr.output.remoteUrl }}
After creating the import yaml file, follow the registering existing import flows steps to register the import-flow-flogo.yaml file.
yaml file based on your requirements. The previously mentioned requirements are the example demonstration of how to import Flogo project in the import flows. To import new software components from Flogo projects, use the following procedure.
- Procedure
- Navigate to Import.
- Click Choose to select the import flow for Flogo projects.
- Fill out the following form details, such as host (GitHub), owner (GitHub organization name), repository name, and click Next.
- Add the application name, repository owner name, and click Review. Review all the details and click Create.
- Import flow runs based on the steps defined in the
yamlfile, for example, Extract Parameters, Create YAML, and more. - When running steps, a pull request gets created in the current (GitHub) repository.
- After completing the import flow run, your (Flogo) component gets registered in the catalog. Click Open in catalog to see the registered component. To view the created pull request in the current repository, click Repository (Pull Request).
- To stop the run of import flow during the run, click Cancel. To rerun the import flow, click Start Over.
- To check the running logs of import flow, click Shows Logs. Click Hide Logs to hide the import flow logs. You can also see the import flow run in the Task List. These options are also available on the upper-right corner if you click the vertical ellipsis icon. Click the Hide/Show Button bar to hide or show these options.

