![]() |
Copyright © Cloud Software Group, Inc. All Rights Reserved |
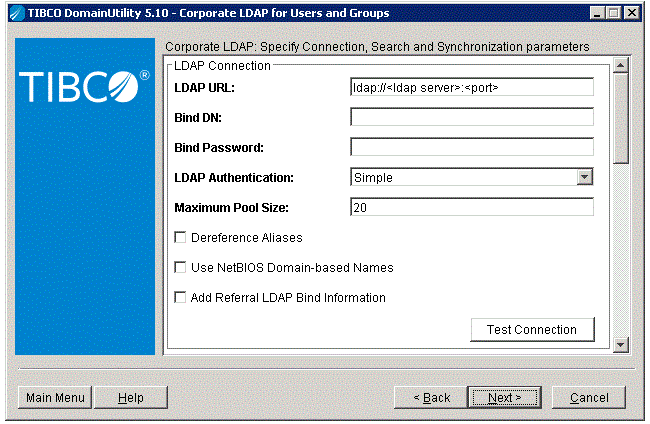
You can integrate an existing domain with an LDAP directory server or modify an administration domain that uses an LDAP directory server by invoking Domain Utility and selecting the Server Setting category, then selecting the LDAP Configuration task. See Changing a Domain’s Integration With an LDAP Directory Server for details.
Information about the calls made to the LDAP server is logged in the LDAP server’s log files and can be logged in the TIBCO_TRA_DOMAIN_HOME\domain-name\logs\administrator.log file.To log the calls in the administrator.log file, you must first edit the TIBCO_TRA_DOMAIN_HOME\domain-name\AuthorizationDomain.properties file) by setting LogDebug=true. Debug statements such as "... searchLDAP ..." will then appear in the administrator.log file.
1. Start Domain Utility and click the Next button on the main screen.
2.
3. Click Next and in the screen that appears, provide a name for the administration domain in Administration Domain. See Domain Details for information about the fields that display.
4. To use TIBCO Enterprise Message Service as the transport for the domain, click Show Advanced and select TIBCO EMS. Provide values for connecting to the Enterprise Message Service server in the TIBCO EMS parameters for TIBCO Administrator panel. To use TIBCO Rendezvous as the transport, no action is necessary as Rendezvous is the default transport choice.
5. As shown next, Select User and Group information retrieved from a corporate LDAP.Figure 3 Administrator Configuration
6. Click Next and, if necessary, change the values for the web server ports. In most cases, its best to accept the default settings. See Web Server Ports.
7. Click Next and provide the administrator credentials for the administration domain. Note that these credentials are for TIBCO Administrator, not for the LDAP directory server.
8. Click Next and in the screen that appears provide the LDAP connection information, search parameters and synchronization information. See LDAP Configuration Fields for a description of these values.Figure 4 Corporate LDAP for Users and Groups
9. Click Next to display a summary page where you can verify the parameters.
10. Click Next to create the domain. After creating the domain, start the required services that are listed in the dialog.
11. Click Finish to end the session.
2. Copy the following file to your working directory: TRA_HOME\template\domainutility\cmdline\CreateDomain.xml
3. Open CreateDomain.xml in a text editor.The CreateDomain.xml file contains sections for creating a domain that uses a repository, LDAP server, and database. Change only the LDAP server section and make sure that the LDAP server section is not commented out. The parameters for a domain that integrates with an LDAP server are explained in the following section. After changing the parameters, save the file and exit the text editor.
Table 17 LDAP Configuration Fields Enter the full distinguished name of the entry with which you want to log into the LDAP directory server. For example, cn=directory manager.If no value is given in the Bind Password fields, an anonymous login into the LDAP directory server is assumed. Set the authentication type that is accepted by your LDAP directory server. The values are Simple and SSL. If using simple authentication, the Bind DN and Bind password (in clear text) is sent to the LDAP directory server. If using SSL, see Configuring LDAP Integration With SSL Connections for more information and additional configuration steps. If using Microsoft Active Directory with multiple domains and if users exist with the same name across the different domains, select this option. With this option selected, users will be displayed in the TIBCO Administrator GUI with names in NetBIOS format (for example, acme_la\jsmith). Group synchronized roles will also be created and displayed in NetBIOS format (for example, acme_la\Human Resources). Note: You cannot use LDAP referral if you are using CA Directory Server as your LDAP server.When selected, the Referral LDAP form appears. Click the Add button to configure the referral LDAP bind information with an LDAP URL, Bind DN and Bind Password. The connection to each referral LDAP directory server can be tested. One or more bind information referrals to LDAP directories can be added.You can limit the maximum number of referral hops that TIBCO applications and services should follow by setting the number in the Maximum Referral Hops field. This helps to avoid indefinite queries when cyclic referrals are present in LDAP directories.
• DomainDnsZones.domain
• ForestDnsZones.domain
• Refer to this article on MSDN: KCC Error Event 1567 Occurs When You Install DNS on a Windows Server 2003-Based Domain Controller (http://support.microsoft.com/default.aspx?scid=kb;en-us;813484). Note: If you select CA Directory Server, note that it does not support LDAP referral. Note also that TIBCO PortalBuilder™ does not support CA Directory Server. This allows you to add, edit or remove the search criteria for retrieving users, groups or both from the LDAP server. Click Add to display the search parameters dialog where you can define search criteria for users and groups. You can select the vendor for your LDAP directory server from the drop-down list to populate the fields with common values. This will reset the search parameters and search attributes with selected vendor defaults. Note that any search parameters added earlier will disappear, and all custom search attributes specified earlier will disappear.When you write a search filter, you must provide a Base DN value as shown next. Using the defaults for the user and group search filters, all users and groups are returned.Base DN: dc=na,dc=tibco,dc=comUser Search Filter: objectclass=personGroup Search Filter: objectclass=groupofuniquenamesBase DN: dc=na,dc=tibco,dc=comUser Search Filter: (&(objectclass=person)(manager=ProductManager))Group Search Filter: objectclass=groupofuniquenamesBase DN: dc=na,dc=tibco,dc=comUser Search Filter: (&(objectclass=person)(manager=ProductManager))Group Search Filter: (&(objectclass=groupofuniquenames)(cn=TEAK*)) Provide the LDAP attribute name that represents the user name in the LDAP directory server. For example, uid for the Sun ONE Directory server. Provide the LDAP attribute name that represents the group name in the LDAP directory server. For example, cn for the Sun ONE Directory server. If you do not set this option, you can still perform synchronization manually in the TIBCO Administrator GUI or by using the CorpRoleSynchronizer command line utility. See the TIBCO Administrator User’s Guide for more information. Note: To ensure that LDAP synchronizations happen at the same time(s) each day, specify an interval that is divisible by 24 hours. Note: To ensure that cached corporate users expire at the same time (s) each day, specify an interval that is divisible by 24 hours. Use this field to dictate a specific time that the cached corporate users in memory expire (see above). The time you specify will be the time that the administration server expires cached corporate users in memory after it starts up the first time. After the first expiration, the time interval you specify in Corporate User Expiration Interval determines the time of the next expiration of cached corporate users. See also Time of Day for Expiry Parameter as described next.You can now control when the schedule is reset with the use of the TimeOfDayForExpiry parameter. Instead of the schedule reset always occurring at midnight GMT, the reset can occur at the time given for the TimeOfDayForExpiry parameter.The parameter must be specified in the AuthorizationDomain.properties file on each machine where TIBCO Runtime Agent is installed. Applications that use TIBCO Runtime Agent (including TIBCO Administrator) must be restarted after adding the parameter to the file. For example:2:00:00 AM time-zone
• If TimeofDayForExpiry is not set and the Corporate User Expiration Interval is 24 hours, a TIBCO Runtime Agent application cache is cleared at midnight GMT (even if the application server is in some other time zone such as EST).
• If TimeofDayForExpiry is set to 2:00 AM EST and the Corporate User Expiration Interval is 24 hours, a TIBCO Runtime Agent application cache is cleared at 2:00 AM EST.
• If TimeofDayForExpiry is not set and the Corporate User Expiration Interval is 4 hours, a TIBCO Runtime Agent application cache is cleared every 4 hours counting from midnight GMT.
• If TimeofDayForExpiry is set to 2:00 AM EST and the Corporate User Expiration Interval is 4 hours, a TIBCO Runtime Agent application cache is cleared every 4 hours counting from 2:00 AM EST.
• TimeOfDayForExpiry works with the Corporate User Expiration Interval setting. Even though you can set TimeOfDayForExpiry to a certain time of the day, it can expire at another time of the day too, based on a Corporate User Expiration interval that is shorter than 24 hours as described in examples above.
• TimeOfDayForExpiry does not affect the time of the synchronization process that (only) occurs in the TIBCO Administrator server and that is based on the synchronization interval that automatically creates roles for each LDAP Corporate Group.
![]() |
Copyright © Cloud Software Group, Inc. All Rights Reserved |