|
| Copyright © TIBCO Software Inc. All Rights Reserved |
• DTD — A Document Type Definition (DTD), the schema language specified by the W3C XML 1.0 specification.
• Schema — An XML Schema, as defined by the W3C Recommendation (May 2001).
• Instance — An XML document conforming to either an XML Schema or DTD. (The Instance resource can also be used to create XML documents that do not use a schema.)
−
For additional information on basic interaction with TIBCO Designer and on customizing your GUI, see TIBCO Designer User’s Guide.
Existing XML resources can be added to a folder in your project by way of the Project menu (Project > Import Resources from File, Folder, URL...).
You can access the schema editing panels by using a set of toolbar buttons or the Schema menu. The available tools combine to present a consistent view of your schema. Figure 2 illustrates the editing environment for Schema and DTD resources.For example, to create an element called Book for a schema describing the structure of a book (which may contain elements such as a title, author, chapters, sections, glossary, index, and so on), follow these steps:
1. Drag a Schema resource from the palette panel to the design panel and double-click it to open it.
2.
3. Ignore the Derives From column for now as this declaration will not be derived from an existing complex type definition.
4. Tab to the Content column and select the appropriate content type from the Content Type button. In this example, the content for Book will contain other elements (such as Chapter), so select Elements.Figure 3 Selecting Content Type
5. Tab to the Content Model column and type in the content model of the book. A simple content model for Book might look like the one shown below. See Elements/Types Panel and Example: Building a Content Model, for more information on how to build a content model.Figure 4 Building Content Model
6. Figure 5 Auto Create Dialog
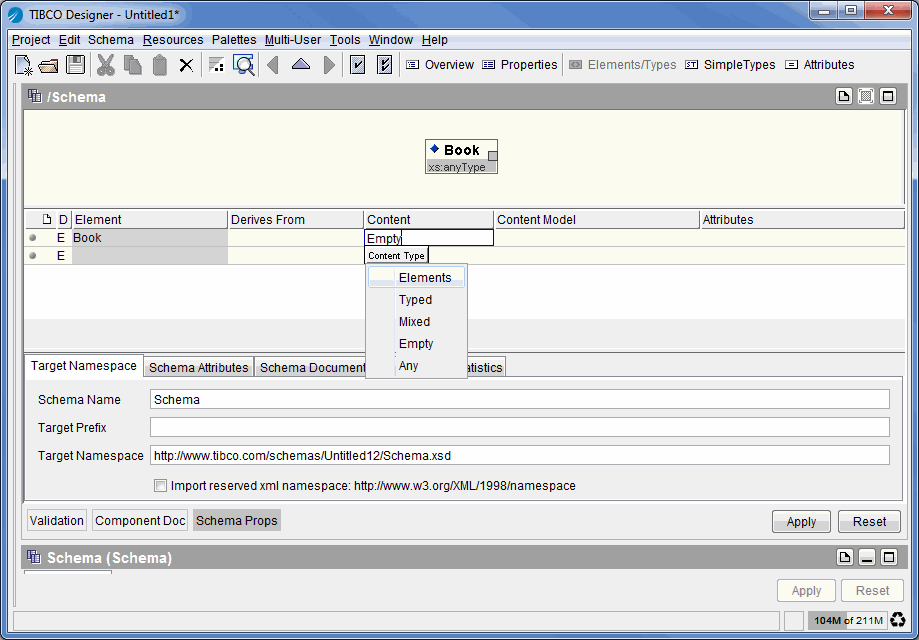
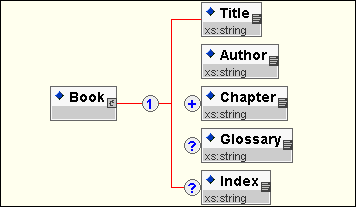
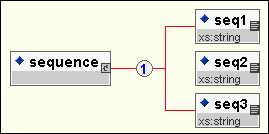
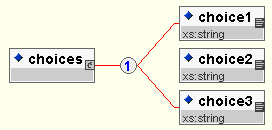
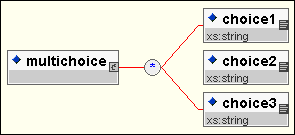
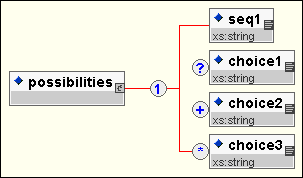
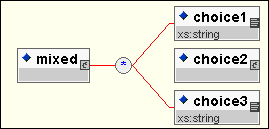
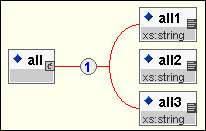
By default, new elements are declared to have xs:string content, which means they can hold text, but not other elements.
XML Schema elements can be declared locally or globally. Local elements exist within the context of their parent element only. Accordingly, you could have a local element named title that appears within a book element and another local element named title that appears within a mortgage element. Global elements are declared such that they can be referenced within any content model. All global elements must have unique names.
7. Click Create to create the elements.
8. Tab to the Attributes column for the element's row and type in attributes for the element. For example, the element Chapter may include attributes that give us more information about a chapter, such as its chapter number and chapter title.If an attribute is as yet undefined, it is automatically created with data type xs:string. These attributes can be seen and modified in the Attributes Panel. See Attributes Panel for more information.Figure 6 Elements DeclaredFigure 7 Content Model DiagramThis serves as a brief introduction into the types of declarations used to build your schema. An overview of the other panels used to build your Instance resources is provided in Table 5.
For step-by-step XML Schema building exercises, see XML Schema Exercises. To build a sample DTD, see DTD Exercise.Figure 8 Instance Editing EnvironmentFigure 9 Tag Area and Edit Area
An overview of the other panels you can use to build your Instance resources is provided in Table 5.
When working with a resource from the XML Tools palette, new panels are provided to help you review and refine the resource. The panels are summarized in the Table 5.
Table 5 XML Tools Panels
• Schema Properties Panel (Schema)
• Configuration Panel (DTD)
• Configuration Panel (Instance)
• Source Panel (Schema)
• Source Panel (DTD)
• Source Panel (Instance)
• Validations Panel (Schema)
• Errors Panel(DTD)
• Errors Panel (Instance)
• Elements/Types Panel (Schema)
• Elements Panel (DTD)Note: This panel is referred to as the elements panel when working with DTD resources. The content panel provides the primary editing area. The panel loads by default when an Instance resource is selected in the project panel. The content panel consists of a left-hand listing of the elements and attributes (tag area) and a right-hand area for inserting values for the elements and attributes (edit area). For more information on the content panel, see Content Panel.
• Attributes Panel (Schema)
• Attributes Panel (DTD)
• Overview Panel (Schema)
• Overview Panel (DTD)
• Properties Panel (Schema)
• Properties Panel (DTD)
• Advanced Panel (Schema)
• Advanced Panel (DTD)
• Component Doc Panel (Schema)
• Notes Panel (DTD)Several panels use tables to display the declarations within a schema. Figure 10 illustrates the first two columns that many tables share.When editing or viewing XML Tools resources, additional buttons appear on the toolbar. The toolbar buttons are described in Table 6.
Table 6 Toolbar Buttons Note: This panel is referred to as the elements panel when working with DTD resources. Table 7 describes the Schema menu.
Table 7 Schema Menu Options Note: This panel is referred to as the elements panel when working with DTD resources. Note: This option is available for Schema resources only. Table 8 describes the XML menu.
Table 8 XML Menu Options Elements are displayed as objects (in boxes) within the content model diagram. The boxes contain element names, data type indicators, and occurrence indicators. An element’s content model may be composed of text, other elements, text and elements, data, or none of these (as defined in the element definition). The icons used in the content model diagram are illustrated in Figure 11.Figure 11 Content Model DiagramSequence indicator symbols do not appear in the content model diagram, but they are implied. Sequence content models are represented by right-angle brackets, with elements listed in the order that they must appear. Figure 12 illustrates the presentation of an element named sequence.Figure 12 Diagram for a SequenceElements that are separated by the 'or' symbol ('|') in the content model appear to the right of the parent element, after two diagonal branch indicators, in the order they appear in the content model. Figure 13 shows the representation of an element named choices with the content model (choice1 | choice2 | choice3).Figure 13 Diagram for ChoiceOccurrence indicator symbols are used to identify how often an element may or must appear and are shown in the content model diagram. If occurrence indicators apply to a group of elements, the elements are illustrated in the content model diagram as branching off an occurrence indicator symbol. Figure 14 shows a content model similar to that presented in Figure 13, but with the group of choices made optional and repeatable. The multichoice element has the content model (choice1 | choice2 | choice3)*.Figure 14 Optional and Repeatable Set of ChoicesIf an occurrence indicator applies only to a single element, it appears appended to the box with the element name. Figure 15 shows a possibilities element whose content model contains all the occurrence indicators: (seq1, choice1?, choice2+, choice3*).Figure 15 All Occurrence IndicatorsMixed declarations always offer a choice of elements that are both optional and repeatable. These appear as the mixed element shown below in Figure 16. Note that the mixed element may contain both text and elements.Figure 16 Mixed Content ModelFor Schema resources, if a content model is defined as all, a conforming document must contain exactly one of each element specified in the content model (or zero if an element is specified as optional), with the elements occurring in any order. (Elements within an all content model cannot be repeatable.) Figure 17 illustrates the all content model (all1 & all2 & all3), represented with an arc.Figure 17 All Content ModelThe content model diagram also provides navigation to the specifics about a particular element or attribute. To scroll to an element's type definition in the list of elements, right-click on the element while browsing the element in the content model diagram. A context-sensitive menu appears. Click the Go to Element Name option, and the selected element is made active in the list of element definitions.
|
| Copyright © TIBCO Software Inc. All Rights Reserved |