Contents
The TIBCO StreamBase® Add-In for Microsoft Excel lets you use a StreamBase CEP or StreamBase LiveView application in combination with an Excel spreadsheet to process tuple data in real time and display the data dynamically. For CEP, the Excel Add-in is bidirectional and can both receive data from an application and publish data to a running StreamBase application. For LiveView, the Excel Add-in can receive data from LiveView Server and publish it in an Excel spreadsheet or to a running StreamBase application. You cannot publish data from an Excel spreadsheet into a LiveView table.
The Excel Add-in installation includes a few samples, described in a separate document included with the Excel Add-in installation.
The StreamBase Add-in for Microsoft Excel has the following requirements:
-
Installation requires Microsoft Excel 2007 or later.
-
There are two versions of the install kit, one each to match 32-bit and 64-bit Microsoft Office. The two kits provide identical functionality for their target Excel editions. Each edition has a separate installer. The two editions cannot coexist on the same PC.
The determining factor in which kit to install is the edition of your Microsoft Office installation, not your Windows installation. Only Office 2010 is provided in a 64-bit edition, so, by default, its installer implements Microsoft's recommendation to install 32-bit Office even on 64-bit Windows.
Only install the 64-bit StreamBase Add-in for Excel if you have 64-bit Excel 2010 installed. To determine your edition of Excel 2010, select → . In the About Microsoft Excel section, look for "Version XX. ... (64-bit)."
If you are running 64-bit Excel 2010, then you must install and use the 64-bit Excel Add-in. The 32-bit kit does not run with 64-bit Excel 2010. When running 64-bit Excel, the companion 64-bit Excel Add-in supports connectivity to large-scale StreamBase data.
-
The PC running Excel must have a working network connection to the instance of StreamBase Server hosting the StreamBase application from which your spreadsheet reads data (or to which it publishes data).
-
Only one Excel Add-in can be registered for use on one PC at any given time. If you have two or more StreamBase installations, each with its own Excel Add-in, you might need to re-install the Excel Add-in for the StreamBase version you want to use. Re-installing the kit re-registers the Excel Add-in's XLL as currently active. The most recently installed kit is the currently active one for the PC.
-
To open some of this Excel Add-in's sample files, your Excel macro security settings must be set to medium or lower. Follow the steps in Setting the Excel Macro Security Level below.
Note
Lowering the Excel macro security level is NOT a requirement for deploying and running the StreamBase Excel Add-in in a production environment. StreamBase Systems does not provide digitally signed macros because the macros in these samples are only examples on which to base the development of your own site's macros.
Lowering your Excel macro security is only required for the duration of testing with the macros in this sample's spreadsheets, and the lowered security can be localized to a few development PCs. Once you develop your own Excel macros using these samples as guidelines, you can digitally sign your site's macros so that they can be distributed easily and securely to PCs running standard levels of macro security.
The Excel Add-in is supported for use with any version of CEP greater than 7.2.0, however, LiveView requires specific CEP versions. See the LiveView product documentation for information on LiveView's compatibility with CEP.
The StreamBase Add-in for Microsoft Excel is compatible with the following versions of StreamBase CEP and StreamBase LiveView:
| Excel Add-in Version | CEP Version | LiveView Data Mart Version |
|---|---|---|
| 2.3.0 | 7.4.x, 7.3.x | 1.6.x, 1.5.x |
| 2.2.0 | 7.2.x, 7.3.x | 1.3.x, 1.4.x, 1.5.x, |
| 2.1.0 | 7.2.x, 7.3.x | 1.3.x, 1.4.x |
| 2.0.0 | 7.2.x, 7.3.x | 1.3.x, 1.4.x |
The Excel Add-in is not compatible with CEP versions 7.1.x and earlier.
The StreamBase Add-in for Microsoft Excel has a separate installation kit from StreamBase itself, and is available for supported Microsoft Windows platforms only. Install the Excel Add-in kit as follows:
-
The Excel Add-in kit must be installed on any PC that will run an Excel spreadsheet that reads from or writes to a StreamBase Server instance. (The kit's installer registers the Excel Add-in's XLL so that Excel can locate the Add-in when it is called in a spreadsheet cell.)
-
For production PCs, the Excel Add-in kit is a standalone package that does not require either StreamBase Studio, StreamBase Server or LiveView to be installed on the same machine.
-
For development PCs, and for running the Excel Add-in kit's sample, you can install StreamBase and the Excel Add-in kit on the same PC.
The Excel Add-in kit's installer follows the same installation directory standards as the base StreamBase kit, as described in the Default Installation Directories page in the StreamBase CEP Installation Guide.
The StreamBase Add-in for Excel uses many of Microsoft Excel's extension facilities to provide a tight integration experience. It integrates with Excel's ribbon to provide menu choices, and installs a custom task pane in the main Excel window (called the StreamBase Explorer) to facilitate the connection to StreamBase Server instances and construct the appropriate formulas to be placed in spreadsheet cells to access its tuples. It also registers several user-defined functions (UDFs) for use in cell formulas and VBA code, as well as a number of COM objects to allow VBA code to construct and send tuples to StreamBase Server applications. Finally and most importantly, it includes an implementation of a Microsoft Real-Time Data (RTD) server, as described on Microsoft's product support page, to allow the Add-in to display incoming tuples from connected StreamBase Server instances. The Add-in can be used in two modes, where the data flows in opposite directions:
-
Dequeuing tuples from one or more StreamBase application output streams and passing them to Excel.
-
Publishing tuples from Excel to a StreamBase application.
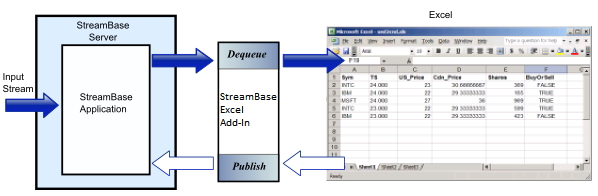
The preceding diagram illustrates how a StreamBase application, running in a StreamBase Server instance, receives a stream of tuples from a data feed, processes the data, and emits tuples on one or more output streams. The RTD server, listening for tuples from StreamBase Server, receives the data and passes it to Excel. In Excel, a UDF function determines how each tuple field of interest is displayed in the spreadsheet. The diagram also shows the publishing option, where tuples are enqueued from an Excel spreadsheet into a StreamBase application for processing there.
In Excel, you can use a combination of two techniques to organize the data on your spreadsheet:
-
Historical topics are associated with the relative order of tuples in the output stream. For example, one row can be set to display the most recent output tuple; the next row might display the previously output tuple, and so on. In a typical historical data display where rows are set up to display tuple numbers sequentially, tuples appear to scroll up or down the spreadsheet as new ones are emitted.
-
Filtered topics are associated with specific values appearing in tuple fields. For example, a row might display only tuples that contain a certain ticker symbol.
The Add-in includes user interface facilities that can be used to control environment and performance parameters. Specifically, after installing the Add-in and restarting Excel you will notice that a new task pane entitled StreamBase Explorer is visible on the right-hand side of the main window:
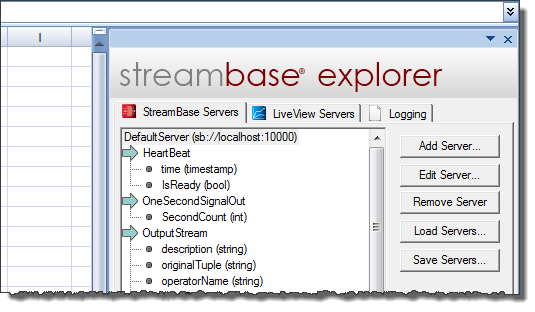
This pane is the focal point of operations when accessing data from a server. It allows you to quickly construct and place the Excel formulas necessary to access StreamBase data in real time using Excel's own RTD functionality. This pane has three tabs, devoted to displaying StreamBase CEP servers, LiveView servers, and logging messages, respectively. Each server included in one of the two servers tab this pane may be used to receive real-time data from the StreamBase Server it defines. If a defined server is available it will also list its available output streams (for CEP servers) or tables (for LiveView servers), along with the list of fields contained therein. Right-clicking on those nodes will bring up a context menu from which you may add real-time values to your spreadsheet.
You will also see a new tab entitled StreamBase on the ribbon:

On this tab are buttons to show or hide the StreamBase Explorer pane, control the rate at which StreamBase data will refresh on the spreadsheet and call up the Excel Add-in's documentation and box.
This section will take you through some simple steps to access StreamBase streaming data from your spreadsheets as well as publish data to a StreamBase CEP server.
To display the contents of the last 10 dequeued tuples from a running CEP servers, follow these steps:
-
Ensure you have a running StreamBase CEP server available.
-
Start Microsoft Excel and create a new workbook.
-
Ensure that there is a definition for your server on the StreamBase Servers tab in the StreamBase Explorer task pane. The top-level node, representing the server itself by name and URI, will show in green if the server is accessible and the node will be expandable to show the running application's output streams and their fields. (If the server is inaccessible the node will display an error icon and red text.)
-
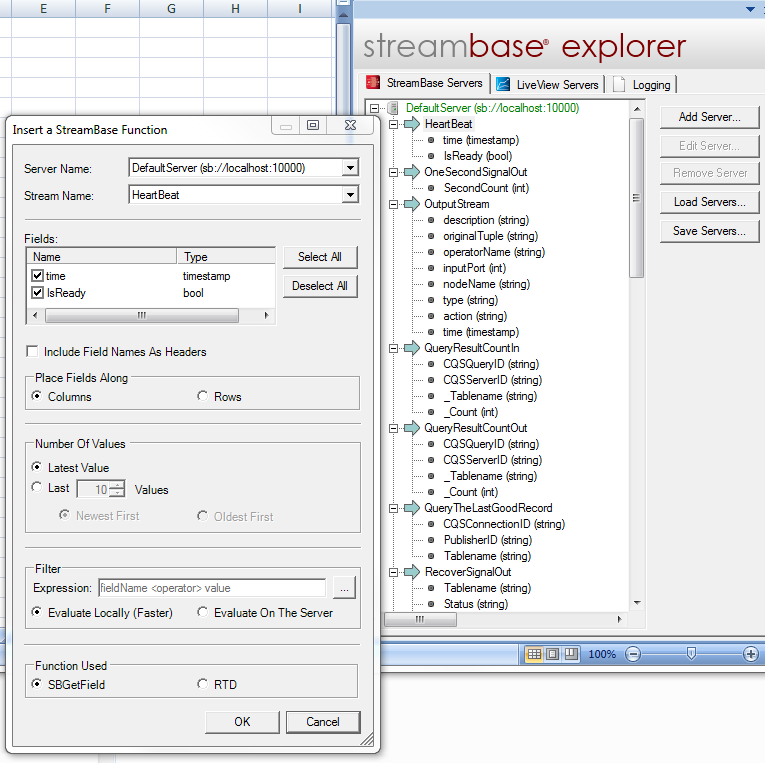
Expand the server node and locate the stream for which you would like to display values. Right-click on the stream's node and select Add tuple values to selected cells. A dialog box will open asking you to enter more details on the information you would like to display:
-
You may select the fields you wish to display on your spreadsheet, as well as reorder them by dragging them around the list with your mouse. You may also enter a filter expression to limit the tuples that will be displayed to those for which the expression evaluates to true.
Note
When specifying a filter expression to filter tuples, the option should be preferred over in most cases for efficiency. Each different server-side filter expression results in a separate stream subscription, which can quickly lead to performance problems.
-
Once you are done, click . The Excel Add-in constructs the necessary Excel formulas and place them in your active worksheet, starting at the active cell. At this point your data should start streaming in:

The Excel Add-in also makes it possible to construct and send tuples to a running StreamBase CEP server. To get started, follow these steps:
-
Make sure you have a running instance of a StreamBase CEP application, and this it is correctly defined in the Excel Add-in's StreamBase Explorer pane in Excel.
-
Make sure the Developer tab is showing on Excel's ribbon. You may find more information on the Developer tab and how to display it by searching Excel's Help System for the topic Show the Developer tab or run in developer mode.
-
Create a new workbook and decide on an event source for publishing tuples to StreamBase. The code below assumes a button click serves this purpose. Thus, add a Command Button to the spreadsheet and name it
CommandButton1. (For instructions on adding controls such as buttons to a spreadsheet, search Excel's Help System for the topic Add an ActiveX control.) -
Double-click the button you have created to bring up the VBA code window and add a Click() event handler for the button.
-
Before editing the event handler you've just created, make sure the workbook loads a reference to the StreamBase COM classes by selecting from the menu and making sure the StreamBase_Excel_Addin item is checked in the list and clicking to return to the VBA code window.
-
Add the following code to the event handler:
Private Sub CommandButton1_Click() Dim pub As SBClient Dim t As SBTuple Dim serverName As String ' StreamBase objects will throw a VBA error if something goes wrong. On Error GoTo EH ' Create an instance of the SBPublisher class & connect to the server. Set pub = New SBClient ' The name must match the one in the StreamBase Explorer pane in Excel. pub.Connect "DefaultServer" ' Create an empty tuple. This tuple uses the schema of the named input ' stream in your SB app. Set t = pub.CreateTupleForStream("DataIn") ' Set the fields on the tuple t.SetField "Symbol", "SB" t.SetField "Price", 1000.5 t.SetField "Volume", 1000000 ' "Date" objects can be used to set SB Timestamps Dim dt As Date dt = Now t.SetField "TransactionTime", dt ' OK, all our tuple's fields are initialized; send it to the server! pub.SendTuple t GoTo Done EH: MsgBox Err.Description & vbCrLf & "Line: " & Erl, , "StreamBase Exception" Done: ' Clean up before exiting pub.Disconnect End Sub -
Save the editor sessions in the VBA Editor and close it.
-
Return to the spreadsheet, make sure it is no longer in design mode by looking at the Developer tab and ensuring the Design Mode toggle is not active and click CommandButton1 to enqueue a tuple to StreamBase.
-
Confirm that tuples are being published to your StreamBase application by watching the Application Output view in Studio or by running sbc dequeue from a StreamBase Command Prompt.
To display LiveView values, you can follow similar steps as above but use a server from those listed on the LiveView Servers tab, selecting the table for which you wish to display values. From there, right-clicking on a table node will bring up this dialog:
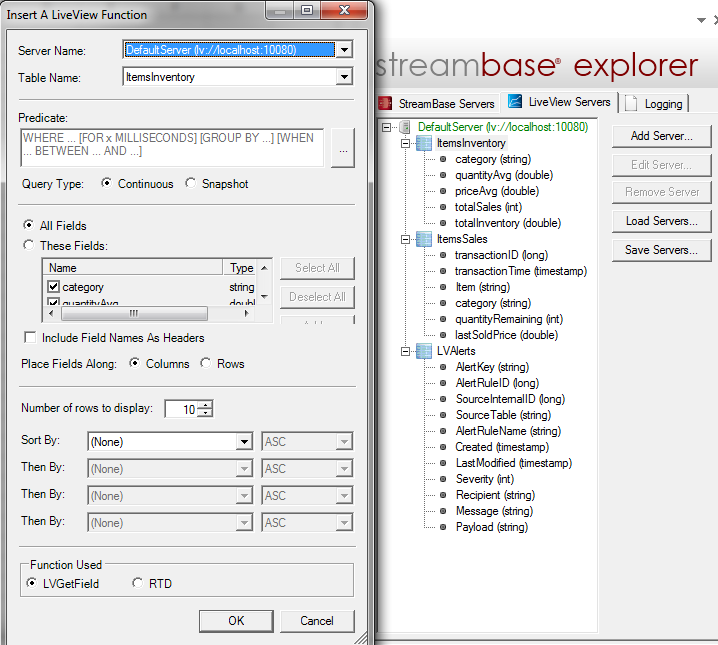
From here you can enter a LiveView predicate, select the type of query to use (continuous or snapshot), select and reorder the table's fields and specify the maximum number of rows you wish to display. Additionally, you may specify a filter expression to further restrict the rows that will be displayed as well as sort criteria used to order the result set.
The following syntax is available to construct expressions in the Filter Expression edit box of both the Insert A StreamBase Function and Insert A LiveView Function dialogs:
-
<expression> := <predicate> [ {<or> | <and>} <predicate> ]...
-
<predicate> := <fieldname> <operator> <literal>
-
<fieldname> := Valid StreamBase field name as defined in the stream or table schema, without any quotes
-
<literal> := <number> | <string> | TRUE | FALSE
-
<number> := Valid number as defined by Excel
-
<string> := A string enclosed by single quotes (preferred) or double quotes
-
<operator> := '==' | '!=' | '<' | '<=' | '>' | '>='
-
<or> := '||'
-
<and> := '&&'
Additionally, you may group predicates using parentheses to control the order in which they are evaluated.
Here are a few examples of valid filter expressions:
-
MyStringField != 'Some value'
-
MyNumericField > 3.1416
-
MyBooleanField == TRUE
-
MyField1 == 'red' && MyField2 != 42
-
(MyField1 == 'red' | MyField1 == 'blue') && MyField2 != 42
Note
The expression you type will be included as a parameter to the SBGetField() or LVGetField() user-defined function call placed in the spreadsheet's cells, so the Excel Add-in will take care of enclosing the entire
expression in double quotes. Any double-quote character you include in your expression will be escaped by the Excel Add-in
in the function call by inserting two double-quote characters in its place according to Excel function syntax, possibly making
your resulting UDF harder to read. For example, the expression MyField == "Hello World" becomes "MyField == ""HelloWorld""" in the function call. To help keep your UDFs more readable you should consider using single-quote characters whenever possible
instead.
Note
It is possible to use Excel cell references in your filter expressions. This is accomplished by disabling the Excel Add-in's
default behavior of enclosing the entire expression in double-quotes (which is done by beginning your expression with a double-quote
character) and constructing the UDF parameter verbatim instead (that is to say, exactly how you would type it in the Excel
function definition if you were constructing the UDF call manually). For example, instead of writing MyField == 'Hello World' you may place the string 'Hello World' in cell A1 and enter the following as your expression filter: "MyField == " & A1. Because this expression begins with a double-quote the Excel Add-in will use it verbatim in the UDF, and this evaluate to
the correct value for the filter expression parameter.
Note
When using StreamBase CEP if you select Evaluate On the Server instead of the default of Evaluate Locally, you may use the entire range of the StreamBase expression language syntax instead of the subset outlined above, giving you access to a richer and more flexible logic to specify your predicate logic. However bear in mind that using server-side predicates may result in an excessive number of separate subscriptions to your StreamBase application's streams and in the worst case severely affect the performance of your Excel spreadsheet. For this reason you should always try to use local filters when specifying filter predicates.
When specifying a predicate in the Insert A LiveView Function dialog's Predicate edit box you may use the entire range of the LiveView syntax for doing so. However as noted in the previous section you should favor the use of single-quote characters for specifying strings whenever possible to keep your UDFs easier to read. Additionally, you can use Excel cell references within your expression by using the same mechanism as described above for filter expressions. That is, begin your expression with a double-quote and construct the UDF parameter verbatim.
This example uses the Hello LiveView sample. To run this example, you need to load and run this sample in LiveView. See the StreamBase LiveView® Data Mart product documentation for full information about LiveView samples.
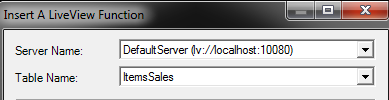
The Hello LiveView sample contains two data tables, ItemsInventory and ItemsSales. Right-click on the ItemsSales table in the StreamBase Explorer tab and select . The Insert a LiveView Function dialog opens.
-
Enter a server name. This example uses LiveView running on the default port on the same machine as the Excel Add-in.
-
Ensure that ItemsSales is selected in the Table Name field.
-
Enter the query predicate in the Predicate field. The predicate can use the full range of LiveQL.
This simple query predicate returns all rows where the quantityRemaining field is less than 50:
WHERE quantityRemaining < 50
-
Select Continuous or Snapshot query type with the radio buttons. This example uses Continuous:

-
Select the query projections. Projections that are simple field names are listed in the Fields table. All fields are selected by default. To change the default settings, select the radio button for These Fields or click the button. This example returns the table fields for transactionTime, Item, and category:
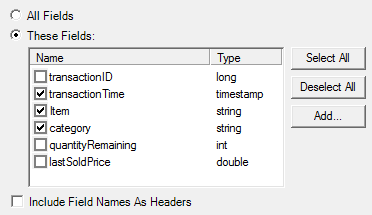
Optionally, you can select Include Field Names As Headers to create column headers for the returned projections.
-
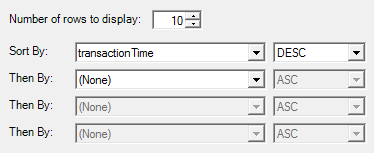
You can select the number of rows to display in the output. By default, the Excel Add-in limits the number of returned rows to ten. This example returns ten results with the sorted by the most recent transaction time:
This example uses the same Hello LiveView Sample as in the previous example to demonstrate dynamic, that is, query-based aggregation. Dynamic aggregation queries require:
-
A GROUP BY clause.
-
An aliased LiveQL aggregate expression.
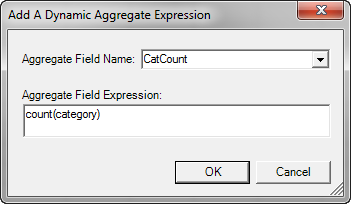
This example counts the number of items in each category.
-
Select the server and table names as in the previous example. For the query predicate, enter:
GROUP BY category
LiveQL clauses are case-insensitive; the clauses are shown in ALL CAPS for readability.
-
Aggregate expressions are entered with the query projections. Select the button in the fields pane to enter an aggregate expression:
The following UDFs are defined by the Excel Add-in:
-
SBGetField(), which retrieves the value of a field in a StreamBase tuple and displays it in the cell in real time. Its parameters are:
Parameter Name Type Description Server Name string The name of the StreamBase server to which to connect, as it appears in the StreamBase Explorer pane. Must be specified. Stream Name string The name of the stream from which to dequeue, as it appears in the StreamBase Explorer pane. Must be specified. Field Name string The name of the field of which to display the value, as it appears in the StreamBase Explorer pane. Must be specified. Tuple Number int The number of the tuple for which to display a value. The default value is 1, meaning the latest dequeued tuple. A number of 2 means the second-latest dequeued tuple, and so forth. Filter Expression string A logical expression which will be applied to filter incoming tuples -- only tuples which satisfy the expression are displayed. The syntax used to define this expression depends on the Is Server-side Filter value. Leaving this parameter blank (the default) will cause all tuples to be included in the results sent to the Add-in. Is Server-Side Filter boolean If this is set to false (the default), the filter specified in Filter Expressionis applied by the Add-in after a tuple is dequeued. In that case, the allowed expression syntax forFilter Expressionis described in Filter Expression Syntax. If it is set to true, the filter is applied by the server to decide whether to send a given tuple to the Add-in. The syntax forFilter Expressionis then the same as the full StreamBase expression syntax. Server-side filters should be used sparingly as every different expression will result in a separate stream connection to the server and may lead to performance issues. -
LVGetField, which retrieves the value of a field in a LiveView row and displays it in the cell in real time. This UDF should be considered deprecated and LVGetFieldEx() should be used instead. Note that when inserting new cells the LVGetFieldEx() function is used.
-
LVGetFieldEx(), which supercedes LVGetField() and should be used instead. Its parameters are:
Parameter Name Type Description Server Name string The name of the LiveView server to which to connect, as it appears in the StreamBase Explorer pane. Must be specified. Table Name string The name of the table to query, as it appears in the StreamBase Explorer pane. Must be specified. Limit int The total number of rows to include in the LiveView result set. Required to be non-zero for tables supporting "Top N" queries. The default is 0, which means 'Use legacy (non-Top-N) query'. Query Fields string A comma-separated list of fields (and/or dynamic aggregate expressions) to include in the query results, or ' *' (or empty) to include all fields from the table.Predicate Expression string The predicate clause (' WHERE ... [FOR x MILLISECONDS] [GROUP BY ...] [WHEN ...]' used to create the query. May be left empty.Field Name string The name of the field for which to display the value. Row Number int The number of the row from which to display the field in this cell. Sort Order string A list of comma-separated sort criteria for the rows, in the form ' field1 [DESC][, field2 [DESC]...]'. The default sort order is ascending (ASC). If this is left blank, row will be displayed in whatever order was returned by the LiveView server.Query Type string Either SNAPto only get a snapshot orCONTto get continuous updates. Default isCONT. -
SBEnableRTDUpdates(boolean enable), which enables programmatic control over whether real-time data is enabled (
enable=true) or disabled (enable=false) -
SBClearHistory(string ServerName, string Stream), which removes all tuples from the given StreamBase server and stream's history queue
You may also refer to Excel's own Function Arguments dialog box for an online list and explanation of the parameters to each of these functions.
The SBGetField() and LVGetFieldEx() UDFs defined above are convenient and easy to use, however they do incur an additional performance cost over using raw RTD directives for accessing StreamBase and LiveView data. If your Excel workbook needs to display thousands of cells containing StreamBase or LiveView data (or both), consider using the RTD functions instead of UDFs. When using the Insert a StreamBase Function or Insert A LiveView Function dialogs to populate the workbook's cells as described in Getting Started, specify the RTD option in the Function Used section. When entering functions manually (or programmatically using VBA), here are the parameters to the RTD() function:
For StreamBase:
| Parameter Name | Type | Description |
|---|---|---|
| Server Name | string | The name of the StreamBase server to which to connect, as it appears in the StreamBase Explorer pane. Must be specified. |
| Stream Name | string | The name of the stream from which to dequeue, as it appears in the StreamBase Explorer pane. Must be specified. |
| Field Name | string | The name of the field of which to display the value, as it appears in the StreamBase Explorer pane. Must be specified. |
| Tuple Number | int | The number of the tuple for which to display a value. The default value is 1, meaning the latest dequeued tuple. A number of 2 means the second-latest dequeued tuple, and so forth. |
| Local Filter Expression | string | A logical expression which will be applied to filter incoming tuples -- only tuples which satisfy the expression are displayed. This filter is applied by the Add-in after a tuple is dequeued. The expression syntax is described in Filter Expression Syntax. Leaving both Local Filter Expression and Server Filter Expression blank (the default for both parameters) will cause all tuples to be included in the results sent to the Add-in. |
| Server Filter Expression | string | A logical expression which will be applied to filter incoming tuples -- only tuples which satisfy the expression are displayed. This filter is applied by the server to decide whether to send a given tuple to the Add-in. The syntax is the same as the full StreamBase expression syntax. This filter should be used sparingly as every different expression will result in a separate stream connection to the server and may lead to performance issues. Leaving both Local Filter Expression and Server Filter Expression blank (the default for both parameters) will cause all tuples to be included in the results sent to the Add-in. |
| Metadata | string | Reserved. Should be left blank. |
For LiveView:
| Parameter Name | Type | Description |
|---|---|---|
| Server Name | string | The name of the LiveView server to which to connect, as it appears in the StreamBase Explorer pane. Must be specified. |
| Stream Name | string | The name of the stream from which to dequeue, as it appears in the StreamBase Explorer pane. Must be specified. |
| Query Fields | string | A comma-separated list of fields (and/or dynamic aggregate expressions) to include in the query results, or '*' (or empty) to include all fields from the table.
|
| Predicate Expression | string | The predicate clause ('WHERE ... [FOR x MILLISECONDS] [GROUP BY ...] [WHEN ...]' used to create the query. May be left empty.
|
| Field Name | string | The name of the field of which to display the value. Must be specified. |
| Row Number | int | The number of the row from which to display the field in this cell. Must be specified. |
| Unused | N/A | Reserved. Should be left empty. |
| Sort Order | string | A list of comma-separated sort criteria for the rows, in the form 'field1 [DESC][, field2 [DESC]...]'. The default sort order is ascending (ASC). If this is left blank, row will be displayed in whatever order was returned by the LiveView server.
|
| Query Type | string | Either SNAP to only get a snapshot or CONT to get continuous updates. Default is CONT.
|
| Limit | int | The total number of rows to include in the LiveView result set. Required to be non-zero for tables supporting "Top N" queries. The default is 0, which means 'Use legacy (non-Top-N) query'. Must be specified. |
The following classes and methods are available for use when publishing data to a CEP application:
-
SBClient class
-
Connect(String serverName)
Connects to the given CEP server
-
Disconnect()
Disconnects from the server
-
SBTuple CreateTupleForStream(String streamName)
Creates an instance of SBTuple suitable for use with the given input stream.
-
SendTuple(SBTuple tuple)
Sends a tuple to the CEP application, on the stream for which the SBTuple instance was created
-
-
SBTuple class
-
SBTuple CreateTupleForField(String fieldName)
Creates an instance of SBTuple suitable for setting the value of the named field, which is assumed to be of type TUPLE or LIST OF TUPLE.
-
SetField(String fieldName, Object value)
Set the tuple's given field to the given value. The field is assumed to be of a StreamBase type compatible with the value (for example, attempting to set a string value on a field of type DOUBLE will result in an error being generated). VBA objects of type Date may be used to set fields of type TIMESTAMP. Zero-based VBA arrays may be used to set fields of type LIST; the type of the array must be compatible with the type of the LIST field's element type.
-
If an exception occurs during the execution of the methods described above an error will be returned to the VBA calling code via the On Error/Goto mechanism, with the Err object correctly initialized to provide more information on the error.
Note
In order for a workbook to use these classes you must:
-
Have VBA support installed. You can tell that VBA is available if the button is enabled on the Developer tab. If it is dimmed, you can install VBA by running the Microsoft Office installation, choosing , and selecting Office Shared Features | Visual Basic for Applications from the Installation Options tab.
-
Ensure that the workbook has a reference to the StreamBase COM objects representing the publishing classes described above. To do so, open the Visual Basic code window by pressing Alt-F11 and selecting from the menu, and making sure the StreamBase_Excel_Addin item is checked in the list before clicking to dismiss the dialog.
Configuration is achieved through the use of the StreamBase Explorer pane and saved automatically. To help get you started when you launch Excel for the first time after installing the Excel Add-in, notice that one CEP server and one LiveView server are already defined on their respective tabs in the StreamBase Explorer pane, pointing to the default server URI for each product. If you have a server running locally at the default port this will allow you to get started immediately; otherwise you must add your own servers' definitions by clicking the button and entering the necessary information in the resulting dialog. Any changes you make to the server definitions in either the StreamBase Servers tab or the LiveView Servers tab are persisted to your system on a per-user basis. Also saved automatically are the state of the Explorer pane and the settings on its Logging tab as well as the current refresh rate.
Using the button you can save the list of configured servers to a separate XML file to be loaded back using the button, possibly on another machine. In this way you can share your server definitions with other users. Just remember: once you have loaded server definitions from an XML file, the new definitions are saved locally to your workspace and you no longer need the XML file. Also note that by loading servers from an XML file, you are supplementing your existing list of defined servers, not replacing it. Finally, note that any username and password information you may have added to a server definition does not get included when you save your list of servers in an XML file; other users loading the list must supply their own credentials.
Note
If you load a new set of server definitions using the button, or if you edit or remove server definitions (using the and buttons respectively), you will need to restart Excel before the changes are reflected in your Workbooks' data.
The macros provided in this sample are deliberately unsigned because they are not meant to be used and distributed as-is, but are only examples for building your own macros. Once you have your own working, site-specific macros, you can digitally sign them for easier and more secure distribution at your site.
While developing your own macros by modifying the unsigned macros in this sample, Excel might display a dialog warning that
macros are not digitally signed. This occurs when you open the sample spreadsheets other than rtd.xls using any supported version of Excel. To resolve the problem temporarily while developing your site-specific macros, lower
your Excel security settings using the following steps:
-
Select the Office orb in the upper left.
-
Select Excel Options.
-
Select Trust Center, then Trust Center Settings.
-
In the next dialog, select Macro Settings.
-
Select the Enable all macros check box.
Now each time you open the spreadsheet, Excel displays a different dialog with another security warning about macros. Click to dismiss the warning.
The dynamic display of data using the StreamBase Add-in for Excel is influenced by a number of factors. These include the rate at which tuples flow in and out of StreamBase Server.
Another variable is how frequently Excel accepts data from the RTD server, referred to as the Excel refresh interval. If your Excel spreadsheet data is being updated too slowly, you can try changing the refresh interval to speed up the frequency of refreshing, as described in this topic.
Note
The information in this topic is adapted from the Microsoft MSDN Library, which documents many aspects of configuring and tuning RTD servers.
Recall that tuples flow from the StreamBase Server output stream through the Excel Add-in's RTD server before being consumed by the Excel spreadsheet. Excel is not continually open to updates; it accepts them only at set intervals (the refresh interval). If the RTD server has an update and Excel is busy (such as when you are editing a cell), it might wait longer than the set refresh interval. If the refresh interval has passed, Excel then retrieves the data changed since its last refresh.
The refresh interval is set by the Excel Add-in by default to one second. To modify the refresh interval, use the StreamBase tab's Refresh Rate control.
Caution
If updates come in so frequently that Excel is continuously updating values and doing calculations, Excel might end up in a state where it never gives the user a chance to do anything. This is effectively putting Excel in a hung state. If this happens, set the Excel refresh interval higher.
This section contains new features and resolved issues for the Excel Add-in.
- Support for LiveView AuthenticationSB-25977
-
Excel Add-in now supports LiveView authentication and authorization.
- Configurable Null-Value Display OptionSB-25512
-
The new Show Null Fields As drop-down on Excel's ribbon presents two options for the display of null-valued cells:
-
Empty Cell leaves the spreadsheet cell empty.
-
#NULL populates the cell with #NULL.
The drop-down determines how StreamBase fields with null values will be represented in a cell. The default value is Empty Cell. The chosen settings may not take effect until you restart Excel.
-
- Dialog Box Settings Saved
-
The settings for dialogs are kept from one invocation to the next within the same Excel session.
- Automatic Refresh for Server Views
-
When StreamBase or LiveView Server is stopped or changed and then restarted with a different list of streams, fields, or tables, the StreamBase Explorer tree views are updated even if the explorer was hidden during the change.
- Refresh Rates Less Than One Second Available
-
The Refresh Rate drop-down list on the Excel ribbon's StreamBase tab now contains values for 0.5, 0.2, and 0.1 seconds.
- New Option for Raw RTD Functions
-
The dialogs for Insert a StreamBase Function and Insert a LiveView Function now have a new Function Used pane that allows you to choose the option of using RTD functions instead of LVGetField or SBGetField. The RTD option may offer improved performance for updates that involve a large number of cells.
The following issues were resolved in the Excel Add-in.
| Fixed in Version 2.2.0 | |
|---|---|
| Number | Resolution |
| SB‑24816 | When adding a server definition in Excel, selecting 'prompt for password' caused a correct password to be rejected as invalid, but not when the password was cached by entering it in the 'use this password' field. This has been fixed. |
| Fixed in Version 2.1.0 | |
|---|---|
| Number | Resolution |
| SB-24625 | The SetField() method did not correctly handle null values in tuples. This was fixed. Calling the Excel Add-in's StreamBase.Excel.Addin.Pub.SBTuple.SetField
method with these parameters:will now correctly set the value of myFieldName to null in the tuple mySBTupleInstance.
|
| SB-24311 | If a cell value was entered for a filter expression without appropriate quotes Excel would sometimes crash. This was fixed. |
| Fixed in Version 2.0.1 | |
|---|---|
| Number | Resolution |
| SBTS-12738 | In a previous release, the Excel Add-in, when used with LiveView 1.3, did not properly handle NULL-valued cells. This was fixed. |