To create and configure a TIBCO ActiveMatrix® BPM Server Component, also known as an ActiveMatrix BPM Server Component, use the TIBCO Silver Fabric Component Wizard described in the following pages.
|
1.
|
In the TIBCO Silver Fabric Administrator GUI, select Stacks > Components.
|
|
2.
|
On the Components page, select the action "Create New TIBCO ActiveMatrix BPM Server Component" from the Global Actions list depicted here in Figure 2.
|
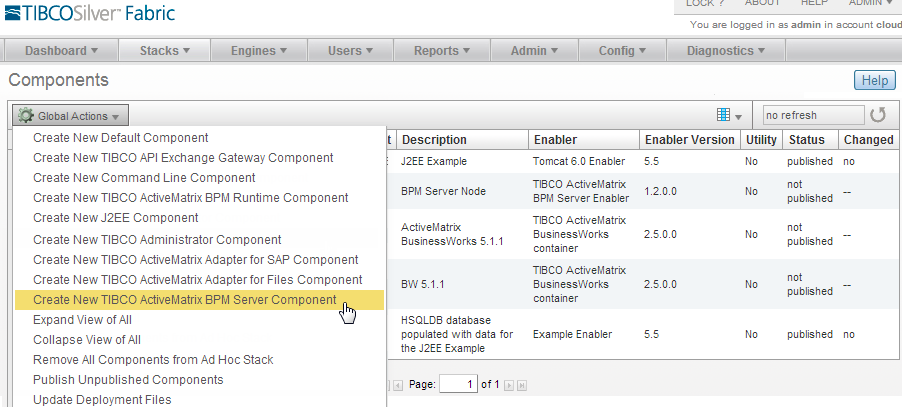
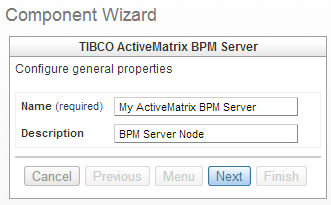
Figure 3 Configuring General Properties
|
4.
|
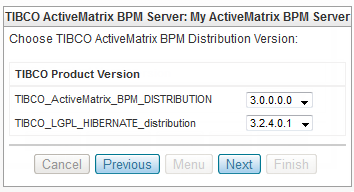
Choose the TIBCO ActiveMatrix® BPM product distribution version.
|
|
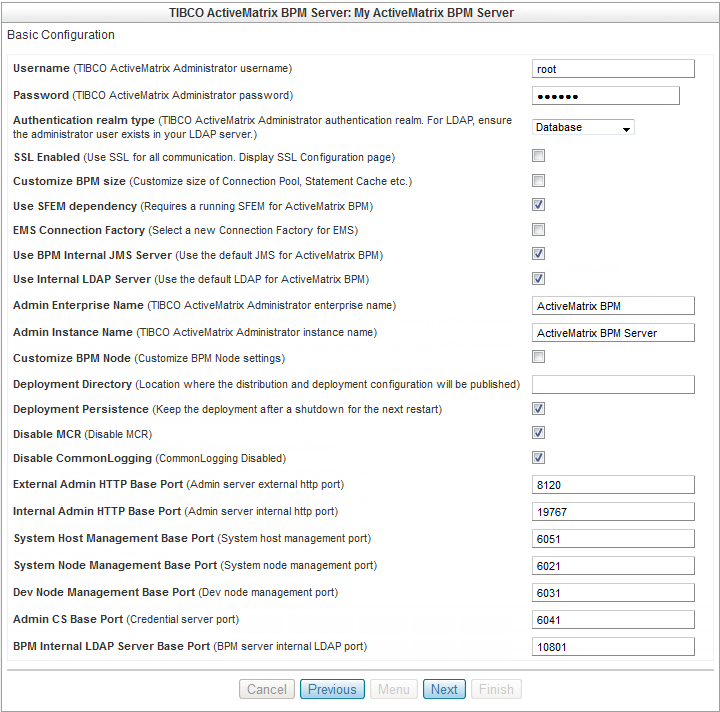
You must click Next or Finish to confirm any changes you make on the Basic Configuration page. If you click Cancel or Menu after making a change, it will not be recorded. Additionally you must click Finish to properly save any changes made in the Component Wizard or the Silver Fabric Administrator will revert any changes to the last completed version.
|
Choose either LDAP or Database to specify the TIBCO ActiveMatrix Administrator authentication realm type.
The Administrator LDAP Authentication Realm Details page is displayed after you click Next on the Basic Configuration page. The LDAP Authentication Realm Details page enables specification of many settings which are all described in the TIBCO ActiveMatrix BPM Installation and Configuration guide in the section: Administrator Server Configuration: LDAP Authentication Realm Details.
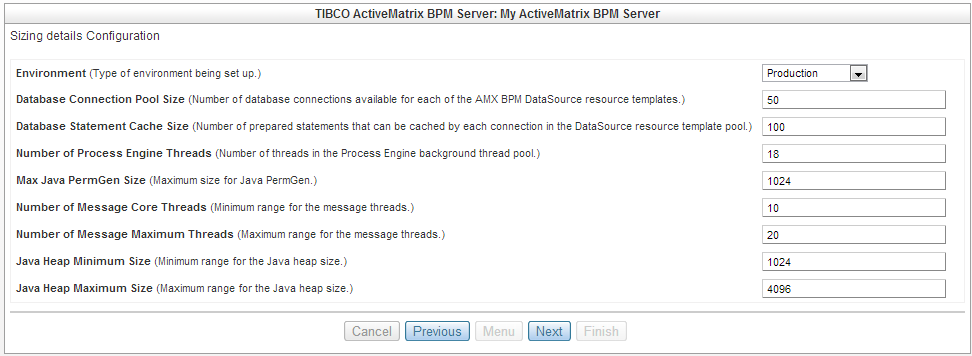
The Environment field is simply a label for this configuration page. Switching between Production to Development does not change the other values on this page. All default values are production environment default values which can be changed individually. For an explanation of what each property controls refer to the ActiveMatrix BPM: Sizing Configuration page.
Check this box to require the use of a TIBCO EMS instance installed by TIBCO Silver Fabric Enabler for TIBCO EMS (SFEM). When creating your Stack for a BPM environment you must also define a BPM Server Component dependency on the EMS Component you have created for the Stack. Refer to Creating an ActiveMatrix BPM Stack for more information. The connection between the BPM Server and the EMS instances will be handled automatically.
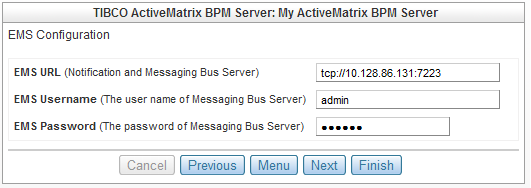
If you want to use an external EMS provider, clear the Use SFEM dependency checkbox and the EMS Configuration page will be added to the Component Wizard so you can specify how the BPM Server will connect with an external EMS provider.
Figure 7 EMS Configuration page
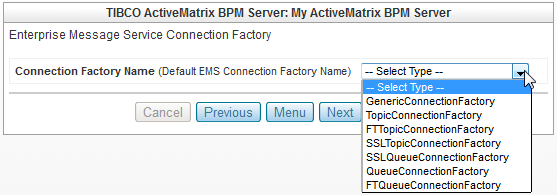
Descriptions of the Connection Factory and Queue Connection Factory types can be found in the TIBCO Enterprise Messaging Service documentation.
Figure 9 BPM JMS Configuration
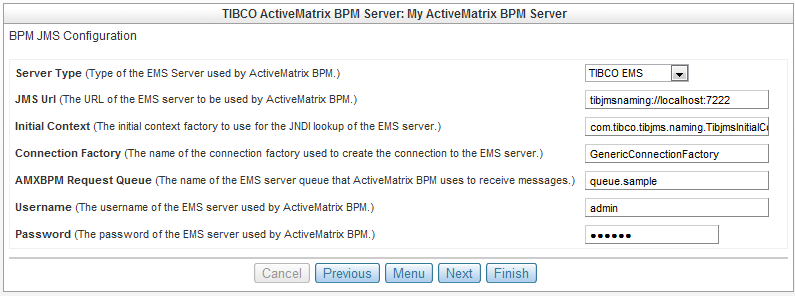
For more information on configuring a connection with an external JMS provider refer to the ActiveMatrix BPM: JMS Configuration page in the TIBCO ActiveMatrix BPM Installation Guide.
Or you can refer to the TIBCO Enterprise Message Service documentation available at http://docs.tibco.com.
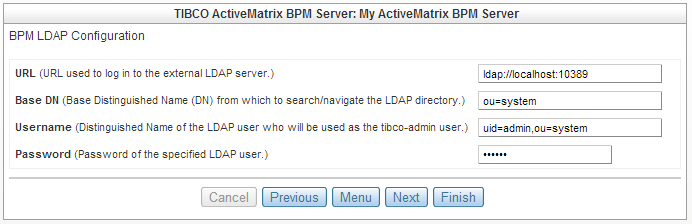
Figure 10 BPM LDAP Configuration
|
Check the Customize BPM Node box to expose the BPM Node Configuration page allowing changes to the Environment Name, Node Name, and Node Management Port.
Figure 11 BPM Node Configuration
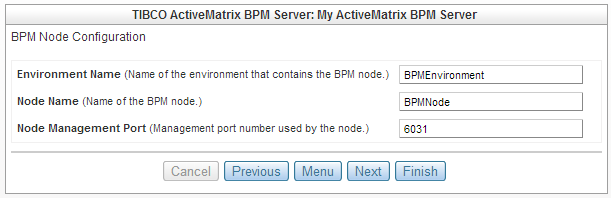
The Node Management Port is the port on which the debug node receives life cycle messages.
If no Deployment Directory is specified and Deployment Persistence is false, then the default is: ENGINE_HOME/work/[component_name]+[instanceID]
|
It is a best practice to minimize the length of this name. Use a Deployment Directory with as few characters as possible: "C:\AMX" instead of "C:\ActiveMatrix" or for a Linux based engine "/dd" will create the deployment directory at the root /.
|
|
EXCEPTION: When Deployment Persistence is enabled the following settings can be changed and published to existing published Components:
|
When Deployment Persistence is not checked then an orderly shutdown of the Component will cleanup and remove the deployment directory and the associated database tables. Simply clearing the Deployment Persistence checkbox and saving the component setting will not change a persistent component that was already deployed.
When you no longer want a persistent deployment, the published instance and the associated database must be cleaned manually according to the procedure for uninstalling the product as is described in the TIBCO ActiveMatrix BPM Installation Guide.
The port settings initially point to the proper default values. Normally the port settings should be left alone unless your implementation environment has port conflicts that require changes.For descriptions of these and other settings refer to the TIBCO Silver Fabric Users Guide and TIBCO ActiveMatrix BPM Administration Guide.
|
For all Base Port configuration parameters the actual port number will be the value of the [Base Port] + [Engine Instance Number] on which the component is running.
|
The ActiveMatrix BPM Administrator internal HTTP port (default 19767) is used for communication between ActiveMatrix BPM Administrator and hosts/nodes. In a Distributed BPM configuration a load balancer must be set to manage HTTP requests between the primary and remote machines for more information on a Distributed BPM configuration refer to the TIBCO ActiveMatrix BPM Installation Guide.
This is also known as the Node Port. The ActiveMatrix BPM Server node management port number can not be in use by another node on the same machine.
If you have checked Use SFEM Dependency on the Basic Configuration page to set a dependency on an EMS Component for use by the ActiveMatrix BPM Administrator then this page will not be displayed in the Component Wizard.
Figure 12 EMS Configuration
EMS URL - EMS uses TCP and the default port used for messaging is 7222. The actual port value used is implementation dependent. EMS can be hosted locally by the same machine hosting the TIBCO Silver Fabric Server or it may be hosted by an external installation.
|
To ensure that happens you must either Add Allocation Rules with a Component Dependency for the TIBCO ActiveMatrix BPM Server Component so the EMS Component is running before it is started, or set a Stack dependency for BPM Server Component depending on the EMS Component.
|
|
Using EMS with Deployment Persistence - When Deployment Persistence is enabled on the ActiveMatrix BPM Server component, then the EMS Component must also have an allocation rule specifying that EMS must be run on the same Silver Fabric Engine. This ensures that a restart of the ActiveMatrix BPM Administrator will make the proper connections with the EMS Component.
|
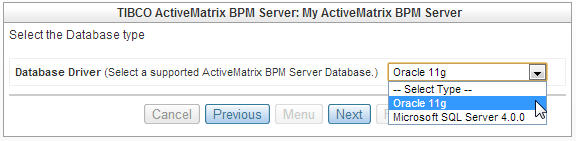
Select the supported database you will use for your implementation and then click Next to get the connection configuration fields for that database.
Figure 13 Select the Database type
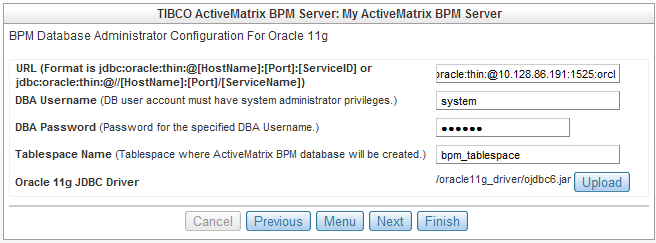
Enter the URL to connect with an external Oracle Database instance. As the UI states the format of the entered string can be either:
jdbc:oracle:thin:@[HostName]:[Port]:[ServiceID] or:
jdbc:oracle:thin:@[HostName]:[Port]:[ServiceID] or:
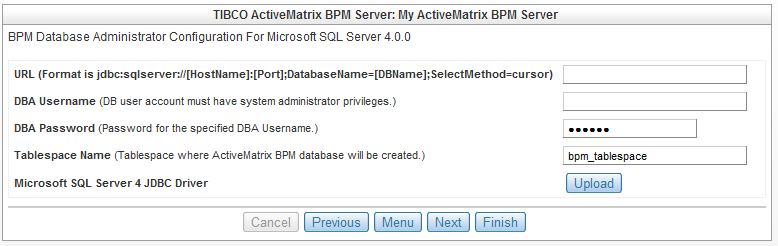
Figure 16 BPM Runtime Database Configuration 
The URL is the exact same string entered on the previous Component Wizard page.
|
9.
|
Configure the BPM BDS Database (Available for TIBCO ActiveMatrix® BPM Distribution for TIBCO Silver® Fabric 3.0.0 and higher only)
|
Figure 17 BPM BDS Database Configuration
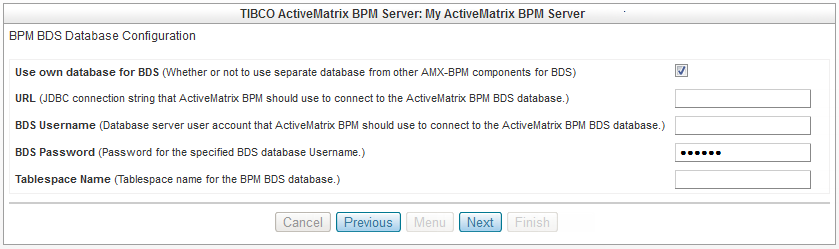
The settings on this page apply to TIBCO® Openspace and TIBCO® Workspace only. In most cases you can just leave the default values.
Figure 18 BPM application and client configuration
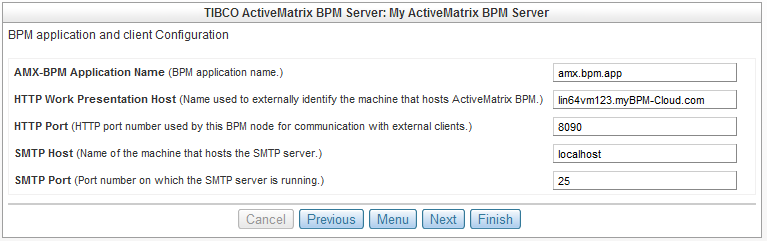
HTTP Work Presentation Host Name - This name must be specified using a fully qualified domain name or IP address that is accessible to external clients. For example, this may be the name of the machine itself or of a proxy server.
HTTP Port - The TIBCO® Openspace and TIBCO® Workspace HTTP port used for external client communication may be changed if there are port conflicts.
SMTP Host and SMTP Port - The SMTP host name and port may be changed from the defaults if an external service host will be used.
All default values are production environment default values which can be changed individually. For an explanation of what each property controls refer to the ActiveMatrix BPM: Sizing Configuration page.
Figure 20 SSL Configuration
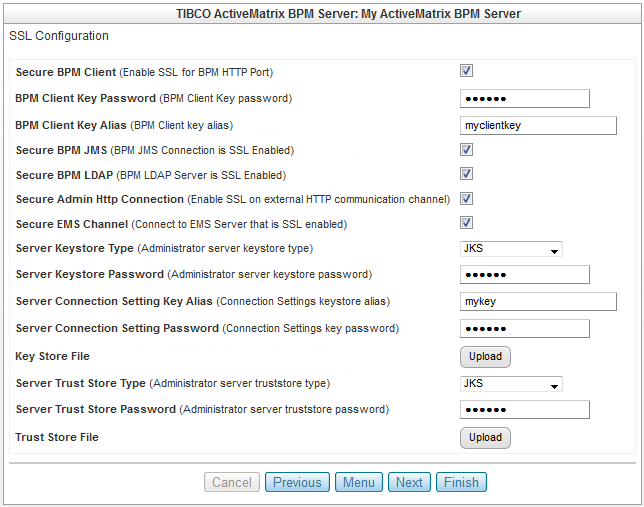
For more information on using SSL with TIBCO ActiveMatrix BPM refer to the Security chapter of the TIBCO ActiveMatrix BPM Administration Guide.
Figure 21 Upload Third Party Drivers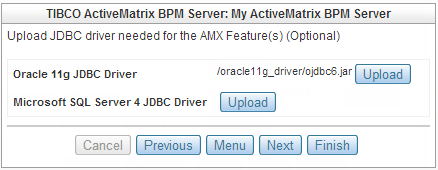
The next diagram shows how a script may be uploaded. Scripts can be executed at various points in the engine life cycle and uploaded for use with the Component or Enabler. Python, Jython, and JavaScript are supported. Refer to the TIBCO Silver Fabric Developers Guide for more information on the methods that may be called.
Figure 22 Upload, Edit, or Remove Scripts
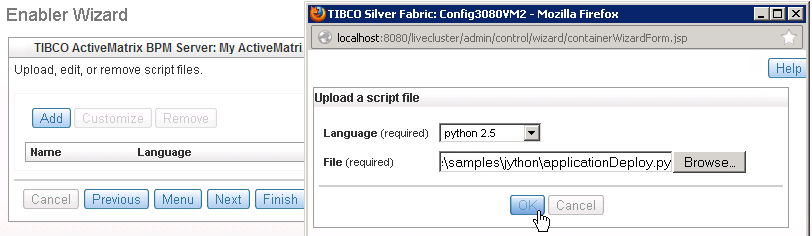
TIBCO Silver Fabric has generic support for adding any JSR-223 compliant script engines that support interfaces that can be invoked and compiled. Support for Jython is included and the JDK includes JavaScript. Refer to https://developer.mozilla.org/en-US/docs/Rhino/Overview for more information.
Refer to the TIBCO Silver Fabric Developer’s Guide on Enabler and Component scripting and methods for a more complete description of what can be done with scripts.
If you have implemented the ScriptStatisticsProvider class added to this Component by a script or an archive, then the Add, edit, or remove script-provided statistics page allows for the addition of archives from that statistics provider.
Refer to the TIBCO Silver Fabric Developer’s Guide for information on implementing script-provided or archive-provided statistics.
|
If you remove log file patterns, they will not be restored by the Add Defaults button. You can add them back manually at any time.
|
Figure 23 Add or Remove Log File Patterns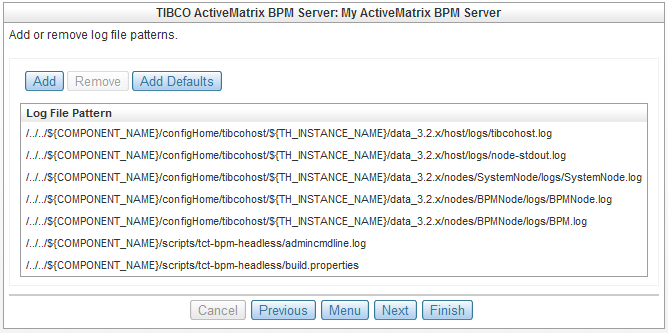
String, Environment, System, or Encrypted variables may be added and edited to the ActiveMatrix BPM Server Component to define and set runtime specific context variables.
Select a variable type from the Add Variable pull-down list or Add from Container to use a variable from a selected container.
Figure 24 Adding a Runtime Context Variable
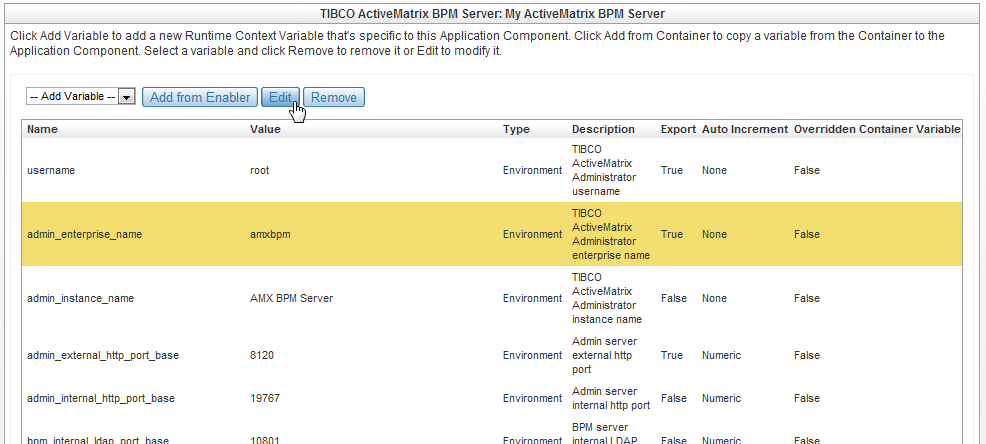
Variable values from a container may be added to the runtime as well. Use the Add from Container button to add container-specific context variables.
Runtime context variables may be changed by selecting the variable (selected row is highlighted) and clicking Edit to change its attributes. Selected rows may also be removed.

Refer to the Silver Fabric Help or the Silver Fabric User’s Guide for more information on controlling the Component behavior.
Figure 26 Default Engine Allocation Settings

Refer to TIBCO Silver Fabric User’s Guide and Administration Guide for additional information on these configurations.
After you click the Finish button, make sure that the Component is published to make it available when creating a Stack.
To do this, select Publish Component in the Actions drop-down list located at the line of the Component you just created.