Click Files
and data ![]() .
.
In the Files and data flyout, click Connect to.
In the list of connectors, click Amazon Redshift.
In the Amazon Redshift flyout, click New connection.
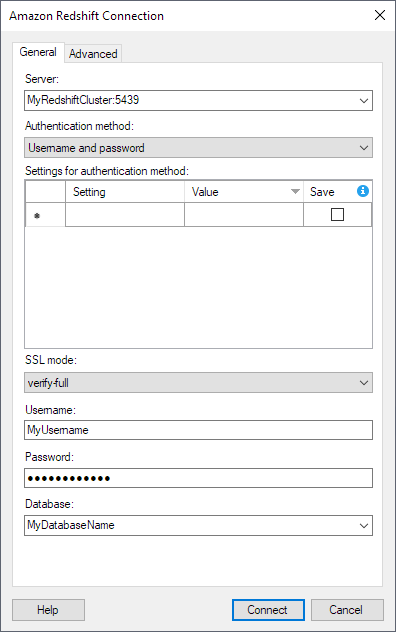
This dialog is used to configure a connection to data in the Amazon Redshift cloud data warehouse.
Note that you need to install a driver on your computer to access the Amazon Redshift connector. See the system requirements at http://spotfi.re/sr/connectors to find the correct driver.
For instructions on how to access your Amazon Redshift data in Spotfire, see the following topic:
To reach this dialog:
Click Files
and data ![]() .
.
In the Files and data flyout, click Connect to.
In the list of connectors, click Amazon Redshift.
In the Amazon Redshift flyout, click New connection.
Option |
Description |
Server |
The name of the server where your data is located. To include a port number, add it directly after the name preceded by colon. Example with port number: |
Authentication method |
The authentication method you want to use to log in to Amazon Redshift. Select from the following options: Username and password Log in to Amazon Redshift with username and password. Sometimes referred to as standard authentication in Amazon Redshift. AWS Profile Log in to Amazon Redshift with IAM credentials that you have stored as a profile in your AWS credentials file. Note: When you select AWS Profile, the Username field controls the connection setting Dbuser. Note: An AWS credentials file must be available and configured on all computers running Spotfire clients where you want to use the connection. If you use Kerberos authentication in your Spotfire Environment, you might have to configure an AWS credentials file per user on computers that run web player services. AWS IAM Credentials Log in to Amazon Redshift with AWS IAM credentials. Enter your AWS IAM credentials with the settings AccessKeyID and SecretAccessKey in the Settings for authentication method table. Note: If you select AWS IAM Credentials and you do not enter AccessKeyID and SecretAccessKey, the Amazon Redshift ODBC driver attempts to connect using the default AWS Profile from your AWS credentials file, if you have one on your computer. AD FS Log in to Amazon Redshift using Active Directory Federation Services. Enter the following information in the Settings for authentication method table:
Azure AD Log in to Amazon Redshift using Azure AD. Enter the following information in the Settings for authentication method table:
Okta Log in to Amazon Redshift with AWS IAM credentials from Okta. Enter the following information in the Settings for authentication method table:
PingFederate Log in to Amazon Redshift with AWS IAM credentials from PingFederate. Enter the following information in the Settings for authentication method table:
|
Settings for authentication method |
Settings for the selected authentication method. Based on what authentication method you select, different settings are added to the table. You can also add other relevant connection settings. To configure a setting, fill in the Value column. Then use the Save checkbox to select if you want the value you entered to be stored in the connection, or if you want the user to fill in their own value when they open the connection. Save the setting value or ask the user to fill it in? In the table, you can choose if you want to save the value that you enter for a setting. By default, Save is not selected.
Adding a setting To add a new setting, enter the name of the setting in the Setting column on the final row in the table. Then enter the value in the Value column. When you enter a name and value for a setting, a new row is added where you can add more settings. Deleting a setting To remove a connection property that you have added, click the leftmost cell in the row to select the entire row. Then press the Delete key. Tip: If your keyboard does not have a Delete key, use the corresponding keyboard shortcut instead. On a Mac computer, for example, the keyboard shortcut is Fn + Backspace. What settings can I use? There is no guarantee that any specific connection setting that you add works in Spotfire. For security reasons, some settings are not allowed. Also, you can not add settings that there are already dedicated controls or input fields for. |
SSL
mode |
Specifies whether SSL should be used when connecting to the Amazon Redshift database. disable allow prefer require verify-ca verify-full SSL must be used, and the server certificate and host name must be verified. See the official Amazon Redshift documentation for more information about how to use SSL mode. |
Username |
The account name you wish to use when logging into the Amazon Redshift database. |
Password |
The password for the specified account. |
Database |
The name of the database where your data is located. |
Option |
Description |
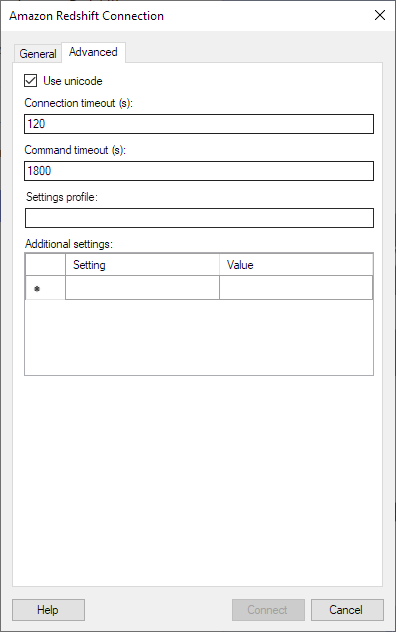
Use
unicode |
If this check box is selected, the Amazon Redshift ODBC driver will return CHAR as SQL_WCHAR, VARCHAR as SQL_WVARCHAR, and TEXT as SQL_WLONGVARCHAR. If this check box is not selected, the Amazon Redshift ODBC driver will return CHAR as SQL_CHAR, VARCHAR as SQL_VARCHAR, and TEXT as SQL_LONGVARCHAR. |
Connection timeout (s) |
Specifies the maximum number of seconds allowed for a connection to the database to be established. Note: If you set the connection timeout to zero, it will be interpreted as no timeout. That is, there will be no upper limit for trying to connect. This is generally not recommended. |
Command timeout (s) |
Specifies the maximum number of seconds allowed for a command to be executed. Note: If you set the command timeout to zero, it will be interpreted as no timeout. That is, there will be no upper limit for trying to execute the command. This is generally not recommended. |
Settings profile |
The name of a settings profile to use when you open the connection in a web client or in Automation Services. A settings profile is a way to store settings from the Settings for authentication method table, without saving the values in the analysis file. Settings profiles are stored in the configuration on Automation Services and web player services. To learn more, see Settings profiles. |
Additional settings |
Caution: All the settings and values that you add in the Additional settings table are stored unencrypted in analysis files. Do not add secret information like usernames and passwords. In the Settings for authentication method table on the General tab, you can add settings without storing values in the analysis file. Add and use additional connection settings. In the Amazon Redshift ODBC driver, there are many connection settings that there are no controls for in Spotfire. The table enables you to use more of those settings. To learn about what connection settings are available, see the documentation for the Amazon Redshift ODBC driver. Adding a setting In the Additional settings table, each row represents a connection setting. To add a new setting, enter the name of the setting in the Setting column, and enter the value in the Value column. When you enter a name and value for a setting, a new row is added where you can add more settings. Deleting a setting To remove a connection property that you have added, click the leftmost cell in the row to select the entire row. Then press the Delete key. Tip: If your keyboard does not have a Delete key, use the corresponding keyboard shortcut instead. On a Mac computer, for example, the keyboard shortcut is Fn + Backspace. What settings can I use? There is no guarantee that any specific connection setting that you add works in Spotfire. For security reasons, some settings are not allowed. Also, you can not add settings that there are already dedicated controls or input fields for. |