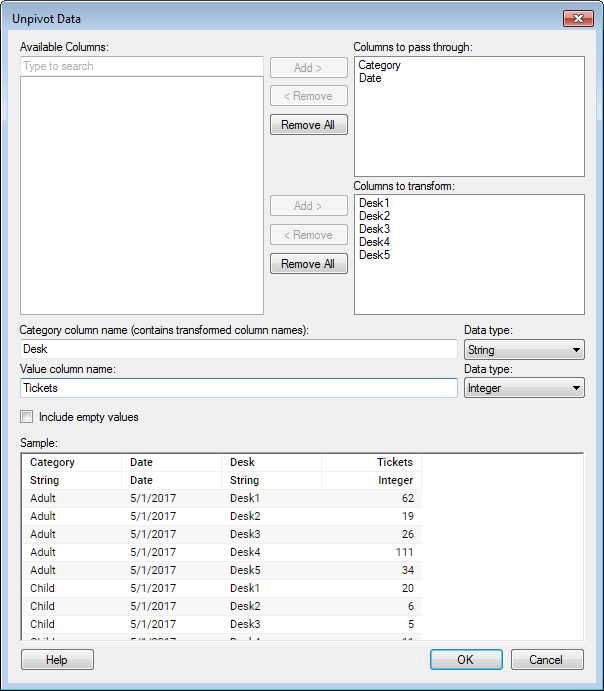
Unpivot Data can be used to transform data from a short/wide
format to a tall/skinny format. When you use the Unpivot Data dialog for
the transformation, you can immediately set the desired names for the
new category and value columns.
To add an Unpivot Data transformation to data that
is already loaded into Spotfire:
Option |
Description |
Available
columns
|
The columns
available for use in the unpivot operation.
Click a column name in the list to select
it. To select more than one column, press Ctrl and click the column
names in the list. Use one of the Add > buttons to send the
selected column to either the Columns to transform or Columns
to pass through field, see below. You can narrow down the list
of available columns by typing a part of a name in the "Type
to search" field. You can also enter an expression in the
field, using the rules described on the Searching
in TIBCO Spotfire page. |
Add
>
|
Moves the
selected columns from the Available columns field to the field
next to the button. |
<
Remove
|
Removes
a column and brings it back to the Available columns field. |
Remove
All
|
Removes
all columns from the selected columns fields. |
Columns
to pass through
|
The selected
columns containing information that should be transferred to the
unpivoted data set without any transformation. This could be ID
columns, categorical information such as Region, Priority etc. |
Columns
to transform
|
The selected
columns containing the values that you wish to combine into a
single column. The column names of these columns will be used
as category values in the resulting new category column. Typically,
this might be a number of columns containing the same type of
data, such as sales figures for different years. |
Category
column name (contains transformed column names)
|
Type a
column name that summarizes the information provided in the columns
that you have selected to transform. For instance, "Year"
could be used when sales figures for several different years are
to be combined to a single column. |
Data
type
|
Allows
you to set the data type of the category column name, if several
are possible. |
Value
column name
|
Type a
column name that shows what type of information is included in
the new value column. For instance, "Sales" would be
a good name for a column containing sales figures for several
different years. |
Data
type
|
Allows
you to set the data type of the value column name, if several
are possible. |
Include
empty values
|
Select
this check box to transfer empty values to the unpivoted data
view. If the check box is cleared, all records containing empty
values will be discarded.
Note: A string
of length zero is not considered empty in this context. Only true
null values will be excluded if the check box is cleared. You
can replace 0-length strings with actual null values using a Calculate
and Replace Column transformation before doing Unpivot, for
example using an expression like "If(Len([Column]) = 0, null,
[Column])", to exclude those values too. |
Sample
|
Gives you
a preview of what the resulting data table will look like.
Note: Uses the
first 100 rows from the data table, so there might be some differences
between the sample and the resulting data table. |