To reach the Image from URL Renderer Settings dialog:
In the Table Properties Columns page, click to select a column that uses the Image from URL Renderer, then click Settings .
OR
Click Settings in the Scatter Plot Properties or Map Chart Properties Labels page, or in the Add Tooltip dialog, when Show as: Image from URL has been chosen.
OR
Click Settings in the Add/Edit Default Renderer dialog when the Image from URL Renderer has been chosen.
Note: If you apply renderer settings from the visualization properties, the settings are applied to that visualization only. If you apply renderer settings from the Add/Edit Default Renderer dialog, the settings are applied to all new visualizations.
Allowed URIs
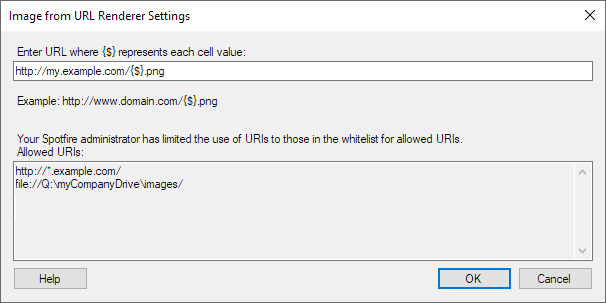
For Spotfire Analyst, your Spotfire Administrator may have specified that only certain URIs should be allowed to link to. If that is the case, then a list of the allowed base URI addresses will be shown in the dialog. An administrator can add more addresses to the Whitelist for Allowed URIs preference found under Application Preferences in the Administration Manager.
If an allowed URI includes a wildcard character (for example, http://*.example.com/ ), then you can use any path within that specified domain.
To whitelist a directory on a company network location, specify the path to the folder in the whitelist. The path must start with file://.
For example:
file://Q:\MyCompany\Images
Note: Since local network paths may be unavailable to other users, the recommended procedure is to use a URL rather than a local network path when publishing analyses to the library.
For Spotfire Desktop users, see below.
Examples:
If the images are available on the internet and the link is entered as the example in the dialog, http://www.domain.com/{$}.png the result would be:
Cell value |
URL |
a |
http://www.domain.com/a.png |
b |
http://www.domain.com/b.png |
c |
http://www.domain.com/c.png |
d |
http://www.domain.com/d.png |
e |
http://www.domain.com/e.png |
Width and Height
If the website allows, you can also specify the width and height of the rendered image (in pixels): http://MyCompany.com/Images/{$}/image?width={$width}&height={$height}
If $width and $height are included in the link template, the image will be rendered using the width and height specified by your current table row height/column width, or, in the case of labels or tooltips, by the size set using the size slider. If not included, the default size will be rendered and changing the size will simply enlarge or shrink the default image.
To update the whitelist for allowed URIs for Spotfire Desktop:
Because the whitelist will be enabled by default, and it will be empty from the start, all URIs in all analyses using Image from URL and Web Page Panel must be added to the whitelist, if you want to be able to use these features with Spotfire Desktop.
Make a comma-separated list of all URLs you want to be able to use with 'Image from URL' or 'Web Page Panel'.
Close Spotfire Desktop.
Go to AppData
on your computer and, in the Modules folder, open the Spotfire
DXP Forms folder. For example:
C:\Users\{user name}\AppData\Local\TIBCO\Spotfire Desktop\{version
number}\Modules\Spotfire DXP Forms_34.0.12508.5863
Note that the Modules folder is hidden by default.
Open Spotfire.Dxp.Main.dll.config in a text editor (e.g., Notepad).
Near the bottom of the file, locate the setting Desktop_Preference_WhitelistForSecuritySensitiveUris.
As value, insert the comma-separated
list of URIs created in step 1. If desired, you can add a wildcard
(*) to the first part of the host-name for the URI, to include all
URIs within a certain domain.
The final result could look something like this:
[....]
<!--
A whitelist of comma-separated uris that are allowed to be used in certain situations.
This setting is only used if Desktop_Preference_UseWhitelistForSecuritySensitiveUris is set to true.
-->
<setting name="Desktop_Preference_WhitelistForSecuritySensitiveUris" serializeAs="String">
<value>http://example.com/some/very/special/deep/path/,http://*.example2.com/,http://*.example3.com/some/
path/</value>
</setting>
</Spotfire.Dxp.Application.Properties.Settings>
</applicationSettings>
<startup><supportedRuntime version="v4.0"
sku=".NETFramework,Version=v4.5"/></startup>
</configuration>
Save the file.
Start Spotfire Desktop.
See also: