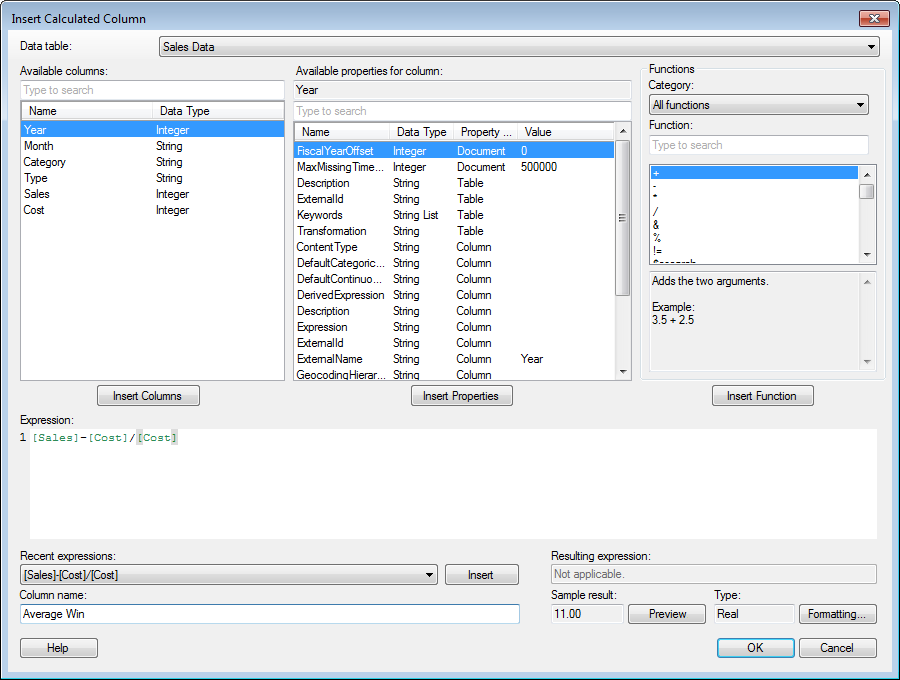
TIBCO Spotfire supports two different types of expressions: Insert Calculated Column, which creates a new column in the data table, and Custom Expression, which is used to dynamically modify the expression used on an axis or to define a setting. Both types of expressions are created with a similar user interface.
Note that when calculated columns are added to in-db data, the expression is evaluated in the underlying database management system. This means that only methods supported by the current connector will be available. See the documentation for your specific connector for a list of supported functions. See also Working With In-Database Data for more information.
To reach the Insert Calculated Column dialog:
Select Insert > Calculated Column....

Option |
Description |
Data
table |
Only available when more than one data table is present in the analysis and the dialog has been opened via the main menu. Specifies the data table where the calculated column will be inserted. |
Available
columns |
Shows all columns that you can use in the calculation of a new column. Select a column by clicking on it in the list and then click on the Insert Columns button, or double-click on the column to send it to the Expression field. Press Ctrl or Shift to select multiple columns. You can narrow down the list of available columns by typing a part of a name in the "Type to search" field. You can also enter an expression in the field using the rules described on the Searching in TIBCO Spotfire page. |
Insert
Columns |
Inserts the columns selected in the Available columns list at the current cursor position in the Expression field. |
Available
properties for column |
Shows all properties that you can use in the calculation of a new column. You can narrow down the list of available properties by using the search field. The column properties shown are specific to the column selected in the Available columns list to the left. Select a property by clicking on it in the list and then click on the Insert Properties button; or double-click on the property to send it to the Expression field. The property will automatically be inserted as text. However, there may be occasions where you need to insert the property as a function to receive the desired result. See Properties in Expressions for more information. Use the pop-up menu in this field to select how to insert the property or type the correct syntax manually. If you want to define a new property to use in the expression, right-click in the Available properties field and select New > [Property Type] Property... from the pop-up menu. You can also edit or delete custom properties by using the pop-up menu. |
Insert
Properties |
Inserts the properties selected in the Available properties for column list at the current cursor position in the Expression field. |
Category |
Select a category of functions to limit the choices in the Function list: All functions |
Function |
Select a function by clicking on it in the list and then click on the Insert Function button, or double-click on the function to send it to the Expression field. Type a search string in the text field to limit the number of items in the Functions list. You can also click on any function and type the first letter of the desired function name to jump to a specific location in the list. |
Description |
Shows a brief description of the selected function. For more detailed descriptions, see the Expression Language chapter. |
Insert
Function |
Inserts the selected function at the current cursor position in the Expression field. |
Expression |
This is the text field in which you build your expression. You can insert columns and functions from the lists, or enter text as in any standard text editor. See Expression and Script Editor Keyboard Shortcuts for information about available shortcuts. |
Recent
expressions |
Displays the ten expressions you have most recently created. You can select one of these and click the Insert button to insert the expression into the Expression field. |
Insert |
Inserts the selected Recent expression into the Expression field. This will replace the entire content of the Expression field. |
Resulting
expression |
Of interest when preprocessor functions (such as ${PropertyName}) are used in the expression only. Displays the expression after all occurrences of the property have been replaced with its current value or values. |
Column
name |
The name of the new calculated column. |
Sample result |
Displays the result of applying the current expression to the first row of the data table. Note that if aggregating functions (such as, "Count") are used in the expression, only the first 100 rows will be used in the sample calculation. If this field shows an error there is a problem with the expression. Moving the mouse pointer over the red exclamation mark next to the Expression field will display an explanation of what is wrong. |
Preview |
Opens a dialog where you can see the calculated values for the first 100 rows, together with the values for the original columns used in the current expression. Only valid expressions can be previewed. |
Type |
The type of the new calculated column. |
Formatting... |
Opens the Formatting dialog, where you can change the formatting of the new calculated column. |