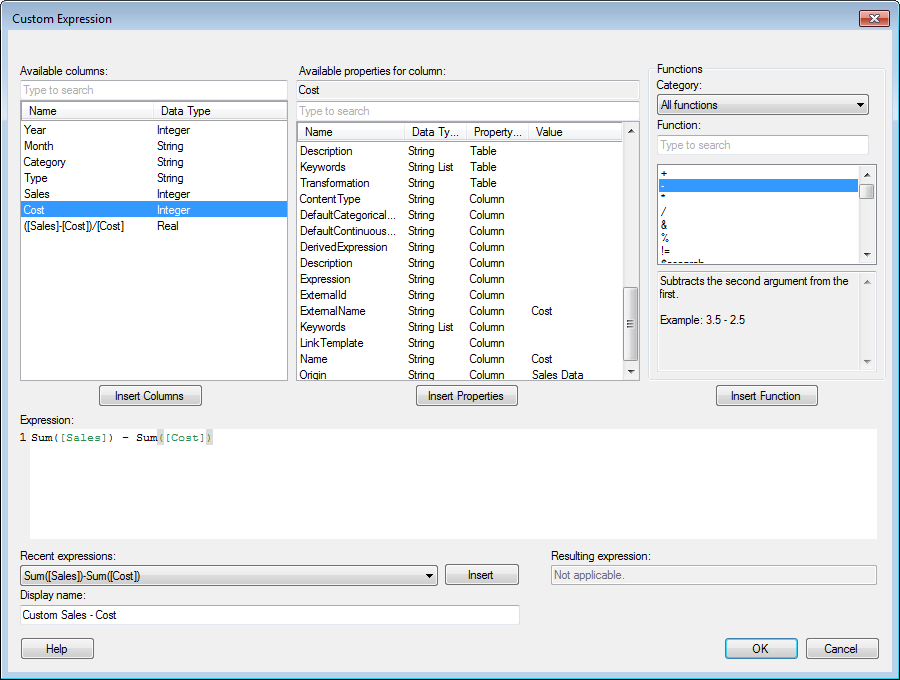
TIBCO Spotfire supports two different types of expressions: Insert Calculated Column, which creates a new column in the data table, and Custom Expression, which is used to dynamically modify the expression used on an axis or to define a setting. Both types of expressions are created with a similar user interface.
To reach the Custom Expression dialog:
Right-click on a column selector on an axis, in a Visualization Properties dialog, or in the Legend, to display the pop-up menu.
Select Custom Expression....

Option |
Description |
Available
columns |
Shows all columns that you can use in the calculation of your custom expression. Select a column by clicking on it in the list and then click on the Insert Columns button, or double-click on the column to send it to the Expression field. Press Ctrl or Shift to select multiple columns. You can narrow down the list of available columns by typing a part of a name in the "Type to search" field. You can also enter an expression in the field using the rules described on the Searching in TIBCO Spotfire page. |
Insert
Columns |
Inserts the columns selected in the Available columns list at the current cursor position in the Expression field. |
Available
properties for column |
Shows all properties that you can use in the calculation of a custom expression. You can narrow down the list of available properties by using the search field. The column properties shown are specific to the column selected in the Available columns list to the left. In the Custom Expression dialog, you also have access to a number of properties which are depending on the current selections on the axes of the visualization. This allows you to set the axis expression on one axis to be the same as the one used on another axis. For example, if you use the custom expression ${Axis.X.Expression} on the Color by axis of a bar chart, then the visualization will always be colored by the those categories that are currently shown on the category axis. See Visualization Properties in Expressions for a list of which properties are available in which visualization. You can also define a new property to use in the expression: right-click in the Available properties field and select New > [Property Type] Property... from the pop-up menu. You can also edit or delete custom properties by using the pop-up menu. Select a property by clicking on it in the list and then click on the Insert Properties button; or double-click on the property to send it to the Expression field. The property will automatically be inserted as text. However, there may be occasions where you need to insert the property as a function to receive the desired result. See Properties in Expressions for more information. Use the pop-up menu in this field to select how to insert the property or type the correct syntax manually. |
Insert
Properties |
Inserts the properties selected in the Available properties for column list at the current cursor position in the Expression field. |
Category |
Select a category of functions to limit the choices in the Function list: All functions |
Function |
Select a function by clicking on it in the list and then click on the Insert Function button, or double-click on the function to send it to the Expression field. Type a search string in the text field to limit the number of items in the Functions list. You can also click on any function and type the first letter of the desired function name to jump to a specific location in the list. |
Description |
Shows a brief description of the selected function. For more detailed descriptions, see the Functions chapter. Note: When you are using in-db (external) data tables the functions available depend on which functions are available in the external data source. See the documentation of your data source for more information about data source specific functions. |
Insert
Function |
Inserts the selected function at the current cursor position in the Expression field. |
Expression |
This is the text field in which you build your expression. You can insert columns and functions from the lists, or enter text as in any standard text editor. Note that columns from other data tables than the main data table need to be entered using their qualified name, that is, [Data Table Name].[Column Name] in the expression. This will happen automatically if you use the Insert Column button to add columns to the Expression field. See Expression and Script Editor Keyboard Shortcuts for information about available shortcuts. |
Recent
expressions |
Displays the ten expressions you have most recently created. You can select one of these and click the Insert button to insert the expression into the Expression field. |
Insert |
Inserts the selected Recent expression into the Expression field. This will replace the entire content of the Expression field. |
Resulting
expression |
Of interest when preprocessor functions (such as ${PropertyName}) are used in the expression only. Displays the expression after all occurrences of the property have been replaced with its current value or values. |
Display
name |
The name of the new expression. |
See also:
Custom Expressions Introduction
How to Insert a Custom Expression