A Simple Dialog Box in Statistica Visual Basic
This example illustrates how to create a simple dialog box and "service" the user choices in this dialog box. Start by creating a new macro:
Ribbon bar. Select the File tab, and in the left pane, click New; in the Create New Document dialog box, select the Macro tab.
Classic menus. From the File menu, select New; in the Create New Document dialog box, select the Macro tab.
Create a new macro called SimpleDialog. Then, in the SVB program editor, place the cursor (i.e., click in the location) between the two statements Sub Main and End Sub; that is where the program code for the dialog box will be inserted.
Creating the dialog box.
- Ribbon bar
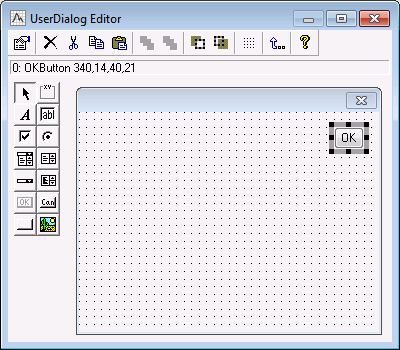
- Select the View tab. In the Tools group, click Dialog Editor to display the UserDialog Editor.
- Classic menus
- From the Tools menu, select
Dialog Editor, or click the
 Dialog Editor toolbar button, to display the
UserDialog Editor.
Click the OK button on the left side of this dialog box, and then move the mouse pointer to the upper-right corner of the window, and click the mouse button; an OK button will be inserted in that location.
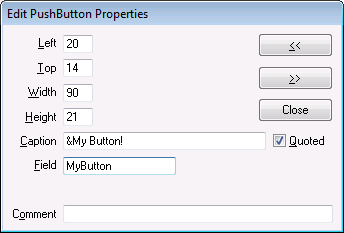
Note: you can further edit the size and location of the OK button by clicking on it and dragging it to the desired location or resizing it. Repeat these steps for the Cancel button and for a user-defined button. To produce the latter, click the blank button toolbar button on the lower-left of the toolbar in the UserDialog Editor, and then click the desired location in the Dialog Editor.By default, the new button will be labeled Pushbutton1; to change that, double-click on the button to display the Edit PushButton Properties dialog box. Then edit the text boxes as follows:
Note: the Caption for the new button is &My Button! When you click Close, the actual caption of the button will change to My Button!, i.e., with the M underlined. Thus, M is the keyboard accelerator that will "click" this button. The other important information in the Edit PushButton Properties dialog box is the "ID" of the button, entered into the Field box. The ID for this button is MyButton; this ID will be referenced throughout the SVB program to service the button, i.e., to identify when the button is clicked and to respond inside the program.Now close the Edit PushButton Properties dialog box, and close the UserDialog Editor dialog box by clicking the
 toolbar button. The SVB program will now contain the following code:
Sub Main
Begin Dialog UserDialog 400,203 ' %GRID:10,7,1,1
OKButton 330,14,50,21 CancelButton 330,49,60,21 PushButton 20,14,90,21,"&My Button!",.MyButton
End Dialog Dim dlg As UserDialog Dialog dlg
End Sub
Remember that, to learn more about the different keywords and statements used in this program, you can always highlight the respective text, and then press F1 to display the general SVB help text explaining the syntax for the respective keyword or statement and provide simple examples on how to use them.
- Servicing the new dialog box; simple dialog boxes
- If you run the program created thus far, the dialog box we designed will be displayed on the screen; when you click any button, the program will terminate. The next task is to "connect" specific programming instructions to different user actions in the dialog box. For example, let's display message boxes to indicate which button the user clicked.
The simplest way to do this is to use the codes returned by the Dialog method; this method will return a 0 when Cancel is clicked, -1 for OK, and different integers greater than 0 to enumerate the other controls in the dialog box. So in this example, clicking the My Button button would return a 1. Here is the program that would service all buttons.
Sub Main
Begin Dialog UserDialog 400,203 ' %GRID:10,7,1,1
OKButton 300,14,70,21
CancelButton 300,42,70,21
PushButton 30,14,90,21,"&My Button!",.MyButton
End Dialog
Dim dlg As UserDialog
Dim ReturnId As Integer
' NOTE: here we added parenthesis around the argument
' (dlg) for the Dialog method; this allows us to
' retrieve the return code from that method.
ReturnId = Dialog (dlg)
Select Case ReturnId
Case -1
MsgBox "The OK button was pressed"
Case 0 ' Cancel Button
MsgBox "The CANCEL button was pressed"
Case 1 ' The 'first' button on the Dialog,
MsgBox "The MY BUTTON was pressed"
End Select
End Sub
This program uses the standard Visual Basic Select Case statement to execute the code for the desired message box, based on the ID number returned by the Dialog method; you could of course also accomplish the same effect by using If ... Then ... Else statements. (All general Visual Basic statements are documented in the general SVB syntax help).


