| Number of processors (cores) to use
|
Use these options to specify how Statistica takes advantage of multiple processors/cores available on your machine.
In most cases, you should use the default maximum allowed, but this value can be adjusted in special circumstances if necessary. Note that for both options, you are always limited by the licensed number of cores.
|
| Default
|
Uses the number of cores for which your hardware is currently configured. This is the recommended default selection.
|
| Limit to _ cores
|
You can enter in the text box any value 1 or greater.
If you specify a value greater than you are licensed for, a message is displayed and the value is changed to the license limit. Note that this value ignores the number of cores actually on your machine, so if you are licensed for more cores than you have on your machine, you can over-subscribe and configure the threading to use more threads than cores.
Changing this value dynamically adjusts the number of cores Statistica uses for multi-threaded operations (for instance, no need to restart the program).
|
| Computation of percentiles
|
This drop-down list contains options from which you can choose the method for computing percentile values, including medians (50th percentile) and quartiles (25th and 75th percentiles). The method you select here applies to every place in Statistica where medians, quartiles, or percentiles are computed, for example, to the computation of:
- percentiles in the Nonparametrics Statistics module;
- medians and quartiles in the Basic Statistics module;
- medians and quartiles in 2D Box Plots;
- medians and quartiles in box-whisker plots in Reproducibility and Repeatability studies;
- medians and quartiles in box-whisker plots in Discriminant Analysis, Reliability and Item Analysis, Basic Statistics, Multiple Regression, and all other modules of Statistica that offer box-whisker plots as an option from the dialog box.
|
| Automatically close Graph menu dialogs after a graph is produced (do not treat these graphs as Analyses to be continued after the initial output is produced)
|
Select this check box if you want the graph creation dialog boxes to automatically close after you create a graph.
If this check box is cleared, the graph creation dialog box is minimized upon the creation of the graph.
|
| Limit maximum memory (MB) for each Analysis
|
In this box, specify the maximum amount of memory you want allocated to a single analysis.
If an analysis exceeds the allocated memory, an error message is displayed. Note that this limit applies to a single analysis only, not to graphs or Statistica as a whole. By default, the maximum amount of memory allocated is 75% of the installed RAM on your computer.
|
| Reset
|
Sets the maximum memory limit for each analysis to the default, 75% of the installed RAM on your computer.
|
| When using non-incremental learning algorithms (e.g. data mining, GRM, etc.), automatically apply sampling when the dataset is larger than _ MB
|
You can select this check box to enable Statistica to use systematic sampling when running analyses (such as data mining, GRM, etc.) on data sets larger than the amount entered in the
MB box in order to use system resources more efficiently.
Statistica chooses the sample using systematic sampling methods, that is, the value for
k is set automatically based on the size of the data set and the
MB limit. The size of the data file is divided by limit, and the resulting value is rounded to the nearest integer and set as k. For example, if the limit is set to 25 MB and the data set being analyzed is 70 MB, Statistica sets
k equal to 3 since 70/25 = 2.8.
If systematic sampling is not the desired sampling method, there are other sampling tools available to use.
|
| When running analyses from SVB, display warnings dialog
|
In many instances throughout interactive analyses, you might receive non-fatal error (warning) messages, for example, to inform you that some missing data were replaced by means, that some variables were dropped from the analyses, that some parameters were reset.
Usually, these warnings are not required that the respective analyses be terminated, but the information provided in these warnings may be important for you to be aware of. When such warning messages occur during the execution of a Statistica Visual Basic (SVB) program, the
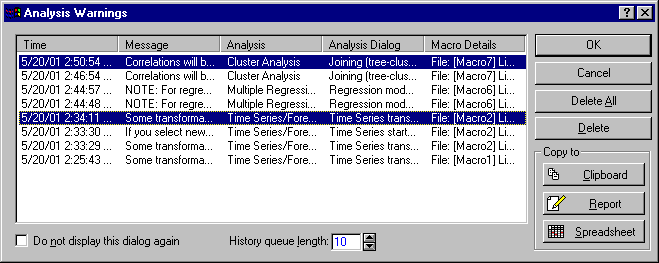
Analysis Warnings dialog box is displayed, which lists the warnings that have occurred, when they occurred (the time and in which specific analysis), the approximate line numbers in the SVB program code where the warnings occurred. For example, this log of errors might look like this:
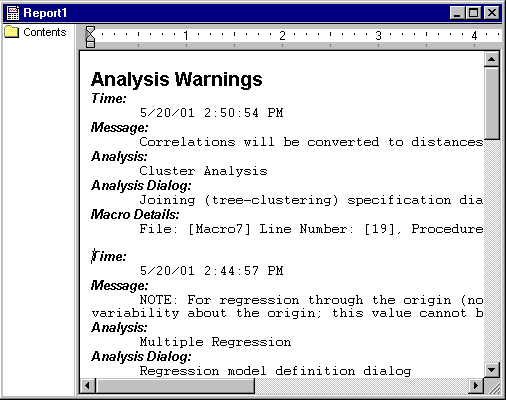
When output to the report window is specified, the warnings can be printed as well:
The maximum number of such warnings that are retained for a single SVB program run can be configured using the respective edit field (default is 10; if more than 10 errors occur, then the first one is dropped from the list of non-fatal errors that can be displayed). If you do not want to display the Analysis Warnings dialog box, clear this check box.
|
| Analysis SVB warnings history queue length
|
Specifies here the maximum length of the queue for storing non-fatal error and warning messages that occur during the execution of SVB programs.
The historically oldest warnings are deleted from the queue to make room for new nonfatal errors and warnings after the number of such messages that occur during a single SVB program execution exceeds the number specified for the queue length.
|
| Display warning when creating a graph with data larger than the data size threshold
|
In most cases, the graphs produced in Statistica contain the data from which they were computed.
For example, when making a histogram for a variable, the actual raw data for that variable is stored along with all other information for the graph; when you save such a graph to a file and later reopen it, you can still change the method of categorization or other aspects of the graph that require reprocessing of the raw data. However, for very large data sets this may not be desirable, because the files (graph objects) can become very large (because they contain the raw data); in those cases only storing the aggregated data (for instance, category counts for histograms) along with the graph yields significantly smaller file sizes when you save the respective graph or when you manage many graphs of large data sets inside a workbook.
Use this check box to select or clear the option that the
Large Data Warning dialog box is displayed, and to specify the minimum number of data points for a single graph that should trigger this dialog box (cause it to be displayed). The
Large Data Warning dialog box provides options to either attach the (large number of) raw data points to the graph, or to detach the graph from the data; in the latter case, various options for modifying the graph later is not available, if they require reprocessing of the raw data.
Note: This option is only relevant to graphs that do not display the actual raw data points themselves, such as histograms or pie charts. For other graphs, such as scatterplots, probability plots, which show as many points as there are individual observations, the data is always attached to (stored with) the graph (since otherwise, the graph could not be plotted).
|
| Data size threshold ( in cells) before displaying the Large Data Warning"dialog
|
Specifies here the minimum number of observations for a single graph that should trigger the
Large Data Warning dialog box. The raw observations are stored along with the graph for all graphs computed from a number of observations that is smaller than this number.
|
| Display warning about the status of version 5 graph files
|
Importing Version 5 Statistica Graphs normally displays a warning message that the graphs might not look identical after importing into the current version of Statistica. Clear this check box to suppress the warning message.
|
| Expand Histogram binning beyond min/max data values
|
When creating a histogram for continuous data, the program has several options for determining how the categories (binning) are created.
When using the
Integer/Auto option, the program tries and breaks the histogram binning into neat intervals based on the range of data. Select this check box to affect the way that this binning is done. When this check box is selected, a small value is added to the min/max data values, after the neat intervals are determined, to ensure that the upper or lower binning boundary does not fall on the min/max data value. In some cases (commonly when the data contains zeros), backing off this small amount would produce confusing graphs. When the check box is cleared, then this small amount is not added to the min/max data values, and the resulting graphs could have the min/max data on the upper or lower binning boundaries, if the min/max values end up being a neat interval.
|
| New Analyses use Spreadsheet selection conditions by default
|
You can select this check box to specify that all analyses use the selection conditions from the spreadsheet (specified using the
Spreadsheet Case Selection Conditions dialog box).
|
| New Graphs use Spreadsheet selection conditions by default
|
You can select this check box to specify that all graphs use the selection conditions from the spreadsheet (specified using the
Spreadsheet Case Selection Conditions dialog box).
|
| Marker point reduction threshold
|
Use the options in this box to specify the thresholds (for example, the minimum number of data points that must be present in the graph) for the marker point reduction setting.
By default, all graphs which have fewer points than the
Fast threshold (by default, less than 10,000 points) are initially created using the
Standard marker point reduction setting. Note that you can modify the marker point reduction setting (after graph creation) in the
Graphs Options dialog box.
|
| Fast
|
Enter the lower boundary for the
Fast setting. Whenever the number of points in the data set is between the value entered here and the value entered for the
Aggressive setting, Statistica uses the
Fast marker point reduction setting to create the initial graph. By default this value is set at 10,000.
|
| Aggressive
|
Enter the lower boundary for the
Aggressive setting. Whenever the number of points in the data set exceeds this value, Statistica usea the
Aggressive marker point reduction setting to create the initial graph. By default this value is set at 1,000,000.
|


