SANN Example 2: The Iris Problem (Classification)
Overview
For this example, we are using the classic Iris data set. This spreadsheet contains information about three different types of Iris flowers - Iris Versicolor, Iris Virginica, and Iris Setosa. The data set contains measurements of four variables (sepal length and width, and petal length and width). The Iris data set has a number of interesting features:
- One of the classes (Iris Setosa) is linearly separable from the other two. However, the other two classes are not linearly separable.
- There is some overlap between the Versicolor and Virginica classes, so it is unlikely to achieve a perfect classification rate.
- There is some redundancy in the four input variables, so it is possible to achieve a good solution with only three of them, or even (with difficulty) from two, but the precise choice of best variables is not obvious.

Specifying the analysis
Open the IrisSNN.sta data file and start SANN using the following ways:
- Ribbon bar. Select the Home tab. In the File group, click the Open arrow and select Open Examples to display the Open a Statistica Data File dialog box. Open the data file, which is located in the Datasets folder. Then, select the Statistics tab. In the Advanced/Multivariate group, click Neural Nets to display the SANN - New Analysis/Deployment Startup Panel. Or, select the Data Mining tab. In the Learning group, click Neural Networks to display the SANN - New Analysis/Deployment Startup Panel.
- Classic menus. From the File menu, select Open Examples to display the Open a Statistica Data File dialog box. Open the data file, which is located in the Datasets folder. Then, from the Statistics menu or the Data Mining menu, select Automated Neural Networks to display the SANN - New Analysis/Deployment Startup Panel.
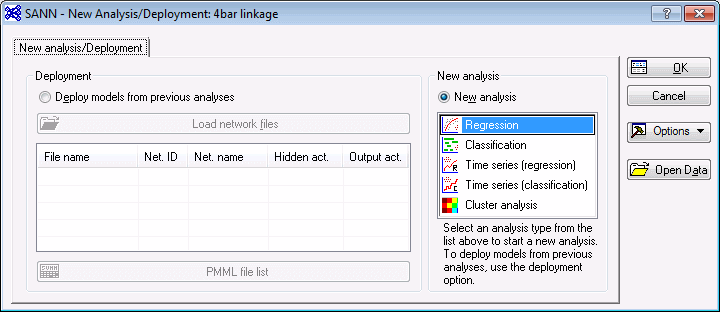
- After you start SANN, the SANN - New Analysis/Deployment Startup Panel is displayed.
- Because the target for our analysis (FLOWER) is categorical, select Classification in the New analysis list, and click OK to display the SANN - Data selection dialog box.
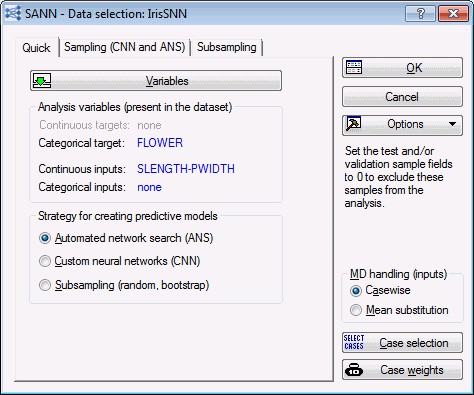
- On the Quick tab of the SANN - Data selection dialog box, click the Variables button to display the variable selection dialog box.
- Select FLOWER as the Categorical target, and select SLENGTH, SWIDTH, PLENGTH, and PWIDTH as Continuous inputs.
- Click the OK button in the variable selection dialog box to confirm these variable selections, close this dialog box, and return to the SANN - Data selection dialog box.
- We begin our search for a neural network using the Automated Network Search. In the Strategy for creating predictive models group box, select the Automated network search (ANS) option button.
- Select the Sampling (CNN and ANS) tab. The performance of a neural network is measured by how well it generalizes to unseen data (that is, how well it predicts data that was not used during training). The issue of generalization is actually one of the major concerns when training neural networks. When the training data have been overfit (that is, been fit so completely that even the random noise within the particular data set is reproduced), it is difficult for the network to make accurate predictions using new data.
- One way to combat this problem is to split the data into two (or three) subsets: a training sample, a testing sample, and a validation sample. These samples can then be used to 1) train the network, 2) verify or test the performance of the network while being trained, and 3) perform a final validation test to determine how well the network predicts new data.
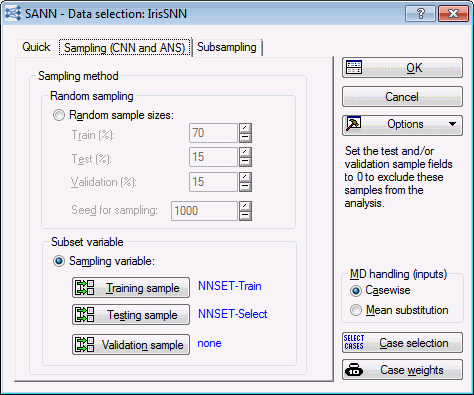
- In SANN, the cases can be assigned to the subsets randomly or based upon a special subset variable in the data set. The IrisSNN.sta file already contains a subset variable that splits the data into two subsets. We will use this variable to specify a training subset and a testing subset.
- On the Sampling (CNN and ANS) tab, select the Sampling variable option button.
- Click the Training sample button to display the Sampling variable dialog box. Click the Sample Identifier Variable button to display a standard variable selection dialog box that is used to select the appropriate variable. For our example, select NNSET, and click OK to close this dialog box. This variable contains two codes - Select and Train - which can be seen by double-clicking in the Code for training sample field to display a variable selection dialog box.
- For the training sample, select Train and click OK in this dialog box to close it and return to the Sampling variable dialog box. Select the On option button in the Status group box. The dialog box should look as shown below.
- Click OK, and repeat this process to specify the variable (NNSET) and code (Select) for the Testing sample. Remember to set the Status to On. Once you have specified both subsets, the Sampling (CNN and ANS) tab looks as follows.
- Next, click OK in the SANN - Data selection dialog box to display the SANN - Automated Network Search (ANS) dialog box. As mentioned in the first example (SANN Example 1: Performing Regression with 4 Bar Linkage Data), the ANS facility is used for creating neural networks with various settings and configurations while requiring minimal effort on your side. ANS helps you create and test neural networks for your data analysis and prediction problems. It designs a number of networks to solve the problem and then selects those networks that best represent the relationship between the input and target variables (that is, those networks that achieve the maximum correlation between the targets and the outputs of the neural network). In SANN Example 1, we discussed the many options that are available in the ANS facility.
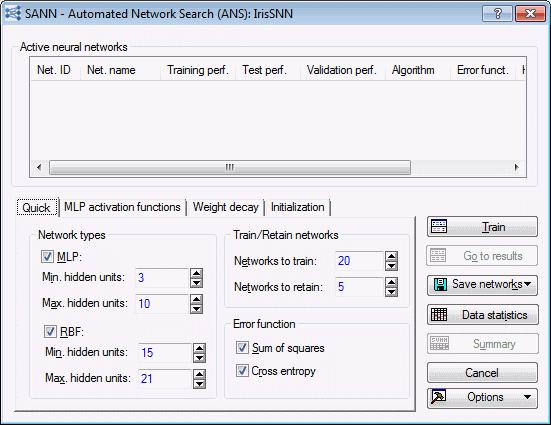
- When using ANS, you should specify as wide a search as you can; however, for the purpose of this example, the default settings are sufficient. This includes leaving the number of networks to train at 20.
- On the Quick tab, in the Network types group box, select the RBF check box.
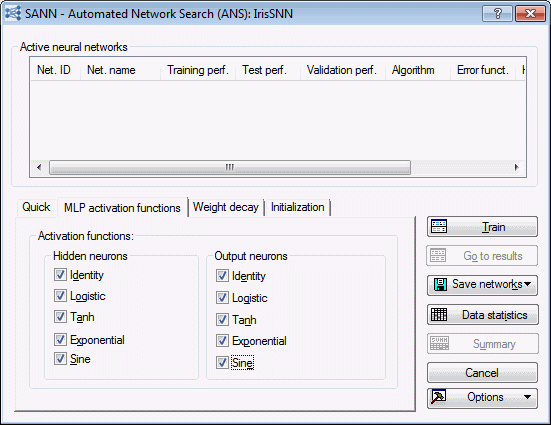
- Select the MLP activation functions tab, and select all check boxes in both the Hidden neurons and Output neurons group boxes.
- This will enable the ANS search to try all the available activation function types including the sine function. Note that it might not always be necessary to include all types of activation functions in the ANS search. For example, if for a particular analysis you have sufficient reasons to believe that a certain class of activation functions will do best, you can then include only this group of activations in the ANS search. Including such prior knowledge of the problem enables ANS to concentrate on other and rather less known search parameters, which can be beneficial for the analysis in terms of creating better networks at the end. This logic is by no means limited to activation functions. If, for example, you believe that the optimal network size for the problem at hand is, say 5 hidden units, then you could specify that ANS limits the network sizes to this number. You could do so by setting the options Min. hidden units = Max. hidden units = 5 on the Quick tab of the SANN - Automated Network Search dialog box.
- Select the Weight decay tab. Select the Use weight decay (hidden layer) check box, and select the Use weight decay (output layer) check box. For now, we will use the default range.
- Click the Train button. During training, the Neural network training in progress dialog box is displayed. For a classification analysis, this dialog box reports the network type (MLP or RBF), number of hidden units, activation function for hidden and output layers, the training cycle and the classification rate for all subsets (example, training and testing).
- The following illustration of the progress dialog shows the network under training as type MLP, with 4 inputs, 3 hidden units, and 3 outputs (since the target has 3 categories), Also displayed in the progress dialog is the iteration number, 50 in this case, and the classification rates for train and test samples. These quantities, classification rates, are particularly useful in monitoring the progress of the training process as they show how the network performance changes in time.
Note: you can stop the training of a network by clicking the Finish button. If ANS is creating more than one network, clicking the Next button stops training the current network and jump to the creation of the next one. The Finish button is useful if you feel that you have already trained a sufficient number of networks, while the Next button is handy when the current network has received enough training and it is time to move to the next one.


Reviewing the results
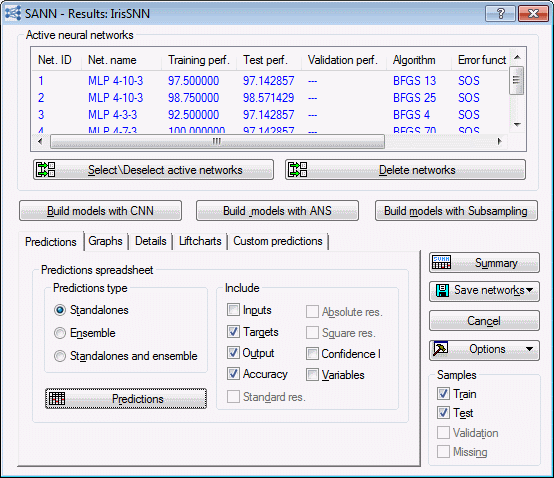
Once training is completed, we can view various network properties to determine the quality of the selected networks. Summary statistics for each retained network are displayed in the Active neural networks grid located at the top of the SANN - Results dialog box. Although your results might vary from those shown here, it is likely that you have models that performed quite well on the training subset and slightly worse on the testing subset.
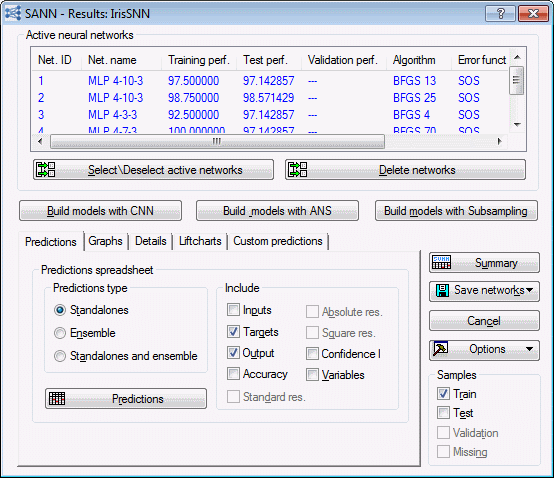
To continue with the analysis, perhaps the first result you should review is the list of retained networks, as well as their performance and specifications, which is displayed on the Active neural networks data grid displayed at the top of the Results dialog box. This information (also available in the Summary spreadsheet) enables you to quickly assess the overall quality of your networks as well as their specific architectures and types, such as number of inputs, number of hidden units, activation types. In this example, the first network is type MLP with 4 inputs, 10 neurons in the hidden layer, and 3 outputs (corresponding to the 3 categories of the target variable FLOWER), with train and test classification rates running at 97.5% and 97.14%, respectively. The display also shows that BFGS (which stands for Broyden-Fletcher-Goldfarb-Shanno) was used to train the network together with the Sum Of Squares (SOS) error function, and that an optimal solution was found at training cycle 30. The network has the exponential function as the activation of the hidden and output units.
To print the above information in a spreadsheet, click the Summary button in the Results dialog box.

Classifications summary and confusion matrix
Despite the usefulness of the overall classification rate, which is used as a measure of performance in classification problems, you should not assess the performance of a network solely on the basis of the overall classification. For example, a network trained on a data set with an unbalanced target variable consisting of 90% of category, say, A and 10% of category B is likely to predict most of the 90% of the patterns belonging to A while unable to perform that well on B. Such a network can yield a high classification rate but also an output that is almost flat, which is not wanted since such a network is likely to generalize poorly.
Given the above, you need to examine the performance of your networks with more depth rather than just considering the overall performance rates. One way to do that is to examine the confusion matrix and classification summary, where you can analyze the percentage of correctly classified cases per category. You can print this information in a spreadsheet by clicking the Confusion matrix button on the Details tab of the Results dialog box. The confusion matrix and classification summary are useful tools in evaluating the effectiveness of a classification network.
In the Classification summary spreadsheet, you are likely to see perfect or near-perfect classification on the training set, with a small number of errors in the selection and test sets.

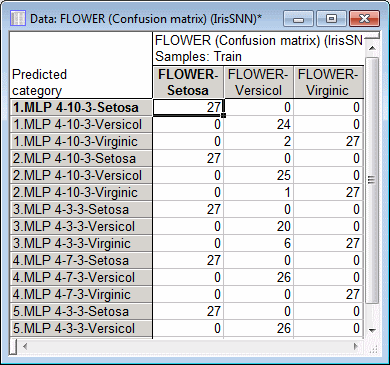
The confusion matrix and classification summary show both, the number of correctly classified cases as well as the number of misclassified cases per category. For example, we note that the first network has correctly classified all cases belonging to Setosa, while 2 out of 26 cases of Versicol is misclassified as Virginic. Similarly, all of the 27 cases belonging to Virginic are correctly classified. In general and for the IRIS problem, it is more likely for any network to exhibit a certain degree of confusion between Versicol and Virginic, compared to Setosa, since there is an appreciable amount of overlap between these two clusters, while Setosa is a well-separated class from the rest.
The above information is further summarized in the classification summary spreadsheet, where we can see the percentage of classified cases for Setosa, Versicol, and Virginic. Note that the network is consistent, that is, it classifies all categories with similar classification rates.
Equally important for a classification analysis is the study of lift charts and the ROC (Receiver Operator Characteristic) curves.
Graphics
- To visually explore the difference between the training and testing subsets, select the Graphs tab.
- Using the options on this tab, you can create histograms, 2D scatterplots, and 3D surface plots for the variables (example, target, outputs, residuals) in the analysis broken down by subset.
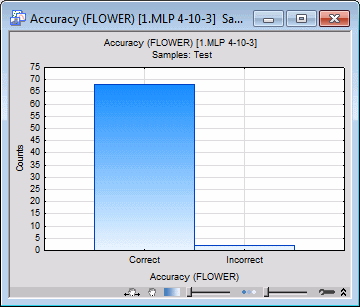
- To review histograms of model accuracy (number correct, number incorrect) for the training subset, select the Train check box in the Samples group box located in the lower-right corner of the SANN - Results dialog box. On the Graphs tab, select Accuracy in the X-axis list box, and click the Histogram of X button.
- Shown here is the histogram for the model 1. All the cases in the training subset were accurately classified by this model (as indicated by the Training performance of 100.0).
- Return to the SANN - Results dialog box by clicking the SANN - Results button on the analysis bar located at the bottom of the Statistica window or by pressing CTRL+R.
- On the Graphs tab, select the Test check box in the Samples group box and clear the Train check box. Once again, select Accuracy in the X-axis list box and click the Histograms of X button. A histogram of accuracy is generated for each model. The histogram for test cases in model 1 is as follows.


Predictions
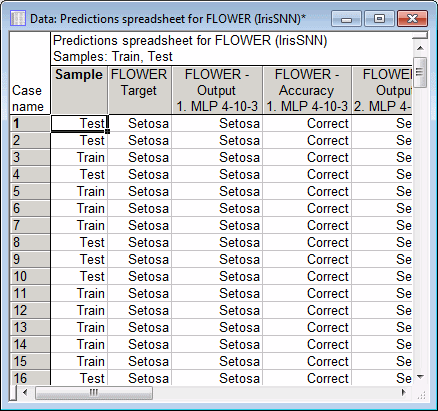
The predictions spreadsheet is one of the most useful results that you can create from the Results dialog box. You can customize the predictions spreadsheet by selecting check boxes in the Include group box (on the Predictions tab of the Results dialog box). In addition to showing predictions for each model, you can include the inputs, targets, accuracy, confidence, and other variables from the spreadsheet that were not used in the analysis. For this example, select Targets, Output, and Accuracy.
Also, select the Train check box in the Samples group box at the lower right of the dialog box.
Then click the Predictions button. A portion of the results for the first model are shown here.
Global sensitivity analysis
Global Sensitivity Analysis produces information about the relative importance of the variables used in a neural network. In sensitivity analysis, SANN tests how the neural network responses (predictions) and, hence, the error rates would increase or decrease if each of its input variables were to undergo a change. In global sensitivity analysis, the data set is submitted to the network repeatedly, with each variable in turn replaced with its mean value calculated from the training sample, and the resulting network error is recorded. If an important variable is changed in this fashion, the error increases a great deal; if an unimportant variable is removed, the error does not increase very much.
On the Details tab of the SANN - Results dialog box, click the Global sensitivity analysis button to conduct a global sensitivity analysis.
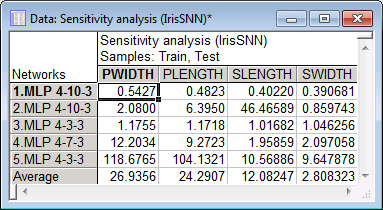
The spreadsheet shows, for each selected model, the ratio of the network error with a given input omitted to the network error with the input available. If the ratio is 1 or less, the network actually performs better if the variable is omitted entirely - a sure sign that it should be pruned from the network.
As with all of the networks shown here, it is likely that the best network discovered by the ANS ranks the variables in the order: PWIDTH, PLENGTH, SWIDTH, and SLENGTH. However, occasionally a network is discovered where SWIDTH and SLENGTH are reversed in sensitivity.
This is indicative of a limitation of sensitivity analysis. We tend to interpret the sensitivities as indicating the relative importance of variables. However, they actually measure only the importance of variables in the context of a particular neural model. Variables usually exhibit various forms of interdependency and redundancy. If several variables are correlated, then the training algorithm may arbitrarily choose some combination of them and the sensitivities may reflect this, giving inconsistent results between different networks. It is usually best to run sensitivity analysis on a number of networks, and to draw conclusions only from consistent results. Nonetheless, sensitivity analysis is extremely useful in helping you to understand how important variables are.
Finally, after completing your analysis and approving the network you have trained, the last step is to save the network, so that you can use it later. This process, that is, using a network for predicting future data is known as deployment. Statistica enables you to deploy SANN PMML models using either the Rapid Deployment Module or SANN itself. You can also deploy networks in compiled C/C++ executables and use them as standalone applications, but first you must save your networks.