Multiple Graph Layouts - Autolayout Wizard Overview
Selecting Wizard from the Graphs - Multiple Graph Layouts menu displays the AutoLayout Wizard - Step 1 dialog. Use this dialog to gather the graphs for the multi-graph layout you are designing.
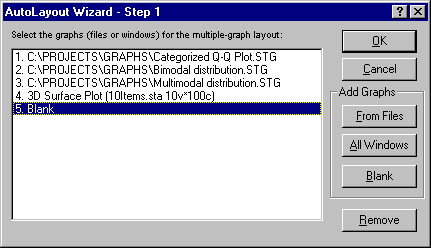
Click the From Files button to add saved graphs to the list. Clicking the All Windows button adds all currently displayed graphs in individual windows to the list (graphs stored in active workbooks or reports are not included). Graphs can be removed from the list by selecting them and clicking the Remove button. To add a blank graph to the list, click the Blank button. These blank graphs can serve as "placeholders" in setting up the layout. Additional STATISTICA Graphs or other graph objects (i.e., text) can later fill the openings reserved by the placeholder blank graphs. The number of graph items (i.e., graphs plus blanks) on the completed list determines the number of items used in creating the graph layout. The order in which the items are displayed can be adjusted on the following dialog.
Click OK in the AutoLayout Wizard - Step 1 dialog to display the AutoLayout Wizard - Step 2 dialog. Use this dialog to determine the actual layout and appearance of the compound graph.
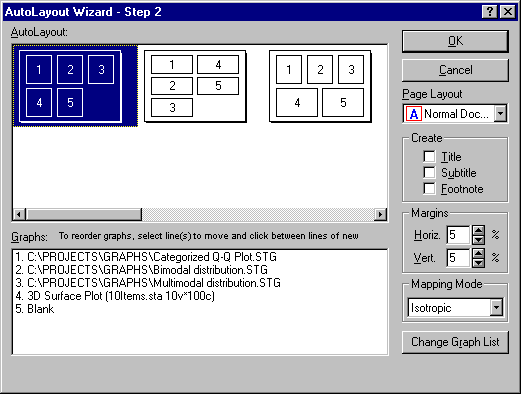
The AutoLayout box contains a variety of layout options. These options correspond to the number of graph items you specified in Step 1 above (e.g., if you selected five graphs, then each of the layout arrangements contains placeholders for five graphs). The order of items in the Graphs box can be changed to correspond to the positions you want the graphs to occupy in the layout option selected.
Other options available on this dialog address changing the list of graph items (via returning to Step 1 dialog), addition of titles to the compound graph, and adjusting margins and overall proportions of the graph. For specific details on these options, press the F1 key when the AutoLayout Wizard - Step 2 dialog is displayed.