Example 3: Predictive data mining and deployment for a continuous output variable
Statistica Data Miner includes a complete deployment engine with various options for deploying solutions derived from predictive data mining projects. This example illustrates the basic mechanism of how Statistica Data Miner can automatically generate all information necessary for deployment, i.e., to predict values automatically for new observations based on the parameters estimated for one or more estimated models.
This example is based on the example data file Patients.sta (also used in Example 3 of Nonlinear Estimation Analysis) reported in Neter, Wasserman, and Kutner (1985, page 469). Suppose you want to predict the number of days that patients are likely to spend in a hospital based on prognostic information. The Patients.sta data file contains observed (learning) data for 15 patients on two variables: the number of days that each patient was hospitalized (in the variable DAYS) and an index of the prognosis for recovery for each patient (in variable PROGNOSIS; larger values reflect a better prognosis). The purpose of this project is to build a deployed system that will enable users to enter data for the variable Prognosis and compute an estimate for the number of days the respective patient will likely stay in the hospital.
In similar real-world applications of Statistica Data Miner, you most likely would have many variables that are related to patients' prognosis for recovery; those variables could simply be treated as additional predictors. If many thousands of possible predictors are available, you may want to use the Feature Selection and Variable Screening methods in Statistica to preselect likely predictors before applying analyses that will build models for predictions (such as neural networks, regression, etc.). Also, in real-world applications, the input data are likely noisy, requiring some initial cleaning and filtering (such as illustrated in Example 1). The data may also reside in a remote database that needs to be connected to Statistica Data Miner via a Streaming Database Connector.
However, this example illustrates the basic mechanism of building data miner projects for prediction and deployment.
Setting up the project; connecting the data.
Open the Patients.sta data file and a new workspace.
See also Data Mining Tools.
A blank
Statistica
workspace
Select the Patients.sta data file in the list, and click OK to insert the data source node into the workspace.
Because we are not sure about the nature of the relationship between the prognostic variables (single variable in this example) and the outcome variable of interest (number of days likely to be spent in the hospital), we will select linear and nonlinear prediction methods to tackle this problem.
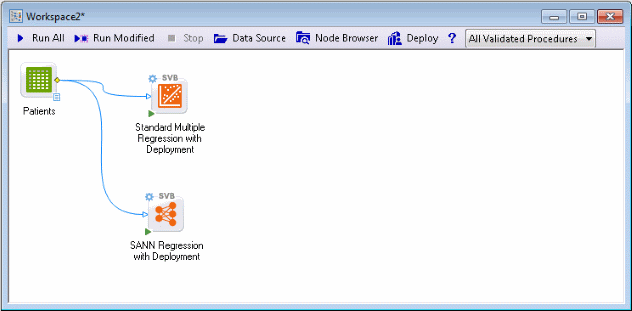
Ensure that the data source node is selected, and in the Feature Finder, type Stand. From the list, select Standard Multiple Regression with Deployment (SVB) to insert that node into the workspace.
In the Feature Finder, type sann. From the list, select SANN Regression with Deployment (SVB).
Double-click the Patients spreadsheet node to display the Select dependent variables and predictors dialog box.
Click the Variables button, and select variable DAYS as the Dependent; continuous variable, and variable PROGNOSIS as the Predictor; continuous variable.
Click the OK button in the variable selection dialog box and in the Select dependent variables and predictors dialog box.
Run the project.
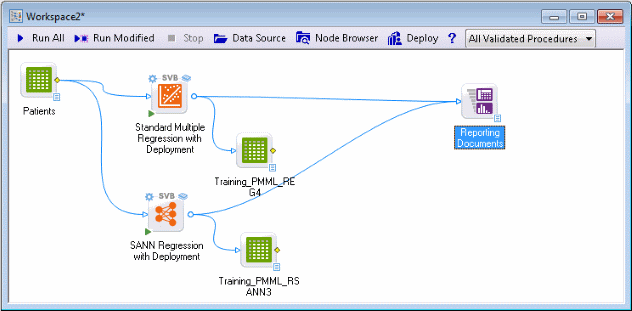
The program fits a linear regression model and five neural network models, retaining the best one.
You can review the results by double-clicking the Reporting Documents node, or change specific analysis parameters by double-clicking on the respective analysis nodes.
You can also review the predicted values in the spreadsheet nodes labeled Training..., which contain the observed and predicted values for each respective model; it is often very informative to connect additional graphics nodes to these data sources to perform some visual inspection of the quality of the fit for each model (see also, Example 2: Visual Data Mining). However, for this example, we will proceed directly to the deployment stage.
Computing predicted values for new data
Suppose that the purpose of this project is to implement an automatic system for predicting the number of days a patient is likely to stay in the hospital, i.e., to predict the length of the hospital stay based on prognostic information. Because we chose analysis nodes explicitly labeled as ... with Deployment, the information required for deployment, for making predictions from new data, is readily available to us at this point.
Specifying data for deployment
For example, suppose we have prognostic information (data) for three new patients, and that information is entered (or transferred automatically) into the data file NewPatients.sta.
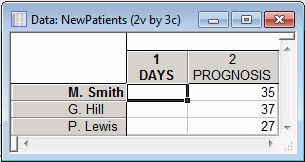
Create this data file for this example; ensure that you use the same variable names when creating the file as those used in the data file from which the current models were estimated, i.e., name the variables DAYS and PROGNOSIS.
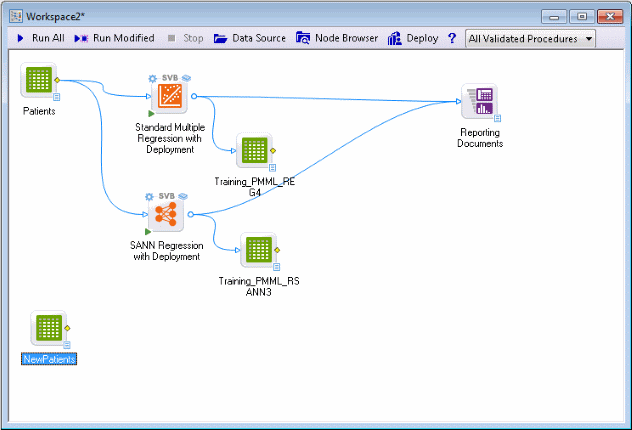
Insert this new data file as a new data source into data miner project.
In the variable selection dialog box, select the same variables as before: specify variable Days as the continuous dependent variable, and variable Prognosis as the continuous predictor variable. Click OK. Then, in the Select dependent variables and predictors dialog box, select the Data for deployed project; do not re-estimate models check box.
As described in the deploying solutions section, the nodes labeled ...with Deployment will automatically apply the most recently estimated model to the new data to compute predicted values. Click the OK button.
Deployment: computing predicted values
Ensure that the NewPatients data node is selected, and in the Feature Finder, type comp. From the list, select Compute Best Prediction from all Models (SVB).
This node automatically takes the most recent information for deployment generated by the other nodes and computes predicted values from each; the node can also compute an average prediction for all current models and for advanced applications (see also, Example 4) and even choose the best prediction from all models currently available (see also the boosting, bagging, and meta-learning topics).
Double-click the NewPatients node. Click the Variables button, and in the variable selection dialog box, select the same variables as before: specify variable DAYS as the continuous dependent variable, and variable PROGNOSIS as the continuous predictor variable. Click OK.
In the Select dependent variables and predictors dialog box, select the Data for deployed project; do not re-estimate models check box.
Run the node to compute predicted values.

The predicted values are available in the Final Prediction for DAYS spreadsheet generated by the prediction node. Right-click on the Final Prediction for DAYS data source, and select View Document from the shortcut menu (see also Statistica Data Miner Workspace Options).

The predictions from both models are shown in the spreadsheet. Column 3 contains predictions for the linear regression model, and column 5 contains predictions for the neural network model. Column 7 contains the average prediction using an ensemble of the models.
See also, Data Mining Definition, Data Mining with Statistica Data Miner, Structure and User Interface of Statistica Data Miner, Statistica Data Miner Summary, and Getting Started with Statistica Data Miner.