When running LiveView Desktop, your visual layout of views and perspectives, saved queries, and other preferences are saved in a folder on your file system, called the workspace. LiveView Desktop and other LiveView applications default to storing your workspaces under your username's Documents folder, in a folder named LiveView Workspaces. (For example, on a Windows system this would be C:\Users\username\Documents\LiveView Workspaces.) The LiveView Workspace Manager allows you to upload and download existing saved workspaces to a LiveView server instance. LiveView Desktop is capable of downloading workspaces from LiveView server as part of its startup.
This page starts with an overview of using local workspaces with LiveView Desktop, and then demonstrates how to use LiveView Workspace Manager to upload workspaces to LiveView Server.
There are several ways that you can use LiveView Desktop and LiveView Workspace Manager as part of your workflow.
As a system administrator with access to LiveView Workspace Manager and LiveView Desktop, you can:
-
Create a basic workspace and upload it to the server.
-
Upload several workspaces to LiveView server, each configured for a different kind of Desktop user, and have multiple machines running LiveView Desktop be able to download the saved workspaces from the single LiveView Server instance.
As an end-user of workspaces, with access to LiveView Desktop, you can:
-
Download a standard workspace and always revert to the server's version of the workspace for every new LiveView Desktop session.
-
Download a standard workspace, make changes locally, and preserve your own changes.
-
Use you own private workspace(s) and preserve any changes you make to your own workspace.
This example demonstrates the following tasks:
-
Using LiveView Desktop to download and use the same workspace for every LiveView Desktop session on a given LiveView Server instance.
-
Using LiveView Desktop to download a workspace and save locally applied changes.
-
Using LiveView Workspace Manager to upload a local version of a workspace to a server.
To follow this example, load and run the sample project lv_sample-helloliveview to start LiveView Server as described in the sample's README.txt file. Looking at the Console view in StreamBase Studio, when you see the log message "All tables have been loaded. LiveView is ready to accept client connections," you can perform the following tasks with LiveView Workspace Manager and LiveView Desktop.
-
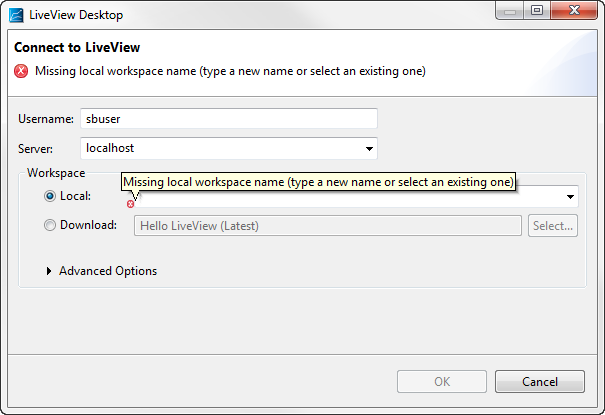
Start LiveView Desktop. This opens the LiveView Desktop connection dialog. Currently, the Local field displays the red X icon. If you hover over the red X, a popup reminds you to enter a new workspace name.

-
Select the radio button next to . Selecting this option means that you want to download a workspace for use on your local machine. Note that LiveView Desktop remembers your settings. The next time you open LiveView Desktop this same radio button will be selected.
-
Click the button. This opens the Select Workspace dialog, which connects to the LiveView Server instance you chose at connection time. This dialog displays all workspaces available on the current server.
-
Click the Sample Workspace node to open the view of all available workspaces.

-
Select the workspace named with the Version set to Latest from the table. Note the information given in the Select Workspace dialog: the name and version you select will be remembered the next time you run the Desktop. In this case, you have elected to download the highest available version of the workspace.
-
Click . LiveView returns you to the LiveView Desktop connection dialog.
-
Click . LiveView Desktop downloads a copy of the preconfigured, server-side workspace and opens the desktop on the local copy. This workspace shows a full screen with two grid views, one of each project table, and one charting view of the ItemsInventory table.
LiveView Desktop remembers the settings that you chose in the startup dialog. The next time you open LiveView Desktop, the same options are selected. This is important to note. When you choose to download a workspace from the server, LiveView Desktop will default to putting the newly downloaded workspace in the same location as the last workspace that you downloaded and overwrite any workspace that exists in that location. For example, if you close LiveView Desktop and re-open it without changing any settings, you will see the following message:

|
You may want to suppress this message if you are sure that you always want to start with a newly downloaded workspace. To suppress the message:
-
Open the Advanced Options node in the LiveView Desktop connection dialog.
-
Select the check box for Silently delete all existing workspace folder contents before download.
You can now make changes to the local workspace; for example, you can run new queries or close existing views. Those changes are saved on your local machine. To continue with this example, close LiveView Desktop.
In the next part of this example, you will download a workspace to a new location on your local machine, make a change to the LiveView Desktop workspace, and save the local workspace.
-
Open LiveView Desktop.
-
Verify that the Download radio button is selected from the last time you ran the Desktop, and make sure "Hello LiveView (Latest)" is still selected as the workspace to download from the server.
-
Open the Advanced Options node.
-
Choose a location to download the workspace to. This example uses the following:
C:\Users\sbuser-
Click the button.
-
Navigate to:
C:\Users\sbuser -
Click . This returns you to the LiveView Desktop connection dialog.
-
Click .
LiveView Desktop downloads the workspace and opens the local copy of the workspace.
-
-
Make a change to the local workspace. For example, you can close the tab that shows the charting view query in the bottom-right corner of the screen and reverse the avgPrice and totalInventory columns in the ItemsInventory grid-view query. LiveView Desktop now displays a workspace with two grid-view queries.
-
Close LiveView Desktop. Your changes to the workspace are now saved on your local machine. You now have two choices for your next LiveView Desktop session: you can download a new copy of the workspace from the server or you can open the local copy with your changes.
-
To open the saved local copy with your changes, select the radio button for Local and choose Hello LiveView from the pull-down menu. Note that if you have downloaded more than one workspace with the same name, you can see the full path to the named workspace by opening the Advanced view.
-
To download a new workspace from the server without overwriting your local workspace, select the radio button for Download and store the workspace in a new location.
-
Now you can use LiveView Workspace Manager to upload your local workspace to the server. The LiveView Workspace manager requires a separate installer from LiveView Desktop. Check with your system administrator if you do not have the Workspace Manager installed.
-
Choose → → to open LiveView Workspace Manager.
-
Enter your username and the server name for the LiveView Server instance. This example uses username
sbuserand connects to the LiveView Server instance running on the default port of the same machine, localhost. By default, LiveView Server uses port 10080.
Click .
-
LiveView Workspace Manager displays a preconfigured workspace called Hello LiveView that already exists on the server:

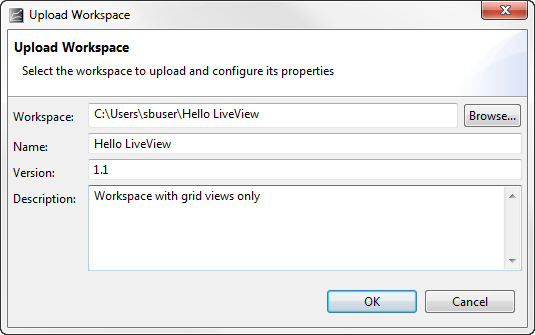
Click . This opens the Upload Workspace dialog.
-
Click the Browse button and navigate to the path where you saved the workspace. This example uses
C:\Users\sbuser\Hello LiveView -
Give the local workspace a name, version, and description. This example creates a 1.1 version of the Hello LiveView workspace in sbuser's home directory:

-
Click . Your LiveView Workspace Manager now displays the two workspaces available on the server:

-
Close LiveView Workspace Manager.
