Customizing Filters for Studio Manager
Filter definitions can be created for in Studio Manager for these options: Cached Resources, Data Sources, Events, Requests, Sessions, Transactions, and Triggers. Filter definitions in addition to the filter that is currently being used on a console are saved when you exit the Studio. The filter will be available when you restart the Studio and Studio will automatically reuse the same active filter for the specific console.
To filter data for displaying in the table view
1. Open Studio Manager.
2. Select any option with a Details table such as Cached Resources, Data Sources, Events, Requests, Sessions, Transactions, or Triggers.
3. From the Filter field, select Edit Filters.
4. Click the green plus-sign to add a filter.
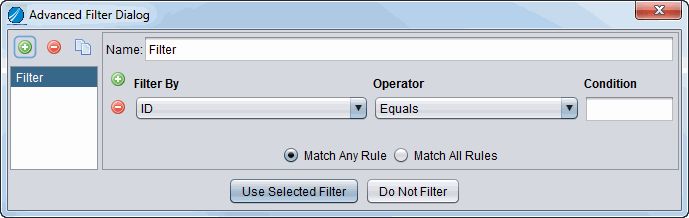
5. Name your new filter.
6. Make choices for the following options.
Option | Description and Action |
Filter By | Lists the columns displayed in the table view. You can select a column in this list to choose the column on which to apply the filter. |
Operator and Condition | Work together as the two sides of an equation with the column. Operator lists a set of conditions for your selection and Condition lets you specify the value for the Operator. Specify your condition in the Operator and Condition columns. |
Match Any Rule | Find data that matches any of the rules defined. This option typically returns more results and might take more time. |
Match All Rules | Find data that matches all of my defined rules. This option typically returns a smaller set of date. |
7. Click Use Selected Filter or Do Not Filter.
All filters are saved.