ibi Data Migrator Setup
In addition to providing a graphical interface for designing flows, the ibi Data Migrator desktop interface can also be used to perform the major setup and administrative tasks.
ibi WebFOCUS Environments
The ibi Data Migrator desktop interface allows you to configure the mid-tier environment for a WebFOCUS Reporting Server.
Requirements for Installing the ibi Data Migrator Desktop Interface
To install the separate ibi Data Migrator desktop interface, you need the following:
- 5 GB of hard disk space.
- 2 GB of RAM.
- SVGA or higher resolution graphics card.
- A mouse or compatible pointing device supported by Windows.
- A network (TCP/IP) connecting to the server.
- Any Windows operating system currently supported by Microsoft®.
Install the ibi Data Migrator Desktop Interface
- Procedure
- Close any open programs.
- Download the product archive from the download
site and unzip to a directory on your hard drive. In Windows Explorer,
navigate to the directory and run
setup_dm_client.exe.
Note: There may be other .exe files in the archive for the WebFOCUS Reporting Server installation, as well as the ODBC Client installation. The setup_dm_client.exe file is the installer that you want to use.
The setup program begins and the InstallShield Wizard opens.
- In the Choose Setup Language window, select a language and click Next.
- The InstallShield
Wizard displays the Select the Program Folder and Standard Location
Prompt dialog, as shown in the following image.
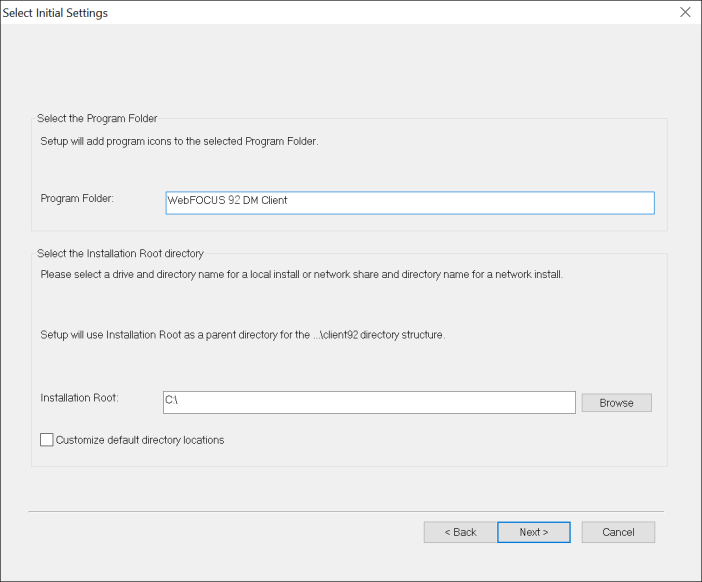
- The default Program Folder name, as it appears in the Windows Start menu, is Information Builders\WebFOCUS DM 90 Client\WebFOCUS DM 91 Client\WebFOCUS DM 92 Client. If you wish to use a different folder name, type it here, but the text must contain WebFOCUS, IBI, or iWay, and the text DM Client. It can contain any interceding numbers, such as 909192. Double spaces are ignored.
- Accept
the default root and product configuration directories, or browse to
directories in which you prefer to install your software. Click Next.
The Configure Basic Server Information dialog opens.
- When
you install the software, you can set up communication to a server.
When you start the software, the server you identify here appears
in the Server list in the navigation pane. The following image shows
the Configure Basic Server InformationConfigure Remote Server dialog.
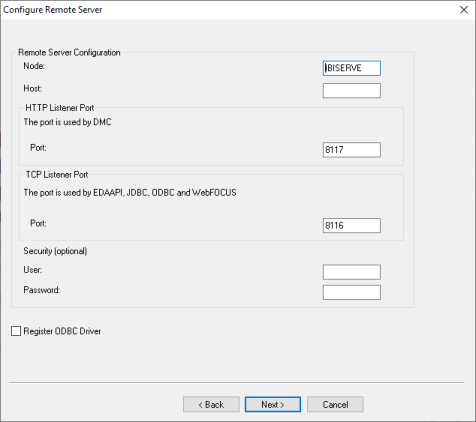
- If you enter a user ID and password in the Server Administrator ID and PasswordSecurity boxes, the client saves the entries, setting security to Explicit by default. You will not be prompted for them again from the ibi Data Migrator desktop interface. This step is optional.
- In the HTTP
Listener Port box, enter the port number of the WebFOCUS Reporting Server.
If you used the defaults when you installed your server,
the HTTP Listener port number is 8121.Note: The server uses a group of six ports, starting one less than the port entered here.
- In the Host box, type the computer name or IP address where the WebFOCUS Reporting Server is running.
- Click Next.
- Click Continue.
Files are copied to the designated locations. Percent of progress is noted during this process.
Informational messages indicate that the setup is configuring the product based on your specifications and that the program folder and icons are being created.
- Optionally, you can start the ibi Data Migrator desktop interface as soon as the installation is complete, or finish (exit) the installation.
Open the ibi Data Migrator Desktop Interface and Connect to an ibi WebFOCUS Reporting Server
As an alternative, the ibi Data Migrator Client can be installed using a UNC location and then accessed from the shared drive. To configure and use the ibi Data Migrator desktop interface from a UNC location, see Running the ibi Data Migrator Client in Zero Footprint Mode.
- Procedure
- On a Windows system, click the Start menu, and click Programs. If using Windows 10, click All Apps.
- Click Information Buildersibi, then
WebFOCUS 90WebFOCUS 91WebFOCUS 92 DM Client\Data Management Console or WebFOCUS 90WebFOCUS 91WebFOCUS 92 Server\Data Management Console.
The ibi Data Migrator desktop interface opens with the available servers listed in the navigation pane on the left.
- Right-click the server that you wish to use and click Connect.
If you have not entered connection information, the ibi Data Migrator desktop interface login dialog opens. Enter the credentials in the fields provided.
- If your server has security enabled, type your user ID and password in the
User Name and Password fields. If you are connecting with a domain
user ID, select the domain from the dropdown menu.
Windows requires that your username be no longer than 32 characters.
Note: If you select Save credentials, you do not need to enter these credentials each time you connect, and the dialog does not appear. However, you must reenter this information when you change your password for the server. To do so, right-click the server name in the navigation tree and click Properties to reopen the Remote Server Configuration dialog. - Click Connect.
For data retrieval and processing to occur, you must perform this connection step each time you start the ibi Data Migrator desktop interface.
Add a Node to Identify the ibi WebFOCUS Reporting Server to the ibi Data Migrator Desktop Interface
You can set up the ibi Data Migrator desktop interface to connect to any number of servers in your enterprise.
When the ibi Data Migrator desktop interface opens for Windows servers, the default LOOPBACK node is listed under Servers in the navigation pane. It does not appear if you open the desktop interface from a non-Windows installation.
To add another server node in this location:
- Procedure
- Right-click Servers and
click Add Server Node.
The Server Node Configuration dialog opens, as shown in the following image.
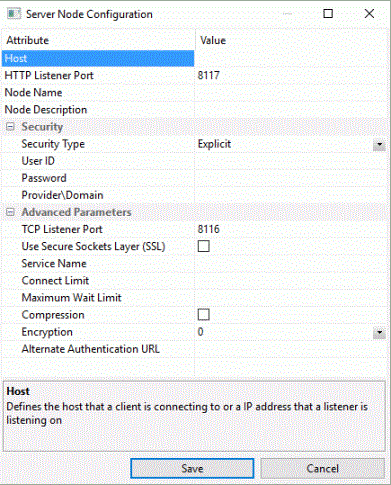 Note: The ibi Data Migrator desktop interface connects to server nodes using an HTTP listener port and the properties specified in the Host section. Applications that connect using the EDA API, like Resource Analyzer/Resource Governor, use a TCP listener port and the properties specified in the Advanced Parameters section.
 - In the Host box, type the computer name or IP address where the server is running. For a server running on the same PC as the client, you can type localhost.
- In the HTTP Listener Port box, enter the port number of the server, which is 8121 if you used the installation defaults. This port listens to all incoming requests from the ibi Data Migrator desktop interface and the WebFOCUS Reporting Server browser interface.
- In the Node Name box, type a name for the server node you wish to add.
- Optionally, type a description of the node in the Node Description box.
- Optionally, use a Secured Sockets Layer (SSL) by selecting that checkbox in the Advanced Parameters section.
- Security
is set to Explicit by default. When this setting
is in effect, the User ID and password you used to log in to Windows
are not passed to the server. If security is required, you must
enter it either at the connection time or in the Security credentials
field to the right.
Alternatively, for servers running on Windows, you can choose IWA (Integrated Windows Authentication), which passes the Windows User ID and password to the server when a connection is made.
- Click Save.
The node is added to the Servers tree, as shown in the following image.
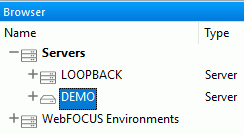
You can test the connection between the ibi Data Migrator desktop interface and the server you have added.
Test the ibi WebFOCUS Reporting Server
Before you proceed, it is recommended to test the connection between the ibi Data Migrator desktop interface and the Server.
To ensure that the server is running and that you are able to retrieve sample data:
- Procedure
- In the ibi Data Migrator desktop interface, double-click the server name. If you can connect to the server, multiple folders, including Application Directories, Adapters, and others, open in the navigation pane.
- Expand the Application Directories folder.
If you can see the list of application directories, you are connected to the server.