Loading Images Into a Database Table
ibi Data Migrator has the capability to load image files into a database table by specifying their location in the input data.
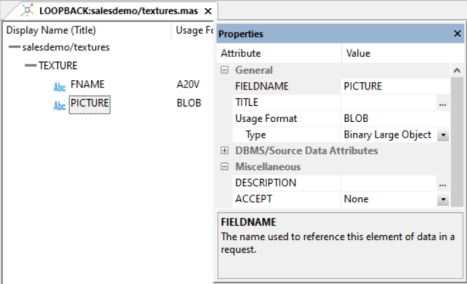
The first step is to create a table to store the images. The table to load should have a column with a data type that can hold binary data. In the current release of MS SQL Server that would be varbinary(max). In previous releases, it is an image. In the synonym, the USAGE and ACTUAL fields for the column are set to BLOB (Binary Large Object, as shown in the following image.
The following example outlines the remaining steps needed to load images into a database table.
Loading Images Into a Database Table
The first step is to map an application directory. The location of the files containing the images is specified in the usual appdir/filename format. To map the application directory:
- Right-click Application
Directories, select New, and
then click Application Directory.
The Create New Application dialog opens.
- From the Application Type dropdown menu, select Application Mapping to Disk.
- In the Application Name box, enter graph.
- In the Physical Location box, enter c:\ibi\srv82909192\home\graph.
- From the Profile dropdown menu, select the desired profile.
- Click OK.
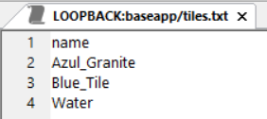
Next, create a source file and synonym. The source data needs a list of the names of the image files. From the ibi Data Migrator desktop interface:
- Right-click baseapp.
- Select New and then click File.
- Type names as a header line, followed by the names of some of the .gif files (without the extension).
- Click the Save button.
- Type tiles as the name and click OK.
The following image shows the result.
Then, create a synonym for the file.
- Right-click baseapp, select New, and then click Synonym.
- Right-click the node for Delimited Files, and click Show local files.
- For Data File, select baseapp/tiles.txt.
- Click OK.
- For Header, select Yes, and click the Tiles synonym.
- Click Add
- Click Close.
Next, create a data flow that loads the images into a database table. The source is the delimited file tiles that contain the names of the image files. The target is the existing database table textures.
- Right-click baseapp. Select New and then click Flow.
- Right-click the left side of the workspace, select Add Source, and then click baseapp/tiles.
- Right-click the right side of the workspace, select Add Target, then Existing, and then click baseapp/textures.
- Double-click the SQL object to open it.
- Double-click Name to add it to the selected columns. Enter FNAME for SQL Alias.
- Click the Insert Columns button.
- For Alias, type PICTURE. For Expression, type 'graph/' || T1.NAME || '.gif'.
- Click the Test SQL button to see the values for the columns.
- Close the Test SQL dialog and click OK to close the SQL object.
- Click OK to close the Column Selection dialog.
- Double-click the Target object.
The Transformations window opens.
- Click the Automap button.
The Transformations window is shown in the following image.
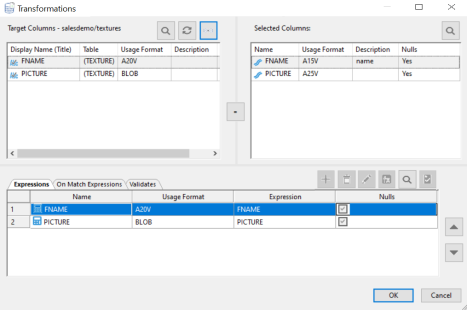
- Click OK to close the Transformations window.
- On the toolbar, click the Run button and click Submit.
- Enter loadim for the procedure name and click Save.
Wait for the completed message to appear in the console log and then click View Last Log to verify that the three rows were loaded.
To see the images that were loaded into the table, you need to write a FOCUS report that sends its output to a PDF file.
- Right-click baseapp, select New, and then click Procedure.
- Enter the following lines:
TABLE FILE textures

PRINT PICTURE

BY FNAME

ON TABLE PCHOLD AS baseapp/texturpt FORMAT PDF

ON TABLE SET STYLE *

TYPE=REPORT,$

TYPE=DATA,COLUMN=PICTURE,IMAGE=(PICTURE),SIZE=(1 1),POSITION=(+0.5 +0.5),$

END
- Click Run.
The PDF file opens in the workspace.