Source Control Security Server and Client Setup
For source management solution, ibi Data Migrator allows SCC control at the client side and stores home directories on the server side. Each developer has a user home directory, which serves as a storage location for ongoing work. User home directories are read-write for their owner with no access by any other developer, which prevents overwriting code among multiple developers. In addition, to prevent circumventing the source code, central application directories allow read-only privileges for all developers, while write access is granted only to the manager. The manager creates user home directories and deploys the latest files from the source control management system to the central application directories.
The descriptions and roles of these two positions are:
Create and edit flows. Their role is that of Application Administrator. By default, developers are assigned to Application Administrator roles. However, more or less privileges can be granted by the Server Administrator.
Create user home directories for all developers and deploy the latest files from the source control management system to the central application directories. Their role is that of Server Administrator. By default, the manager is assigned to Server Administrator. However, you can create different roles so that the manager can deploy files, but cannot stop and start the server or change adapters.
It is critical that you follow the procedures carefully and in their proper sequence.
Configure Server Security
Before starting, the manager must set up server security so that developers are required to log in.
- Procedure
- From the ibi Data Migrator desktop interface, expand the Access Control folder.
- Right-click
the Security Providers folder and click Change
Provider.
The Change Provider dialog opens.
- Set the Security Mode dropdown menu to the desired authentication type.
- Enter your password and click Apply and Stop Server.
- Restart the server.
Create and Configure User Home Directory
Once the manager logs in to the ibi Data Migrator desktop interface with ibi Data Migrator Security On, the next step is to create the user home directory, also referred to as homeapps. Each developer possesses write access to their home directory inside homeapps.
- Procedure
- From the
ibi Data Migrator desktop interface, right-click the Workspace folder, point to Workspace SET, and
then click Application Settings.
The Application Settings dialog opens.
- Enable nested_app by setting it to the Y value.
- Enter the
appropriate homeapps path. The homeapps path should be created under
the ibi Data Migrator root, ibi directory, as shown in the following image.
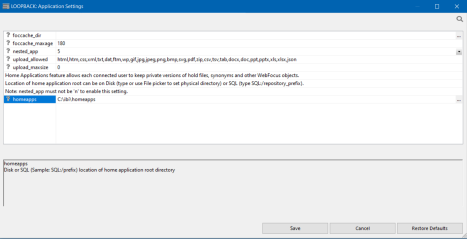
- Click Save.
Register Users
The manager registers new developers and assigns access roles from the WebFOCUS Reporting Server browser interface.
- Procedure
- From the ibi Data Migrator desktop interface, expand the Access Control folder.
- Expand the Roles folder, right-click Application Administrator, and then click Register User.
- Enter the
appropriate user or developer name and their credentials in the
User Registration dialog.
Note: A user or developer name must be defined in Windows Local Users and Groups if using OPSYS authentication type on Windows. A similar rule would apply to another authentication type.
- Click Register.
An Option dialog appears to indicate that the new user is registered. Click OK.
Assign Access Control
The default role setting for developers is that of Application Administrator. Each developer possesses write access to their home directory and read/list access to central application directories.
In the ibi Data Migrator desktop interface:
- Procedure
- Right-click
an application directory and click Privileges.
The File/Directory Privileges dialog opens.
- For the Application Administrator role, limit File
Access options to Read files for AREAD and List
files for ALIST, as shown in the following image.
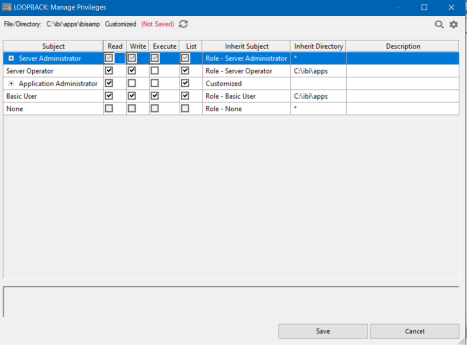
- Click Save.
Log Onto ibi Data Migrator Desktop Interface With Security On
Developers log on to the ibi Data Migrator desktop interface with proper authentication.
- Procedure
- Open the ibi Data Migrator desktop interface.
- Right-click a Server node and click Properties.
- Log in with the appropriate User ID and Password that was created and registered by the manager. Click OK.
- Right-click the Server node and click Disconnect and then Connect to connect through the new security setting.
Associate User Home Directory With Source Control Project
Each developer has a user home directory, which serves as a storage location for ongoing work. All developers must copy and paste the application directories into their user home directory.
- Procedure
- In the ibi Data Migrator desktop interface,
right-click Application Directories and click Create
My Home.
My Home [developer name] directory appears.
- Right-click the application directory that you want to add to the source control, click Copy, and then paste it in the user home directory.
Repeat this step for all application directories that you want to add to source control.