Adding Data Targets
You are going to add two data targets and specify the options you want to use when loading data into them.
- The first data target is a pre-existing table for sales reports that we designed just for this purpose. You are going to add data from last year to it.
- The second is a target table that you create to provide additional analytic data that is useful to the line managers.
The newly created target is updated by other flows.
Map Columns in an Existing Data Target
To specify the first data target:
- From the navigation pane, drag the synonym dmrpts from the ibisamp directory into the workspace, to the right of the SQL object. (The position to the right of the SQL object makes it a data target.)
- Once you have
added the data target to the data flow, you can specify how incoming data
should be handled during the loading process.
Right-click the dmrpts target object and click Properties. For this exercise, accept the default Load Type, Insert/Update, as shown in the following image.
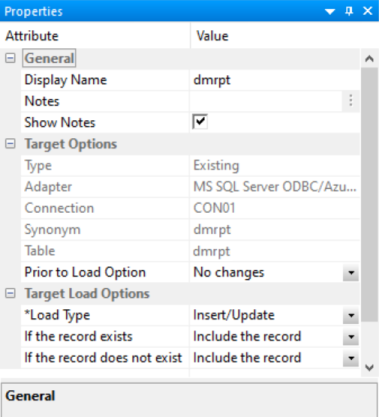 Tip: If you intend to run a flow more than once, it is advisable to clear the target before starting the run. This technique generally enhances performance in subsequent runs. In the Prior to Load Option in the Target Properties window, select the clearing option that suits the adapter type being used for your data targets. For example, for a relational table, the option is Truncate table. For a FOCUS/FDS or XFOCUS table, the option is Drop table.
 - Click X to
close the Properties window.
The next step is to map the data source columns you are extracting to the data target columns.
- Right-click dmrpts and
this time, click Target Transformations.
The Transformations dialog opens. Note: You may need to turn off Optimize Load by right-clicking in the flow workspace and deselecting that option to see all of the tabs on the Target Transformations dialog.
- Click the Automap button.
The five columns with identical names and data types are mapped and moved to the Expression tab. Note that the mapped columns are also checked in the Target Columns list, as shown in the following image.
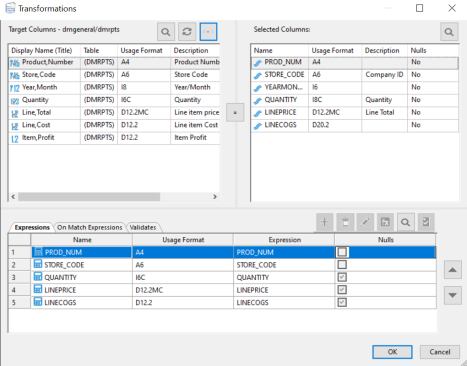
- Two target
column names are deselected, so you need to create mappings or transformations
for them. In the Target Columns list, YRMTH contains year and month data.
You map it to the YEARMONTH column in the Selected Columns
list.
- Under Target Columns, click Year,Month(YRMTH).
- Under Selected Columns, click YEARMONTH.
- Click the equal sign (=) to move the mapping into the grid in the Expressions tab.
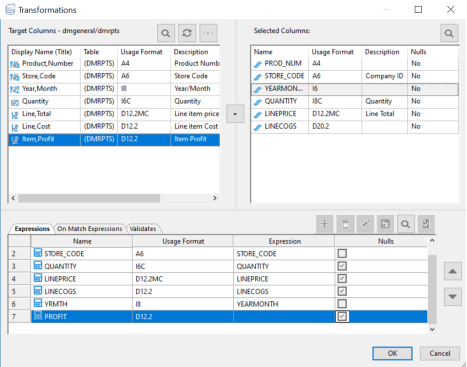
- For the PROFIT
column, you build a transformation based on the definition
of PROFIT as the difference between LINEPRICE and LINECOGS. As you
can see, the data target is another place where we can apply transformations.
Under Target Columns, double-click Item,Profit(PROFIT) to move it to the Target Columns list in the Expressions tab, as shown in the following image.
- To open the
Transformations Calculator, double-click PROFIT in
the Expressions tab. To create the expression in the Expression
box of the calculator:
- In the tree, double-click LINEPRICE.
- On the calculator pad, click the minus (-) sign.
- In the Source Columns list, double-click LINECOGS.
The Transformation Calculator should look like the following image.

- Click OK to
complete the expression and close the calculator.
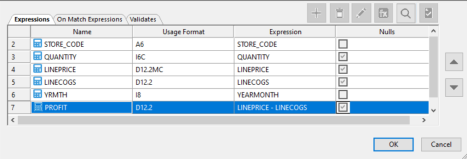
The Expressions tab of the Transformations dialog now looks like the following image.
- Scroll to the
right to see the last column. It may be useful to validate the incoming data.
To do that, load only those records with a quantity greater than
or equal to ten. Records that do not meet this validation criterion
can be logged to a file for additional processing or for review
later.
Click the Validates tab in the Transformations dialog. Then click the Insert Intermediate Transforms button to open the Validate Calculator.
- To build the validation expression, double-click QUANTITY in the tree, and then select GE from the Relation dropdown menu. Input 10 into the Value field. Click OK. Your goal is to see which rows pass the validation test.
- Now, let us
test the validation and transformations to ensure that they are syntactically
correct and performing the desired calculations. The test retrieves
some rows from the server, applies the transformations, and displays
the results.
Click the Test Transforms button in the upper-right corner, above the Validates tab in the Transformations calculator.
The result of the transformation test appears, as shown in the following image.
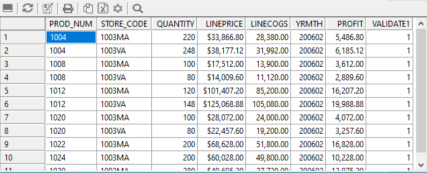 Note: The number of records retrieved depends on the Run Options set from Options, in the Tools group on the Home tab, and on the database you choose for your sample data.
In the VALIDATE1 column, the number 1 represents the rows that is accepted based on the validation test. The zeroes (0) represent rows that is rejected because QUANTITY is less than 10.
Tip: Since you have been working in the Transformations dialog, testing from there is the simplest method, but you can also test the transformation by right-clicking the target object, clicking Expand, and clicking the Test Transforms tab. - Notice that Profits are positive in the answer set, which means that the transformation is working. It also satisfies the test condition, so you can move on to the next data target, which you will create from scratch.
- Close the Test Transformation dialog, and click OK to close the Transformations dialog.
Create a Data Target
ibi Data Migrator can load multiple data targets in a single data flow. Let us add another target object into the data flow. This time, the data target you need does not exist, so you create it using the columns in the SQL SELECT statement that you defined for the SQL Select Columns object.
This target table is used by line managers for competitive analysis. You create the base table here, but other flows can update it with additional information.
- Right-click in the workspace to the right of the SQL object, point to Add Target, and then click New. A new data target appears to the right of the SQL object.
- Right-click
the new target and click Properties.
The Target Properties pane opens.
- To define target
properties:
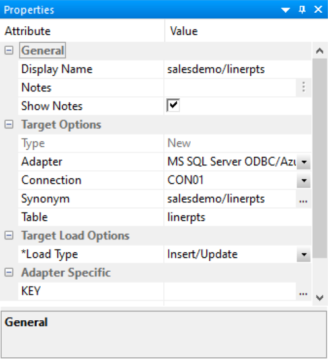
- Choose the same type of adapter that you used for the data sources in our example. In this case, it was MS SQL Server ODBC.
- Change the value for Synonym to salesdemo/linerpts.
- Retain the
default Load Type of Insert/Update.
The target Properties pane should look like the following image.
- Close the pane.
- Right-click the new data target and click Target Transformations.
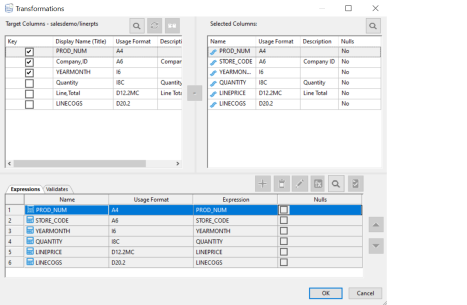
- In the table
you are creating, PROD_NUM, STORE_CODE, and YEARMONTH are all keys.
Click each one to identify them, and those above it, as keys. The
Transformations dialog looks like the following image.
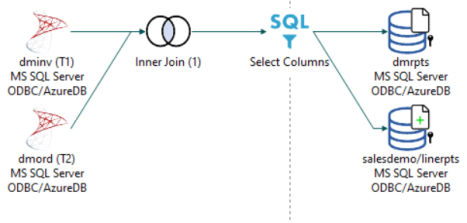
- Click OK to
return to the Data Flow tab, which now contains two data sources
and two data targets, as shown in the following image.
Next Step: You are ready to save the data flow. Both data targets, dmrpts and linerpts, is loaded based on your specifications.
Save and Name the Data Flow
Click the Save button in the Quick Access Toolbar.
The Save Procedure As window opens. Select which application directory to save the flow to using the Save In dropdown menu, and enter a flow name in the Name field. For this example, we save our flow in the salesdemo application directory, and name it salesdb.
Next Step: You are ready to run the data flow.