Configuring the Adapter for Salesforce.com
Configuring the adapter consists of specifying connection and authentication information for each of the connections that you want to establish.
Configuring an Adapter
- Procedure
- From the WebFOCUS Reporting Server browser interface Applications page, click Get Data.
- In the WebFOCUS Reporting Server browser interface, click the (+) button, and find the adapter on the page or, in the ibi Data Migrator desktop interface, exapnd the Available folder if it is not already expanded.
- In the ibi Data Migrator desktop interface, expand the appropriate group folder and the specific adapter folder. The group folder is described in the connection attributes reference.
- Right-click
the adapter name and/or version and select
Configure.
The Add Adapter to Configuration pane opens.
- Enter values for the parameters required by the adapter, as described in the chapter for the specific adapter you want to configure.
- Click
Configure. The configured adapter is added to the
Configured list in the
WebFOCUS Reporting Server browser interface or in the Adapters
list in the ibi Data Migrator desktop interface resources tree.
In the WebFOCUS Reporting Server browser interface, the adapter remains on the Available Adapters list with an asterisk to indicate that at least one connection has been configured. You can configure additional connections from either the Configured or Available list by right-clicking the adapter and clicking Add Connection.
Salesforce.com Connection Parameters
The following list describes the information in the Add Salesforce.com to Configuration dialog. Not all options appear for all applications.
Logical name used to identify this particular set of connection attributes. The default is CON01.
Salesforce.com user ID (email address).
The password associated with your Salesforce.com user ID, followed by the security token. For example, if your password is myPass and your security token is xyyzyx then you would enter myPassxyyzyx.
The URL to log into Salesforce.com using SOAP. Use the default value provided, unless instructed otherwise by Customer Support.
This field appears when Explicit security is selected.
There are two methods by which a user can be authenticated when connecting to a database server:
- Explicit. The user ID and password are explicitly specified for each connection and passed to the database, at connection time, for authentication.
- OAuth. Open Authorization which grants limited access to user accounts on an HTTP service.
EXPLICIT
The following are the connection attributes for the Explicit security method:
Primary authorization ID by which you are known to the data source.
Password associated with the primary authorization ID.
OAUTH
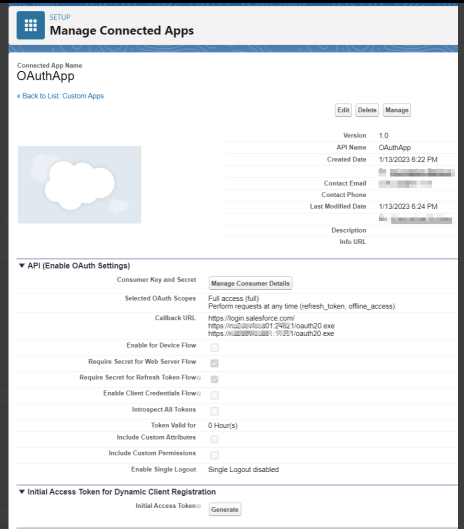
Before configuring the Adapter for Salesforce.com with OAuth security, you must register and configure a connected app. For more information about configuring a connected app, see Create a Connected App and Enable OAuth Settings for API Integration topics in the Salesforce Help.
When configuring the connected app for the Authorization Code flow, enable the following settings in the API (Enable OAuth Settings) section.
- Select the following OAuth scopes:
- Perform requests at any time (refresh_token, offline_access)
- Full Access
- Select the Require Secret for Refresh Token Flow setting.
- Select the Require Secret for the Web Server Flow setting.
- Enter the Callback URL.
The connected app for Authorization Code is shown in the following image.
The following are the connection attributes for the OAuth security method:
There are two OAuth Grant Types that can be configured:
- Authorization Code. Allows you to obtain a long-lived Access Token that can be renewed with a Refresh Token by using an Authorization Code returned from an Authorization request.
- Client Credentials. Is used when the OAuth implementation only requires a Client ID and Client Secret.
This field appears when OAuth security is selected.
AUTHORIZATION CODE
The following are the connection attributes for the Authorization Code Grant Type:
Is the client ID used for OAuth authentication. This field appears when OAuth security is selected.
Is the Client Secret used for OAuth authentication. This field appears when OAuth security is selected.
URL used for OAuth Authorization to a specific application.
For example, the Authorization URL for the Salesforce set of APIs is https://login.salesforce.com/services/oauth2/authorize.
Is the URL used for obtaining an Access Token to a specific application. This field appears when OAuth security is selected.
For example, the Token URL for the Salesforce set of APIs is https://login.salesforce.com/services/oauth2/token.
Is the Refresh Token returned from the OAuth Token request. This field appears when OAuth security with the Authorization Code Grant Type is selected. The token is used for obtaining a new Access Token at the time a report is run accessing the REST Service for a specific application. Click Get Access Token to obtain this token.
CLIENT CREDENTIALS
The following are the connection attributes for the Client Credentials Grant Type:
Is the client ID used for OAuth authentication. This field appears when OAuth security is selected.
Is the Client Secret used for OAuth authentication. This field appears when OAuth security is selected.
Is the URL used for obtaining an Access Token to a specific application. This field appears when OAuth security is selected.
Advanced HTTP connection options
Is the IP address of the proxy server, which intercepts requests and forwards them to the actual server.
Is the port number on which the proxy server listens. The default port number is 80.
When checked, the request sends the proxy HTTPS relative path rather than the absolute path when a proxy server is configured.
Select a profile from the drop-down menu to indicate the level of profile in which to store the CONNECTION_ATTRIBUTES command. The global profile, edasprof.prf, is the default.
If you wish to create a new profile, either a user profile (user.prf) or a group profile if available on your platform (using the appropriate naming convention), choose New Profile from the drop-down menu and enter a name in the Profile Name field (the extension is added automatically).
Store the connection attributes in the server profile (edasprof).