Migrating the Resource Management Repository
If you want to access monitor data from a previous release when upgrading, you must migrate the previous Resource Management repository contents into the new release repository.
Requirements for Migrating the Resource Management Repository
The following conditions are required to migrate the Resource Management repository.
- Monitoring must be turned off on both the host and target server before running the migration procedure. Also, the host log file must be archived to the repository before it is migrated to the new repository.
To turn off monitoring, use the WebFOCUS Reporting Server browser interface to Disable Monitoring & Governing. If you turn monitoring back on and continue to monitor in the old release, you must re-run the migration in order to migrate the newly monitored data.
- When migrating monitor data stored in FOCUS, the tables must be available during migration. No actively running sink machine (SU) process is recommended or required.
- For both relational and FOCUS migration, the repository tables in the old release locations remain where they were and can be used as backup. Note: When you run the migration more than once, which is necessary if you continued monitoring in the old release after migration and want the newly monitored data to be migrated, you will get a duplicate record error message. The duplicates are ignored and the new records are added.
Migrating a Resource Management Repository for a New Server Install
You can migrate a Resource Management repository on UNIX, Windows, UNIX System Services, and IBM i for a new server install. For these platforms, the migration procedure is executed in a WebFOCUS Reporting Server browser interface session.
Migrate a Resource Management Repository for a New Server Install
To start the migration job:
- Procedure
- Click the Resource Management option in the .
- On the ribbon, in the Repository group, click Migration and click Migrate old release.
or
From the navigation pane, right-click , point to Migration, and then click Migrate old release.
Note: You can also perform this task by clicking the Workspace option in the , right-clicking Workspace in the navigation pane, and clicking Migrate.The Migration page opens.
- From the drop-down menu, select the release number from which you are migrating. Options include 7703, 7704, 7705, .
- For all releases, you must enter the path to the EDACONF directory of the release being migrated. Examples are C:\ibi\srv77\wfs for Windows and /home1/ibi/srv77/wfs for UNIX.
- Enter the path to the EDAHOME directory of the release being migrated. Examples are C:\ibi\srv77\home for Windows and /home1/ibi/srv77/home for UNIX.
Note: This is only required if the old release is version 7.7.03.
- Click Next.
The Resource Management Migration: Submit Migration Job pane opens.
- From the System Database Migrate drop-down menu, select Yes if you want to migrate the old release system database. If you select Yes, additional options become available.
The additional configuration data options are:
Log record preferencesSelect Yes to migrate the old release log record preference settings to the system repository of the current server. Migrating this data will cause any existing log record preference data to be replaced with the data from the old release.
Logging PropertiesSelect Yes to migrate the old release logging property settings to the system repository of the current server. Migrating this data will cause any existing logging properties data to be replaced with the data from the old release.
- From the Data Repository Migrate drop-down menu, select Yes if the previous release data repository should be migrated. If Yes is selected, SMCNTRL, SMPRMTRS, and SMPRL data will be migrated. The default value is No.
If you select Yes, additional options become available.
The additional options let you migrate data in smaller portions, instead of all at once. The available options are:
Start DateThe starting date of the data to be migrated. The default value is the earliest date in the old repository.
End DateThe ending date of the data to be migrated. The default value is the latest date in the old repository.
Note: Only custom BRL members will be migrated. The SMKNBNAME value in SMCNTRL will not be migrated, and any Govern and/or Advise values will be set to OFF. Any compiled rule files must be rebuilt after the migration is completed, and new Govern and/or Advise values must be set.
- Accept the default dates, or enter a specific date that you want the migration to run.
- Click Submit Job. A confirmation of the request appears, stating that the deferred execution request is in the queue.
- On the ribbon, in the Repository group, click Migration and then click .
or
From the navigation pane, right-click , point to Migration, and click .
The Deferred List pane opens, displaying the list of deferred requests, and showing the request name that was displayed when the deferred migration job was scheduled. Examples of request names are listed in the Defer ID column.
The Status column shows the state of the deferred request, which can be Queued, Executing, or Ready. To see if the status has changed to Ready, either keep refreshing the page using the refresh options located at the top of the page, or redisplay the page at a later time. Once the status is Ready, right-click the request line and click Get to review the job output.
- You can choose whether to remove the old configuration files or perform this action in the future.
On the ribbon, in the Repository group, click Migration and then click Delete work files.
or
From the navigation pane, right-click point to Migration, and click Delete work files.
- Click Delete and then OK to confirm.
Note: Once you choose to remove the old configuration files, the option to migrate data will no longer be available.
Migrate a Resource Management Repository for a New Server Install
To start the migration job:
- Procedure
- Click the Resource Management option in the Tools menu.
- On the ribbon, click the Repository icon, point to Migration, and click Migrate old release.
Note: You can also perform this task by clicking the Workspace option in the sidebar, right-clicking Workspace in the navigation pane, and clicking Migrate.
The Repository Migration page opens, as shown in the following image.
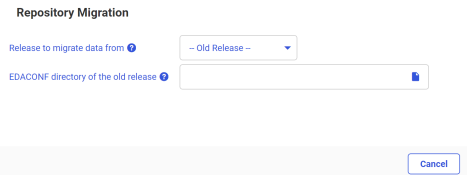
- From the drop-down menu, select the release number from which you are migrating. Options include 7703, 7704, 7705, 7706, 7707, 7708, 7709, and 7710.
- For all releases, you must enter the path to the EDACONF directory of the release being migrated. Examples are C:\ibi\srv77\wfs for Windows and /home1/ibi/srv77/wfs for UNIX.
- Click Next.
The Resource Management Migration: Submit Migration Job pane opens, as shown in the following image.
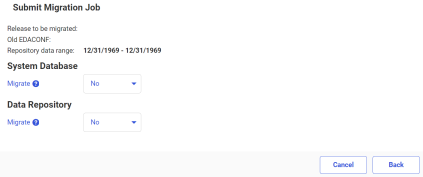
- From the System Database Migrate drop-down menu, select Yes if you want to migrate the old release system database. If you select Yes, additional options become available, as shown in the following image.
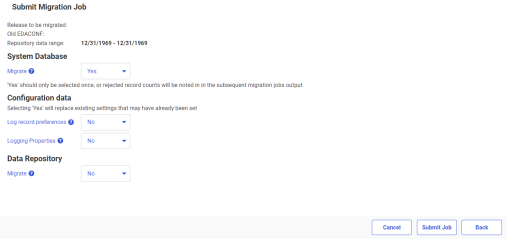
The additional configuration data options are:
Log record preferencesSelect Yes to migrate the old release log record preference settings to the system repository of the current server. Migrating this data will cause any existing log record preference data to be replaced with the data from the old release.
Logging PropertiesSelect Yes to migrate the old release logging property settings to the system repository of the current server. Migrating this data will cause any existing logging properties data to be replaced with the data from the old release.
- From the Data Repository Migrate drop-down menu, select Yes if the previous release data repository should be migrated. The default value is No.
If you select Yes, additional options become available, as shown in the following image.
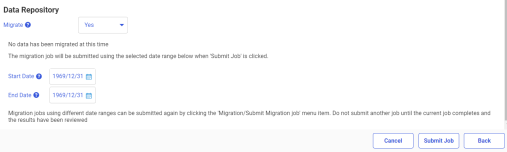
The additional options let you migrate data in smaller portions, instead of all at once. The available options are:
Start DateThe starting date of the data to be migrated. The default value is the earliest date in the old repository.
End DateThe ending date of the data to be migrated. The default value is the latest date in the old repository.
Note: Only custom BRL members will be migrated. The SMKNBNAME value in SMCNTRL will not be migrated, and any Govern and/or Advise values will be set to OFF. Any compiled rule files must be rebuilt after the migration is completed, and new Govern and/or Advise values must be set. - Accept the default dates, or enter a specific date that you want the migration to run.
- Click Submit Job. A confirmation of the request appears, stating that the deferred execution request is in the queue.
- On the ribbon, click the Repository icon, point to Migration, and then click View jobs.
The Deferred List pane opens, displaying the list of deferred requests, and showing the request name that was displayed when the deferred migration job was scheduled. Examples of request names are listed in the Defer ID column, as seen in the following image.

The Status column shows the state of the deferred request, which can be Queued, Executing, or Ready. To see if the status has changed to Ready, either keep refreshing the page using the refresh options located at the top of the page, or redisplay the page at a later time. Once the status is Ready, right-click the request line and click Get to review the job output.
- You can choose whether to remove the old configuration files or perform this action in the future.
On the ribbon, click the Repository icon, point to Migration, and then click Delete work files.
- Click Delete and then OK to confirm.
Note: Once you choose to remove the old configuration files, the option to migrate data will no longer be available.
Migrating a Resource Management Repository After a Server Refresh
You can migrate a Resource Management repository on UNIX, Windows, UNIX System Services, and IBM i after a server refresh. The migration information described below is only applicable if the server environment has been upgraded by performing the refresh option during the installation process. To refresh the server, follow the instructions in the Installation Guide for your platform.
Migration Usage Notes:
- The migration process must be applied to the original server that was refreshed. If a clone server was set up and the Resource Management repository was copied to this server for the purpose of testing, the migration process will not work. There are inter-dependencies in the Resource Analyzer repository data based on the machine name and port number used when first configured.
- The migration of the Resource Management repository on MVS PDS deployment after a refresh is not supported. A new server environment is required.
Once the refresh process has completed successfully, start the server and then the WebFOCUS Reporting Server browser interface.
The migration is performed from the WebConsole and consists of three phases:
- Migrate configuration file (Required).
- Migrate repository (Optional).
- Remove old files (Optional).
For these platforms, the migration procedure is executed on a WebFOCUS Reporting Server browser interface session.
If you start the WebFOCUS Reporting Server browser interface session with security ON, a message is displayed, as shown in the following image.

This message indicates that the structure of the Resource Management repository has changed. A migration process is required in order to update the existing repository so that new data columns can be archived to the repository. If the migration process is not run, monitor data will still be collected and archived but without the new data columns.
You can:
- Ignore the message contents by closing the message window. The repository will still have the old structure and the warning message will continue to be shown for a total of 10 times, or until the migration process has been performed.
- Start the migration process by clicking Continue and then clicking Resource Management.
The Resource Management Migration pane opens. The sequence of panes is slightly different depending on the repository type.
Migrate a Repository After a Server Refresh
The following procedure details the steps for migrating a FOCUS or relational repository after a server refresh.
- Procedure
- Click the Resource Management option in the Tools menu.
- For a FOCUS Repository: Phase 1 - Migrate Configuration, the pane opens in Phase 1.
- Click Reconfigure to complete Phase 1.
- For a Relational Repository: Phase 1 - Migrate Configuration, the pane opens in Phase 1, as shown in the following image.
The options in the Create Repository drop-down menu are Yes, No, and DDL Only.
For Phase 1 - Create Repository Yes:
Select this option if you have DBA authority over the existing Resource Management repository tables. New repository tables will be created with a suffix of _nnnn, where nnnn reflects the release number. The process will continue at Phase 2.
- Select Yes from the Create Repositories drop-down menu. A list of actions that will be performed is displayed.
- Click Next to go to step 4 and begin Phase 2.
For Phase 1 - Create Repository DDL Only:
Select this option if you do not have DBA authority over the existing Resource Management repository tables. This option creates a file, rmldb.sql, which contains RDBMS specific DDL.
- Select DDL Only from the Create Repositories drop-down menu.
- Click Create DDL. The instructions for the location of the rmldb.sql file are displayed. Give this file to the DBA for processing.
- Click Close. You will be returned to the first migration screen. You must create the tables before continuing.
Note: Your DBA must create the new repository tables in the same location as the original 7.7 tables, and both sets of tables have to be accessible on the same adapter connection on the server. The new tables will have the release number appended to the name. The format will be tablename_release.
- Once the repository tables have been created, return to the WebFOCUS Reporting Server browser interface and click Resource Management.
- Go to step 4 to begin Phase 2.
- Phase 2 - Migrate data, select the Migration data option from the drop-down menu, as shown in the following image.
The options are Yes or No.
Note:-
If you selected DDL Only in the previous step, click Reconfigure.
- When returning to this page after selecting DDL Only, the default value is No. Do not select Yes or an error will occur.
For Phase 2 - Migrate data Yes:
Select this option to copy data from the old repository to the new one. When this option is selected, additional options become available, as shown in the following image.

The additional options let you migrate data in smaller portions, instead of all at once. The available options are:
Start DateThe starting date of the data to be migrated. The default value is the earliest date in the old repository.
End DateThe ending date of the data to be migrated. The default value is the latest date in the old repository.
- Click Submit Job to schedule the migration procedure. A confirmation of the request appears, stating that the deferred execution request is in the queue.
- Go to step 7.
For Phase 2 - Migrate data No:
Select this option if you do not want data to be copied from the old repository to the new one.
To run the migration process at a later date, select Resource Management on the Tools menu and on the ribbon, Migration, and click Submit job.
The Resource Management Migration: Submit Migration Job pane will open on Phase 2.
- Click Exit to continue.
- Optionally, review step 5.
-
- To view the Migration Job page if migration was selected, on the ribbon, in the Repository group, click Migration, and then click View job.
The Deferred List pane opens.
- Right-click on the job and click Get to see if there are any FOCUS errors.
- Phase 3 - Remove old configuration and data files, you can choose whether to remove the old configuration files or perform this action in the future.
On the ribbon, Migration, and then click Delete work files.
- Click Delete and then OK to confirm.
Note: Once you choose to remove the old configuration files, the option to migrate data will no longer be available.
Migrating a Resource Management Repository on MVS
This option is only available when migrating data from a new server install of Release 7.7. Repository migration is not available from earlier releases.
Migrate a Resource Management Repository on MVS
To start the migration job:
- Procedure
- Click the Resource Management option in the Tools menu.
- On the ribbon, click the Repository icon, point to Migration and click Migrate old release.
- The Resource Management Migration page opens.
- To migrate data from the release, use the drop-down menu to select the release number from which you are migrating. The options include 7700-7702, 7703, 7704, 7705, 7706, 7707, 7708, and 7709. Depending on the release selected, one or more of the following options will be available.
Note: For help in identifying the dataset names required on the next two panes, see the chart in Step 6.GKTABLE dataset name
The dataset name of the Resource Management parameter file.
REPOSITORY dataset nameThe dataset name of the FOCUS repository from the previous release.
RMLSYS dataset nameThe dataset that contains Resource Management system information.
CONFIGURATION dataset nameFor old release selections of 7703 or 7704, this is the dataset name that contains the Master File profile members. They are RMLPD773 (7703) or RMLPD774 (7704) and RMLPRFSY (both releases).
- Click Next to continue.
- The Submit Migration Job pane opens.
For all other releases, the same pane will show but without the Create 7.6 compatibility masters option available. The following options are available:
Migrate system dataSelect Yes if the previous releases system data should be migrated. If Yes is selected, SMCNTRL, SMPRMTRS and SMPRL data will be migrated. Only custom BRL members will be migrated. The SMKNBNAME value in SMCNTRL will not be migrated and any Govern and/or Advise values will be set to OFF. Any compiled rule files must be rebuilt after the migration is completed, and new Govern and/or Advise values must be set. The default value is No.
For releases 7700 – 7702, 7703 and 7704, if Yes is selected, one or two additional input boxes are shown depending on the old release selection.
All of the names in the following chart require QUALIF.servertype as a prefix.
Where servertype can be FFS, WFS, or DM.
Dataset name
7704-7706
GKTABLE
CONF.PRF
REPOSITORY**
RMLDB.FOCUS
RMLSYS*
RMLSYS.FOCUS
CONFIGURATION
CONF.CFG
* Only required when migrating system data.
** Only required if old repository is FOCUS.
- From the Data Repository Migrate drop-down menu, select Yes if the data repository for the previous release should be migrated. If Yes is selected, SMCNTRL, SMPRMTRS, and SMPRL data will be migrated. The default value is No.
If you select Yes, additional options become available.
The additional options let you migrate data in smaller portions, instead of all at once. The available options are:
Start DateThe starting date of the data to be migrated. The default value is the earliest date in the old repository.
End DateThe ending date of the data to be migrated. The default value is the latest date in the old repository.
- Accept the default dates, or enter a specific date that you want the migration to run.
- Click Submit Job. A confirmation of the request appears, stating that the deferred execution request is in the queue.
- On the ribbon, Migration and then click View job.
The Deferred List pane opens, displaying the list of deferred requests and showing the request name that was displayed when the deferred migration job was scheduled. Examples of request names are listed in the Defer ID column.
The Status column shows the state of the deferred request, which can be Queued, Executing, or Ready. To see if the status has changed to Ready, either keep refreshing the page using the refresh options located at the top of the page, or redisplay the page at a later time. Once the status is Ready, right-click the request line and click Get to review the job output.
- You can choose whether to remove the old configuration files or perform this action in the future.
On the ribbon, Migration and then click Delete work files.
- Click Delete and then OK to confirm.
Note: Once you choose to remove the old configuration files, the option to migrate data will no longer be available.