Linking to a Git Repository
If you have configured the Adapter for Git, you can link to a Git repository.
Before you connect to the Git repository, you must enable the Source Code Management option in the Administration Console. For more information, see ibi™ WebFOCUS® Security and Administration guide.
Prerequisites for Connecting to the Git Repository
- WebFOCUS must be configured for source control management.
- You must configure a connection for the Adapter for Git. For more information see the, ibi™ WebFOCUS® Adapter Administration guide.
Link to a Git Repository
- Procedure
- Sign-in to WebFOCUS as a developer or administrator.
- To clone the existing Git repository, right-click an empty WebFOCUS Reporting Server application directory,
point to Git, and then click Clone.
The Clone tab opens in the canvas.
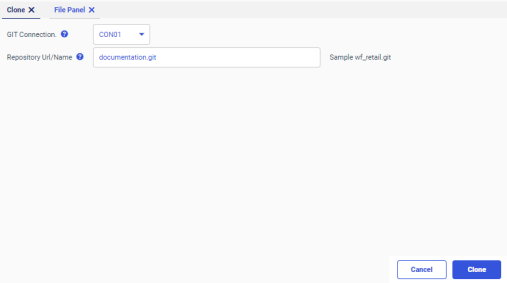
- Select the predefined connection for the Adapter for Git from the GIT Connection drop-down list, enter the Git repository URL or name that you have defined while creating the GIT connection, and click Clone, as shown in the following image.
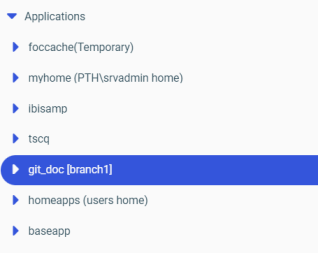
Your remote repository is cloned and displayed in the list of applications, as shown in the following image.
 Note: You can also initialize the new empty repository, connect to the remote Git repository, and perform all the Git operations on it. Right-click the WebFOCUS Reporting Server application directory, point to Git, and then click Init. The selected application directory is converted into a repository. After initializing the new local repository you can link to the remote Git repository. For more information, see Linking to a Git Repository.
Create a New Branch
- Procedure
- Right-click the WebFOCUS Reporting Server application directory,
point to Git, point to Branch, and then click New
Branch.
The New Branch tab opens.
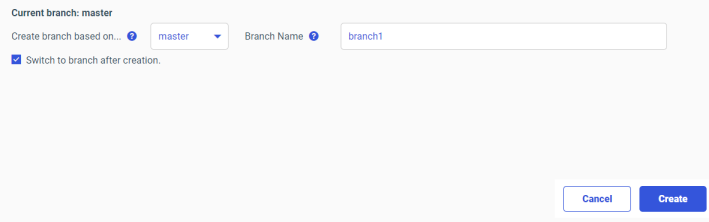
- Select the branch from the Create branch based on drop-down list, enter the Branch name, and click Create, as shown in the following image.
A confirmation displays informing you that the new branch is successfully created.
Note: If you select the Switch to branch after creation checkbox, then the name of your new branch is displayed next to the name of the application directory in the Applications tree.
Switch the Branches
- Procedure
- Right-click the WebFOCUS Reporting Server application directory,
point to Git, point to Branch, and then click Switch to.
The Switch to tab opens. Here you can see all the branches that are associated with your repository.
- Select a branch from the list and click Switch, as shown in the following image.
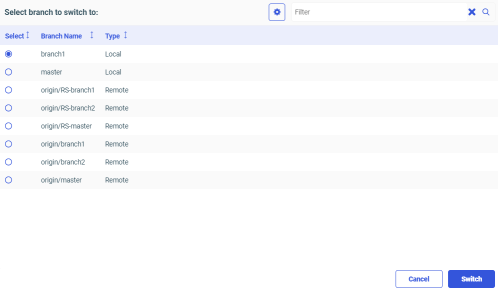 Note: If your list is long, you can use the search field to look for a specific branch.
A confirmation displays informing you have successfully switched the branch. The name of your new branch is displayed next to the name of the application directory in the Applications tree.
Delete a Branch
- Procedure
- Right-click the WebFOCUS Reporting Server application directory,
point to Git, point to Branch, and then click Delete Branch.
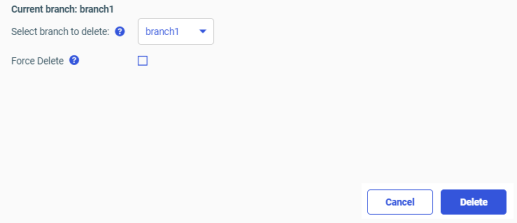
The Branch tab opens.
- Select a branch from the Select branch to delete drop-down list and click Delete, as shown in the following image.
The selected branch is removed from the WebFOCUS repository.
Note: If you select the Force Delete checkbox, your selected branch is deleted even if it is not pushed or merged.
Merge a Branch into Current Branch
- Procedure
- Right-click the WebFOCUS Reporting Server application directory,
point to Git, point to Branch, and then click Merge into Current Branch.
The Branch tab opens.
- Select a branch from the Select branch to merge drop-down list and click Merge, as shown in the following image.
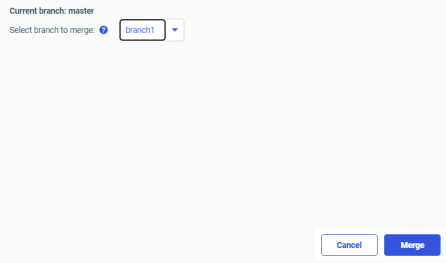
The selected branch is merged into the current branch.
Stage Files for Commit
- Procedure
- Right-click the WebFOCUS Reporting Server application directory,
point to Git, and then click Stage.
The Stage tab opens. Here you see the list of all files which are available for staging.
- Select files from the Select files to be staged list and click Stage, as shown in the following image.
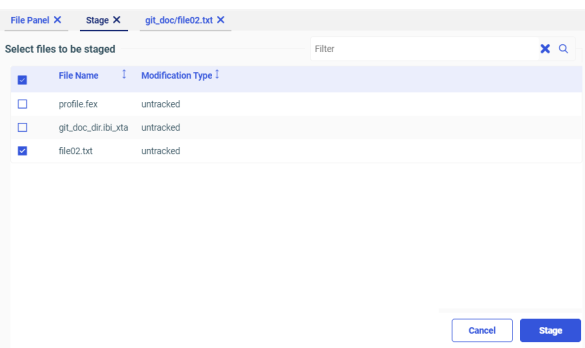
A confirmation displays informing you that the selected files are staged.
Unstage Files
- Procedure
- Right-click the WebFOCUS Reporting Server application directory,
point to Git and then click Unstage.
The Unstage tab opens. Here you see the list of all staged files.
- Select files from the Select files to be unstaged list and click Unstage, as shown in the following image.
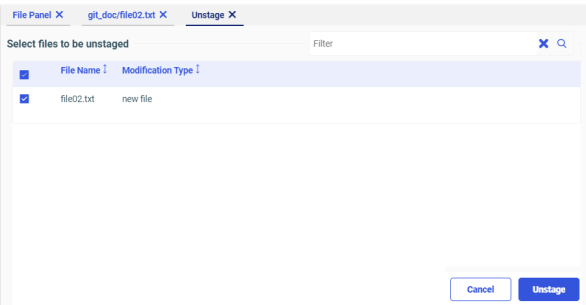
A confirmation displays informing you that the selected files are unstaged.
Create a Commit Request
- Procedure
- Right-click the WebFOCUS Reporting Server application directory,
point to Git, and then click Commit.
The Commit tab opens. There are two tables for Unstaged files and Staged files. You can commit only the files from the Staged table. You can drag and drop files from one table to another table. Therefore, you can add files to the Staged table from Unstaged table and commit them.
- Fill out the Commit Subject and Commit Description fields. and then click Commit, as shown in the following
image.
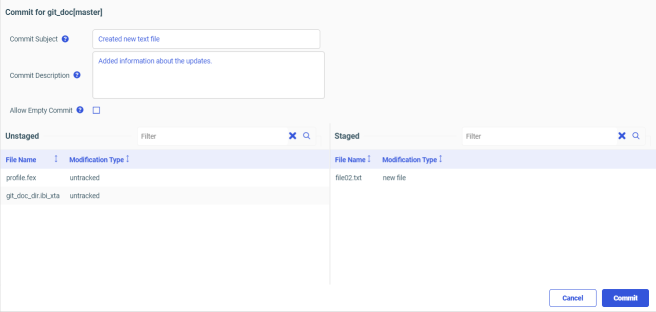 Note: You must enter a value in the Commit Subject field since it is a mandatory field. The Commit Description field is an optional field and can be left empty.
The staged files are now committed to your repository.
Note: If you select the Allow Empty Commit checkbox, you can create a commit request without any files in the Staged table.
Discard Local Changes
- Procedure
- Right-click the WebFOCUS Reporting Server application directory,
point to Git, and then click Discard Local Changes.
The Discard tab opens. Here you see the list of all files with local changes that are not committed.
- Select files from the Select files to discard local changes for list and click Discard, as shown in the following image.
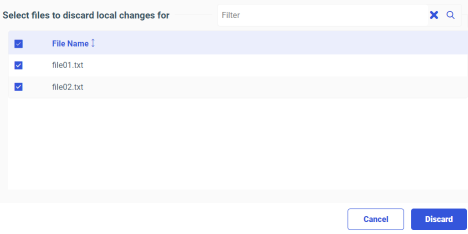
A confirmation displays informing you that the local changes are removed from the selected files.
Track Files in the Repository with the Diff Command
You can compare the different versions of the files and commits by using the Diff option. It allows you to track the changes in the staged files, unstaged files, and the last commit.
- Procedure
- To perform the Diff command on unstaged files, right-click the WebFOCUS Reporting Server application directory,
point to Git, point to Diff, and then click Not Staged.
The Diff tab opens. Here you can see all the untracked files in the current branch which underwent changes.
- To perform the Diff command on staged files, right-click the WebFOCUS Reporting Server application directory,
point to Git, point to Diff, and then click Staged.
The Diff tab opens. Here you can see all the staged files in the current branch which underwent changes and are ready for the commit.
- To perform the Diff command on the last commit, right-click the WebFOCUS Reporting Server application directory,
point to Git, point to Diff, and then click With Last Commit.
The Diff tab opens. Here you can see all the files in the current branch that are committed in the latest commit.
Create a .gitignore file
- Procedure
- Right-click the WebFOCUS Reporting Server application directory,
point to Git, and then click Ignore.
The .gitignore tab opens. Here you can add untracked files and folders. The entries in the .gitignore file are ignored by Git.
- Click the Save icon to save the .gitignore file.
A confirmation displays informing you that the changes are successfully committed to the .gitignore file.
To add more entries to the .gitignore file, repeat the above procedure.
Note: You can also ignore a directory or repository by editing the .gitignore file. You can add patterns of files or directories that you want to ignore to the .gitignore file. When you ignore a directory, all files and subdirectories from that directory are ignored.
View the History of the Current Branch
You can view the history of the current branch based on the log and the reflog as follows.
- Procedure
- To view history based on log, right-click the WebFOCUS Reporting Server application directory,
point to Git, point to History, and then click Based on Log.
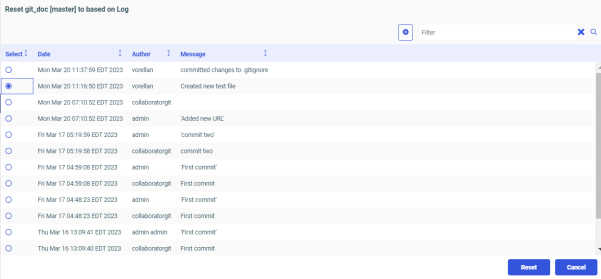
The entire commit history from the latest commit to the very first commit of the current branch is displayed. Here you can see the basic information about the commits this branch underwent, including the committing user, commit dates, and messages, as shown in the following image.
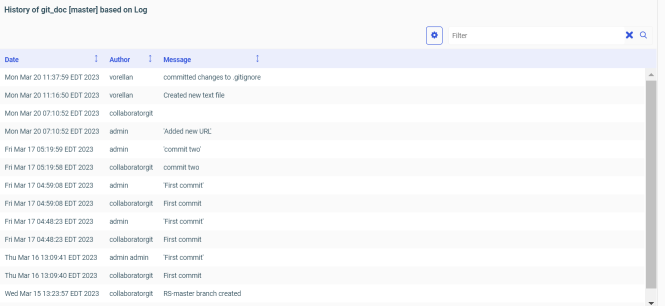
In above example, the history of the master branch based on the log is displayed.
- To view history based on reflog, right-click the WebFOCUS Reporting Server application directory,
point to Git, point to History, and then click Based on RefLog.
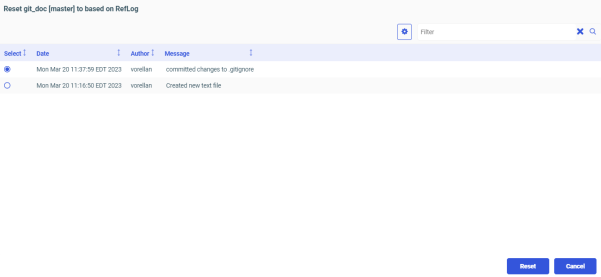
The history of your local commits to the current branch is displayed. Here you can see the basic information about the commits you have performed locally on this branch, including the committing user, commit dates, and messages, as shown in the following image.

In above example, the history of the master branch based on the reflog is displayed.
View the Status of the Current Branch
- Procedure
- Right-click the WebFOCUS Reporting Server application directory,
point to Git, and then click Status.
The Status tab opens and the status of the current branch is displayed. Here you can see the list of the staged and unstaged files, as shown in the following image.

Add a Remote Repository
You can link your WebFOCUS Reporting Server application directory with more than one remote Git repository.
- Procedure
- Right-click the WebFOCUS Reporting Server application directory,
point to Git, point to Remote, and then click Add Remote.
The Remote tab opens.
- Enter the name and the URL of the remote repository you want to add and then click Add, as shown in the following image.
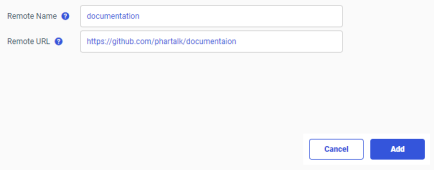
A confirmation displays informing you that the new remote repository is successfully added. You can push your local changes to this remote repository.
Rename the Remote Repository
- Procedure
- Right-click the WebFOCUS Reporting Server application directory,
point to Git, point to Remote, and then click Rename Remote.
The Select remote to rename tab opens. Here you see the list of the remote repositories that are associated with your WebFOCUS repository.
- Select the repository you want to rename, enter the new name, and then click Rename, as shown in the following image.
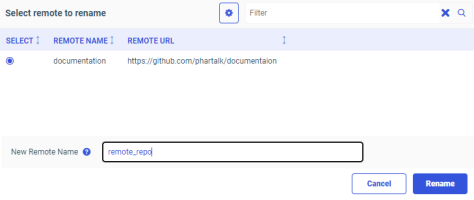
A confirmation displays informing you that the selected repository from you local server is renamed.
Delete the Remote Repository
- Procedure
- Right-click the WebFOCUS Reporting Server application directory,
point to Git, point to Remote, and then click Delete Remote.
The Select remote to delete tab opens. Here you see the list of the remote repositories that are associated with your WebFOCUS Reporting Server application directory.
- Select the repository you want to delete and click Delete, as shown in the following image.
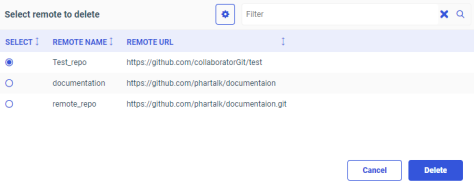
A confirmation displays informing you that the selected repository is deleted from your local server.
View the List of the Remote Repositories
You can view the list of remote repositories that are associated with your WebFOCUS Reporting Server application directory.
Right-click the WebFOCUS Reporting Server application directory, point to Git, point to Remote, and then click List Remotes.
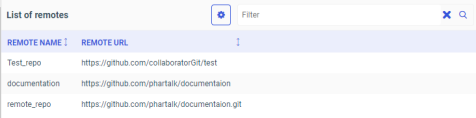
The List of remotes tab opens. Here you see the list of the remote repositories that are associated with your WebFOCUS Reporting Server application directory, as shown in the following image.
Reset the Current Branch to the Previous Commit Based on Log
- Procedure
- Right-click the WebFOCUS Reporting Server application directory,
point to Git, point to Reset to, and then click Based on Log.
The entire list of commits from the latest commit to the very first commit of the current branch is displayed.
- Select the commit to reset to and click Reset, as shown in the following image.
A warning displays informing you that all uncommitted changes will be discarded.
- To confirm the reset, Click OK.
A confirmation displays informing you that the reset is successful.
Reset the Current Branch to the Previous Commit Based on RefLog
- Procedure
- Right-click the WebFOCUS Reporting Server application directory,
point to Git, point to Reset to, and then click Based on RefLog.
The list of your local commits to the current branch is displayed.
- Select the commit to reset to and click Reset, as shown in the following image.
A warning displays informing you that all uncommitted changes will be discarded.
- To confirm the reset, Click OK.
A confirmation displays informing you that the reset is successful.
Reset the Current Branch to the Previous Commit Based on Tag
- Procedure
- Right-click the WebFOCUS Reporting Server application directory,
point to Git, point to Reset to, and then click Based on Tag.
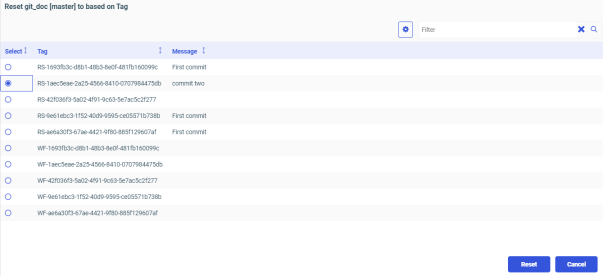
The list of tags for the current branch is displayed.
- Select the tag to reset to and click Reset, as shown in the following image.
A warning displays informing you that all uncommitted changes will be discarded.
- To confirm the reset, Click OK.
A confirmation displays informing you that the reset is successful.
Create a Tag Based on a Branch
- Procedure
- Right-click the WebFOCUS Reporting Server application directory,
point to Git, point to Create Tag, and then click Based on Branch.
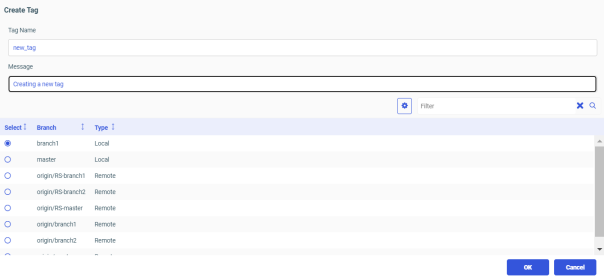
The Create Tag tab opens.
- Enter the tag details, select a branch to create a tag, and click OK, as shown in the following image.
 Note: If your list is long, you can use the search field to look for a specific branch.
A confirmation displays informing you that a tag is successfully created for the selected branch.
Create a Tag Based on a Commit
- Procedure
- Right-click the WebFOCUS Reporting Server application directory,
point to Git, point to Create Tag, and then click Based on Commit.
The Create Tag tab opens.
- Enter the tag details, select a commit to create a tag, and click OK, as shown in the following image.
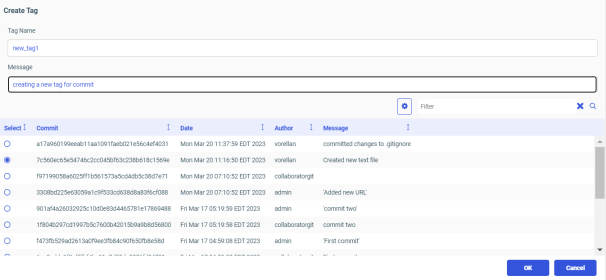 Note: If your list is long, you can use the search field to look for a specific commit.
A confirmation displays informing you that a tag is successfully created for the selected commit.
Create a Push Request
- Procedure
- Right-click the WebFOCUS Reporting Server application directory,
point to Git, and then click Push.
The content from the WebFOCUS Reporting Server application directory is synced with your remote repository.
Note: If you are connected with more than one Git repository, then the Select remote to PUSH to tab opens after you click Push. Here you see the list of all the available remote repositories. Select the remote repository to push your changes, and click Push, as shown in the following image.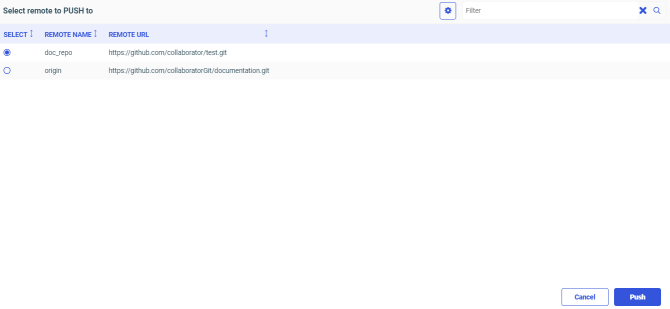
Create a Fetch Request
- Procedure
- Right-click the WebFOCUS Reporting Server application directory,
point to Git, and then click Fetch.
The content from your remote repository is downloaded to your local repository.
Note: If you are connected with more than one Git repository, then the Select remote to FETCH from tab opens after you click Fetch. Here you see the list of all the available remote repositories. Select the remote repository to fetch commits, files, and references to your local repository, and click Fetch, as shown in the following image.
Perform a Pull Operation
You can synchronize the updates made in the remote repository with your local repository.
- Procedure
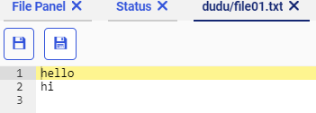
- Update a remote repository branch and commit the changes, as shown in the following figure.

- Right-click the WebFOCUS Reporting Server application directory,
point to Git, and then click Pull.
A confirmation displays informing you that the pull request was successful. The updates made in the remote repository are synched with your local repository.
Note: If you are connected with more that one remote repository, then the Select remote to PULL from tab opens after you click Pull. Here you see the list of all the available remote repositories. Select the remote repository from the list, and then click Pull, as shown in the following image.
You can open the updated branch in your local repository and see the new updates, as shown in the following image.