SQL Server Preinstallation Steps
The following are general guidelines and information for creating an SQL Server database to be used as the WebFOCUS repository. These steps should be performed by a DBA to apply options and configuration settings that meet your organization's specifications.
- Ensure that SQL Server Authentication is enabled. See Configure Security.
- Create a SQL Server account that you will use to own this database. See Create the Login ID.
- Create a SQL Server database for the repository. See Create the Repository Database.
- Set up connectivity between the WebFOCUS Client and the SQL Server. See Install the JDBC Driver for SQL Server.
- If you are using SQL Server, you must enable TCP/IP since it is not available, by default. See Enable TCP/IP in SQL Server.
The WebFOCUS repository can reside on the same system as the WebFOCUS Client or on a different system, and can be stored in any JDBC-compliant database for which a driver exists. For more information, see ibi WebFOCUS Client Postinstallation Tasks. When the Distribution Server is installed (as explained in Installing the ibi WebFOCUS Client), you will be required to provide a supported database, JDBC driver, and authentication information (user ID and password).
Configure Security
SQL Server provides the following authentication modes:
- Windows Authentication. Uses the same IDs as the Windows operating system.
- SQL Server Authentication. Uses IDs defined within SQL Server.
The JDBC driver that is used by WebFOCUS to connect to the SQL Server database does not support Windows Authentication mode. Perform the following steps to ensure that SQL Server Authentication mode is set:
- Procedure
- Open the SQL Server Management Studio.
- Connect to your database server.
- Right-click your SQL Server and choose Properties.
- On the left, click Security.
- Ensure that Server authentication is set to SQL Server and Windows Authentication mode. If Authentication is set to Windows Authentication mode, change the setting.
- Click OK.
- If you changed the authentication mode, restart SQL Server.
Create the Login ID
- Procedure
- In the SQL Server Management Studio, expand your SQL Server and expand the Security folder.
- Right-click Logins.
- Select New
Login.
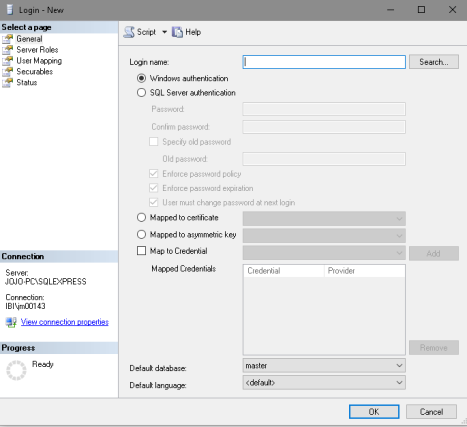
- Enter the user ID you wish to use in the Login name field.
- Select SQL Server authentication.
- Enter and confirm your password.
- Clear the checkboxes for Enforce password policy, Enforce password expiration, and User must change password at next login.
- Click OK.
Create the Repository Database
- Procedure
- In the SQL Server Management Studio, right-click the Databases folder.
- Select New
Database.
A form appears for adding a database.
- Type a name for the repository database in the Database name field.
- In the Owner
field, enter the user ID you created in Create the Login ID.
You can leave the remaining defaults. An initial size of 50MB for the database should be adequate for most departmental applications, but you may want to increase the initial size of the database if you anticipate a lot of use.
- Under the Options panel, ensure you click Collation and select a Case-sensitive (CS) collation.
- Click OK,
and the database is created.
It is a good idea to set this database as the default for your user ID. To do this, under Security and Logins, right-click your user ID and choose Properties. Then set the Default database and click OK.
Install the JDBC Driver for SQL Server
The application server where the WebFOCUS Client and the ReportCaster Distribution Server are deployed on, use the SQL Server JDBC driver to access the WebFOCUS Repository. You should download the SQL Server JDBC driver for your SQL Server release.
For more information on supported versions of JDBC drivers, see the ibi™ WebFOCUS® Release Notes.
If the WebFOCUS Client and ReportCaster Distribution Server are on separate machines, the driver must be on both machines. Running the driver installation program is not necessary, so you can manually copy the driver files between different machines.
During the ReportCaster Distribution Server installation, you are prompted for the file or files, as explained in Installing the ibi WebFOCUS Client. In addition, if you manually configure your application server, you must also provide the file or files, as explained in Configuring Web and Application Servers.
Enable TCP/IP in SQL Server
TCP/IP is not enabled in SQL Server, by default. Since the WebFOCUS Client and ReportCaster require TCP/IP, you must perform the following steps to enable TCP/IP in SQL Server.
- Procedure
- Open the SQL Server Configuration Manager.
- Under the SQL
Server Network Configuration, select Protocols
for MSSQLSERVER.
A list of valid network protocols for the SQL Server engine is displayed in the right pane.
- Select TCP/IP from the list of available protocols.
- Right-click TCP/IP and
select Enable from the context menu.
A message displays, which indicates that the MSSQLSERVER service must be restarted before the change is applied.
- Restart the MSSQLSERVER service.