Manually Configuring Apache Tomcat With or Without Apache HTTP Server
Note: If you chose the option for the WebFOCUS installation to install Tomcat, you can skip this section.
This section explains how to install and configure Apache Tomcat, with or without an Apache HTTP web server. There are two configurations available when using Apache Tomcat:
- Tomcat can be used as both a web server and application server where all processing is done by Tomcat. This is referred to as a Tomcat stand-alone configuration.
- Tomcat can be used as an
application server for Java processing, while Apache HTTP Server can handle the
traditional static web content.
Note: You can also use Tomcat for all WebFOCUS processing and use the HTTP Sever only to forward requests through a firewall. This is the recommended configuration.
This section contains information for installing and configuring Tomcat and setting up the connection between the HTTP and Tomcat Servers. If you are using the HTTP Server, it should already be installed. Apache HTTP Server 2 is recommended, but 1.3 should work.
The following are the steps:
- If it is not installed, install Tomcat.
- Set environment variables and create contexts to deploy WebFOCUS web applications, as explained in Preparing Tomcat for WebFOCUS Configuration.
- If you are using Apache HTTP Server to serve WebFOCUS content, create aliases, as explained in Configuring Apache HTTP Server.
- If you are using Apache HTTP Server, configure communications between Tomcat and the HTTP Server, as explained in Connecting Apache HTTP and Apache Servers.
- Verify the configuration, as explained in Verifying the WebFOCUS Configuration With Tomcat and Apache HTTP Server.
- When Apache Tomcat is
configured to use Secure Sockets Layer (SSL), it is recommended for security
reasons to allow communication only over the Transport Layer Security (TLS) 1.2
protocol.
To enable TLS 1.2 only, perform the following:
- Edit the $CATALINA_BASE/conf/server.xml file.
- In the Connector port
section, add the following attribute:
sslEnabledProtocols="TLSv1.2"
- Save and close the file.
- Restart Apache Tomcat.
Preparing Tomcat for WebFOCUS Configuration
To prepare Tomcat for WebFOCUS, you need to choose how to create WebFOCUS graphs and add the ReportCaster JDBC driver.
Configure Tomcat for WebFOCUS Graphs
To generate graphs, WebFOCUS Servlets either need access to an X Server or they can use the Java VM headless option. You can set either by editing the catalina.sh file.
- DISPLAY. If an X Windows Server is available, you should set
a DISPLAY environment variable.
Open the following file in a text editor:
/tomcat_home/bin/catalina.shNear the beginning of the file just after the commented section, add the appropriate DISPLAY definition. For example:
DISPLAY=xserver_host:0.0

export DISPLAY

TERM=xterm

export TERM
where:
xserver_hostIs the host name or IP Address of a machine that is running an X server.
Note: Graphs are not actually displayed on the machine you set to DISPLAY, but WebFOCUS Servlets must access this X Server to generate graphs. After finishing this chapter, be sure to review the tests to verify graphs in Verifying and Troubleshooting Server Side Graphics (PCHOLD).
- Headless. If an X Windows Server is not available, you can
set the headless Java VM option. However, be aware that headless does not
support GIF files or the older WebFOCUS graph engine (GRAPH32). Open the
following file in a text editor:
/tomcat_home/bin/catalina.shYou can add the headless option by setting the $JAVA_OPTS variable. Near the beginning of the file, just after the commented section, add the following line:
export JAVA_OPTS="${JAVA_OPTS} -Djava.awt.headless=true"
Set the Tomcat CLASSPATH for the WebFOCUS Repository
Before a WebFOCUS application can connect to the WebFOCUS repository, you must first add the location of a JDBC driver to the CLASSPATH in setclasspath.sh.
- Procedure
- Open the
following file in a text editor:
/tomcat_home/bin/catalina.sh - Find the
line that sets CLASSPATH. For example:
CLASSPATH=/home/oracle/oracle/ojdbc6.jar
Note: If there is more than one jar file, it should be appended, separated by a colon (:).
- Append a
colon (:) followed by the path to the JDBC drivers for your repository. Include
any ZIP or JAR files. For example:
CLASSPATH="$JAVA_HOME"/lib/tools.jar:/home/oracle/oracle/ojdbc6.jar
Note: You must include the full path including the file name. Specifying a directory is not sufficient.
- Save and close the editor.
Deploying WebFOCUS Applications With Tomcat
Configuring Tomcat mainly requires telling Tomcat where WebFOCUS files are located and the context roots in which to use them. For example, you must tell Tomcat to serve files from the WebFOCUS web application:
/install_directory/ibi/WebFOCUS93/webapps/webfocus
When it receives a request for the WebFOCUS context root:
http://TomcatHost:tomcatHTTPport/ibi_apps
By creating this context, you deploy the WebFOCUS web application.
- When using Tomcat as the
application server and Apache HTTP Server as the web server, create only the
following context on Tomcat:
Context (path):
/ibi_appsDirectory (DocumentBase):
/install_directory/ibi/WebFOCUS93/webapps/webfocusThe approot context is then created as aliases on the HTTP Server. The HTTP Server is then configured to send requests for ibi_apps to Tomcat. However, this assumes the HTTP Server handles some WebFOCUS content directly. If you want the HTTP Server to only forward requests through a firewall, do not create aliases on the HTTP Server, but instead configure Tomcat to handle all WebFOCUS content.
- When using Tomcat as both
web and application server, the following contexts must be created:
Context (path)
Directory (DocumentBase)
/ibi_apps
/install_directory/ibi/WebFOCUS93/webapps/webfocus
/approot
/install_directory/ibi/appsTomcat can be used as both a web server and application server, so Tomcat can also serve files outside of a web application after it knows their location and context. On a traditional web server, you create aliases. With Tomcat, a traditional web server alias is treated like a context root, even when serving files outside of a web application.
Create Contexts
There are several ways to create contexts:
- You can manually create individual XML files for each web application or context under the /tomcat_home/conf/Catalina/localhost directory.
- You can edit the server.xml file to define contexts.
- You can copy webfocus.war to /tomcat_home/webapps and then rename it to ibi_apps.war.
- You can use the Tomcat web-based tools.
This procedure explains how to create contexts using the web-based tools. When you create a context for a web application, the web application is deployed.
To create contexts for Tomcat, it is recommended to create or edit XML files in the following directory to define the contexts:
/tomcat_home/conf/Catalina/localhost
Reloading Web Applications
This is not a consideration if you just installed WebFOCUS for the first time, but you should be aware of it for when you install a service pack or new release. When you upgrade WebFOCUS or install a service pack, Tomcat must use the new web applications rather than cached copies of the old version.
- If you install a service
pack in the same location and you had deployed the expanded directories, the
new web applications should be used automatically, but you should remove the
following work directory and then restart Tomcat.
/tomcat_home/work/Catalina/localhost/ibi_appsNote: The redirect.war file is available for redirecting custom applications with URLs containing rcaster as the ReportCaster context root. If you are planning to deploy this file, you should also remove the following work directory and then restart Tomcat.
/tomcat_home/work/Catalina/localhost/rcaster - If you are installing in
a different location or you deployed WAR files, you need to completely remove
the existing WebFOCUS contexts and then recreate them. To remove contexts, you
can use the Tomcat Manager Tool or remove the corresponding files and
directories of the context. For example:
/tomcat_home/conf/Catalina/localhost/ibi_apps.xml/tomcat_home/work/Catalina/localhost/ibi_apps/tomcat_home/webapps/ibi_appsNote: When you deploy WAR files, Tomcat expands them into its own directory structure and does not always know the original location.
Configuring Apache HTTP Server
Tomcat can be used with or without Apache HTTP Server.
- If you are using Tomcat without the HTTP Server, you should have created the approot alias as a Tomcat context. If you are not using the HTTP Server, proceed to Manually Configuring Apache Tomcat With or Without Apache HTTP Server.
- If you are using Tomcat with the HTTP Server, you need to create aliases and configure communications between the HTTP Server and Tomcat.
To create aliases, edit the httpd.conf configuration file as explained below making sure to replace install_directory with the correct path on your machine. If you changed the default names for the WebFOCUS aliases and context root (/ibi_apps), substitute accordingly.
Modify the Apache httpd.conf File
- Procedure
- Using a text editor, open the httpd.conf file located in the /apache_home/conf directory.
- Add the
following lines in the Alias section making sure to use the correct
install_directory on your machine.
- Point an alias to the
apps directory.
Alias /approot/ "/install_directory/ibi/apps/"
For example:
Alias /approot/ "/home/iadmin/ibi/apps/"

Alias /icons/ "/usr/apache2/icons/"
- Point an alias to the
apps directory.
- Save and close the file.
- Restart the HTTP Server.
Connecting Apache HTTP and Apache Servers
There are many different ways to connect from Apache HTTP Server to Tomcat. This section addresses JK1.2, mod_jk. If you wish to use another approach, such as ProxyPass or JK2, refer to Apache and Tomcat documentation.
The following files are needed for Apache to connect to Tomcat when using JK1.2:
Provides binary instructions for Apache to connect to Tomcat. See Download or Build the mod_jk.so File.
Provides configuration information needed by the mod_jk.so binary. See Create the mod_jk.conf File.
Tells Apache to load the mod_jk.so binary and use settings in the workers.properties file. See Create the workers.properties File.
Tells Apache to Include mod_jk.conf. See Edit httpd.conf to Use JK1.2.
Additional documentation on using the JK1.2 connector is available at:
http://tomcat.apache.org/connectors-doc/index.html
Download or Build the mod_jk.so File
The mod_jk.so binary must be compiled specifically for your platform and Apache HTTP Server release (1.3 or 2.0).
Binaries and source code can be downloaded from:
http://jakarta.apache.org/tomcat/connectors-doc/index.html
- Procedure
- Test the
WebFOCUS web application by going to the following URL in a browser:
http://TomcatHost:TomcatHTTPport/ibi_apps/diagnostics/about.jspA page should appear displaying information about the current build. For example:
Version:WEB93If the page fails to load, restart Tomcat, and ensure it can compile JSP files. In some environments, the first time a JSP file is compiled you might receive an error.
- If you are using Tomcat as both web and application server, proceed to Verifying the WebFOCUS Configuration With Tomcat and Apache HTTP Server.
The binaries you download will have a long name indicating the platform and Apache release. You should rename this file to mod_jk.so.
If a binary is not available for your platform, you can download the source code and compile it. If you do an online search, you should be able to find information on compiling mod_jk.so. The compiled file may have a different name, such as libmod_jk.so.
The mod_jk.so file should be placed on your system in a directory to which the HTTP Server has at least read permissions.
Create the workers.properties File
- Procedure
- If the
file does not exist, create the following file in a directory to which Apache
HTTP Server has at least read permissions:
workers.properties
For example:
/apache_home/conf/tomcat/workers.properties - Open the
file in a text editor to edit or add the following text to the file, replacing
text in italics with absolute paths:
workers.tomcat_home=tomcat_home

workers.java_home=java_homeps=/

worker.list=ajp13

worker.ajp13.port=8009

worker.ajp13.host=localhost

worker.ajp13.type=ajp13
where:
tomcat_homeIs the installation directory for Apache Tomcat. Use an absolute path.
java_homeIs the installation directory for the Java JDK. Use an absolute path.
8009Is the Ajp13 port defined in server.xml. 8009 is the default, but if you changed this, provide the new value.
Create the mod_jk.conf File
- Procedure
- If the file does not exist, create the following file in a
directory to which Apache HTTP Server has read access:
mod_jk.conf
For example:
/apache_home/conf/tomcat/mod_jk.conf - Open the
file using a text editor to edit or add the following text to the file,
replacing the instances of /PATH_TO/ with absolute paths to the file in question:
<IfModule !mod_jk.c>

  LoadModule jk_module /PATH_TO/mod_jk.so

</IfModule>

JkWorkersFile "/PATH_TO/workers.properties"

JkLogFile "/PATH_TO/tomcatjk1.2/mod_jk.log"

JkLogLevel emerg

JkMount /ibi_apps ajp13

JkMount /ibi_apps/* ajp13
Note: If you changed the default context roots, substitute accordingly.
Edit httpd.conf to Use JK1.2
- Procedure
- Using a text editor, open the httpd.conf file located in the /apache_home/conf directory.
- Add the
following line to the end of the file specifying where the mod_jk.conf file is
located on your system:
Include /PATH_TO/mod_jk.conf
Verifying the WebFOCUS Configuration With Tomcat and Apache HTTP Server
After finishing the configuration, run test calls to verify operability.
Verify the WebFOCUS Configuration
- Procedure
- If they
are not started, start the following:
- Apache Tomcat
- WebFOCUS Reporting Server
- Enter
the following URL in your browser:
http://hostname:port/ibi_apps
where:
hostname:portAre the host name and port of the web server. However, if you use an application server only configuration, then these are the host name and HTTP port of the application server. If you require SSL, use https instead of http.
The WebFOCUS Sign in page opens.
- Sign in
as an administrator. The default user name and password are
admin and
admin.
The Hub opens in your web browser.
- On the
Hub, from the side navigation pane, select
Management Center and then
Administration Console.
The WebFOCUS Administration Console opens.
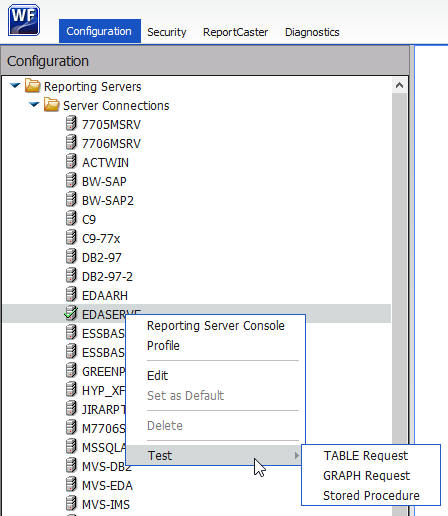
- Select the Configuration tab, expand Reporting Servers, and then expand Server Connections.
- Right-click a node, select
Test, and then select
TABLE Request,
GRAPH Request, or
Stored Procedure, as shown in the following image.
- Click Run to run the test procedure.
- If you are using Tomcat stand-alone, proceed to Postinstallation Verification and Configuration.