External Authentication
In external authentication, a sign-in page is presented to users, who then type a user ID and password. The WebFOCUS Client passes these credentials to the WebFOCUS Reporting Server, which in turn validates them with an external source, such as Active Directory, LDAP directories, information in a custom RDBMS table, and web services. Users are authenticated externally both when they access the WebFOCUS Client, and when they access the WebFOCUS Reporting Serverbrowser interface directly.
Note: WebFOCUS does not currently support user password change through the WebFOCUS Reporting Server. Clear the Enable Password Change check box, located on the Advanced page of the Security tab, when configuring external authentication.
Understanding Active Directory and LDAP Authentication
WebFOCUS can authenticate users to Active Directory and to LDAP directories by authenticating users to the WebFOCUS Reporting Server, and then using the WebFOCUS Reporting Server LDAP security provider to validate user credentials to the external directory.
Optionally, WebFOCUS can update the user account information in the WebFOCUS Repository with the email and description from the external directory.
Configure Active Directory and LDAP Authentication
Before you begin, complete the prerequisites for External Authentication. For more information, see Configuring Pre-Authentication, External Authentication or External Authorization.
We also recommend that you use the Export command to save backup copies of the Security Settings configuration files before making changes to the Authentication page.
- Procedure
- On the WebFOCUS Reporting Server, configure LDAP as the primary security provider
and PTH as a secondary security provider.
For more information, see Configuring a Security Provider on the ibi WebFOCUS Reporting Server.
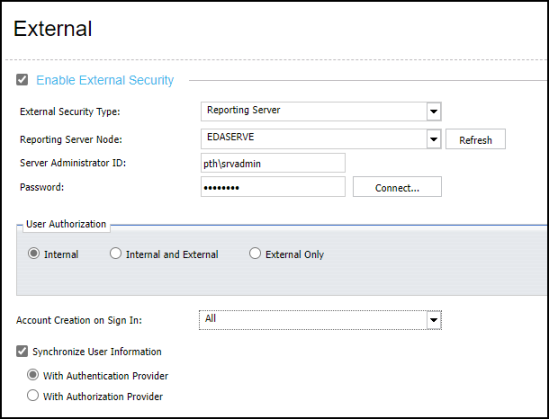
- Sign in as an administrator, and open the Administration Console.
- In the Administration Console, on the Security tab, under the Security Configuration folder, click External.
- Select the Enable External Security check box.
The External page displays the settings currently assigned to the WebFOCUS Reporting Server.
- Type pth\srvadmin in the Server Administrator ID field.
- Type the password assigned to the Security User in the
Password field.
The password for this account is pre-configured during the installation process to be the same as the password you supplied for the original administrator account.
- Click Connect.
A confirmation dialog box opens, click OK.
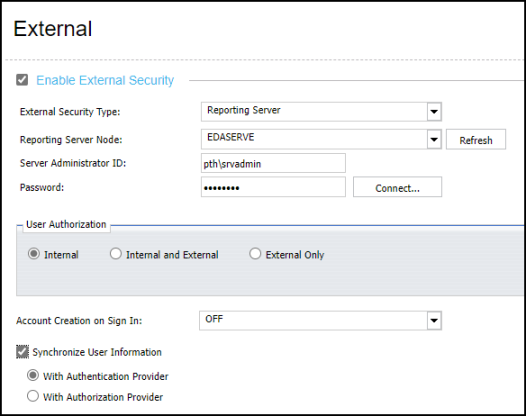
- In the User Authorization Group, click the Internal option.
- In the Account Creation on Sign In list, click Off.
- To update WebFOCUS accounts with the AD or LDAP user
description and email during authentication, select the Synchronize
User Information with Authentication Provider check
box.
- To retrieve updated user description and email information from the authentication provider, accept the default selection of the option, With Authentication Provider.
- To retrieve updated user description and email information from the authorization provider, click the option, With Authorization Provider.
When your updates are complete your page will resemble the following image.
- In the Administration Console Menu bar, click Close.
- In the Security Configuration section, click Save.
- When you receive the confirmation message, click OK.
- When you receive the message to reload the web application, click OK.
- Sign out of your current session.
- Stop and restart the WebFOCUS Reporting Server.
- Sign in as an administrator, and test the new configuration.
Configuring Authentication by Information in an RDBMS Table
WebFOCUS can authenticate users against data in an RDBS table by using a CUSTOM security provider on the WebFOCUS Reporting Server. The CUSTOM provider uses a custom FOCUS procedure to perform the authentication. It is recommended that you store a hash of the user password in the RDBMS table and calculate the hash in your custom FOCUS procedure at run time before making the authentication comparison.
Optionally, user account information in the Repository can be updated with the email and description from the database.
Configure Authentication by Information in an RDBMS Table
Before you begin, complete the prerequisites for External Authentication. For more information, see Configuring Pre-Authentication, External Authentication or External Authorization.
We also recommend that you use the Export command to save backup copies of the Security Settings configuration files before making changes to the Authentication page.
- Procedure
- On the WebFOCUS Reporting Server, configure a custom security provider as the primary provider and PTH as a secondary provider.
- Sign in as an administrator, and open the Administration Console.
- Click the Security tab, and on the Security page, under the Security Configuration folder, click External.
- Select the Enable External Security check box.
The External page displays the settings currently assigned to the WebFOCUS Reporting Server.
- Type a WebFOCUS Reporting Server Administrator account service
user name in the Server Administrator ID field, using the format ProviderName/serviceUserName,
where:
ProviderNameIs the name of the RDBMS.
serviceUserNameIs the UserID for the RDBMS.
- Type the password assigned to the Security User in the Password field.
- Click Connect.
A confirmation dialog box opens, click OK.
- In the User Authorization Group, click the Internal option.
If you are using the RDBMS to override other authorization methods, such as AD or LDAP, click the Internal and External option, and click the name of the RDBMS provider that will deliver authorization in the Group provider Override list.
- In the Account Creation on Sign In list, click Off.
- To update WebFOCUS accounts with the RDBMS user description
and email during authentication, select the Synchronize
User Information with Authentication Provider check
box.
When your updates are complete your page will resemble the following image.
- Sign out of your current session.
- Stop and restart the application server.
- Sign in again using an RDBMS User ID and Password.
If you are able to sign in, the external authentication configuration was successful.