Map an Application to a Physical Directory
You can map an application name to a physical directory anywhere in the file system. This application name can be then used in APP commands.
Application mappings can be added and deleted based on profiles from either the WebFOCUS Reporting Server browser interface or the ibi Data Migrator desktop interface.
- Procedure
- On the Applications page, either click New, then Application Directory on the ribbon, or right-click
an application, select New,
and then Application Directory.
The Create New Application page opens.
- Select Application
Mapping to Disk or SQL Repository from the Application
Type drop-down menu.
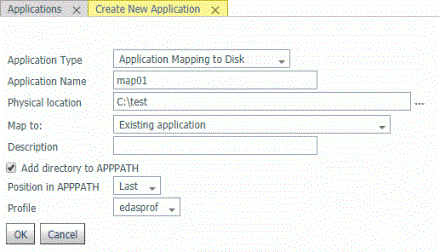
- Enter a name in the Application Name field.
- Accept the
default Physical location, enter a different location, or click
the selector button (...) and navigate to a directory on your file
system.
For platforms other than z/OS HFS Deployment, in addition to using the selector button, you can enter the full path of the physical directory to be mapped, in the format required on your platform. (If there are spaces in the directory you are mapping, you must enclose the entire path in double quotation marks.)
For z/OS HFS and PDS servers, in addition to using the selector button, you can enter values using the following formats:
ext=//DD:ddname[;ext2=//DD:ddname2][...][;extn=//DD:ddnamen]
where extn are file type extensions.
/dir/subdir
entered manually or using the selector button.
For z/OS PDS servers, you can also inform the high-level qualifiers of the data set collection that comprise this application. Here is an example of the format:
IADMIN.SRV7782909192.MAPAPP
where the user has the following datasets (not in approot):
IADMIN.SRV7782909192.MAPAPP.FOCEXEC.DATA
IADMIN.SRV7782909192.MAPAPP.MASTER.DATA
IADMIN.SRV7782909192.MAPAPP.ACCESS.DATA
- Select New application (directory will be created) from the Map to drop-down menu.
- Optionally, enter a description in the Description field.
- Add directory to APPPATH is the default. Optionally, you can decide not to add the directory.
- Select a position from the Position in APPPATH drop-down menu. The options are Last and First. The default is Last.
- Select a
profile from the Profile drop-down menu.
For Server Administrators, the default is edasprof. For all other users, the default is the user profile.
- Click OK.
The mapping is added to the Application Directories folder.