Distribution Server Settings
The Distribution Servers folder contains the settings that define and configure the Distribution Server. You can also define a secondary failover Distribution Server to act as a backup, and configure two or more Distribution Servers to share the workload. The Server Status option, located on the ribbon, provides the ability to restart the Distribution Server, suspend distribution, stop distribution, switch servers, and refresh data. For more information, see Server Status and Configure ReportCaster Failover and Workload Distribution.
The Distribution Servers folder contains the following configuration settings.
|
Setting |
Optional or Required/Default Value |
Descriptions and Possible Values |
|---|---|---|
|
Primary Distribution Server section |
||
|
Host |
Required. |
Host name of the primary Distribution Server. |
|
Port |
Required. |
Port number of the primary Distribution Server. |
|
Secondary Distribution Server Displays the host name and port number of the secondary failover server. Select the icon to the right of the Secondary Distribution Server field to access the following settings. |
||
|
Enabled |
Required for Failover. Default is not enabled. |
Enables or disables the Distribution Server failover function. |
|
Host |
Required if Failover is enabled. |
Host name of the failover Distribution Server. |
|
Port |
Required if Failover is enabled. |
Port number to access the failover Distribution Server. |
|
Failover Interval |
Required if Failover is enabled. Default value is 1. |
Frequency (in minutes) at which the failover Distribution Server checks the primary Distribution Server to verify it is running. |
| Use repository to synchronize Primary and Failover servers |
Default is not selected. |
Selected. The Primary and Secondary servers monitor the status of each other by reading and updating a server status record in the WebFOCUS repository. Not Selected. The Primary and Secondary servers communicate to each other through the network. If network communication between the servers is disrupted, the Secondary server may promote itself to Full Function status if does not receive a response from the Primary server even if the Primary server is in Full Function mode. |
|
Workload Distribution Displays whether Workload Distribution is in effect. Select the icon to the right of the Workload Distribution field to access the following failover settings. |
||
|
Add |
Required to add new entry. |
Enables you to add another server for Workload Distribution. |
|
Delete |
Optional. |
Enables you to delete a Workload Distribution Server. |
|
Enabled |
Required for Workload Distribution. Default is not enabled. |
Enables or disables the distribution of ReportCaster jobs among Distribution Servers. |
|
Worker Name |
Required if Workload Distribution is enabled. |
Name to identify the worker Distribution Server. |
|
Worker Distribution Server Host |
Required if Workload Distribution is enabled. |
Host name of the worker Distribution Server. |
|
Worker Distribution Server Port |
Required if Workload Distribution is enabled. The default value is 8200. |
Port number of the worker Distribution Server. |
|
Restrict to IP Address |
Optional. |
Restricts Distribution Server Console access to one or more IP Addresses. For more information, see Restricting Distribution Server Console Access to an IP Address List. |
|
Maximum Threads Controls how many simultaneous connections (threads) the WebFOCUS ReportCaster Distribution Server can utilize to process scheduled jobs. The default value is 3. This setting is also available in the Administration Console. You can specify any maximum that can be supported by your hardware and memory. |
||
|
Server Name |
Required if one or more servers are listed. |
Displays the name of the server. |
|
Threads (Connections) |
Required. The Default Value is 3. |
Displays the simultaneous connections (threads) for each server. |
|
Other Task |
Non server-based tasks. |
|
|
Reader Interval, Recovery, Processing for No Report to Distribute, , and Max Messages per Task from Data Server options: |
||
|
Reader Interval |
Required. Default value is 1 minute. |
Polling interval (in minutes) for the WebFOCUS ReportCaster Distribution Server to check for scheduled jobs. An acceptable value is any positive integer from 1 to 999999. Negative numbers and zero are not allowed. Note:
This setting is also available in the Administration Console. |
|
Recovery |
Default value is Off. |
On. During startup, the WebFOCUS ReportCaster Distribution Server recovers scheduled jobs that were processed but not completed. Off (Default). During startup, the WebFOCUS ReportCaster Distribution Server does not recover any scheduled jobs. Note:
This setting is also available in the Administration Console. |
|
Processing for No Report to Distribute |
Required. Default value is Error. |
Specifies whether the No Report to Distribute message from the WebFOCUS Reporting Server is categorized as an error or a warning. This is a global setting, relevant to all schedules. Possible values are:
These settings also apply to burst reports when there is a No Report to Distribute message for an individual burst value. If a schedule contains multiple tasks, the No Report to Distribute processing only applies if all tasks that are part of the schedule produce the No Report to Distribute message. If one task in the schedule produces a report, then the value of this setting does not affect log messaging or notification. |
|
Processing for Blackout Period Job Termination |
Required. Default value is Error. |
If a scheduled report distribution is terminated due to a previously set blackout period, this option specifies whether or not an error notification will be sent via email.
For more information, see Using Blackout Periods. |
|
Max Messages per Task from Data Server |
Required. Default value is 1000. |
Controls the number of messages for each task from the Data Server written to the WebFOCUS ReportCaster log file. |
Scan-back Section
|
Setting |
Optional or Required/Default Value |
Descriptions and Possible Values |
|---|---|---|
|
Scan-back Type |
Required. Default value is On. |
Possible values are:
|
|
Scan-back Interval |
Default value is 15, 24 hour periods. |
If the Distribution Server is unavailable for a period of time, this is the number of 24 hour periods (beginning with the Distribution Server restart time) that you want the Distribution Server to scan for jobs not yet run and run them. Note:
This setting is also available in the Administration Console. |
Settings for the Additional Settings Folder
|
Setting |
Optional or Required/Default Value |
Descriptions and Possible Values |
|---|---|---|
|
The Console Requires Secure SSL Connection |
Optional. |
Select this check box to encrypt the communication between the WebFOCUS ReportCaster application and the WebFOCUS ReportCaster Distribution Server. After enabling secure communication and saving the changes, you must manually restart the WebFOCUS ReportCaster application and the WebFOCUS ReportCaster Distribution Server. |
|
SSL Certificate |
Required if The Console Requires Secure SSL Connection check box is selected. |
A default SSL Certificate is supplied by the installation procedure. You can optionally replace the default certificate with your own certificate to activate secure communication. To do this, you must import your signed server certificate from a CA or self-signed certificate to the distribution server keystore, and then export an SSL certificate from the keystore. Once you have exported the SSL certificate, you must paste this certificate to the SSL Certificate setting, save the configuration changes, and manually restart the ReportCaster application and the ReportCaster Distribution Server. |
|
Days Until Traces are Deleted |
Optional. The default value is 10. |
Files and folders in the trc, log, and temp directories that are older than the specified number of days are automatically deleted by the Distribution Server. They are deleted at the same time as the daily Job Log purge and deletion of expired Library versions. |
|
Schedule Job Traces |
Optional. The default value is Off. |
Enables Distribution Server Traces.
|
|
Job Status Notification Plug-in |
Optional. |
Name of a custom written Java class that implements the WebFOCUS ReportCaster Job Status Notification interface and instructs the Distribution Server to perform some action (such as notifying a Web Service or other listener) that a scheduled job has started and ended. For more information, see Configuring the Job Status Notification Plug-in. |
|
Provide Metrics Information from Resource Analyzer |
Optional. |
This functionality enables the collection of RA DBMS statistics from the Reporting Server for display in the schedule log. Note:
If you do not have Resource Analyzer on the WebFOCUS Reporting Server, this functionality will not work. When the check box is selected, the RC log displays messages containing RA DBMS information. When the check box is not selected, messages are not displayed. |
|
Hold Repository Connection |
Required. By default, this option is selected. |
Selected. The database connection is kept open throughout the execution of the schedule, including obtaining Address Book information, and writing information to the log files. Not selected. The database connection is dropped before executing the schedule. A new connection is made after the schedule is executed to obtain Address Book information and write information to the log files. |
Configuring the Job Status Notification Plug-in
- Procedure
- From the Tools menu, click WebFOCUS ReportCaster Status.
- Click the Configuration button.
- In the left pane, expand the Distribution Servers folder, then click the Additional Settings folder.
- Populate the Distribution Servers fields using the information provided in the preceding tables.
- In the Job Status Notification Plug-in field, enter the name of the program that implements the Job Listener interface.
- Click
Save.
Your program will be called at the start and end of each schedule to perform the customized actions it has been designed to do. For more information, refer to the ibi.broker.scheduler.plugin package found in the Java documentation.
Your program will be called at the start and end of each schedule to perform the customized actions it has been designed to do.
For more information about the Job Status Notification plug-in, refer to the ibi.broker.api.data.console package description found in the ReportCaster API Specifications document, located at https://webfocusinfocenter.informationbuilders.com/javadoc/rcaster/index.html.
Configure ReportCaster Failover and Workload Distribution
The Distribution Server Failover feature allows you to configure a secondary Distribution Server that can resume ReportCaster operations when there is an interruption (planned or unplanned) in the primary Distribution Server service. The primary Distribution Server is monitored to verify it is operational. If there is an interruption in service, the failover Distribution Server is triggered to take over the role of the primary server.
The Workload Distribution feature allows ReportCaster to distribute scheduled jobs across multiple Distribution Servers, providing an efficient and fast way to process large numbers of schedules. Multiple Distribution Servers can be installed on one or more hosts. One instance is designated as the Workload Manager, while the other are designated as Workers. The WebFOCUS Repository will be shared by the Workload Manager and the Workers. Workload Distribution is set up through the ReportCaster Configuration tool. All servers will share one set of configuration information, and the Workload Manager will push any configuration changes to the Workers.
For your application of ReportCaster, you can configure either or both Failover and Workload Distribution. The following procedure includes instructions to configure both, but notes when to skip to the appropriate steps if you are only configuring one or the other.
Configuring Distribution Server Failover
- Procedure
- From
the Tools menu, click
ReportCaster Status.
The ReportCaster Console opens.
- Click the Configuration tab.
- Click the Distribution Servers folder in the left pane.
- Click
the button to the right of the Secondary Distribution Server field.
The Secondary Distribution Server dialog box opens.
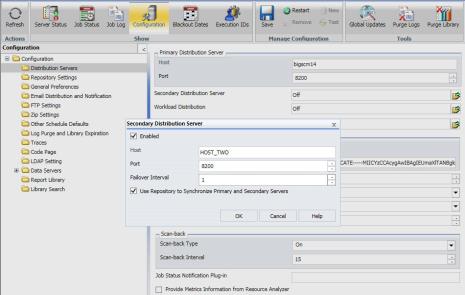
- Select the Enabled check box.
- Enter the hostname, port number, and failover interval of the Secondary server.
- Optionally, select the Use Repository to Synchronize Primary and Failover Servers check box.
- Click OK.
- Click Save and then OK when you are prompted to save.
- Install the Distribution Server on the specified host with the specified port number for that host.
Configuring Workload Distribution
- Procedure
- Open the ReportCaster Console and click Configuration in the top pane.
- Click the Distribution Servers folder in the left pane.
- Click
the button to the right of the Workload Distribution field.
The Workload Distribution dialog box opens.
- Select the Enabled check box.
- Click Add.
- Enter
the name, hostname, and port number of the Worker Distribution Server.
Repeat this step for each Worker Distribution Server instance that you want to add.
- Click OK.
- Click Save and then OK when you are prompted to save.
- Install the Distribution Server on each of the specified hosts with the specified port number for that host.
Restricting Distribution Server Console Access to an IP Address List
Limiting Distribution Server access to a preselected IP address helps prevent denial of service (DoS) attacks against your server. A DoS attack is a malicious cyber-attack that overloads a server with requests from multiple IP addresses, which blocks legitimate IP addresses from accessing the server. You can use the Restrict to IP Addresses option in the WebFOCUS ReportCaster Console to enhance the security of your network. If you populate the Restrict to IP Addresses field with one or more IP addresses, the Distribution Server only accepts TCP/IP requests from the addresses listed. This setting is blank by default.
Configuring IP Address Restrictions
- Procedure
- Open the WebFOCUS ReportCaster Console.
- On the ribbon, in the Show group, click Configuration.
- In the
Configuration pane, click
Distribution Servers.
The Primary Distribution Server options display.
- Click
the
Restrict to IP Addresses open folder button.
The Allowed IP Addresses dialog box opens.
- Click
Add.
The Add IP Address dialog box opens, as shown in the following image.
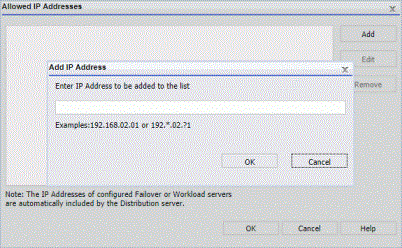
- Type an IP address and click OK. This adds the IP address to the Allowed IP Address list.
- Repeat steps 5-6 to add any additional IP addresses.
- Click OK to save the Allowed IP Address list and return to the WebFOCUS ReportCaster Console.
- On the ribbon, in the Manage Configuration group, click Save to keep your allowed IP address changes.
- On the ribbon, in the Manage Configuration group, click Restart to apply your changes.
Editing an IP Address
- Procedure
- Click
the Restrict to IP Addresses open folder button.
The Allowed IP Addresses dialog box opens.
- Click
the IP address that you want to modify, and then click
Edit.
The Edit IP Addresses dialog box opens.
- Modify the IP address, and then click OK.
- On the ribbon, in the Manage Configuration group, click Save to keep your allowed IP address changes.
- On the ribbon, in the Manage Configuration group, click Restart to apply your changes.
Deleting an IP Address
- Procedure
- Click
the
Restrict to IP Addresses open folder button.
The Allowed IP Addresses dialog box opens.
- Click
the IP address that you want to delete, and then click
Remove.
The selected IP address is deleted.
- Click OK.
- On the ribbon, in the Manage Configuration group, click Save to keep your allowed IP address changes.
- On the ribbon, in the Manage Configuration group, click Restart to apply your changes.