Messaging Distribution
The Messaging Distribution folder in the Configuration tab contains settings for messaging distribution. You specify settings for the following messaging applications:
-
Google Chat
-
Microsoft Teams
-
Slack
Create Messaging Applications
Google Chat
You can setup the Google chat environment by performing the following steps:
- Procedure
-
Create a Google Cloud project. For more information, see Create a Google Cloud project.
-
Setup OAuth consent. For more information, see Configure the OAuth consent screen and choose scopes.
-
Configure and enable Google chat API and People API. For more information, see Configure the Google Chat API.
-
Create OAuth ID and credentials. For more information, see Create OAuth client ID credentials
Microsoft Teams
You can setup the Microsoft Teams environment by performing the following steps:
-
A Microsoft Entra ID tenant. If you don't have a tenant, create a free Azure account to get free subscription.
-
An account that has at least the Cloud Application Administrator role.
- Procedure
-
Register a new application in the Microsoft Entra admin center.
-
Browse to Identity > Applications > App registrations and select New registration, set following values:
-
Set Name to your app name.
-
Choose the supported account types
-
Set Redirect URI to Web
http(s)://{host:port}/ibi_apps/oauth2_callback
-
Click Register.
-
-
On the overview page, copy and save the Application (client) ID, OAuth 2.0 authorization endpoint (v2) and token endpoint (v2). You will need those later when updating your Microsoft Teams profile in WebFOCUS ReportCaster configuration.
-
-
Add credentials.
-
From the application overview page, navigate to the Certificates & secrets.
-
In the Client secrets section, select on + New client secret.
-
Add a description (Name of the secret) for the secret.
-
Select 730 days (24 months) for Expires.
-
Select Add.
-
-
Once the client secret is created, copy its value immediately. The value is saved in your Microsoft Teams profile in WebFOCUS ReportCaster configuration. This secret value is never displayed again after you leave this page.
-
-
Configure API permissions for Microsoft Teams (static user consent). From the application overview page, navigate to the API permissions.
-
On the application’s API Permissions page, choose Add a permission.
-
Select Microsoft Graph, select Delegated permissions.
-
In the Select Permissions dialog, choose the following permissions to configure to the application:
Channel.ReadBasic.All ChannelMessage.Send Chat.Create ChatMessage.SendTeam.ReadBasic.All User.Read User.ReadBasic.All Files.ReadWrite.AllChat.ReadWrite
-
-
Configure permissions for email distribution.
-
On the application’s API Permissions page, choose Add a permission.
-
Select Microsoft Graph > select Delegated permissions.
-
In the Select Permissions dialog, choose the following permissions to configure to the application
Mail.Send.Shared
-
Slack
You can setup the Slack environment by performing the following steps:
- Procedure
-
Launch https://api.slack.com/apps
-
Create an app.
-
Click the Create New App button.
-
Select Create an app.
-
Select From a manifest.
-
Get the app manifest and paste it into the YAML text box, click Next, review the scopes then click Create button.
-
Click Install App and then select Request to Install button to submit request.
-
After the request to install the new app has been approved, you can copy and use your Bot User OAuth Token.
-
- Manage Slack App.
Update Slack App settings and scopes.
Navigate to Settings > Basic Information.
Display Information:
App name: ReportCasterQA
Short description: add a short description
App icon & Preview: set or change the app icon
Navigate to Features and then OAuth & Permissions.
Scopes: add or delete Bot Token Scopes (default scopes can be found in the app manifest.
After you make any changes in your app, reinstall your app for those changes to take effect.
App Manifest (template)
display_information:
 name: {your_app_name}
features:
 bot_user:
  display_name: {your_app_name}
  always_online: true
oauth_config:
 scopes:
  bot:
   - channels:read
   - chat:write
   - chat:write.customize
   - files:write
   - groups:read
   - im:read
   - incoming-webhook
   - mpim:read
   - users:read
   - users:read.email
settings:
 org_deploy_enabled: false
 socket_mode_enabled: false
 token_rotation_enabled: false
App Manifest (template)
With the ability to post in all public channels:
display_information:
 name: {your_app_name}
features:
 bot_user:
  display_name: {your_app_name}
  always_online: true
oauth_config: scopes:
  bot:
    - channels:read
    - chat:write
    - chat:write.customize
    - files:write
    - groups:read
    - im:read
    - incoming
    -webhook
    - mpim:read
    - users:read
    - users:read.email
    - chat:write.public
settings:
 org_deploy_enabled: false
 socket_mode_enabled: false
 token_rotation_enabled: false
Configuring Messaging Applications
Follow the steps to configure messaging applications in WebFOCUS ReportCaster:
Google Chat
-
Navigate to WebFOCUS ReportCaster configuration and select Messaging Distribution folder.
-
Select Google Chat and then select New.
-
Provide the name for the Google Chat setting.
-
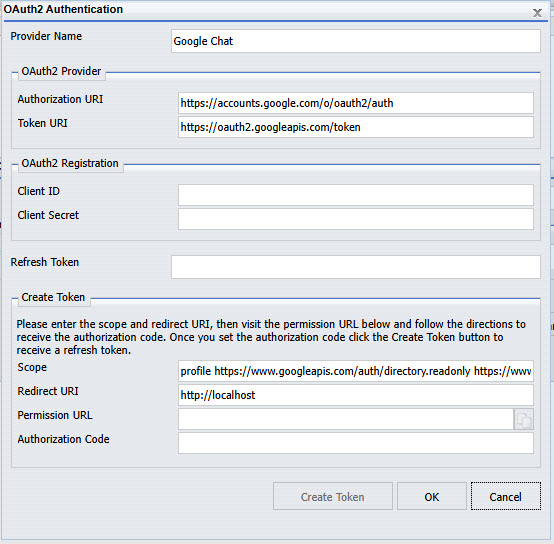
Select the folder icon, the following window pops up.
-
Enter the OAuth ID and credentials you have while creating the messaging app in the appropriate fields.
-
The permission url is auto-populated in the Permission URL field after you enter client id and secret.
-
Copy the permission url and paste it in a browser and enter the credentials to obtain authorization code.
-
Enter the authorization code in the Authorization Code field.
-
Select Create Token to create a refresh token.
-
Select OK to create the settings.
-
Save the changes to WebFOCUS ReportCaster configuration and restart Distribution server.
Microsoft Teams
-
Navigate to WebFOCUS ReportCaster configuration and select Messaging Distribution folder.
-
Select Microsoft Teams and then select New.
-
Provide the name for the Microsoft Teams setting.
-
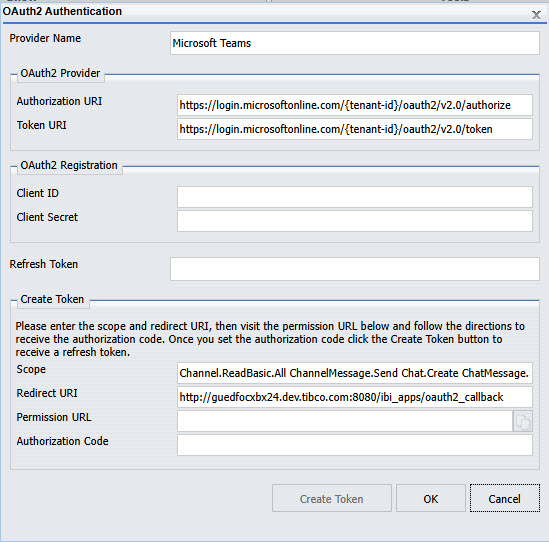
Select the folder icon, the following window pops up.
-
Enter the OAuth ID and credentials you have while creating the messaging app in the appropriate fields.
-
The permission url is auto-populated in the Permission URL field after you enter client id and secret.
-
Copy the permission url and paste it in a browser and enter the credentials to obtain authorization code.
-
Enter the authorization code in the Authorization Code field.
-
Select Create Token to create a refresh token.
-
Select OK to create the settings.
-
Save the changes to WebFOCUS ReportCaster configuration and restart Distribution server.
Slack
-
Navigate to WebFOCUS ReportCaster configuration and select Messaging Distribution folder.
-
Select Slack and then select New.
-
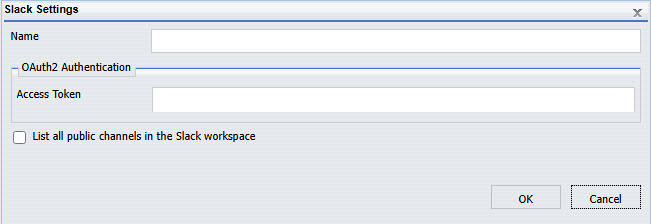
Provide the name for the Slack setting.
-
Paste the access token in the Access Token field.
-
Select the List all public channels in the Slack workspace checkbox to list the available public channels.
-
Select OK to create the settings.
-
Save the changes to WebFOCUS ReportCaster configuration and restart Distribution server.
Testing the Configuration
You can test the configuration you created by selecting any of the configuration and select Test. An alert saying test successful pops up if the configuration is correct else it says test failed.