WebFOCUS ReportCaster Configuration
The Configuration tool enables Managers to view and manage the configuration of the Distribution Server, Servlet (deployed in WebFOCUS ReportCaster web application) interfaces and tools. Options that Managers can modify include Distribution Servers, General Preferences, Email Distribution, Notification, and other options.
Note: When you change a configuration setting, the event is logged in the audit log file located in the Administration Console. Configuration events are logged, by default.
Configuration Icons
In the Configuration tab on the WebFOCUS ReportCaster Console ribbon, a series of icons enable you to perform the following tasks.
Note: When you select Configuration in the WebFOCUS ReportCaster Console ribbon, the Manage Configuration group displays on the left-hand side. Clicking Server Status, Server Performance, Job Status, Job Log, or Blackout Periods will change the name and functionality of this group, depending where you are in the interface. These options all appear in the Show group of the ribbon.
- Manage
Configuration group
- Save. Saves any changes made to the configuration. You will receive a message asking you to confirm the save. You must save the changes to the configuration settings as part of the process to implement the change. For details, see Changing Configuration Settings.
- New. Creates a new WebFOCUS Reporting Server connection. This option is only active when working in the Data Servers folder.
- Remove. Deletes a WebFOCUS Reporting Server from the WebFOCUS ReportCaster configuration. You will receive a message asking you to confirm the deletion. This option is only active when working in the Data Servers folder.
- Test. Tests the connection to the selected server or repository. This option is only active when working in the Data Servers and LDAP Settings folders. You may be prompted for a user ID and password to connect to a specified server. You will receive a message describing whether the test succeeded or failed.
- Restart. Restarts the Distribution Server and WebFOCUS ReportCaster to implement changes to the server configuration. You can also select Restart from the Action menu. For more information, see WebFOCUS ReportCaster Configuration.
- Configuration Files. Provides options to view and download
the WebFOCUS ReportCaster configuration files. Click the arrow to access the following
individual files.
- dserver.xml. Contains a record of current WebFOCUS ReportCaster configuration settings.
- sendmodes.xml. Contains information about MIME output file formats.
- rc_preference.xml. Contains information about the display of options in the UI.
Clicking one of these file options displays the file information in a browser window. Click Download Configuration Files to download all files as a single zip file.
- Tools group
- Global Updates.
Authorized users can make global updates for the values stored in schedules and
distribution lists. using the Global Updates interface, the following settings
can be updated:
- Mail Server
- FTP Server
- Printer
- Email Address
- Email From
- Data Server
- Notification Type
- Notification Reply Address
- Notification Subject
- Notification Brief Message To
- Notification Full Message To
For more information, see Global Updates.
- Global Updates.
Authorized users can make global updates for the values stored in schedules and
distribution lists. using the Global Updates interface, the following settings
can be updated:
- Actions group
- Refresh. Refreshes the settings to reflect the last saved configuration settings.
Configuration Tab Folders
The Configuration tab provides access to configuration settings through the following folders:
- Distribution Servers. Defines and configures the Distribution Server. This folder provides settings to define a failover Distribution Server to act as a backup, and configure two or more Distribution Servers to share the workload. This folder also contains the Additional Settings folder. For details on these settings, see WebFOCUS ReportCaster Configuration.
- General Preferences. Specifies which distribution formats, and methods will be available to a user creating a schedule. In this folder, you can also specify blackout period settings, and if WebFOCUS ReportCaster scheduling options will include the ability to distribute a PDF file directly to a printer. For details on these settings, see WebFOCUS ReportCaster Configuration.
- Email Distribution. Configures email settings, such as the default email host, number of attempts to distribute to an email host, and security information. For details on these settings, see WebFOCUS ReportCaster Configuration.
- Notification. Configures notification settings, such as the notification email host and default notification type. For details on these settings, see WebFOCUS ReportCaster Configuration.
- FTP Settings. Allows you to specify the default FTP and user ID, and security plug-in. You can also indicate whether the server requires a secure SFTP connection and specify the authentication method. For details on these settings, see WebFOCUS ReportCaster Configuration.
- Zip Settings. Provides settings to configure how Zip files will be created and named. For details on these settings, see WebFOCUS ReportCaster Configuration.
- Other Schedule Defaults. Defines the default end date and time of a WebFOCUS ReportCaster schedule. For details on these settings, see WebFOCUS ReportCaster Configuration.
- Log Purge. Allows you to specify the time and period that log files will be automatically purged. For details on these settings, see WebFOCUS ReportCaster Configuration.
- Data Servers. Allows you to configure multiple Reporting Servers, including cluster servers. For details on these settings, see WebFOCUS ReportCaster Configuration.
Changing Configuration Settings
To implement changes to the WebFOCUS ReportCaster server configuration settings, you must save the changes, and then restart the Distribution Server and the WebFOCUS ReportCaster web application. Use the following steps to save any configuration changes.
- After you make changes to
any of the configuration settings within a Configuration folder, click the
Save icon in the Manage Configuration group toolbar.
A window opens, asking you to confirm the save.
- Click
OK.
A window opens, explaining that you must restart the Distribution Server and the WebFOCUS ReportCaster web application in order for the changes that you saved to take effect.
- Click OK.
- Click the
Restart icon in the Manage Configuration group toolbar.
A window opens, asking you to confirm that you want to stop all running jobs and restart.
- Click Yes.
- Notify all users that are currently logged that they must restart their sessions to obtain the new configuration information. This is required because user sessions have information cached pertaining to the WebFOCUS ReportCaster configuration. The user interfaces must be restarted to obtain any updated configuration information.
Distribution Server Settings
The Distribution Servers folder contains the settings that define and configure the Distribution Server. The Server Status option, located on the ribbon, provides the ability to restart the Distribution Server, suspend distribution, stop distribution, switch servers, and refresh data.
The Distribution Servers folder contains the following configuration settings.
|
Setting |
Optional or Required/Default Value |
Descriptions and Possible Values |
|---|---|---|
|
Primary Distribution Server section |
||
|
Host |
Required. |
Host name of the primary Distribution Server. |
|
Port |
Required. |
Port number of the primary Distribution Server. |
|
Restrict to IP Address |
Optional. |
Restricts Distribution Server Console access to one or more IP Addresses. For more information, see WebFOCUS ReportCaster Configuration. |
|
Maximum Threads Controls how many simultaneous connections (threads) the WebFOCUS ReportCaster Distribution Server can utilize to process scheduled jobs. The default value is 3. This setting is also available in the Administration Console. |
||
|
Server Name |
Required if one or more servers are listed. |
Displays the name of the server. |
|
Threads (Connections) |
Required. The Default Value is 3. |
Displays the simultaneous connections (threads) for each server. |
|
Other Task |
|
Non server-based tasks. |
|
Reader Interval, Recovery, Processing for No Report to Distribute, and Max Messages per Task from Data Server options: |
||
|
Reader Interval |
Required. Default value is 1 minute. |
Polling interval (in minutes) for the WebFOCUS ReportCaster Distribution Server to check for scheduled jobs. An acceptable value is any positive integer from 1 to 999999. Negative numbers and zero are not allowed. Note: This setting is also available in the Administration Console. |
|
Recovery |
Default value is Off. |
On. During startup, the WebFOCUS ReportCaster Distribution Server recovers scheduled jobs that were processed but not completed. Off (Default). During startup, the WebFOCUS ReportCaster Distribution Server does not recover any scheduled jobs. Note: This setting is also available in the Administration Console. |
|
Processing for No Report to Distribute |
Required. Default value is Error. |
Specifies whether the No Report to Distribute message from the WebFOCUS Reporting Server is categorized as an error or a warning. This is a global setting, relevant to all schedules. Possible values are:
These settings also apply to burst reports when there is a No Report to Distribute message for an individual burst value. If a schedule contains multiple tasks, the No Report to Distribute processing only applies if all tasks that are part of the schedule produce the No Report to Distribute message. If one task in the schedule produces a report, then the value of this setting does not affect log messaging or notification. |
|
Max Messages per Task from Data Server |
Required. Default value is 1000. |
Controls the number of messages for each task from the Data Server written to the WebFOCUS ReportCaster log file. |
|
Setting |
Optional or Required/Default Value |
Descriptions and Possible Values |
|---|---|---|
|
Scan-back section |
||
|
Scan-back Type |
Required. Default value is On. |
Possible values are:
|
|
Scan-back Interval |
Default value is 15, 24 hour periods. |
If the Distribution Server is unavailable for a period of time, this is the number of 24 hour periods (beginning with the Distribution Server restart time) that you want the Distribution Server to scan for jobs not yet run and run them. Note: This setting is also available in the Administration Console. |
|
Setting |
Optional or Required/Default Value |
Descriptions and Possible Values |
|---|---|---|
|
Settings for the Additional Settings folder: |
||
|
The Console Requires Secure SSL Connection |
Optional. |
Select this check box to encrypt the communication between the WebFOCUS ReportCaster application and the WebFOCUS ReportCaster Distribution Server. After enabling secure communication and saving the changes, you must manually restart the WebFOCUS ReportCaster application and the WebFOCUS ReportCaster Distribution Server. |
|
SSL Certificate |
Required if The Console Requires Secure SSL Connection check box is selected. |
A default SSL Certificate is supplied by the installation procedure. You can optionally replace the default certificate with your own certificate to activate secure communication. To do this, you must import your signed server certificate from a CA or self-signed certificate to the distribution server keystore, and then export an SSL certificate from the keystore. Once you have exported the SSL certificate, you must paste this certificate to the SSL Certificate setting, save the configuration changes, and manually restart the Report Broker application and the Report Broker Distribution Server. |
|
Schedule Job Traces |
Optional. The default value is Off. |
Enables Distribution Server Traces.
|
|
Job Status Notification Plug-in |
Optional. |
Name of a custom written Java class that implements the WebFOCUS ReportCaster Job Status Notification interface and instructs the Distribution Server to perform some action (such as notifying a Web Service or other listener) that a scheduled job has started and ended. For more information, see WebFOCUS ReportCaster Configuration. |
|
Provide Metrics Information from Resource Analyzer |
Optional. |
This functionality enables the collection of RA DBMS statistics from the Reporting Server for display in the schedule log. Note: If you do not have Resource Analyzer on the WebFOCUS Reporting Server, this functionality will not work. When the check box is selected, the RC log displays messages containing RA DBMS information. When the check box is not selected, messages are not displayed. |
|
Hold Repository Connection |
Required. By default, this option is selected. |
Selected. The database connection is kept open throughout the execution of the schedule, including obtaining Address Book information, and writing information to the log files. Not selected. The database connection is dropped before executing the schedule. A new connection is made after the schedule is executed to obtain Address Book information and write information to the log files. |
Configure the Job Status Notification Plug-in
- Procedure
- From the Tools menu, click WebFOCUS ReportCaster Status.
- Click the Configuration button.
- In the left pane, expand the Distribution Servers folder, then click the Additional Settings folder.
- Populate the Distribution Servers fields using the information provided in the preceding tables.
- In the Job Status Notification Plug-in field, enter the name of the program that implements the Job Listener interface.
- Click
Save.
Your program will be called at the start and end of each schedule to perform the customized actions it has been designed to do. For more information, refer to the ibi.broker.scheduler.plugin package found in the Java documentation.
Restricting Distribution Server Console Access to an IP Address List
Limiting Distribution Server access to a preselected IP address helps prevent denial of service (DoS) attacks against your server. A DoS attack is a malicious cyber-attack that overloads a server with requests from multiple IP addresses, which blocks legitimate IP addresses from accessing the server. You can use the Restrict to IP Addresses option in the WebFOCUS ReportCaster Console to enhance the security of your network. If you populate the Restrict to IP Addresses field with one or more IP addresses, the Distribution Server only accepts TCP/IP requests from the addresses listed. This setting is blank by default.
Configure IP Address Restrictions
- Procedure
- Open the WebFOCUS ReportCaster Console.
- On the ribbon, in the Show group, click Configuration.
- In the
Configuration pane, click
Distribution Servers.
The Primary Distribution Server options display.
- Click
the
Restrict to IP Addresses open folder button.
The Allowed IP Addresses dialog box opens.
- Click
Add.
The Add IP Address dialog box opens, as shown in the following image.
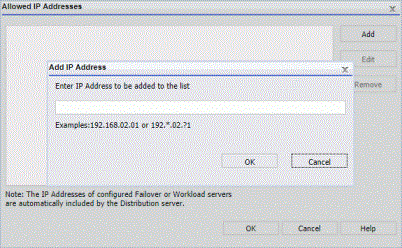
- Type an IP address and click OK. This adds the IP address to the Allowed IP Address list.
- Repeat steps 5-6 to add any additional IP addresses.
- Click OK to save the Allowed IP Address list and return to the WebFOCUS ReportCaster Console.
- On the ribbon, in the Manage Configuration group, click Save to keep your allowed IP address changes.
- On the ribbon, in the Manage Configuration group, click Restart to apply your changes.
Edit an IP Address
- Procedure
- Click
the Restrict to IP Addresses open folder button.
The Allowed IP Addresses dialog box opens.
- Click
the IP address that you want to modify, and then click
Edit.
The Edit IP Addresses dialog box opens.
- Modify the IP address, and then click OK.
- On the ribbon, in the Manage Configuration group, click Save to keep your allowed IP address changes.
- On the ribbon, in the Manage Configuration group, click Restart to apply your changes.
Delete an IP Address
- Procedure
- Click
the
Restrict to IP Addresses open folder button.
The Allowed IP Addresses dialog box opens.
- Click
the IP address that you want to delete, and then click
Remove.
The selected IP address is deleted.
- Click OK.
- On the ribbon, in the Manage Configuration group, click Save to keep your allowed IP address changes.
- On the ribbon, in the Manage Configuration group, click Restart to apply your changes.
General Preferences
The General Preferences folder in the Configuration tab contains settings that determine which schedule tasks, distribution formats and methods will be available to a user.
The General Preferences folder contains the following configuration settings.
|
Setting |
Optional or Required/Default Value |
Descriptions and Possible Values |
|---|---|---|
|
Allow PDF Distribution Directly to a Printer |
Required. By default, this option is selected. |
When selected, PDF is a selectable format for the Printer distribution method. This enables a PDF file to be distributed directly to a printer. The printer must have the appropriate driver to print PDF files. |
|
Use Legacy Behavior for Parameterized Schedule Settings |
Optional. By default, this option is not selected. |
Restores the legacy behavior for the use of amper variables in schedule settings. When selected, amper variables can only be used in the Email Subject. The value of an amper variable is set to the value stored with the schedule in the WebFOCUS ReportCaster parameters table. Runtime values are not available. |
|
Schedule Tasks |
Optional. All Task Types are enabled, by default. |
Specifies what Task Types are available to users. The default Schedule task for all Advanced Schedules is Db2 Web Query Report. When you are creating a task in the Advanced Scheduling tool, clicking the New button displays the dialog box for the selected default task. For more information, see WebFOCUS ReportCaster Configuration. |
|
Distribution Formats |
Optional. All formats are enabled, by default. |
Specifies what report and graph formats are available to users. |
|
Distribution Methods |
Optional. All distribution methods are enabled, by default. |
Specifies what distribution methods are available to users. |
Specifying Schedule Task Settings
The Schedule Tasks setting in the General Preferences folder enables authorized users to specify what Task Types are available to users and groups.
By default, all Task Types are enabled (selected). A minimum of one Task Type must be selected.
Note:
- If a task is cleared after a schedule using that task has been created, the schedule will fail when it is run. A message in the log will indicate how to fix the problem.
Specify Schedule Task Settings
- Procedure
- In the
General Preferences folder, click the icon to the right of the
Schedule Tasks field.
The WebFOCUS ReportCaster - Schedule Tasks dialog box opens.
- To
enable or disable specific Task Types, select or clear the check box
for the following options:
- Db2 Web Query Report
- WF Server Procedure
- File
- URL
- FTP
- Web Query Schedule
- Optionally, choose a default Schedule task for the Advanced Scheduling tool. Db2 Web Query Report is selected, by default.
- Optionally, if you want the Report Broker Distribution Server to not run scheduled jobs for the task types that have been cleared, select the Only run schedules for selected Tasks check box.
- When
your selections are complete in the Schedule Tasks dialog box, click
OK.
The changes are saved and the Schedule Tasks dialog box closes.
- To implement the configuration changes, restart the Distribution Server and WebFOCUS ReportCaster web application.
Specifying Schedule Format Settings
The Distribution Formats setting in the General Preferences folder enables users to specify what report and graph formats are available to users and groups.
This setting only applies to WebFOCUS ReportCaster (Repository) procedures. By default, all report and graph formats are enabled (selected). A minimum of one report or graph format must be selected.
Note: If a format is cleared after a schedule using that format has been created, the schedule will fail when it is run. A message in the log will indicate how to fix the problem.
Specify Schedule Format Settings
- Procedure
- In the General Preferences folder, click the icon to the right of the Distribution Formats field.
- Using
the Styled Formats drop-down list, you can select
Specialized Formats,
Non-styled Formats, or
Graph Images. Optionally, you can keep the default,
Styled Formats.
By default, Styled Formats are displayed with each format type selected.
- To enable or disable styled formats, select or clear the check box for one of the listed formats.
- To enable or disable Non-styled Formats, which do not support styling using Report Broker StyleSheet commands, select Non-styled Formats from the drop-down list. By default, the Non-styled Formats are displayed with each format type enabled.
- To enable or disable graph images, select Graph Images from the drop-down list. By default, the graph image formats are displayed with each format type enabled.
- When
your selections are complete in the Report/Graph Formats dialog box, click
OK.
The changes are saved and the Report/Graph Formats dialog box closes.
- To implement the configuration changes, restart the Distribution Server and Report Broker.
Specifying Schedule Distribution Method Settings
The Distribution Methods setting, in the General Preferences folder, enables authorized users to specify the distribution methods that are available to users and groups. If a method is cleared after a schedule using that method has been created, and Only run schedules for selected Distribution Method is selected, the schedule processing will not run the scheduled tasks. A message in the log will indicate that the distribution method is not configured for use. In addition, a schedule that has multiple distributions will not run if one of the distribution methods is cleared in the Distribution Methods drop-down menu, in the General Preferences folder, of the Configuration tab.
By default, all distribution methods are enabled (selected).
Note: A minimum of one distribution method must be selected.
The Repository option only appears if these products are enabled. Repository is an optional product component that is installed with the WebFOCUS ReportCaster Client.
Specify Schedule Distribution Method Settings
- Procedure
- In the
General Preferences folder, click the icon to the right of the
Distribution Methods field.
The Report Broker - Schedule Distribution Methods dialog box opens.
- To enable or disable specific distribution methods, select or
clear the check box for one of the listed options.
Note: At least one schedule distribution method must be selected.
- Optionally, select the Only run schedules for selected Distribution Methods check box to limit the schedules running to those that have at least one of the Distribution Methods selected.
- When
your selections are complete in the Schedule Distribution Methods dialog box,
click
OK.
The changes are saved and the Schedule Distribution Methods dialog box closes.
- To implement the configuration changes, restart the Distribution Server and Report Broker web application.
Email Distribution
The Email Distribution folder in the Configuration tab contains default email settings, email retry options, and email security.
The Email Distribution folder contains the following configuration settings.
|
Setting |
Optional or Required/Default Value |
Descriptions and Possible Values |
|---|---|---|
|
Inline Report Distribution |
Required. The default value is Allowed. |
Specifies whether the Schedule tool will enable the email distribution option to send a report in the body of the email (inline). Note: If this option is cleared after a schedule using this option has been created, the schedule will fail when it is run. A message in the log will indicate how to fix the problem. |
|
Packet Email |
Required. The default value is Yes. |
Controls how task output and burst content are distributed through email. Valid values are:
|
|
Allowed Email Domains and Addresses |
The default value is off. |
Contains the email domains and addresses that are authorized to be used in a distribution. Select the Restrict user input with this list check box to restrict user input of email addresses and domains to the allowed addresses saved in your list. For more information, see WebFOCUS ReportCaster Configuration. Note:
|
|
Restrict Email Distribution to the Email Address of the Schedule Owner |
Optional. |
Check this box if you want to restrict email distribution to the email address of the schedule owner. Note: If no email address is specified for the schedule owner in the Security Center, the schedule cannot be saved. |
|
Always Compress and Password Protect Distributed Report |
Optional. |
Select this box to have any distributed reports converted into a password-protected Zip file. Passwords can be provided in a distribution file, a dynamic distribution list, or by way of the zip encryption plug-in. If no password is created, the report will not be distributed. The distribution server will enforce this rule on all schedules, including schedules created prior to selecting the check box. Note: When this check box is selected, Inline Report Distribution will be disabled. If Inline Email is enabled, the Always Compress and Password Protect Distributed Report check box will be cleared. Also, if the Always Compress and Password Protect Distributed Report check box is selected, then the Add Report to Zip File check box in the Distribution tabs of schedules created from the Basic scheduling tool is selected, by default. |
|
Customize Attachment Message |
Optional. |
Provides the ability to specify a custom message. |
|
Default Attachment Message |
Required. |
Defines the default message used in your Email Distribution. The message that you define here displays in the Basic Scheduling Tool. Note: If you customize the default message, this new message will be the default message for new schedules. |
|
Mail Server Defaults section |
||
|
Mail Server |
Required. |
Name of the default mail server used to distribute an email schedule. You can also specify a port for Mail Host using hostname:port. If you do not specify a port or the port you specify is not present, the default port is used. |
|
This Server Requires a Secure SSL Connection |
Optional. |
Select this check box if the specified mail server uses SSL. |
|
This Server Requires a Secure TLS Connection |
Optional. |
Select this check box if the specified mail server uses TLS. |
|
This Server Requires Authentication |
Optional. |
Select this check box if the specified mail server requires authentication with a user ID and password. |
|
SMTP User Id/Password |
Required if the mailhost is using SMTP Authorization. No default value. |
User ID and password used to connect to the mailhost. |
|
SMTP Security Plug-in |
Optional. |
Name of a custom written Java class that implements the WebFOCUS ReportCaster SMTP security interface to dynamically retrieve the user ID and password needed to connect to an SMTP server. For more information, see WebFOCUS ReportCaster Configuration. |
|
Email Reply Defaults section |
||
|
Mail From |
Optional. |
Default value for the email From field. This can be any value. |
|
Email Retries section |
||
|
Email Retries |
The default value is 1. |
Number of times the Distribution Server will try to connect to the email server to deliver report output. If the Distribution Server is unable to connect to the email server on the first try, it will attempt to connect again after the specified Email Retry Interval has passed. A message for each attempt is written to the log file. Valid values are 0 through 9. |
|
Email Retry Interval (seconds) |
The default value is 60 seconds. |
Amount of time that the Distribution Server will wait between retries. Valid values are 1 through 999. |
Configure Email Distribution
- Procedure
- From the Tools menu, click WebFOCUS ReportCaster Status.
- Click the
Configuration button.
Note: Authorized users can also access the WebFOCUS ReportCaster Configuration tool from the Administration Console.
- In the left pane, select the Email Distribution folder.
- Populate
the email distribution fields. You can:
- Make changes to the current email settings. For more information, refer to the preceding table.
- Supply any default values that you would like to be available at schedule creation time.
- If your mail server(s) require authentication or SSL or TLS, check the appropriate boxes and enter the required credentials.
- Click Save.
Validating Allowed Email Domains and Addresses
When sending reports by email, you can restrict user selection of email domains and addresses from a pre-defined list.
The following image shows the Allowed Email Domains and Addresses dialog box in the Report Broker Console, where this option is available.
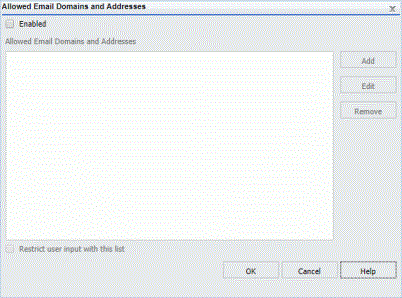
Select the Enabled check box to restrict email distribution to a list of valid email domains and addresses. When the list is enabled, and a user enters an email address that is not on this list, the WebFOCUS ReportCaster job cannot be saved.
If you select the Restrict user input with this list check box, users will only be able to use email domains and addresses selected from this list, applying another layer of email distribution restriction for other users.
Note: You must select the Enabled check box in order to select the Restrict user input with this list check box.
Examples of Invalid Email Addresses and Domains
In this example, an Administrator added the following email addresses and email domains to the Allowed Email Domains and Addresses list:
- john@gmail.com
- roger@gmail.com
- @gmail.com
- @yahoo.com
These additions to the list define what is valid and what is invalid for user input.
Invalid Email Addresses
For example, since john@gmail.com was added to the list, if a user types in John@gmail.com, with an upper case J, the email address is valid. This is because the Allowed Email Domains and Addresses feature is not case sensitive.
However, if a user types johnroger@gmail.com, which is a combination of two email addresses that were added to the list, the email address would be invalid, because this specific email address was not added to the list.
Invalid Email Domains
When entering domain addresses, if a user types in any email address with the email domain @gmail.com, it is valid, because @gmail.com is one of the domains added to the list.
However, if a user types in any email address with the email domain @outlook.com, it is not valid, because @outlook.com is not one of the domains added to the list.
Email Domain and Address Restrictions
Restrictions apply during the following situations:
-
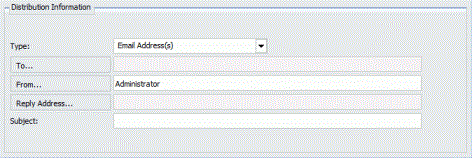
Editing Email Distribution options in the Basic Scheduling tool.
The following image shows the Email Distribution options in the Basic Scheduling tool. If you select the Restrict user input with this list check box, you can click the To, From, and Reply Address fields to select or create email addresses.
-
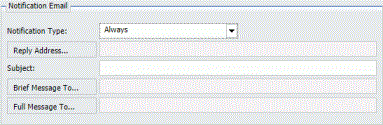
Editing Notification Email options in the Basic Scheduling tool.
The following image shows the Notification Email options in the Basic Scheduling tool. If you select the Restrict user input with this list check box, you can click the Reply Address, Brief Message To, and Full Message To fields to select or create email addresses.
-
Adding new members to a Distribution List
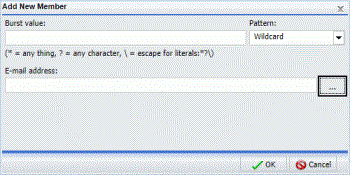
The following image shows the Distribution List Add New Member dialog box. If you select the Restrict user input with this list check box, you can click the ellipsis button next to the E-mail address field to select or create email addresses.
Restrictions also apply to the following file types:
- Distribution Files. If you import an external distribution file, the emails listed in the file are validated against the list of allowed email addresses and domains.
- Dynamic Distribution Lists. If you create a Dynamic Distribution List, the emails selected for use are validated against the list of allowed email addresses and domains.
The Email Selection Dialog Box
When the Restrict user input with this list check box has been selected, you can click a To, From, Cc, Bcc, Reply, Reply Address, Brief Message To, Full Message To, or ellipsis button to display one of three dialog boxes. The dialog box that displays is based on the type of email domain and address information contained in the Allowed Email Domains and Addresses list.
Note:
- You can enter multiple email addresses into the To, From, Cc, Bcc, Reply, Reply Address, Brief Message To, and Full Message To fields.
- To cancel the selection of an email address in the Select Email Addresses dialog box, hold the Crtl key and select the email address.
A List of Only Email Addresses
If the Allowed Email Domains and Addresses list contains only email addresses, the Select Email Addresses dialog box allows you to select an email address for the To, Cc, Bcc, or Reply fields, as shown in the following image.
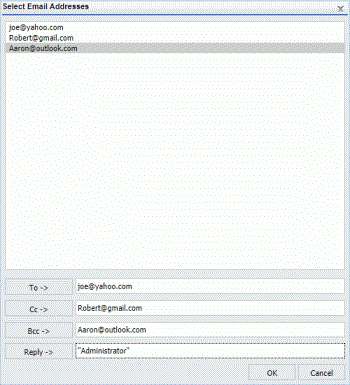
After you select an email address, click the To, Cc, Bcc, or Reply button to assign the email address to the respective field.
A List of Email Domains and Addresses
If the Allowed Email Domains and Addresses list contains both email domains and addresses, the Select or Enter Email Addresses dialog box lets you select from a list of email address. The dialog box also lets you create an email address for specific domains, as shown in the following image.
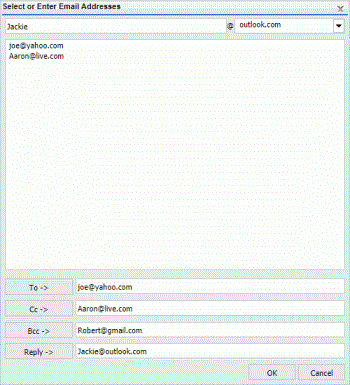
After you select an email address, or enter an email address and choose a domain, click the To, Cc, Bcc, or Reply button to assign the email address to the respective field.
A List of Only Email Domains
If the Allowed Email Domains and Addresses list contains only email domains, the input dialog box lets you select an email domain and enter the name of an email address, as shown in the following image.
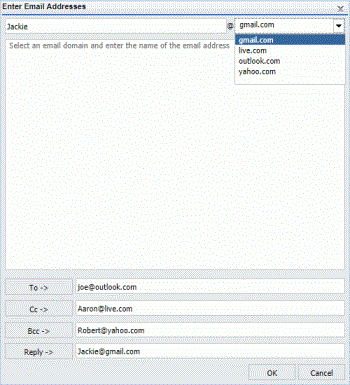
After you enter an email address and choose a domain, click the To, Cc, Bcc, or Reply button to assign the email address to the respective field.
Notification
The Notification folder in the Configuration tab contains default notification settings.
|
Setting |
Optional or Required/Default Value |
Descriptions and Possible Values |
|---|---|---|
|
Notification Defaults section |
||
|
Notify Mail Server |
Optional. |
Name of the mail server that distributes the notification email. If blank, WebFOCUS ReportCaster uses the Mailhost setting as the notification mail server. Tip: We recommend using different mail servers for notification and email distribution. This way, if there is a problem with your Mailhost, notification will still be sent. Having separate mail servers ensures that you will be informed when the default mail server falters. You can also specify a port for the Notify Mailhost using hostname:port. If you do not specify a port or the port you specify is not present, the default port is used. |
|
Default Notify Type |
The default value is Never. |
Specifies whether to send notification of the schedule status to a specified email address. Possible values are:
Note: This setting is also available in the Administration Console. |
|
Enable Brief Notification Only |
Optional. |
Controls whether Full Notification is available as a scheduling option. When this check box is selected, you can only select the Brief Notification option when you schedule a report. Full Notification is not available. Note: Messages are displayed in the log when Full Notification is disabled. If a schedule is created before Full Notification is disabled, when the schedule executes, a Brief Notification will be sent, and a warning will be displayed in the schedule log. |
|
Enable system notifications |
Optional. |
Controls whether a notification is sent to a designated administrator when a Failover event occurs, when a Distribution Server changes from Failover Mode to Full Function mode, or when a Distribution Server is stopped. When this option is selected, the fields within the System Notifications section must be filled out before this configuration can be saved. When a Distribution Server changes from Failover to Full Function mode, the body of the email will display as follows: The Distribution Server at <Host>:<Port> has changed from Failover to Full Function mode. When a Distribution Server has stopped, the body of the email will display as follows: The Distribution Server at <Host>:<Port> is going to stop. |
|
System Notifications section |
||
|
Administrative Email Address |
Required. |
Enter the default Administrative Email Address to which you want the system notification to be sent. This value is required. |
|
From |
Optional. |
Enter the default address from which you want the system notification to be sent. This value is not required. |
|
Reply Email Address |
Required. |
Enter the default Reply Email Address to which you want the user receiving the email address to reply. This value is required. |
|
Email Subject |
Optional. |
Enter the default Email Subject line. This value is not required. |
Configure Notification
- Procedure
- From the Tools menu, click WebFOCUS ReportCaster Status.
- Click the
Configuration button.
Note: Authorized users can also access the WebFOCUS ReportCaster Configuration tool from the Administration Console.
- In the left pane, select the Notification folder.
- Populate
the notification fields. You can:
- Make changes to the current notification settings. For more information, refer to the preceding table.
- Supply any default values that you would like to be available at schedule creation time.
- Click Save.
FTP Settings
The FTP Settings folder in the Configuration tab contains the settings that define the default FTP server that WebFOCUS ReportCaster will use for FTP distributions.
The following table lists and describes the configuration settings that are available in the FTP Settings folder.
|
Setting |
Optional or Required/Default Value |
Descriptions and Possible Values |
|---|---|---|
|
Default FTP Host |
Optional. |
Name of the default FTP server when creating an FTP schedule. If you want to designate a port number other than the default port number, then use the following format: hostname:port |
|
Default FTP Location |
Optional. |
Name of the default FTP location (directory) when creating an FTP schedule. |
|
Default User |
Optional. |
Default user ID and password to perform FTP file transfers. To access the Default User settings, click the icon to the right of the Default User field. The User dialog box opens, where you can type the user name and password. |
|
SFTP Security Plug-in |
Optional. |
Name of a custom written Java class that implements the WebFOCUS ReportCaster SFTP security interface to dynamically retrieve the value of a public key needed to connect to a secure FTP server. For configuration information, see WebFOCUS ReportCaster Configuration. |
|
Create Index File with Burst Distribution |
Required. By default, this option is selected. |
For an FTP distribution of burst reports, this option determines whether or not to create an index file when the schedule runs. |
|
FTP Server Information |
||
|
This server requires a File Transfer Protocol (FTP). |
Optional By default, this option is selected. |
This option specifies that the default setting in the schedule tool is to use FTP. |
|
This server requires a secure File Transfer Protocol over TLS/SSL (FTPS). |
Optional |
This option specifies that the default setting in the schedule tool is to use FTPS. This functionality enables you to select this option once in the configuration tool, eliminating the need to select the button each time you use the scheduling tool. You can clear the option in the scheduling tool. If this button is not selected, you can optionally select the button in the scheduling tool at schedule creation time. |
|
This server requires a secure SSH File Transfer Protocol (SFTP) |
Optional. |
This option specifies that the default setting in the schedule tool is to use SFTP. This functionality enables you to select this option once in the configuration tool, eliminating the need to select the button each time you use the scheduling tool. You can clear the button in the scheduling tool. If this button is not selected, you can optionally select the button in the scheduling tool at schedule creation time. |
Configure FTP Settings
You can optionally supply values for the Default FTP Host, Default FTP Location, and Default User fields. These values are defaults for the schedule, as they are used at schedule creation time.
- Procedure
- On the ribbon, in the show group, click the Configuration button.
- In the left pane, select the FTP Settings folder.
- Optionally, populate the FTP Settings fields, using the
following information as a guideline:
- Default FTP Host. Enter a name for the default FTP Server. This will be used when creating an FTP schedule.
- Default FTP Location. Enter the name of the directory that will be used when creating an FTP schedule.
- Default User. Enter the default user ID and password to perform FTP file transfers.
- SFTP Security Plug-in. Enter the name of a custom written Java class that will implement the WebFOCUS ReportCaster SFTP security interface to dynamically retrieve the value of a public key needed to connect to a secure FTP server.
Note: Once stored, these values are used when you create a schedule. They are constant, unless you override them at the time you create a schedule.
- Optionally, clear the Create Index File with Burst Distribution check box to indicate that an index will not be generated when the FTP schedule is run.
- If your SFTP Server uses encryption keys, you can use the SFTP Security Plug-in to provide the values. To use this plug-in, enter the name of your program that implements the SFTP Security interface.
- Optionally, select the This server requires a File Transfer Protocol (FTP) button if the FTP server does not require SFTP or FTPS.
- Optionally, select the This server requires a secure SSH File Transfer Protocol (SFTP) button to secure the configuration information. Select the Security Mode, Protocol, and Data Connection Security settings to authenticate the server.
- Optionally, select the This server requires a secure File Transfer Protocol over TLS/SSL (FTPS) button if the FTP server requires FTPS. Select the type of authentication you want for the server.
- Click Save.
Zip Settings
The Zip Settings folder in the Configuration tab contains settings for adding an extension to a distributed Zip file, the Zip encryption to use for distribution, and defining a Zip encryption password plug-in.
The Zip Settings folder contains the following configuration settings.
|
Setting |
Optional or Required/Default Value |
Descriptions and Possible Values |
|---|---|---|
|
Add Zip Extension to Filename if Not Specified |
Required. By default, this option is selected. |
Controls whether or not the .zip file extension will be automatically appended to the Zip file name entered by the user in a schedule distributed by email or FTP. Select this option if you want to automatically append .zip to the entered file name. Do not select this option if you want to use the file name as entered by the user and not have .zip automatically appended to the file name. |
|
Zip Minimum with Email Distribution |
Required. The default size is in KB and set to 0. |
Select either MB or KB and customize the size of your file using the up and down arrows. |
|
Zip Encryption Password Plug-in |
Required. Default value is None. |
Global setting that enables you to password protect and encrypt scheduled output distributed in a Zip file. This setting controls how passwords are obtained by the Distribution Server. The zip encryption is AES 256. For more information, see WebFOCUS ReportCaster Configuration. Possible values are:
|
|
Zip Encryption Password Plug-in Name |
Required when Zip Encryption Password Plug-in setting is Custom. |
Type the name of a custom written plug-in that will return passwords. This plug-in must be available to the Distribution Server. |
|
Zip Encoding |
Optional. |
Specifies an encoding other than the default encoding of the WebFOCUS ReportCaster Distribution Server platform. The encoding specified must match the encoding used by WinZip or any other Zip utility installed on the Distribution Server. Note: This setting is also available in the Administration Console. |
|
Maximum Concurrent Compressions |
Optional The default value is zero (0). |
The total number of compression operations that the Distribution Server will perform simultaneously. If many running jobs include a compression operation (for example, zipping the output before sending), the compression operations could consume all of the available resources on the Distribution Server. You can lower this number to prevent this from occurring. |
|
Use Distributed Filename for FTP Archive Filename if Archive Filename not Specified in Schedule |
Optional. |
If this box is checked, then when a schedule is created that uses FTP as the distribution method and the archive file name is left blank, the Distribution Server will use the name found in the FTP Distribution List as the name of the archive file to be distributed. |
Using the Zip Encryption Protection Default Plug-in
The default plug-in provided with WebFOCUS ReportCaster enables the encryption password to be associated with the Db2 Web Query Repository folder where the scheduled report resides. For information on customizing a Zip Encryption Protection Plug-in, see WebFOCUS ReportCaster Configuration.
The plug-in delivers the password to the Distribution Server at schedule execution time, where the output is then encrypted and zipped. To use the default plug-in, choose Default for the Zip Encryption Password Plug-in setting. The default plug-in references the password file, zipencrypt.txt, for the domain and password. During installation, an empty version of this file is included in the /qibm/UserData/qwebqry/base80/ReportCaster/cfg directory.
The password statement in this file must be in the following format:
domain, domainhref, password,$
where:
Is the location of the HTML page (for example, untitled/untitled.htm) that contains the Report Broker Repository folder.
Is the password to open content from the associated domain.
Note: The Report Broker log will indicate that encryption was used.
The guidelines for using the default plug-in are:
- The zipencrypt.txt file must be in the /qibm/UserData/qwebqry/base80/ReportCaster/cfg directory.
- The zipencrypt.txt file
must contain the WebFOCUS ReportCaster Repository folder of the WebFOCUS ReportCaster Repository report.
Note: Since a Report Broker Repository folder is required to use the Zip Encryption Password Plug-in, attempting to enter a task other than a Report Broker Repository report will result in a failure to distribute the output of that task.
- If the zipencrypt.txt file contains an entry with the Web Query Repository folder, but no password, then the output is not encrypted and will be zipped or not zipped according to the Zip option selected in the schedule when it was created.
- If both the Web Query Repository folder and a password are in the password file, then the output is zipped regardless of the Zip option selected in the schedule when it was created.
To edit the zipencrypt.txt password file:
- From the bin directory on
the Distribution Server, run the decode utility,
decdpwds.
Note: Once the decdpwds utility is run, a log file named decdpwds.log will be created in the /qibm/UserData/qwebqry/base80/logs directory.
- Make the necessary additions or edits, such as adding a domain or changing the password.
- Run the encode utility,
encdpwds, to encrypt the file.
Note: Once the encdpwds utility is run, a log file named encdpwds.log will be created in the /qibm/UserData/qwebqry/base80/logs directory.
Configure Zip Settings
- Procedure
- From the Tools menu, click WebFOCUS ReportCaster Status.
- Click
the
Configuration button.
Note: Authorized users can also access the WebFOCUS ReportCaster Configuration tool from the Administration Console.
- In the left pane, select the Zip Settings folder.
- Populate the Zip Settings fields using the information provided in the preceding tables.
- If you want to produce zipped output that is encrypted and password protected, you can use the Zip Encryption Password Plug-in. To use your own program to supply the password, select Custom from the drop-down list and enter the name of the program in the Zip Encryption Password Plug-in Name field. To use the default, select Default. For more information, see WebFOCUS ReportCaster Configuration.
- Click Save.
Configure the Default Zip Encryption Password Plug-in
- Procedure
- From the Tools menu, click WebFOCUS ReportCaster Status.
- Click the Configuration button.
- In the left pane, select the Zip Settings folder.
- From the Zip Encryption Password Plug-in drop-down list, select Default.
- Click Save.
- In the
/qibm/UserData/qwebqry/base80/ReportCaster/cfg directory, create the zipencrypt.txt file that contains
the passwords used by the Zip Encryption Password Plug-in.
This file has the following structure:
Domain, domainhref, Password,$
where the first column is the word Domain, the second column identifies the folder containing the report to be scheduled, and the third column is the password.
Note: Only Report Broker procedures can be scheduled when this plug-in is configured. If a password is found, the output is encrypted. If a password is not found, the output is zipped but not encrypted.
- Restart the Distribution Server.
Other Schedule Defaults
The Other Schedule Defaults folder in the Configuration tab contains settings for Schedule End Date and Schedule End Time.
Note: Depending on your time zone, the default Schedule End Date may be set to Jan 1, 2100.
The following table lists and describes the configuration settings available in the Other Schedule Defaults folder.
|
Setting |
Optional or Required/Default Value |
Descriptions and Possible Values |
|---|---|---|
|
Schedule End Date |
Required. |
Clicking the drop-down menu displays a calendar where you can select the schedule end date. |
|
Schedule End Time |
Required. |
Manually, you can enter an end time for the schedule. Alternatively, use the arrows to assign a schedule end time. |
Log Purge
The Log Purge folder in the Configuration tab contains settings for purging log files, log purge periods, and log purge times.
The Log Purge folder contains the following configuration settings.
|
Setting |
Optional or Required/Default Value |
Descriptions and Possible Values |
|---|---|---|
|
Purge Log at Distribution Server Start |
Optional. By default, the check box is unchecked. |
When selected, log reports are automatically purged each time the Distribution Server starts. This is in addition to the scheduled log purging that is set using the Log Purge Period and Log Purge Time options. |
|
Daily Scheduled Log Purge section: |
||
|
Log Purge Period (Days) |
Optional. |
Automatically purges individual log reports when they are older than a set number of days. To disable daily scheduled log purges, set the Log Purge Period (Days) value to 0. Note: This setting is also available in the Administration Console. |
|
Log Purge Time |
Optional. |
Time at which log purging occurs. Note: This setting is also available in the Administration Console. |
Data Servers Settings
The Data Servers folder in the Configuration tab contains settings to configure the Reporting Servers associated with WebFOCUS ReportCaster. Using the configuration settings in this folder, you can also configure multiple Reporting Servers with Report Broker.
Note: Data Server connection information is stored in the Db2 Web Query Client, and not in Report Broker. Report Broker runs scheduled procedures through the Db2 Web Query Client which is installed with the Distribution Server. When a Report Broker job is executed by the Db2 Web Query Client, the alternate deferred server is used if an alternate deferred server is defined.
The Data Servers folder contains the following configuration settings.
|
Setting |
Optional or Required/Default Value |
Descriptions and Possible Values |
|---|---|---|
|
Settings for the Data Servers folder: |
||
|
Graph Agents |
The default value is 1. |
Optimizes the processing of graphs. Due to performance considerations, we recommend configuring this setting to 1 Graph Agent for each concurrent graph report. However, your own internal testing should determine the Graph Agent value that best suits the business needs of your organization. |
|
Graph Servlet URL |
Optional. There is no default. |
Overrides the default graph server setting and configures graph image files to be created on the Application Server. Type the following value http://hostname/context_root/IBIGraphServlet
where: hostname
Is the host name of the Application Server where the WebFOCUS Client is installed. context_root
Is the site-customized context root for the WebFOCUS web application deployed on your Application Server. The default is webquery. This setting is available for WebFOCUS Reporting Server and WebFOCUS procedures. This setting should not be used when web server security is enabled. This includes Basic authentication, IWA, SSL, and third-party security products (such as SiteMinder). In these cases, the web server security settings can prevent WebFOCUS from creating the graph. |
|
Excel Servlet URL |
Optional. |
Specifies the application server to be used to zip the file components that comprise an EXCEL® 2007 file (.xlsx) as follows: &URL_PROTOCOL://servername/alias/IBIEXCELSERVURL where: URL_Protocol
Is HTTP. servername
Is the name of the application server where the Db2 Web Query Client is installed. alias
Is the context root of the Db2 Web Query application. The default is webquery. This setting is available for the WebFOCUS Reporting Server and Db2 Web Query procedures. This setting should not be used when web server security is enabled. This includes Basic authentication, IWA, SSL, and third-party security products (such as SiteMinder). In these cases, the web server security settings can prevent WebFOCUS from creating the Excel 2007/2010 file. |
|
FOCEXURL/FOCHTMLURL |
Default value is http://localhost:8080 |
Specifies the fully-qualified URL, including host name and port of the FOCEXURL/FOCHTMLURL. If running with SSL security, update the URL to specify https. |
|
Settings for an individual Data Server: |
||
|
Name |
Required. |
Name of the selected Data Server. Note: Data Server names are case-sensitive. Data Servers are defined in the WebFOCUS Client as uppercase so you should also define Data Servers as uppercase in WebFOCUS ReportCaster. |
|
Default |
Required. |
This option is selected by default. |
|
Set FOCEXURL/ FOCHTMLURL in the scheduled procedure |
Required. |
This setting is selected, by default. If this setting is not selected, the Distribution Server will not set the value of FOCEXURL or FOCHTMLURL for a scheduled procedure. Therefore, when cleared, if FOCEXURL or FOCHTMLURL is already set in the edasprof.prf file, this setting remains in effect, unless it is overridden in the scheduled procedure. |
|
Security section |
||
|
Security Type |
By default, this option is set to Trusted and should not be changed. |
Static. A valid Execution Id and password is supplied in the User setting. When creating a schedule, you cannot specify an Execution Id and password. User. A valid Execution Id and password must be specified when creating a schedule. Shared. When creating a schedule, the user ID and password is internally assigned as the Execution Id and password. Note: Since the actual password is not stored in the WebFOCUS repository, the Shared configuration can only be used when a password is not required to connect to the WebFOCUS Reporting Server. Trusted. The Execution Id is the schedule owner and no password is sent to the WebFOCUS Reporting Server when schedules run. Note: The Reporting Server must be a configured to accept a Trusted connection when the Trusted option is selected. |
|
User |
Required if Security Type is set to Static. |
Default Execution Id and password. To access the ID and password, select the icon to the right of the User field. The User dialog box opens, where you can type the user name and password. |
|
Graph section |
||
|
Graph Engine |
Required. The value is GRAPH53. |
Controls which graph engine to use for server-side graphics. By default, this specifies the GRAPH53 setting. |
|
Headless |
By default, this option is not selected. |
Determines whether a graphics card exists on the WebFOCUS Reporting Server. When not selected (the default), a graphics card exists on the server. When selected, no graphics card exists on the server. |
|
Maximum Connection/Threads |
Required. The default connection is 3. |
Maximum number of connections available to the WebFOCUS Reporting Server. . |