Installing WebFOCUS Integrated Installation
This topic provides the step-by-step instructions that you need to install WebFOCUS Integrated Installation on a Windows or Linux environment.
Important: As of Release 9.0.0, the WebFOCUS system file configuration no longer includes the ibi_html directory, located at drive:\ibi\WebFOCUSrelease\WebFOCUS, where release is the number of your installed release. If you store customized stylesheet files or other files in the ibi_html directory, you must upload them from this directory to the WebFOCUS Repository before installing or upgrading to WebFOCUS Release 9.0.0 or higher. If you do not take this precaution, you will lose customized files stored in the ibi_html directory.
We recommend that you copy customized stylesheet files into the same workspace as the reports that call them, or in a common workspace if the stylesheets support content in multiple workspaces. You must also revise the links to these customized stylesheet files in existing procedures to identify their new location. For more information, see the Uploading Files topic in the ibi ™ WebFOCUS Client User's Guide technical content.
Installing WebFOCUS Integrated Installation on a Windows Environment
The following section describes how to install WebFOCUS Integrated Installation on a Windows environment.(Undefined variable: installing\:on Windows)
You can begin using WebFOCUS Integrated Installation immediately after you install the product. No additional configuration steps are required.
WebFOCUS Integrated Installation System Requirements for Windows
To install WebFOCUS Integrated Installation, you must have Administrator privileges. Additionally, your machine must meet the following system requirements defined in Hardware Requirements and Software Requirements.(Undefined variable: system requirements)
Hardware Requirements
- 4-core processor, 2.5 GHz minimum per core. 8-core processors are recommended for better performance.(Undefined variable: hardware requirements)
- 16 GB of RAM or higher is recommended for optimal performance.
- 12 GB of free disk space.
- Ensure that the Windows page file is properly configured and that it is set to Automatically manage paging file size. For Windows 64-bit, the recommended paging file size is three times the size of the RAM.
Software Requirements
- Windows 10 (for prototype and testing), Windows 2019, 2016, and 2012 Server editions.(Undefined variable: software requirements)(Undefined variable: browser requirements)
- 64-bit Version of Windows.
- Supported browsers:
Google Chrome™, Mozilla Firefox®, Microsoft
Edge®.
For more details on browser support, see the ibi™ WebFOCUS® Release Notes.
Install WebFOCUS Integrated Installation
Important: As of Release 9.0.0, the WebFOCUS system file configuration no longer includes the ibi_html directory, located at drive:\ibi\WebFOCUSrelease\WebFOCUS, where release is the number of your installed release. If you store customized stylesheet files or other files in the ibi_html directory, you must upload them from this directory to the WebFOCUS Repository before installing or upgrading to WebFOCUS Release 9.0.0 or higher.
- Procedure
- Download the installation files.
- Run the executable application file (.exe). If the file is
available in a zip format, extract the contents, and then run the executable
application file.
Note:
- The
WebFOCUS Integrated Installation
program includes the following third-party components:
Tomcat 9.0.73Tomcat
9.0.67Tomcat 9.0.58Tomcat
9.0.80,
Oracle JRE 1.8.0_381Oracle JRE 1.8.0_321Oracle JRE
1.8.0_341, and Derby 10.14.2.0. For more information on the third-party
versions packaged with the product, see the
ibi™ WebFOCUS® Release Notes.
- The latest version of Tomcat is available at https://tomcat.apache.org.
- The latest version of Oracle JRE is available at https://www.oracle.com/java/technologies/javase-jre8-downloads.html
- The latest version of Derby is available at https://db.apache.org/derby.
- Solr Version 8.11.1Solr Version 8.11.2 is included with WebFOCUS Integrated Installation. Solr is an open-source, high-performance, full-featured enterprise-search platform. Solr uses the Apache Lucene™ Java search library as its core for searching and indexing.(Undefined variable: Solr)
Tomcat Memory Allocation
- The Tomcat initial memory pool size (JvmMs) is configured to use 1/8 of the physical memory of the machine. For example, on a machine with 16 GB RAM, the pool size is set to 2124. The maximum memory pool size (JvmMx) is configured to use 1/4 of the physical memory of the machine. For example, on a machine with 16 GB RAM, the pool size is set to 4448.
- You can change the Java memory allocation by running the WFIAppSrvw.exe Tomcat configuration utility, located in the drive:\ibi\WebFOCUS\tomcat\bin:\ibi\WebFOCUS_WFI\tomcat\bin directory, and selecting the Java tab.
WebFOCUS Reporting Server Memory Allocation
- The default WebFOCUS Reporting Server memory allocation is set to half the amount of physical memory on the machine.
- Memory
configuration is done on the infobright.cnf file, located in folder:
drive:\ibi\WebFOCUS_WFI\srv\wfs\hs\ib_data\
- Parameter ServerMainHeapSize specifies the size (in MB) of the main memory heap.
The InstallAnywhere installation program opens, as shown in the following image.
- The
WebFOCUS Integrated Installation
program includes the following third-party components:
Tomcat 9.0.73Tomcat
9.0.67Tomcat 9.0.58Tomcat
9.0.80,
Oracle JRE 1.8.0_381Oracle JRE 1.8.0_321Oracle JRE
1.8.0_341, and Derby 10.14.2.0. For more information on the third-party
versions packaged with the product, see the
ibi™ WebFOCUS® Release Notes.
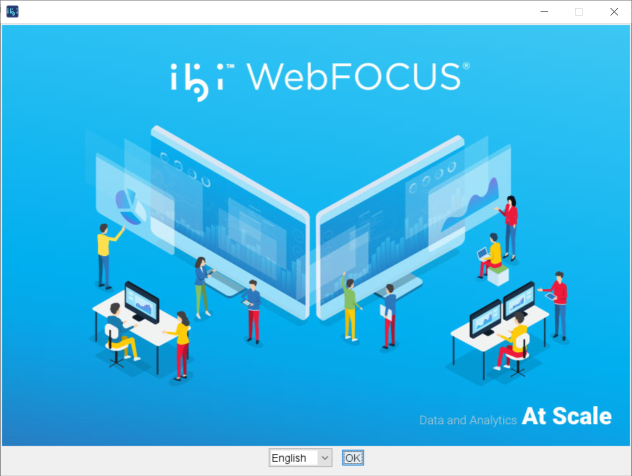
- Choose the appropriate language from the dropdown list and
click
OK.
The list of languages depends on the regional language settings of the Windows Operating System where WebFOCUS Integrated Installation is being installed.
Note: The language selected will be the language used during the installation program. This language is also used to set the code page of the WebFOCUS Reporting Server, which is responsible for data access.
If your data sources are in a different language, you will have to change the code page of the WebFOCUS Reporting Server.
The Introduction window opens, as shown in the following image.
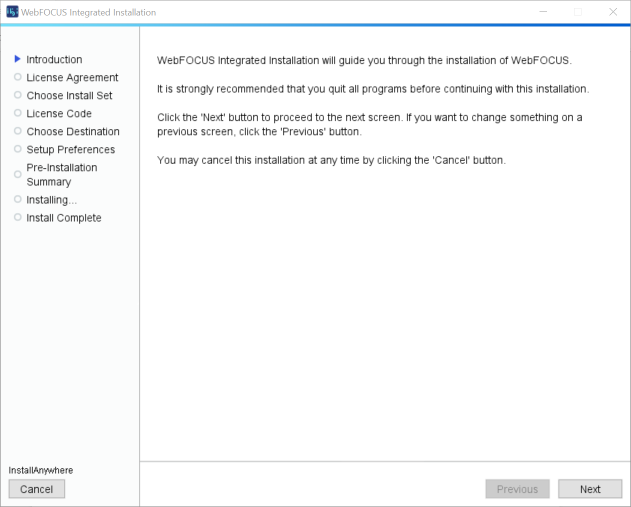
- Click
Next to continue.
The License Agreement window opens, as shown in the following image.

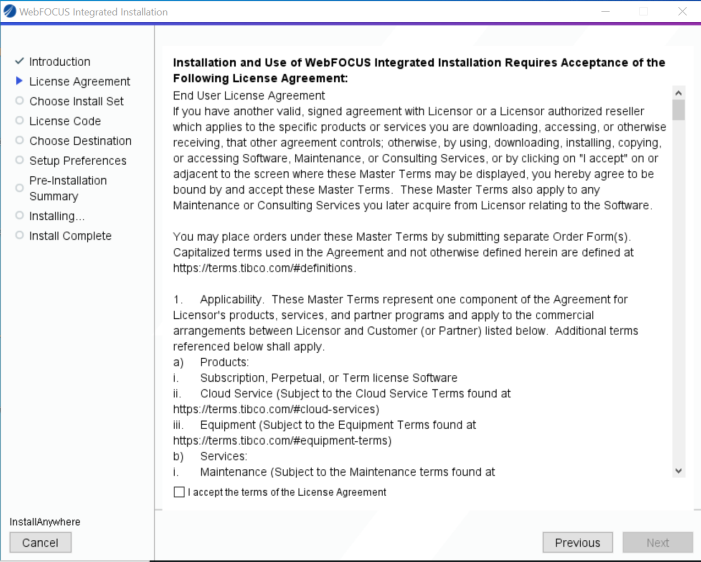
- Select
I accept the terms of the License
Agreement, and then click
Next.
A message displays indicating that this release includes several updates to search capabilities in WebFOCUS.
Note:
- For an upgrade installation from Release 9.0.1 or earlier, the repository must be reindexed to use these search capabilities.
- For a new installation, the repository must be reindexed if you are using a pre-existing repository from a previous release.
For more information on how to reindex, see the Indexing Content and Data topic in the TIBCO WebFOCUS® User's Guide or in the WebFOCUS Online Help system.
Note: If you have an earlier release of WebFOCUS Integrated Installation installed on your machine, the Choose Install Set window opens, as shown in the following image.
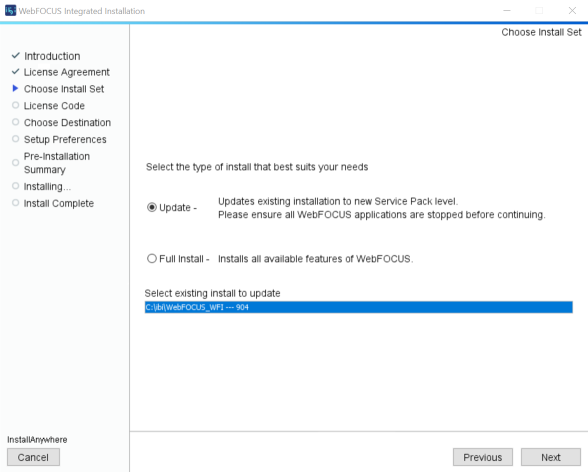
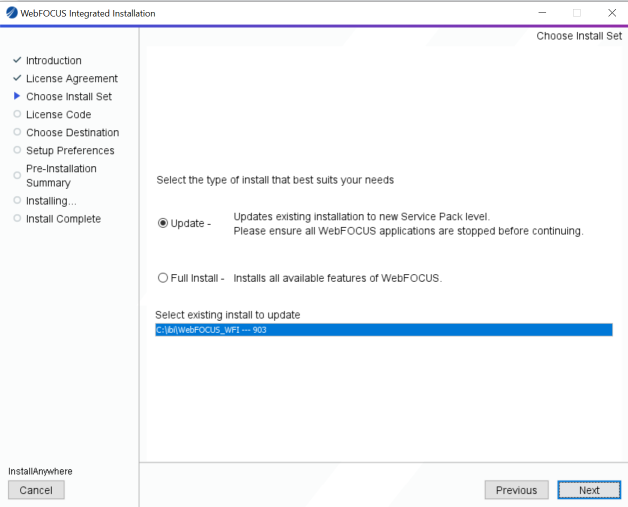
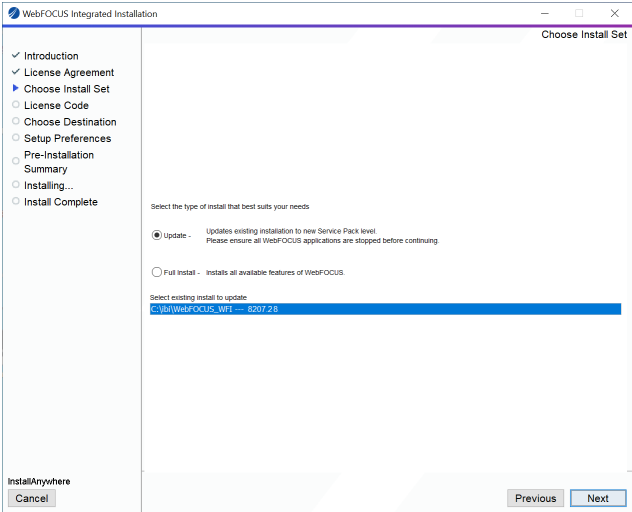
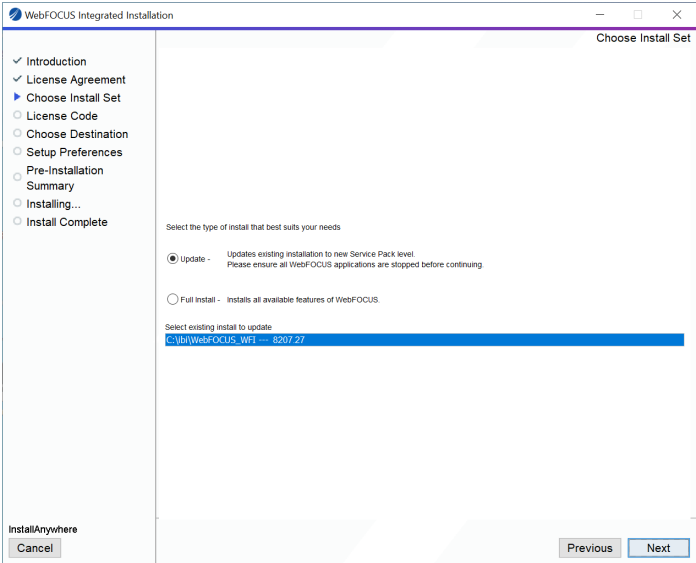
From the Choose Install Set window, you can choose to upgrade a selected installation or install a full version.
- To perform a new full installation, select Full Install and continue to step 6.
- To update your
existing installation to a new service pack, select
Update and the existing instance you
want to update.
Important: The Hyperstage Upgrade Warning window opens, as shown in the following image.
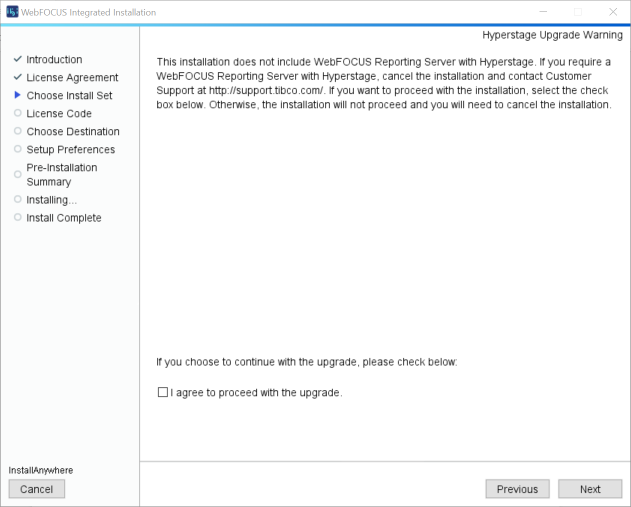
If you want to continue with the installation, select the checkbox to acknowledge that you agree to proceed with the upgrade. Otherwise, the installation will not proceed and you will need to cancel the installation.
Important: A message displays indicating that the WebFOCUS Release 9.1.x upgrade installation contains a higher version of PostgreSQL used by Hyperstage. Hyperstage databases created in earlier versions of WebFOCUS are not compatible with this release. We do not recommend that you run the upgrade installation to Release 9.1.x if you use Hyperstage in your applications.
If you want to proceed with the installation, select the I acknowledge that I understand the issue with upgrading Hyperstage, and I agree to proceed with the upgrade checkbox. Otherwise, the installation will not proceed and you will need to cancel the installation.
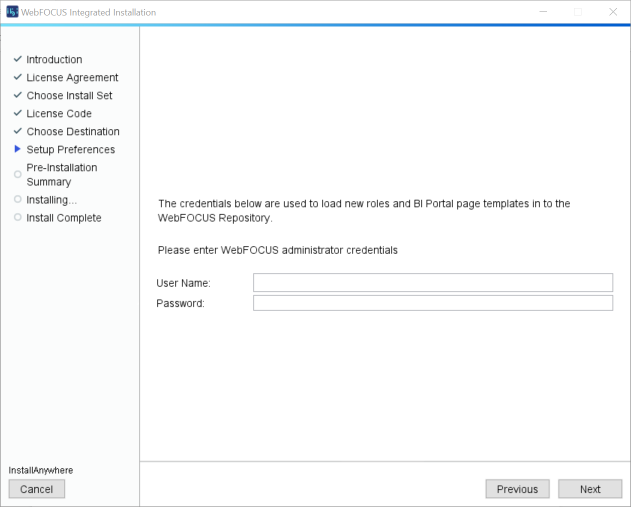
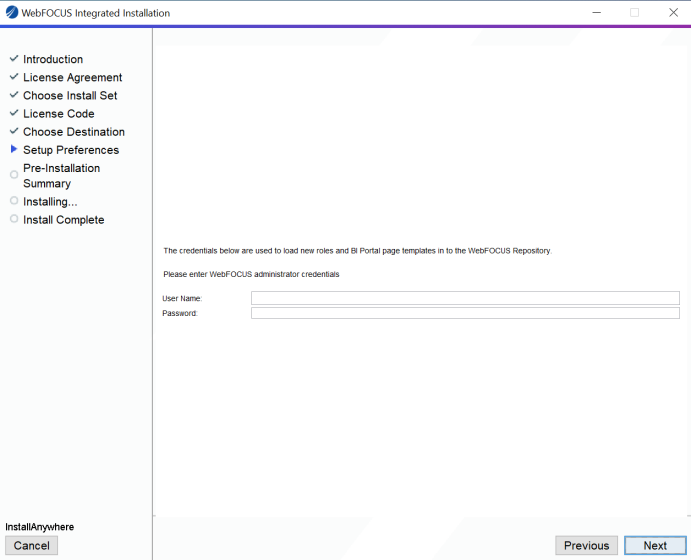
- If you proceed
with the upgrade installation, you will be prompted to update your installation
and to provide Administrator credentials to load new roles and BI Portal page
templates, as shown in the following image. In addition, you must manually stop
all
WebFOCUS Integrated Installation
services, except the WebFOCUS Repository Server service, before beginning the
installation program. After typing the Administrator user name and password,
continue with step 10.
- Click
Next.
The Choose Destination window opens, as shown in the following image.
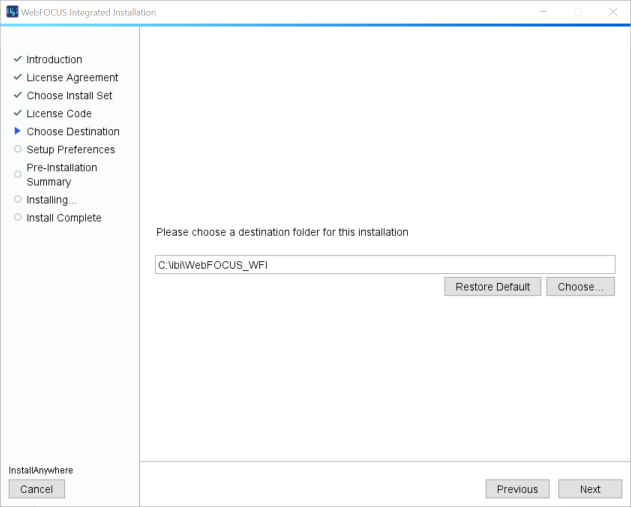
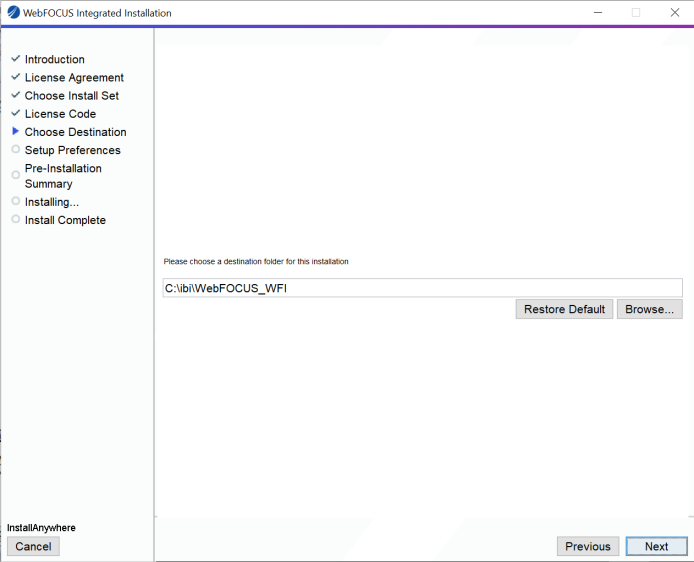
- Type a destination folder for your
WebFOCUS Integrated Installation or
accept the default, and then click
Next.
The Setup Preferences window opens, as shown in the following image.
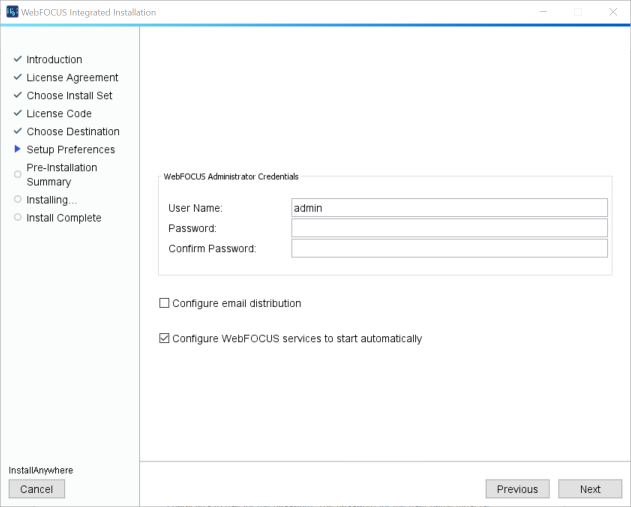
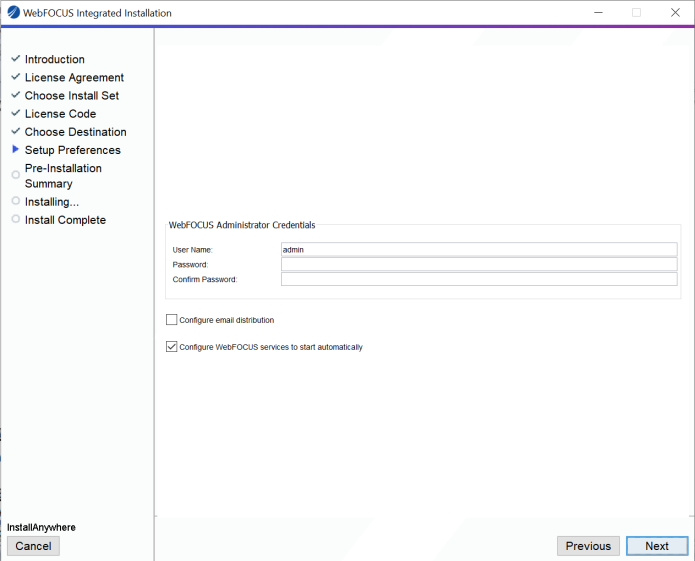
- In the Setup Preferences window, complete the following
steps:
- The installation program preconfigures a default
Administrator user name of admin, which can be changed, and requires that you
type a password. You must complete the User Name credentials section to proceed
with the installation. In the Password field, type a password, and then confirm
your password. These values are passed to the WebFOCUS Reporting Server so that there is
a common set of Administrator credentials.
Note: The Administrator user name and password supports ASCII characters from 32 to 126 and cannot include the following characters: caret (^), ampersand (&), percent (%), or double quotation mark ("). Refer to the ASCII character table to determine the characters to use for the password. The password for the user name must be between four and 20 characters. Leading blanks and trailing blanks will be removed.
- Optionally, select the
Configure email distribution check
box to select the type of Mail Server to be used for report distribution. Valid
options are:
- Google. This
requires a Google Account Name and Password.
Note: Google may block sign-in attempts when delivering reports through WebFOCUS Integrated Installation. To allow WebFOCUS Integrated Installation to connect to the Google email account that was configured for email distribution, sign in to the Google account, navigate to My Account settings, select Sign-In & security, and turn the Allow less secure apps option to On.
- Yahoo. This requires a Yahoo Account Name and Password.
- Other. Select
this for all other mail servers. This option requires you to type the host name
or IP address for your SMTP mail server.
Check the Advanced Configuration option if your mail server is configured with SSL or TLS and requires authentication.
- Google. This
requires a Google Account Name and Password.
- The
Configure WebFOCUS services to start
automatically checkbox is selected, by default. You can leave this
checkbox selected to keep the services Startup Type as Automatic. This will
ensure that the services required to run the product are always running, and
will not require that you start the services manually, even if you restart the
machine.
Optionally, you can clear the Configure WebFOCUS services to start automatically checkbox so you can manually start and stop the WebFOCUS Integrated Installation services from the shortcut options found in the WebFOCUS Integrated Installation group, or through the Windows services program.
- The installation program preconfigures a default
Administrator user name of admin, which can be changed, and requires that you
type a password. You must complete the User Name credentials section to proceed
with the installation. In the Password field, type a password, and then confirm
your password. These values are passed to the WebFOCUS Reporting Server so that there is
a common set of Administrator credentials.
- Click
Next to continue.
The Configure ports window opens, which indicates the ports used by all product components, as shown in the following image.
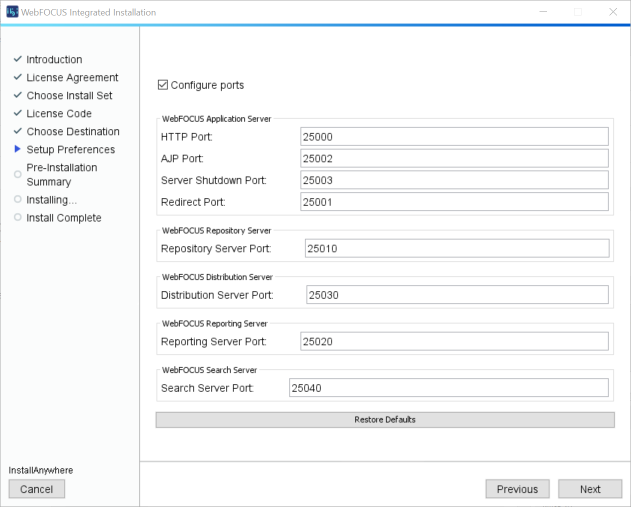
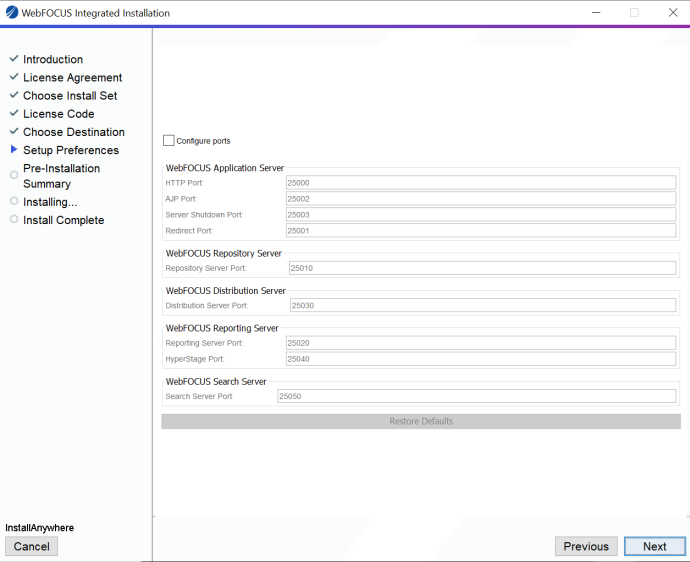
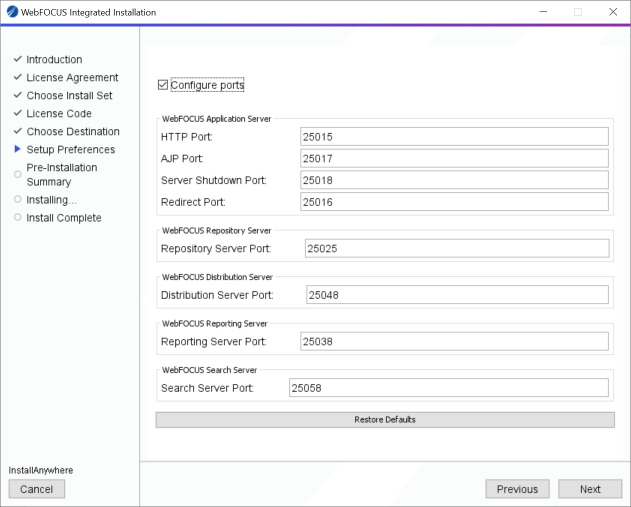
Note: By default, Tomcat starts on port 25000. If ports are busy, the next available port is used. You can customize all ports, if necessary, by selecting the Configure ports checkbox.
- Click
Next to continue.
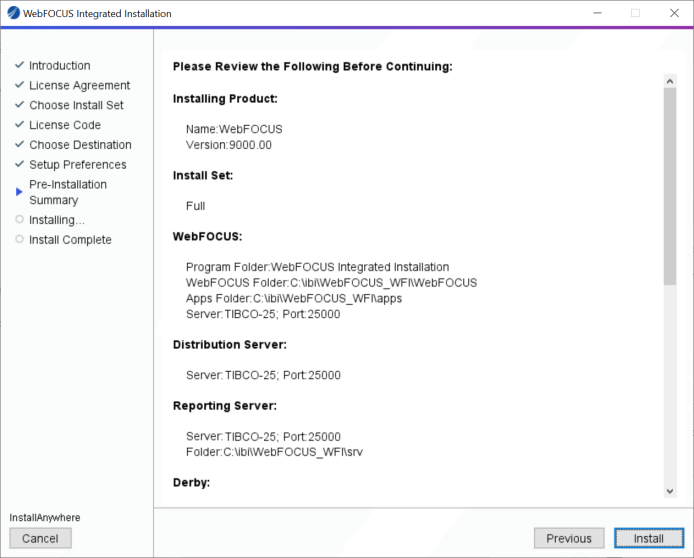
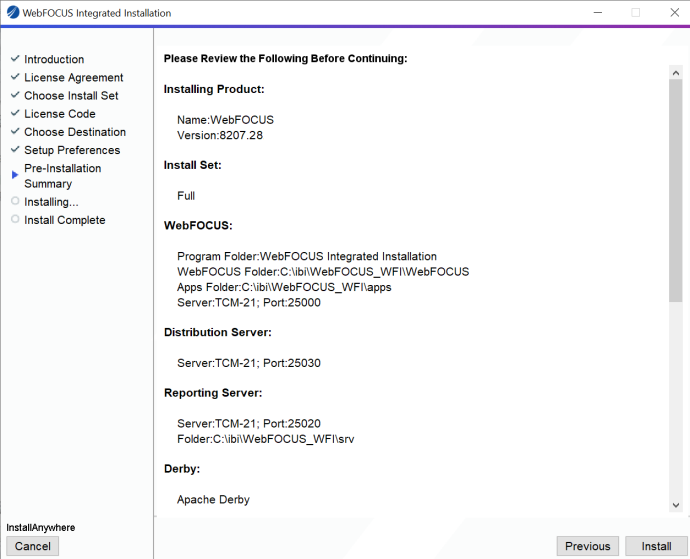
The Pre-Installation Summary window for the installation opens.
The following image shows an example of the Pre-Installation Summary window for a full installation.
The following image shows an example of the Pre-Installation Summary window for an upgrade installation.
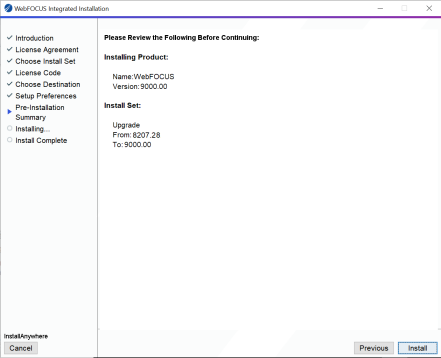
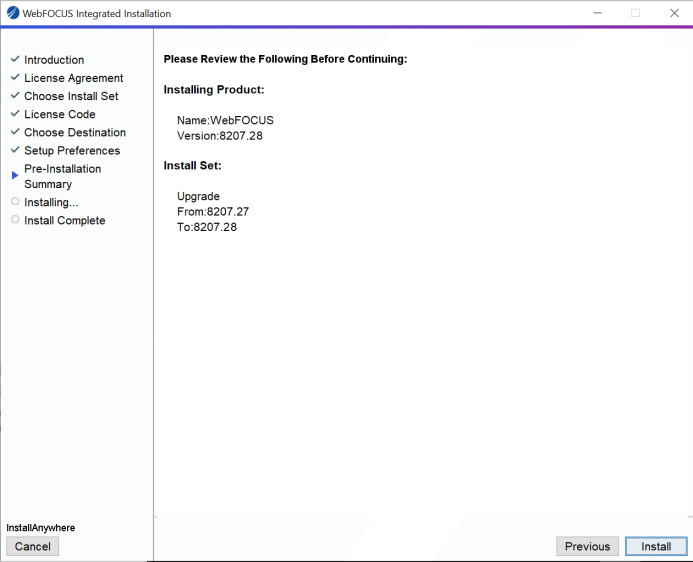
- Confirm that the summary information is correct, and then
click
Install.
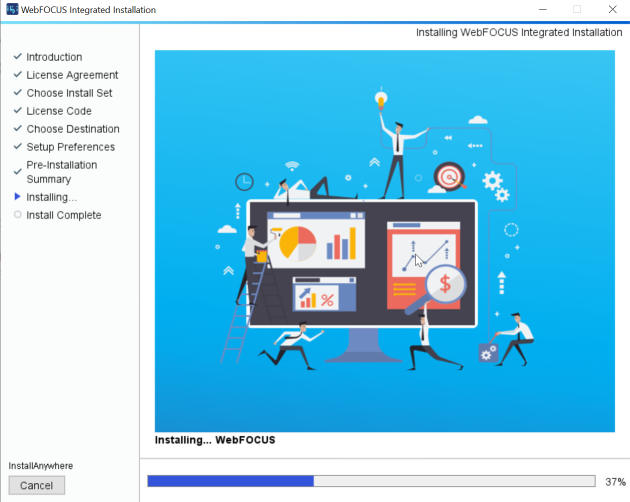
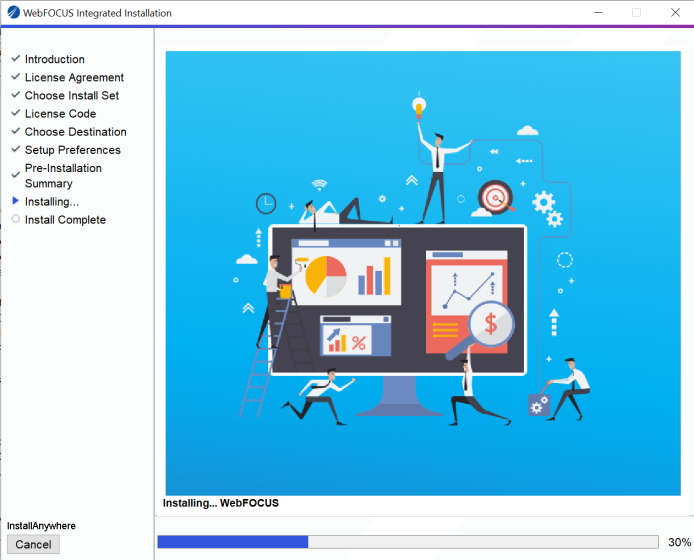
The installation process begins, as shown in the following image.
- When the installation completes, click
Done to close the installation program.
The Sign in page opens, as shown in the following image.
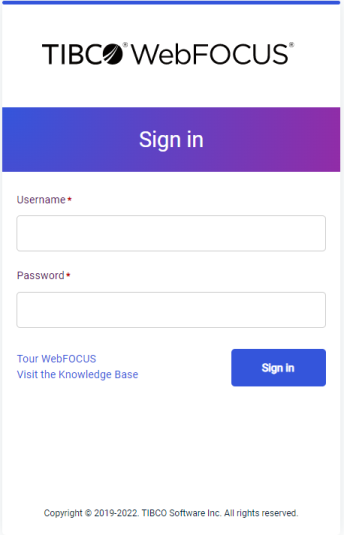
- Sign in using the Administrator credentials that you configured during the installation program.
Starting and Stopping WebFOCUS Integrated Installation Services
The installation program installs the following services:(Undefined variable: services)(Undefined variable: services\:WFIAppSvc)(Undefined variable: services\:WFIDistSvc)(Undefined variable: services\: )WebFOCUS WFI Reporting Server" />(Undefined variable: services\:WFIReposSvc)(Undefined variable: services\:WFISrchSvc)(Undefined variable: services\: )WebFOCUS WFI Application Server" />(Undefined variable: services\:)WebFOCUS WFI Distribution Server" />(Undefined variable: services\:)WebFOCUS WFI Reporting Server" />(Undefined variable: services\:)WebFOCUS WFI Repository Server" />(Undefined variable: services\:)WebFOCUS WFI Search Server" />
- Application Server
- Distribution Server
- WebFOCUS Reporting Server
- Repository Server
- Search Server
To view the status of these services, start your Windows Services program. The following table shows the WebFOCUS Integrated Installation services as they appear in the Windows Services program. Select a service and use the toolbar to start or stop the service.
|
Display Name |
Service Name |
|---|---|
|
WebFOCUS WFI Application Server |
WFIAppSvc |
|
WebFOCUS WFI Distribution Server |
WFIDistSvc |
|
WebFOCUS WFI WebFOCUS Reporting Server |
WebFOCUS WFI WebFOCUS Reporting Server |
|
WebFOCUS WFI Repository Server |
WFIReposSvc |
|
WebFOCUS WFI Search Server |
WFISrchSvc |
Start or Stop WebFOCUS Integrated Installation Services
From the Start menu, under the Information Builders program group, navigate to the WebFOCUS Integrated Installation shortcut. (Undefined variable: services\:starting)(Undefined variable: services\:stopping)(Undefined variable: starting services)(Undefined variable: stopping services)
- Click Start WebFOCUS Services to start the WebFOCUS Integrated Installation services.
- Click Stop WebFOCUS Services to stop the WebFOCUS Integrated Installation services.
To stop or start an individual WebFOCUS Integrated Installation service, use the Windows Services program as described earlier in this section.
Uninstalling WebFOCUS Integrated Installation
If you want to remove an existing WebFOCUS Integrated Installation and want to perform a full installation of a later release, you can run the uninstall program.(Undefined variable: uninstalling\:on Windows)
Preserve Your Data
You can perform the following steps if you want to preserve your data and perform a new installation, if you need to move your data to another location, or if an upgrade installation fails and you need to perform a new full installation. (Undefined variable: data\:preserving)(Undefined variable: preserving data)
- Procedure
- Back up the WebFOCUS Repository Server and WebFOCUS Reporting Server
application folders to a different location on your machine.
By default, these are located in the following folders:
drive:\ibi\WebFOCUS_WFI\derby\drive:\ibi\WebFOCUS_WFI\apps\drive:\ibi\WebFOCUS_WFI\srv\wfs\hs\
- Uninstall WebFOCUS Integrated Installation. You can uninstall WebFOCUS Integrated Installation from the Start menu, or manually, as described in Manually Uninstall WebFOCUS Integrated Installation Components.
Restore and Move Backed Up Data
- Procedure
- Install WebFOCUS Integrated Installation.
- After the installation program is complete, do the
following:
- Manually stop the Repository Server service.
- Replace the new Repository Server and WebFOCUS Reporting Server application folders, using the backup directories that you created in step 1 of Installing WebFOCUS Integrated Installation.
- Restart the Repository Server service.
Uninstall WebFOCUS Integrated Installation
- Procedure
- From the Start menu, under the Information Builders Program group, navigate to the WebFOCUS Integrated Installation Uninstall shortcut.
- Click
Uninstall.
The InstallAnywhere installation program opens.
- In the Uninstall
WebFOCUS Integrated Installation
window, click
Uninstall, as shown in the following
image.

The installation program begins and uninstalls the WebFOCUS Integrated Installation components.
Troubleshooting WebFOCUS Integrated Installation
If you are unable to startWebFOCUS Integrated Installation, ensure that all services are running. If they are not, do the following: (Undefined variable: troubleshooting)
- Stop all services.
- Restart the services.
- Restart WebFOCUS Integration Installation using the Run WebFOCUS shortcut available in the WebFOCUS Integrated Installation folder, under the Information Builders program group.
If this does not work, stop the services again. Before you restart the services, ensure that the Hyperstage processes, ibengine.exe and postgres.exe, are also stopped. Restart your machine if you are still unable to restart the services.
Port Assignments
By default, ports in the range of 25000 to 25040 are checked for availability. If the installation program detects that no ports in that range are available, it then increases the range by 4 and checks again for availability. For example, if ports 25000 to 25040 are unavailable, ports 25004 to 25044 are then checked. (Undefined variable: port assignments)
Default Port Assignments
- Ports 25000 to 25003 are used by the application server.
- Port 25010 is used by the repository server.
- Ports 25020 to 25023 and port 25040 are used by the WebFOCUS Reporting Server.
- Port 25030 is used by the Distribution Server.
- Port 25050 is used by the Search Server.
WebFOCUS Integrated Installation Log Files
WebFOCUS Integrated Installation creates log files in the following location for Windows:(Undefined variable: log files)
drive:\Users\user_id\WebFOCUS_Integrated_Installation_Install_date_time.log


drive:\Users\user_id\WebFOCUS_WFI_Debug_date_time.log
where:
Is your Windows user ID.
Is the date and time the log file was created.
These log files provide information about WebFOCUS Integrated Installation. If you contact Customer Support with an installation problem, have these files available.
Troubleshooting the Uninstall Process
If you choose to uninstall WebFOCUS Integrated Installation, and the uninstall process fails, you can follow one of the procedures in this section to clean up your machine before reinstalling the product.
Before performing one of the following procedures, ensure that you have uninstalled WebFOCUS Integrated Installation, as described in Installing WebFOCUS Integrated Installation.
Manually Uninstall WebFOCUS Integrated Installation Components
If the WebFOCUS Integrated Installation uninstall process fails, you can do the following to manually cleanup the remaining WebFOCUS Integrated Installation components on your machine.
- Procedure
- Stop any running WebFOCUS Integrated Installation services on the system, as detailed in Start or Stop ibi WebFOCUS Integrated Installation Services .
- Remove any remaining services from your machine.
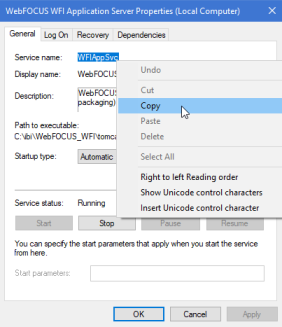
- Locate the existing
WebFOCUS Integrated Installation
services. To get the service name, right-click the service in the Windows
Services program and select
Properties. The Properties window
opens, where you can right-click the service name and click
Copy, as shown in the following
image.
- To remove a service, open the Command Prompt as an
Administrator and issue the following command:
sc delete "service_name"where:
service_nameIs the name of the service you are manually deleting. For example:
C:\sc delete "WFIAppSvc"
Note: The service name must be enclosed in double quotation marks (") if it contains a space.
Repeat this for the remaining services.
- Locate the existing
WebFOCUS Integrated Installation
services. To get the service name, right-click the service in the Windows
Services program and select
Properties. The Properties window
opens, where you can right-click the service name and click
Copy, as shown in the following
image.
- Open Task Manager and ensure that the process ibengine.exe is not running.
- Remove files from disk, except for the WebFOCUS Reporting Server
application folders and other folders containing application data, in case you
need to save this data for later use.
For example, if WebFOCUS Integrated Installation is installed on the C:\ drive, remove all folders under C:\ibi\WebFOCUS_WFI\, except for the following folders:
- C:\ibi\WebFOCUS_WFI\apps\
- C:\ibi\WebFOCUS_WFI\srv\wfs\hs\
- C:\ibi\WebFOCUS_WFI\Derby\
- From the Start menu, under the Information Builders program group, right-click the WebFOCUS Integrated Installation folder, select More, select Open file location, and then delete the folder.
- Start the Windows Registry Editor, and remove the
following registry keys.(Undefined variable: registry keys)
- HKEY_LOCAL_MACHINE\SOFTWARE\Information Builders\WebFOCUS
- HKEY_LOCAL_MACHINE\SOFTWARE\Information Builders\Derby\WFIReposSvc
- HKEY_LOCAL_MACHINE\SOFTWARE\Information Builders\WebFOCUS WFI WebFOCUS Reporting Server
- HKEY_LOCAL_MACHINE\SOFTWARE\Wow6432Node\Information Builders\ReportCasterWOW6432Node\Apache Software Foundation\Procrun 2.0\WFIDistSvc
- HKEY_LOCAL_MACHINE\SOFTWARE\WowWOW6432Node\Apache Software Foundation\Procrun 2.0\WFIAppSvc
Installing WebFOCUS Integrated Installation on a Linux Environment
The following section describes how to install WebFOCUS Integrated Installation on a Linux environment. For more information on the supported Linux environments, see the ibi™ WebFOCUS® Release Notes.
The installation program includes the following third-party components: Tomcat 9.0.73Tomcat 9.0.58Tomcat 9.0.67Tomcat 9.0.80, Oracle JRE 1.8.0_381Oracle JRE 1.8.0_321Oracle JRE 1.8.0_341, and Derby 10.14.2.0. For more information on the third-party versions packaged with the product, see the ibi™ WebFOCUS® Release Notes.
- The latest version of Tomcat is available at https://tomcat.apache.org.
- The latest version of Oracle JRE is available at https://www.oracle.com/java/technologies/javase-jre8-downloads.html
- The latest version of Derby is available at https://db.apache.org/derby.
Solr Version 8.11.1Solr Version 8.11.2 is included with WebFOCUS Integrated Installation. Solr is an open-source, high-performance, full-featured enterprise-search platform. Solr uses the Apache Lucene™ Java search library as its core for searching and indexing.(Undefined variable: Solr)
WebFOCUS Integrated Installation System Requirements on a Linux Environment
The following section describes the system requirements for installing WebFOCUS Integrated Installation on a Linux environment.
Installation Prerequisites
The following are installation prerequisites for installing WebFOCUS Integrated Installation on Linux:
- WebFOCUS Integrated Installation cannot be installed as the root
user.
If the root user is detected, the installation will exit and the following message displays:
The installation cannot proceed under the root user account and will terminate. Restart the installation as a non-root user.
- When installing
WebFOCUS Integrated Installation on Linux
machines, if the unzip application is not found, the following message
displays:
Invalid unzip command found.
This is generated by the installation program and does not prevent the installation from proceeding and completing successfully.
- WebFOCUS Integrated Installation requires a minimum of 5GB of available disk space to successfully install on the target system.
- An additional 8GB of
required disk space is used during the installation of the product. This
temporary use of disk space will be removed at the end of the installation.
If the temp directory on the host does not meet the minimum size requirements, the InstallAnywhere environment variable IATEMPDIR can be set to use an alternate directory.
You may specify an alternate /tmp location by setting the following environment variable:
IATEMPDIR=/large_tm
export IATEMPDIR
System Resource Limits
The operating system provides ways of limiting the amount of resources that can be used. These limits can affect the installation process.
Use the ulimit command to set process memory-related resource limits for your session.
The WebFOCUS Integrated Installation program requires ulimit to be set to 8192.
Limits can be hard or soft. Hard limits are set by the root user. Only the root user can increase hard limits, although other users can decrease them. Soft limits can be set and changed by other users, but they cannot exceed the hard limits.
To view the current limits, type the following command:
ulimit -a
Use the /etc/security/limits.conf file to store ulimit settings. Changes to this file should be made by a system administrator.
Installing WebFOCUS Integrated Installation Using Console Mode
The following section describes how to install WebFOCUS Integrated Installation using Console Mode. (Undefined variable: installation steps\:Linux)
Install WebFOCUS Integrated Installation Using Console Mode
Important: As of Release 9.0.0, the WebFOCUS system file configuration no longer includes the ibi_html directory, located at drive:\ibi\WebFOCUSrelease\WebFOCUS, where release is the number of your installed release. If you store customized stylesheet files or other files in the ibi_html directory, you must upload them from this directory to the WebFOCUS Repository before installing or upgrading to WebFOCUS Release 9.0.0 or higher.
- Procedure
- Download the self-extracting installation program (.bin).
- Apply the permissions necessary for
the owner of the file to run the installation by using the following
command:
chmod u+x TIB_wf-wi_release_linux_x86_64.bin - Run the installation program using the following command:
./TIB_wf-wi_release_linux_x86_64.bin -i consoleThe Introduction to WebFOCUS Integrated Installation prompt displays.
- Press Enter to continue.
The License Agreement prompt displays.
- Read the License Agreement. Press Enter after each screen until you receive the License Agreement Acceptance prompt.
- Type
Y to accept the terms of the agreement
and press Enter to continue.
A message displays indicating that this release includes several updates to search capabilities in WebFOCUS.
Note:
- For an upgrade installation from Release 9.0.1 or earlier, the repository must be reindexed to use these search capabilities.
- For a new installation, the repository must be reindexed if you are using a pre-existing repository from a previous release.
For more information on how to reindex, see the Indexing Content and Data topic in the ibi™ WebFOCUS® User's Guide or in the WebFOCUS Online Help system.
The Choose Install Type prompt displays.
- Type 2 to perform a full installation of WebFOCUS Integrated Installation.
- Press Enter to continue.
The Choose Folder prompt displays.
- Accept the default destination folder for the installation.
If you want to install
WebFOCUS Integrated Installation in a
different folder, type the path to the location where you want to install the
software.
Note: Spaces are not allowed in the destination path.
- Press Enter to continue.
The Setup Preferences prompt displays. You are prompted to enter the WebFOCUS Integrated Installation Administration credentials.
- Type a user name and password to use
as the Administration ID.
Note: The Administrator user name and password supports ASCII characters from 32 to 126 and cannot include the following characters: caret (^), ampersand (&), percent (%), or double quotation mark ("). Refer to the ASCII character table to determine the characters to use for the password. The password for the user name must be between four and 20 characters. Leading blanks and trailing blanks will be removed.
The Configure email distribution prompt displays.
- Optionally, type
Y to choose the type of Mail Server to
be used for report distribution. Valid options are:
- Google. This
requires a Google Account Name and Password.
Note: Google may block sign-in attempts when delivering reports through WebFOCUS Integrated Installation. To allow WebFOCUS Integrated Installation to connect to the Google email account that was configured for email distribution, sign in to the Google account, navigate to My Account settings, select Sign-In & security, and turn the Allow less secure apps option to On.
For more information, see:
- Yahoo. This requires a Yahoo Account Name and Password.
- Other. Select this for all other mail servers. This option requires you to type the host name or IP address for your SMTP mail server. You can also specify if your mail server is configured with SSL or TLS and requires authentication.
- Google. This
requires a Google Account Name and Password.
- Press Enter to continue.
- Verify that the Pre-Installation Summary information is
correct, and press Enter to continue.
The installation begins.
During installation, the activity window indicates which installation program tasks are being performed.
When installation is complete, a summary is provided displaying the servers that were installed and the ports that have been assigned.
Configuring Java Memory Allocation for the Application Server
For Linux installations, the default Tomcat Java memory configuration is set to use an initial Java heap size of 1024MB and a maximum Java heap size of 2048MB.
These settings are located in the /ibi/WebFOCUS/tomcat/bin/catalina.sh file.
For example:
JAVA_OPTS="-Xms1024m -Xmx2048m -Djava.awt.headless=true"
These settings are applied, by default, to provide better product performance.
Note:
- Ensure that the memory allocated on the machine is available. If the memory is not available, the application server will not start.
- You can adjust the
memory allocation by updating the catalina.sh file or by setting the Java heap
size, using the _JAVA_OPTIONS environment variable.
The following is an example of setting Java through the _JAVA_OPTIONS environment variable:
_JAVA_OPTIONS='-Xms1024m -Xmx2048m'


 export _JAVA_OPTIONS
This will override the memory setting in the catalina.sh file and must be issued prior to starting Tomcat.
WebFOCUS Reporting Server Memory Allocation
- The default Reporting Server memory allocation is set to half the amount of physical memory on the machine.
- Memory configuration is
done on the infobright.cnf file, located in the following folder:
install_directory/ibi/WebFOCUS_WFI/srv/wfs/hs/ib_data/
- Parameter ServerMainHeapSize specifies the size (in MB) of the main memory heap.
Launching WebFOCUS Integrated Installation
To startWebFOCUS Integrated Installation, type the following:
http://host:port/ibi_apps/
Note: Enter the application server port number when using this command to start WebFOCUS Integrated Installation. The application server port number is the lowest port number displayed in the summary at the end of the WebFOCUS Integrated Installation.
The default port for the WebFOCUS Integrated Installation application server is 25000. It is listed during the end of the installation and is also available in the installation log file.
Installation log files are under the user home directory. An example of an installation log file is shown in the example below:
/$HOME/WebFOCUS_Integrated_Installation_Install_date_time.log


/$HOME/WebFOCUS_WFI_Debug_date_time.log
where:
Is the date and time the log file was created.
These log files provide information about WebFOCUS Integrated Installation. If you contact Customer Support with an installation problem, have these files available.
Running WebFOCUS Integrated Installation Servers Manually
The following commands are used to manually start and stop the required WebFOCUS Integrated Installation servers.
Note: The /home/user/ path depends on your installation.
Starting Servers
You must start the servers in the following order:
- Search Server
- Repository Server
- Application Server
- Distribution Server
- WebFOCUS Reporting Server
To start the WebFOCUS Integrated Installation Search Server, run:
/home/user/ibi/WebFOCUS_WFI/Solr/start_solr_linux.sh
To start the WebFOCUS Repository Server, run:
nohup /home/user/ibi/WebFOCUS_WFI/derby/bin/start.sh &
To start the WebFOCUS Integrated Installation Application Server, run:
/home/user/ibi/WebFOCUS_WFI/tomcat/bin/startup.sh
To start the WebFOCUS Integrated Installation Distribution Server, run:
nohup /home/user/ibi/WebFOCUS_WFI/WebFOCUS/ReportCaster/bin/schbkr &
To start the WebFOCUS Integrated Installation Reporting Server, run:
/home/user/ibi/WebFOCUS_WFI/srv/wfs/bin/edastart -start
Stopping Servers
You must stop the servers in the following order:
- Search Server
- Application Server
- Distribution Server
- Repository Server
- WebFOCUS Reporting Server
To stop the WebFOCUS Integrated Installation Search Server, run:
/home/user/ibi/WebFOCUS_WFI/Solr/stop_solr_linux.sh
To stop the WebFOCUS Integrated Installation Application Server, run:
/home/user/ibi/WebFOCUS_WFI/tomcat/bin/shutdown.sh
To stop the WebFOCUS Integrated Installation Distribution Server, run:
/home/user/ibi/WebFOCUS_WFI/WebFOCUS/ReportCaster/bin/stopit
To stop the WebFOCUS Repository Server, run:
/home/user/ibi/WebFOCUS_WFI/derby/bin/stop.sh
To stop the WebFOCUS Integrated Installation Reporting Server, run:
/home/user/ibi/WebFOCUS_WFI/srv/wfs/bin/edastart -stop
Creating Shell Scripts to Start and Stop Servers
You can create shell scripts that run the following commands to start and stop servers:
Start Servers
/home/user/ibi/WebFOCUS_WFI/Solr/start_solr_linux.sh


nohup /home/user/ibi/WebFOCUS_WFI/derby/bin/start.sh &


sleep 5


/home/user/ibi/WebFOCUS_WFI/tomcat/bin/startup.sh


nohup /home/user/ibi/WebFOCUS_WFI/WebFOCUS/ReportCaster/bin/schbkr &


/home/user/ibi/WebFOCUS_WFI/srv/wfs/bin/edastart -start
Stop Servers
/home/user/ibi/WebFOCUS_WFI/Solr/stop_solr_linux.sh


/home/user/ibi/WebFOCUS_WFI/tomcat/bin/shutdown.sh


/home/user/ibi/WebFOCUS_WFI/WebFOCUS/ReportCaster/bin/stopit


/home/user/ibi/WebFOCUS_WFI/derby/bin/stop.sh


/home/user/ibi/WebFOCUS_WFI/srv/wfs/bin/edastart -stop
Note:
- Adjust the paths based on your installation directories.
- The sleep 5 command adds a wait period to ensure Derby has started.
Updating WebFOCUS Integrated Installation
You can update an earlier release of WebFOCUS Integrated Installation using the following steps.
Update WebFOCUS Integrated Installation
Important: As of Release 9.0.0, the
WebFOCUS system file configuration no
longer includes the
ibi_html directory, located at
drive:\ibi\WebFOCUSrelease\WebFOCUS, where
release is the number of your installed release. If you
store customized stylesheet files or other files in the
ibi_html directory, you must upload them from this
directory to the WebFOCUS Repository before installing or upgrading to
WebFOCUS
- Procedure
- Manually stop the following WebFOCUS Integrated Installation servers: Application Server, Distribution Server, WebFOCUS Reporting Server, and Search Server.
- Ensure that all ports that are used by
WebFOCUS Integrated Installation
processes are stopped. You can run a command, such as
netstat, to check the ports.
Note: If the ports are busy, run a command, such as lsof, to identify what processes are still running, and stop those processes. Before you proceed, you must rerun the netstat command.
- Download the self-extracting installation program (.bin).
- Apply the permissions necessary for the owner of the file to
run the installation by using the following command:
chmod u+x TIB_wf-wi_release_linux_x86_64.bin - Press Enter to continue.
- Run the installation program using the following command:
./TIB_wf-wi_release_linux_x86_64.bin -i consoleThe Introduction to Integrated Installation prompt displays.
- Read the License Agreement. Press Enter after each screen until you receive the License Agreement Acceptance prompt.
- Type
Y to accept the terms of the agreement
and press Enter to continue.
A message displays indicating that this release includes several updates to search capabilities in .
Note:
- For an upgrade installation from Release 9.0.1 or earlier, the repository must be reindexed to use these search capabilities.
- For a new installation, the repository must be reindexed if you are using a pre-existing repository from a previous release.
For more information on how to reindex, see the Indexing Content and Data topic in the ibi™ WebFOCUS® User's Guide or in the Online Help system.
The Choose Install Type prompt displays.
- Type
1 to update an existing
Integrated Installation to a
new Service Pack level.
Important: The following Hyperstage warning message appears:
This installation does not include WebFOCUS Reporting Server with Hyperstage. If you require a WebFOCUS Reporting Server with Hyperstage, quit the installation and contact Customer Support at http://support.tibco.com/.
In the prompt, type Y to proceed with the installation or type quit to end the installation. The installation will keep prompting until you type Y or quit. Typing an N will keep looping and display the prompt again.
- Press Enter to continue.
- Type the path to the existing installation you want to update.
- Press Enter to continue.
- Verify that the Pre-Installation Summary information is
correct, and press Enter to continue.
The installation begins.
During installation, the activity window indicates which installation program tasks are being performed.
- Clear the Tomcat cache, all folders under:
/home/user/ibi/WebFOCUS_WFI/tomcat/work/Catalina/localhost/
- Before startingWebFOCUS Integrated Installation, start the Servers as outlined in Installing WebFOCUS Integrated Installation.
- Start the
WebFOCUS Repository Server by running:
nohup /home/user/ibi/WebFOCUS_WFI/derby/bin/start.sh &
- Run the following script file, if this step failed to run
during the installation update process.
/home/user/ibi/WebFOCUS_WFI/WebFOCUS/utilities/WFReposUtil/update_repos.shThis script will make updates to the WebFOCUS Integrated Installation repository that are required to load new roles and BI Portal page templates.
You are prompted for WebFOCUS Integrated Installation Administrator credentials.
- Start the other servers:
/home/user/ibi/WebFOCUS_WFI/tomcat/bin/startup.sh


nohup /home/user/ibi/WebFOCUS_WFI/WebFOCUS/ReportCaster/bin/schbkr &


/home/user/ibi/WebFOCUS_WFI/srv/wfs/bin/edastart -start
The upgrade is now complete and you can use the software.
Importing WebFOCUS Applications Using the Change Management Facility
After installation, if you need to import WebFOCUS applications, see the Change Management content in the ibi™ WebFOCUS® Security and Administration manual.
Uninstalling WebFOCUS Integrated Installation
To uninstall WebFOCUS Integrated Installation, delete the /home/user/ibi/WebFOCUS_WFI/ directory or run the uninstall program using the following command:(Undefined variable: uninstalling\:on Linux)
/home/user/ibi/WebFOCUS_WFI/Uninstall/Uninstall
Indexing Content and Data
On occasion, you might need to index the content and data in your environment to ensure they appear correctly in your search results. Indexing in WebFOCUS is a quick and simple process. Once your content and data are indexed, all subsequent changes to the repository content and data directories are indexed automatically by WebFOCUS.
Index Content and Data
- Procedure
- Sign in to WebFOCUS as a developer or administrator.
- In the WebFOCUS Hub, in Application Directories area, from
the Servers dropdown list, select the server that you want to index.
Note: For more information on how to configure multiple Reporting Servers, see the WebFOCUS Security and Administration technical content.
- Right-click the
Applications node, and then click
Properties.
The Properties panel opens. The following search index options are available:
Files:
Files from all application directoriesIndexes files in the WebFOCUS and the files that belong to the mapped directories, as configured in the properties under the Location group below.
Files only from application directories in defined application pathIndexes only the files that appear in the application directories in defined application paths.
Location:
All regular directories & marked mapped directories.Indexes application directories under the APPROOT and the application directories with the Include in search index option enabled.
All mapped directories.Indexes every mapped directory regardless of whether it has the Include in search index option enabled.
- Select an indexing option and click
Save.
Your WebFOCUS Reporting Server data is now indexed.
- Navigate to the Workspaces area and switch to the Admin view,
as shown in the following image.
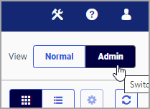
Note: You must be signed in as an administrator to switch between Normal and Admin views.
- In the Resources tree, right-click the
Workspaces node, and then click
Properties.
The Properties panel opens.
- Click
Refresh Search Index.
Your WebFOCUS content is now indexed.
Configuring for Email Distribution
An email server is required for email distribution and notifications. The following procedures provide the steps for configuring the supported mail servers.(Undefined variable: email distribution)(Undefined variable: configuring\:email distribution)(Undefined variable: configuring\:mail server)
Configure the Mail Server
- Procedure
- On the start page, from the side navigation pane, select
Management Center and then
Administration Console. From the
Administration Console, click the
ReportCaster tab.
or
On the start page, select Main Menu on the banner, and then under Quick Access, select ReportCaster Status.
- From the ReportCaster Console, click the Configuration option on the ribbon.
- Select the Email Distribution folder.
- Type the name of your mail server in the Mail Server text box.
In addition, if your mail server uses a secure connection or requires authentication, select the appropriate options and type the required credentials. You need to save your configuration changes and restart ReportCaster to make the changes effective.
If you use Google as your email server, see Installing WebFOCUS Integrated Installation.
If you use Yahoo as your email server, see Installing WebFOCUS Integrated Installation.
Configure Google as the Email Server
- Procedure
- Type the name of the Google SMTP Server in the Mail Server
text box, as shown in the following image.(Undefined variable: email server\:Google)(Undefined variable: Google email server)(Undefined variable: configuring\:Google mail server)
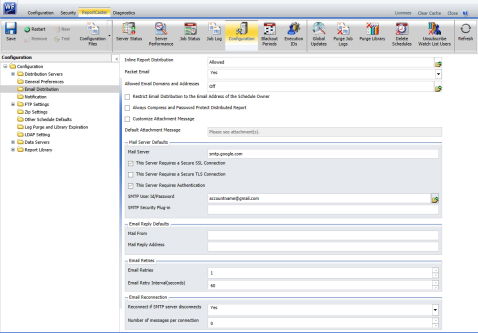
- Select the This Server Requires a Secure SSL Connection checkbox.
- Do not select the This Server Requires a Secure TLS Connection checkbox.
- Select the This Server Requires Authentication checkbox.
- Click the File Open button to open the SMTP User ID/Password dialog.
- Type your Google account name.
- Type the password for this account.
- Confirm the password for this account.
- Click OK to close the dialog.
- Click Save in the Manage Configuration group on the ribbon.
- Click Restart in the Manage Configuration group on the ribbon.
Configure Yahoo as the Email Server
- Procedure
- Type the name of the Yahoo SMTP Server in the Mail Server text
box, as shown in the following image.(Undefined variable: email server\:Yahoo)(Undefined variable: Yahoo email server)(Undefined variable: configuring\:Yahoo mail server)
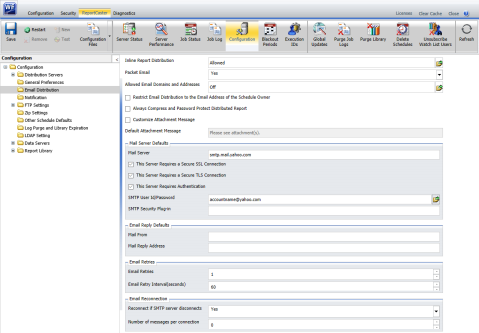
- Select the This Server Requires a Secure SSL Connection checkbox.
- Select the This Server Requires a Secure TLS Connection checkbox.
- Select the This Server Requires Authentication check box.
- Click the File Open button to open the SMTP User ID/Password dialog.
- Type your Yahoo account name.
- Type the password for this account.
- Confirm the password for this account.
- Click OK to close the dialog.
- Click Save in the Manage Configuration group on the ribbon.
- Click Restart in the Manage Configuration group on the ribbon.