Procedure: How to Customize the Dynamic Language Switch
- On
the Administration Console, on the Configuration tab,
under the Application Settings folder, click Dynamic
Language Switch.
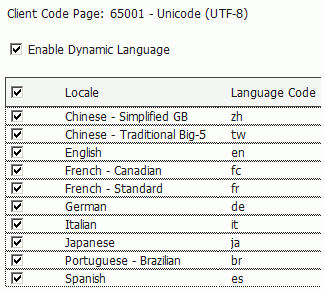
The Dynamic Language Switch window appears with a list of the languages made available by our code page selection in the National Language Support page. By default, the Enable Dynamic Language check box is unselected and all of the language check boxes are deactivated.
- Select
the Enable Dynamic Language check box to
activate the check boxes for all of the available languages displayed
in the panel, as shown in the following image.
Selecting the Enable Dynamic Language check box and one or more languages activates the display of the Select Languages button on all of the sign in pages. It also activates the Language menu on the BI Portal Menu bar.
- Select the check box next to each of the languages that you want to appear on the sign in pages and in the Language menu..
- Select the check box in the Locale heading if you want all of the languages to appear in the Select Languages drop-down list on the sign in pages and in the Language menu.
- Click Save to save your changes.
Note: To remove languages from the Select Languages drop-down list on the sign-in pages, clear the check boxes next to the languages you want to remove.