The Security Tab enables you to configure the type of preauthentication to use for each of the four security zones. Pages under the Security folder enable you to view and update the configuration for each Security Zone.
The four zones are:
The Default Zone establishes the type of authentication for most users.
By default, the Authentication page in the Default Zone is configured to accept Form Based and Anonymous Authentication settings. Form Based security can be based on Internal Portal Security or External Security (WFRS). The Form Based setting presents users with a Sign in page whenever they open WebFOCUS. The public user defined in the Anonymous Authentication profile permits WebFOCUS to accept all users with or without passwords. This default configuration accommodates the broadest range of users. However, Administrators can enable or disable any of the authentication methods on this page to upgrade this configuration to a level of authentication that best supports their requirements.
By default, the Request Matching page in the Default Zone is configured to accept all Request URL Patterns and IP Address Patterns. The Request Matching page should not be changed, but you can modify the IP Addresses to use for this default zone.
The Mobile Zone offers authentication methods tailored to the higher level of security required by users who access WebFOCUS from mobile devices. This zone allows Administrators to use one of the established authentication methods within WebFOCUS for Mobile users.
The Authentication page in the Mobile Zone is configured to accept Form Based and Remember-Me settings, by default. These settings present users with a Sign in page whenever they open WebFOCUS and the Remember-Me Authentication profile permits WebFOCUS to allow users to maintain trusted access to WebFOCUS through multiple sessions. Administrators can enable or disable any of the authentication methods on this page.
The Request Matching page in the Mobile Zone limits URL Requests to two patterns, /Mobile Controller/**, and /Mobile Favs Controller/**. Neither URL Request patterns nor IP Addresses can be added, removed, or edited.
The Portlet Zone offers authentication methods tailored to the higher level of security required by remote users who access WebFOCUS from WebFOCUS Open Portal Services products, including SharePoint.
The Authentication page in the Portlet Zone is configured to accept Form Based and Remember-Me settings, by default. These settings present users with a Sign in page whenever they open WebFOCUS and the Remember-Me Authentication profile permits WebFOCUS to allow users to maintain trusted access to WebFOCUS through multiple sessions. You can enable or disable any of the authentication methods on this page.
The Request Matching page in the Portlet Zone limits URL Requests to a single pattern, /tool/portlets/**. Neither URL Request patterns nor IP Addresses can be added, removed, or edited.
The Alternate Zone allows Administrators to sign in using a different method of authentication from the Default Zone. Administrators can use the Alternate Zone to customize the methods of authentication that can be used to support users.
The Authentication page in the Alternate Zone is configured to accept Form Based Authentication, by default. This setting presents users with a Sign in page whenever they open a session. You can enable or disable any of the authentication methods on this page. To establish an alternate method of authentication, disable the two default methods, and enable a method that is not in use in the default zone.
The Request Matching page in the Alternate Zone permits you to add URL Request Patterns and IP Address Patterns to limit the range of valid URLs to support authentication. By default, the URL Request Patterns page displays the pattern, /**, that accepts any and all URL layouts. The IP Address pattern page displays three patterns, 127.0.0.1, 0:0:0:0:0:0:0:1, and, ::1, all representations of the LocalHost IP address in IPV4 and IPV6 respectively.
How to: |
All security zones except the Alternate Zone are enabled by default. You must enable the Alternate Zone, to use it. To enable a Security Zone, change the status of that zone on the Security Zones page from Disabled to Enabled.
The status changes from Disabled to Enabled, and the Security Zone is ready for use.
In this section: |
How to: |
The Authentication page defines the methods of authentication available within a security zone. The default settings for each zone identify the most commonly used authentication methods for users in that zone, but Administrators can replace or supplement them with any of the other methods on the Authentication page.
Each available authentication method requires a unique configuration and works in different ways to authenticate users. Authentication methods that are available to users within a specific zone are identified with a check mark and a status of Enabled. Methods that are not available are marked with a status of Disabled.
The Actions section of the Authentication page contains links to the dialog boxes and activities that affect all Authentication methods in a particular zone. The Security Zones section contains links that save, export, or import Authentication page settings.
The Options link opens the Authentication Options dialog box where administrators can identify a customized URL to which WebFOCUS can direct users after their logout.
The Key Management link opens the Key Management dialog box where administrators can configure the location of the Keystore file that identifies the secure keys that support certificate-based methods of authentication, such as SAML and Trusted Ticket.
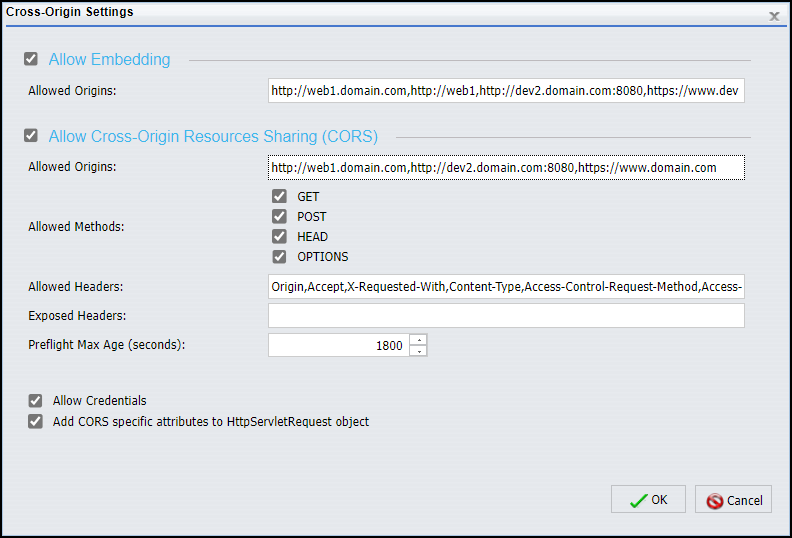
The Cross-Origin Settings link opens the Cross-Origin Settings dialog box, where administrators can configure WebFOCUS to allow the use of its resources in external applications that take advantage of WebFOCUS business intelligence by embedding WebFOCUS content and resources into their webpages. Within this dialog box, the Allow Embedding check box supports the embedding of WebFOCUS resources in the webpages of comma-delimited whitelisted URLs. The Allow Cross-Origin Resources Sharing (CORS) check box supports the use of Ajax request and response messages that enable users of comma-delimited whitelisted URLs to interact with embedded WebFOCUS resources. Each zone maintains its own configuration of cross-origin settings.
The Enable/Disable link enables previously disabled authentication methods, and disables previously enabled methods. This link becomes available only after an authentication method is selected.
The Edit link opens the dialog box that supports a selected Authentication Method. In that dialog box, you can create or update the configuration settings required by that method. This link becomes available only after an authentication method is selected.
or
The status changes from Disabled to Enabled with a check mark, and the method of authentication represented by that entry is available for use within the Security Zone.
or
The status changes from Enabled to Disabled, the check mark clears, and the method of Authentication represented by that entry is no longer available for use within the Security Zone.
Your new or updated settings appear as configured.
Security Zones are configured to use form-based authentication, by default. When users in a form-based authentication security zone sign out, the Sign out page that opens links users to the Sign in page. However, in zones that use an external authentication method or a pre-authentication method, there is no need to link users to the Sign in page after they sign out. For these zones, the Custom Logout Address substitutes the URL of an alternative sign-out page that overrides the display of the default Sign out page.
http://webseal.domain.com/pkmslogout
The sign-out URL for Siteminder may be:
http://siteminder.domain.com/logout.html
To return a user working in a single sign on environment to his or her original portal automatically, leave the final term blank. For example, the sign-out URL for WebSEAL would then be:
http://webseal.domain.com
How to: |
In WebFOCUS internal communications, user requests move from browsers to the WebFOCUS Server in the form of HTTP Request messages. By convention, HTTP Request messages must identify the URL of the virtual host, which is the application or website hosted on the server that will process the request, in their Host Header field. Messages from legitimate users identify the URL of an existing host on their targeted server. However, messages from potential attackers can identify URLs for hosts that do not exist on the targeted server.
Servers that do not require the authentication of the host header URL of incoming HTTP Request messages typically direct those that contain the URL of an undefined host to the first available host application for processing. That host then processes the message containing the unrecognized URL, substitutes it for the legitimate URL in the Location field in the Web Cache, and returns messages containing this poisoned content from the cache. Any following messages are then redirected to the URL introduced by the attacker and allow that server to return a message that contains malicious code to the sender.
To protect against these HTTP response header injection attacks, administrators must create an allowed list of valid host names for each active security zone. The Host Header URLs from incoming request messages can then be validated against this list.
After an allowed list is established, the WebFOCUS Server accepts only incoming HTTP Request Messages that contain a URL that appears on this list and returns an error message stating that the resource did not process correctly for all other messages.
Administrators can define a list of allowed host names for their organization in the Allowed host names field of the Authentication Options dialog box. By default, this field contains an asterisk (*) wild card, which accepts incoming HTTP Request messages directed to all host name URLs. We recommend that you accept this option only if you have incorporated an independent application that validates host names in HTTP Request Headers before they are accepted by the WebFOCUS Reporting Server.
To restrict the acceptance of incoming HTTP Request messages within a security zone to those that contain the URL of an existing virtual host on the WebFOCUS Server, administrators must replace the asterisk (*) wildcard character in the Allowed host names field of the Authentication options dialog box with a comma-separated allowed list of the URLs of virtual hosts, web sites, or applications, located on the WebFOCUS Server. URLs in the host header field of incoming HTTP Request messages must match a URL in this list to be accepted.
External applications can take advantage of WebFOCUS business intelligence by embedding WebFOCUS content and resources into their webpages. For example, an external application designed to provide customer service can embed portals designed and built within WebFOCUS that add reporting, charting, and analytic resources to the customer service metrics or account service history information they display.
However, to protect WebFOCUS from requests to embed its resources or content from unknown and unauthorized external applications, WebFOCUS does not allow embedding, by default. By selecting the Allow Embedding check box in the Cross-Origin Settings dialog box, an administrator can override this default configuration, and allow WebFOCUS to accept requests to embed portals, pages, or other resources into a frame or iframe within the webpage of a trusted external application.
External applications can also take advantage of WebFOCUS business intelligence by making embedded WebFOCUS content and resources interactive. Asynchronous Ajax requests issued from the browsers of users of the embedded application retrieve or update WebFOCUS resources and content dynamically, keeping information current and allowing for user interaction with embedded content.
Cross-origin resource sharing (CORS) allows a web page to request restricted resources from another domain outside of the domain from which the first resource was served. Using a cross-origin resource sharing policy configuration, a web page may be permitted to embed cross-origin images, stylesheets, scripts, iframes, and videos from separate domains, but forbid more sensitive cross-domain requests, such as Ajax requests. Because it allows a resource to limit cross-origin requests to a specific set of domains and messages, the CORS standard defines a way in which a browser and server can interact to determine whether or not it is safe to allow a cross-origin request. It allows for more freedom and functionality than purely same-origin requests, but is more secure than simply allowing all cross-origin requests. It is a recommended standard of the W3C consortium. For more information see, https://en.wikipedia.org/wiki/cross-origin_resource_sharing and the Cross-Origin Resource Sharing Recommendation from the W3C consortium http://www.w3.org/TR/cors/.
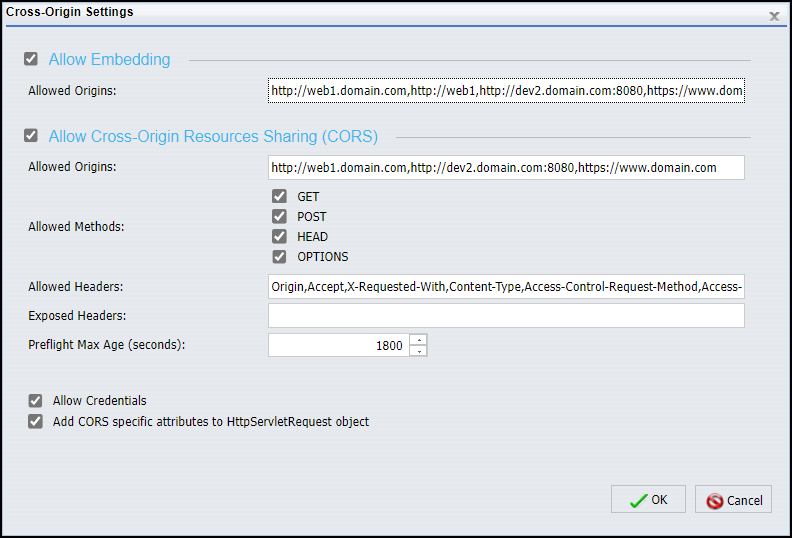
The Cross-Origin Settings dialog box activates the use of Embedding and Cross-Origin Resource sharing within WebFOCUS, as shown in the following image. The Allow Embedding check box supports the basic request to embed content within a frame or iframe of an external webpage. The Allow Cross-Origin Resources Sharing (CORS) check box supports the use of Ajax cross-origin sharing requests.
Note: Even though the Allow Embedding and Allow Cross-Origin Resources Sharing (CORS) check boxes appear together in the Cross-Origin Settings dialog box and work together to support the full requirements of Embedded BI Applications, these two settings are not dependent on each other. For example, an installation of WebFOCUS can be configured to support an external application that uses cross-origin resource sharing but does not require the use of embedded WebFOCUS content in a frame or iframe. Another installation of WebFOCUS could be configured to support an simple application that embeds a portal in a frame or iframe, but does not support cross-origin Ajax requests.
In the Cross-Origin Resource Sharing standard, an origin is defined by the scheme, host, and port of a URL. The Scheme identifies the protocol of the host it represents, typically http:\\ or https:\\. The Host identifies the registered name (including but not limited to a hostname), or IP address of the host. The Port identifies the endpoint of communications for the host.
As long as these three components are effectively the same, the URL defines the same origin. For example, both of the following resources have the same origin, even though the host component of the second resource URL contains additional path information:
However, in the following examples, each of the resources has a different origin from the others:
In each case, at least one of the scheme, host, and port components differs from others in the list. For more information, see https://tools.ietf.org/html/rfc6454.
The Allow Embedding check box determines whether or not requests to embed content within a frame or iframe on the webpage of an external application are allowed. When this check box is selected, the Allowed Origins field beneath it defines the range of applications that are allowed to embed WebFOCUS content.
TIBCO WebFOCUS either allows or prevents embedding by assigning specific values to the X-Frame-Options ALLOW-FROM header or to the Content-Security-Policy header of the message it sends in response to a request for embedded content. The specific response header used depends upon the type of browser requesting the resource. The values in the Allow Embedding check box and the Allowed Origins field associated with it are assigned to these response headers.
By default, the Allow Embedding check box is cleared, and WebFOCUS assigns the SAMEORIGIN value to the response header, which will prevent WebFOCUS from embedding resources within a frame or iframe in an external application.
The Allowed Origins field contains the asterisk wild card character (*), by default. When the Allow Embedding check box is selected, and the Allowed Origins field contains the asterisk wild card character (*), the ALLOW-FROM or Content-Security-Policy header is excluded from the response message, allowing its content to be embedded in all third party applications.
To limit the range of external applications that are allowed to embed TIBCO WebFOCUS resources, an administrator must replace the asterisk (*) wild card character in the Allowed Origins field with a comma-separated whitelist of URLs that host the specific origins that TIBCO WebFOCUS supports. Every URL in the whitelist must contain the scheme, hostname, and port of the external host. The port should be excluded if the URL uses the default port for the protocol it uses in the scheme, port 80 for URLs using the http protocol or port 443 for URLs using the https protocol.
When the Allow Embedding check box is selected, and the Allowed Origins field contains a specific URL or a comma-delimited whitelist of URLs, TIBCO WebFOCUS assigns the whitelist of Allowed Origins, depending on the type of browser that issued the request, to the response header. This setting allows only the specific hosts identified in that whitelist to embed TIBCO WebFOCUS content.
Permission to allow embedding varies by security zone. This feature ensures that embedding can be limited to those security zones that support requests from external applications, and prohibited in those security zones that do not.
The Allow Embedding setting only supports the placement of webpages within a frame or iframe. The separate Allow Cross-Origin Resources Sharing (CORS) request supports the request to retrieve or update resources or content within a webpage. For more information see, Allowing Cross-Origin Resource Sharing.
For more information about Embedded BI Applications, see the TIBCO WebFOCUS® Embedded Business Intelligence User's Guide.
Most installations assign this configuration to the Default Security zone, but they may also use the Alternate Security zone if they do not use the Default Security zone to support embedded BI applications.
When typing URLs in this field, keep the following requirements in mind:
To activate cross-origin resource sharing for external applications, see How to Allow Cross-Origin Resource Sharing for a Security Zone.
For more information about the configuration of Embedded BI Applications, see the TIBCO WebFOCUS® Embedded Business Intelligence User's Guide.
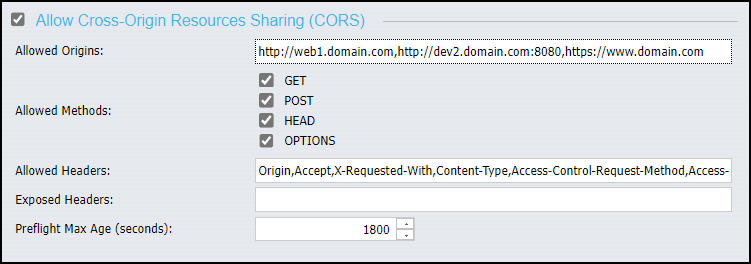
The Allow Cross-Origin Resources Sharing (CORS) check box determines whether or not TIBCO WebFOCUS allows cross-origin sharing requests for content or resources from external applications. When this check box is selected, the Allowed Origins field beneath it defines the range of applications that are allowed to deliver cross-origin sharing requests.
TIBCO WebFOCUS either allows or prevents cross-origin sharing by assigning specific values to the Access-Control-Allow-Origin header of the message it sends in response to Ajax messages requesting cross-origin sharing. The values in the Allow Cross-Origin Resources Sharing (CORS) check box and the Allowed Origins field associated with it define the values that are assigned to this response header.
By default, the Allow Cross-Origin Resources Sharing (CORS) check box is cleared, and TIBCO WebFOCUS responds to cross-origin sharing requests with an HTTP 403 error message, which prevents TIBCOWebFOCUS from sharing resources with an external application.
The Allowed Origins field contains the asterisk wild card character (*), by default. When the Allow Cross-Origin Resources Sharing (CORS) check box is selected, and the Allowed Origins field contains the asterisk wild card character (*), TIBCO WebFOCUS assigns the wild card character to the Access-Control-Allow-Origin response header allowing its resources to be available to all external applications.
To limit the range of external applications that are allowed to share TIBCO WebFOCUS resources, an administrator must replace the asterisk (*) wild card character in the Allowed Origins field with a comma-separated whitelist of URLs that host the specific origins that TIBCO WebFOCUS supports. Every URL in the whitelist must contain the scheme, hostname, and port of the external host. The port should be excluded if the URL uses the default port for the protocol it uses in the scheme, port 80 for URLs using the http protocol or port 443 for URLs using the https protocol.
When the Allow Cross-Origin Resources Sharing (CORS) check box is selected, and the Allowed Origins field contains a specific URL or a comma-delimited whitelist of URLs, TIBCO WebFOCUS assigns the whitelist of Allowed Origins to the Access-Control-Allow-Origin response header. This setting allows TIBCO WebFOCUS to share resources only with the specific hosts identified in that whitelist in response to Ajax request messages.
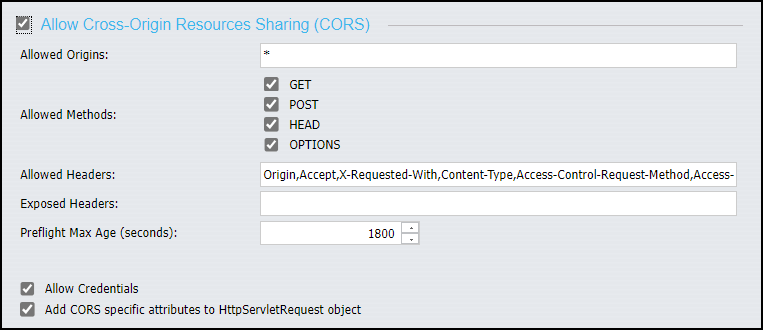
Once activated, the remaining features establish a standard set of protections over the use of cross-origin resources for those embedded applications supported by the security zone, as shown in the following image.
Settings in this dialog box incorporate all of the features that the cross-origin resource sharing specification will support, such as URLs, request methods, headers, and credentials. They also define the maximum time by which preflight requests must be completed.
Permission to allow cross-origin resource sharing varies by security zone. This feature ensures that cross-origin resource sharing can be limited to those security zones that support requests from external applications, and prohibited in those security zones that do not.
The Allow Cross-Origin Resources Sharing (CORS) check box only supports the use of cross-origin requests to retrieve or update resources or content within a webpage. The separate Allow Embedding request supports the request to embed content within a frame or iframe in an external application webpage. For more information see, Allowing Embedding.
For more information about Embedded BI Applications, see the TIBCO WebFOCUS® Embedded Business Intelligence User's Guide.
Most installations assign this configuration to the Default Security zone, but they may also use the Alternate Security zone if they do not use the Default Security zone to support Embedded BI Applications.
Settings in the dialog box become available, as shown in the following image.
When typing URLs in this field, keep the following requirements in mind:
When your configuration is complete, the dialog box will resemble the following image.
For more information about the configuration of Embedded BI Applications, see the TIBCO WebFOCUS® Embedded Business Intelligence User's Guide.
In this section: |
How to: |
The HTTP Strict Transport Security Settings link connects you to the HTTP Strict Transport Security Settings dialog box, where you can implement the use of an HSTS security policy for your selected Security Zone. This policy calls for the use of TLS (SSL) level security on all communications between browsers assigned to individual users and the Application Server. Therefore, it is relevant only to those organizations that have configured the use of TLS (SSL) security. For more information, see Configuring TIBCO WebFOCUS for SSL.
An HTTP Strict Transport Security (HSTS) policy is a security enhancement issued by a server that requires the use of the https protocol for all incoming requests. When this policy is in place, the server that hosts a website responds to the first request from a browser that does not use the https protocol by returning a message with a response header that contains the Strict-Transport-Security field. The presence of this field in the response header indicates that the server will not accept any further requests from that browser that do not arrive over an https connection.
The response header can also include a field identifying the time limit, typically one year, over which the policy will be enforced. Any subsequent requests from that browser that do not use this protocol will receive an error message in response.
When the browser receives a message with a response header that contains a Strict-Transport-Security field, it knows to use the https protocol when sending any future messages to the site. The browser also knows that any other site using the same name that does not require the use of this protocol is not legitimate, and it automatically redirects requests to the site that does require the use of the https protocol.
By imposing this policy within a Security Zone, you introduce this extra level of security to all communications between users in that zone and the Application Server. The policy ensures that all communications within that zone use the https protocol and are therefore encrypted and validated by a public key certificate. It also helps prevent requests from users in that zone from being inadvertently misdirected to an illegitimate site that does not require the https protocol.
A link to the HTTP Strict Transport Security Settings dialog box and its configuration appears on the Authentication page of the Administration Console Security tab. Because the policy only applies to the zone in which it is configured, you will need to establish this policy for each of the security zones in which it will apply. As a best practice, we recommend the use of the HSTS policy for all security zones in installations that have been configured to use TLS (SSL) security.
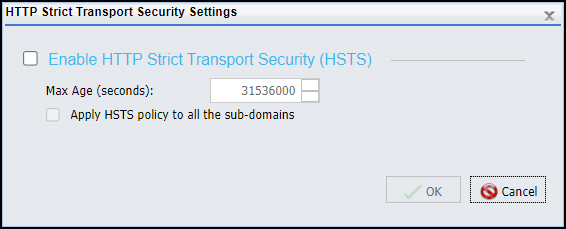
The HTTP Strict Transport Security Settings dialog box enables the HSTS policy for a selected Security Zone. Additional settings define the length of time that the policy is enforced and whether or not the policy extends to messages directed to subdomains within the host server URL.
HTTP Strict Transport Security is not enabled, by default, for any security zone, therefore the features in this dialog box remain unavailable until you select the Enable HTTP Strict Transport Security (HSTS) check box.
When selected, the Enable HTTP Strict Transport Security (HSTS) check box activates the HSTS policy for the security zone selected in the left pane of the Security tab. When this check box is selected, the other features in the dialog box become available.
The Max Age (seconds) list contains the number of seconds for an entire year, by default. You can increase or decrease this value to conform to the standards of your organization.
The Apply HSTS policy to all the sub-domains check box is cleared, by default. However, we recommend that you select it in order to ensure that messages directed to all subdomains in the site hosting the Application Server are required to use the https protocol.
This configuration is relevant only if you have also configured the use of TLS (SSL) in internal communications. For more information, see Configuring TIBCO WebFOCUS for SSL.
If you have configured TIBCO WebFOCUS to use https, we recommend that you enable this feature for all security zones in use within your installation.
You can use the up or down arrows to the right of this field to increase or decrease the number of seconds in this value.
In this section: |
The Request Matching page defines the range of authentic URLs and IP addresses for a Security Zone. The page contains two tabs, Request URL Pattern, and IP Address of Client/Last Proxy. These tabs identify the patterns of URLs and IP Addresses of trusted users. A pattern can be very general to include a wide range or URLs and IP Addresses, or it can be very precise to limit valid requests to a few URLs and IP Addresses. When configured for a Security Zone, settings on the Request Matching page tabs exclude all request messages except those that match the pattern of trusted URLs and IP Addresses. By excluding requests from untrusted locations, the Request Matching pages help prevent potentially malicious requests from compromising WebFOCUS operations.
Request URL patterns use the following Java Ant path patterns.
Do not make modifications to the settings on this page unless instructed to do so by a member of the Customer Support Team.
The Request URL Pattern tab defines the range of URLs that can be accepted as authentic origins for user requests.
The default settings for this tab vary by Security Zone to reflect differences in the security restrictions required by each one. For example, the Mobile and Portlet Security Zones support users who work at remote sites or through a portlet. Their configurations therefore strictly limit the range of acceptable URLs to a few patterns, by default. In contrast, the Default and Alternate Security Zones support all users who work at sites within an organization and their default configurations impose few to no restrictions.
The IP address of the Client/Last Proxy tab defines the range of client and proxy site IP Addresses that can be accepted as authentic origins for user requests. A proxy site, or proxy server, is a server that acts as an intermediary in all messages exchanged between a user and an application server.
The default settings for this tab vary by zone to reflect differing security restrictions required by each zone. The Default, Mobile, and Portlet zones contain no values for this tab, and the Add, Edit, and Remove links are unavailable, effectively making the evaluation of the client or last proxy IP addresses irrelevant.
By contrast, the IP Address of the Alternate Security Zone contains three default patterns, 127.0.0.1, 0:0:0:0:0:0:0:1, and ::1. All of these patterns are representations of the LocalHost IP address in IPV4 and IPV6 respectively, limiting the Alternate Security Zone to requests issued from local users. The Add, Edit, Edit Setting and Remove links are also available in this zone. Any configuration of these features will affect only those users who are assigned to the Alternate Zone.
How to: |
The settings for each security zone are stored in four security configuration files, securitysettings.xml, securitysettings-mobile.xml, securitysettings-portlet, and securitysettings-zone.xml. Before you change the authentication method for a zone, use the Export link on any zone page to save a backup zip file of the security zone configuration. If you need to restore a previous configuration of security zone settings, use the Import link to capture settings from that configuration and restore them to the security configuration files on the server.
The Export link creates a zip copy of the four security configuration files from the server and saves them in a designated network location. Use this operation to backup existing security configuration settings before updating them.
The Import feature enables you to copy and paste the text of previous versions of the security configuration files into the four security files on the WebFOCUS server. Use this operation whenever you need to restore previously established security configuration settings.