Understanding Access Control Templates

In this section:

WebFOCUS Server Access Control Templates, in conjunction with WebFOCUS Resource Templates, provide a comprehensive access control solution for users in an Enterprise or SaaS Tenant deployment.

Access Control Templates are configurations of groups, roles, and privileges that, when defined on a WebFOCUS Server, automatically grant users in those groups an appropriate level of access to the application directories and capabilities available on that server. For example, a user assigned only to the Marketing/AdvancedUsers group can create reports using metadata residing in the marketing application directory, but not metadata residing in the finance application directory. Another user, assigned to the Marketing/Developers group, can access Server browser interface tools to monitor their connections and agents, while other marketing users who are not in that group, cannot.

If you only need to support a small number of groups, you can use the Server browser interface to create individual application directories manually, and then configure access privileges for each one. However, when there is a pattern of access between group names and application directories, the implementation of server access control templates is a best practice that saves time, imposes consistency on the results, and is easy to use. Server access control templates allow for the best integration of resource templates with application directory access privileges and the assignment of users to their proper server role.

However, note that explicit group registration takes precedence over access control template matching. A user connecting to the WebFOCUS Server from a group that maintains an explicit registration on the WebFOCUS Server, will always obtain their authorization from that group, and not from the group that is the closest match in the access control template.

The access control template described in this section follows a standard model for user access. In that model, workspaces created from resource templates create four sub-groups, by default, basic users, advanced users, developers, and group administrators. These four sub-groups enable administrators to tailor the availability of workspace resources to the needs and responsibilities of the four most common user types.

Developing Business Requirements for Server Access Control Templates

The first step in developing an access control template is to develop business requirements that identify the groups, the content with which they are allowed to work, and the appropriate level of access to that content. For the access control template discussed in this section, consider the following business requirements:

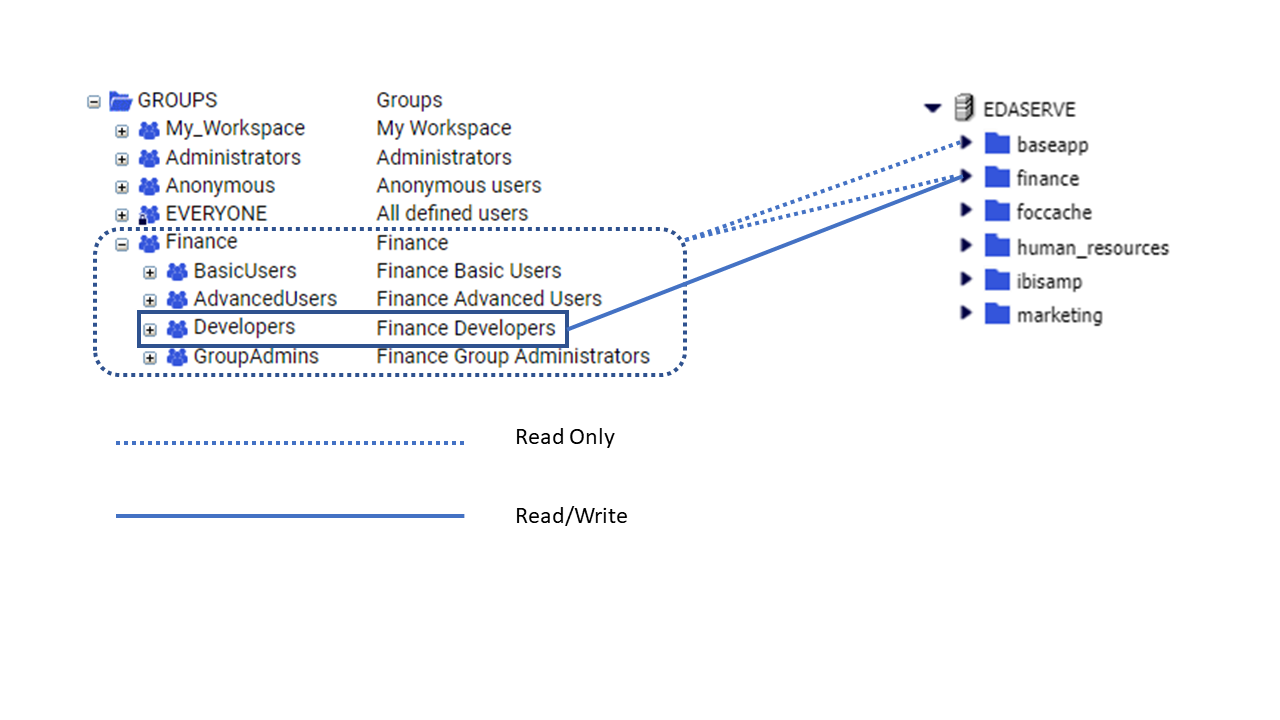
  1. All users have read-only access to the ibisamp directory and the baseapp directory.
  2. Managers and Administrators have read/write access to the application directories of all workspaces.
  3. Workspace users have read-only access to the application directory for their workspace.
  4. Workspace developers have read/write access to the application directory for their workspace.
  5. Workspace users and developers have no access to any directories other than the application directory for their workspace and the ibisamp and baseapp directories.

These business requirements are shown in the following image. In this example, workspace users and developers are assigned to the Finance workspace. For clarity, the Administrator and Manager access lines are omitted.

Folders for the finance group next to the server directories to which they have access. Developers have read and write access to the Finance folders. All four groups have read only access to the baseapp and ibisamp folders.

When you configure an access control template, you can vary these basic requirements. For example, if all users do not need to have access to the ibisamp directory or the baseapp directory, you can remove the option that grants access to those directories to all users.

The business requirements listed in this example are the basis for the access control template configuration that appears in the Access Control Template Text section and throughout the remainder of this section.

Access Control Template Regular Expressions and Group ID Patterns

Regular expressions and Group ID patterns make access control templates available to a range of groups. As long as the name of a group matches a Group ID pattern, the template and its configuration of WebFOCUS Server access roles and privileges automatically applies to that group. The regular expressions used to configure Group ID patterns allow administrators to limit an access control template to a select few groups that conform to a closely-defined pattern, or to make a template accessible to a broad range of groups that conform to a minimally-defined pattern. By default, these regular expressions include:

Access control templates also use two placeholder terms as variables in their configuration.

In this configuration example, these values are assigned to fields on the Template Registration page of the WebFOCUS Server browser interface. They also appear in the configuration file that records access control template settings.

Creating Access Control Templates

In this section:

The access control template feature is compatible with many different authentication and authorization configurations. However, the topics in this section presume the use of Internal Authentication, and pass groups through a trusted connection to the WebFOCUS Server for user authorization.

There are two different ways to configure an access control template:

Access Control Template Prerequisites

In this section:

How to:

Before creating access control templates, regardless of the method you choose, you must:

  • Allow the WebFOCUS client to pass Trusted User IDs and Groups to the WebFOCUS Server by configuring the WebFOCUS Server Security setting in the WebFOCUS Client Administration Console.
  • Allow the WebFOCUS Server to accept those Trusted User ID and Groups by changing the Security Provider Trusted setting to y (Yes) on the Server browser interface.
  • Restrict Trusted Connections to specific hosts by changing the Special Service and Listener configuration on the Server browser interface to accept hosts that support trusted communications.
  • Disable the automatic pre-pending of the name of the primary security provider when registering group or user names by changing the value in the Console Access Control setting, prepend_provider_name setting, located on the Access Control page of the Server browser interface, to n (No). By disabling this setting, you can switch to another primary security provider later if, for example, you want to authenticate users to the Active Directory instead of Internal Authentication, without re-registering those users or group roles.

You will find instructions on how to configure these prerequisites in the following topics.

The features that support this configuration are most readily available from the Legacy Home Page.

Procedure: How to Establish a Trusted Connection to the WebFOCUS Server From the WebFOCUS Client

This procedure is based on the default configuration of internal authentication and authorization. The features that support this procedure are only available from the Legacy Home Page.

To confirm that your installation uses internal authentication and authorization, on the Administration Console Security Tab, under the Security Configuration folder, click External. If the Enable External Security check box is cleared, your installation uses internal authentication. If the Internal option in the User Authorization group is selected, your installation uses internal authorization. If you identify a different configuration, contact the Customer Support Team for information on establishing a trusted connection.

Note that this procedure establishes a trusted connection to the EDASERVE WebFOCUS Server, and not to any other WebFOCUS Server. This server is specified because the default resource templates also specify EDASERVE as the WebFOCUS Server in their configuration. If you must establish a trusted connection to a different WebFOCUS Server, you must also replace EDASERVE with the name of your chosen WebFOCUS Server in each of the default resource templates.

  1. In the Administration Console, on the Configuration tab, expand the Reporting Servers folder, and then expand the Server Connections folder.
  2. Double-click the EDASERVE node.
  3. On the Client Configuration page, under the Security entry, click the Trusted option.

    The page refreshes and displays two options. The Pass WebFOCUS User ID and their Groups option is selected automatically.

  4. In the Host field:
    1. If the WebFOCUS Client and WebFOCUS Server are on the same machine, type localhost.
    2. If the WebFOCUS Client and WebFOCUS Server are on different machines, type the name or IP address of the machine hosting the WebFOCUS Server.

      You will later assign this same value to the RESTRICT_TO_IP setting on the WebFOCUS Server to disallow trusted connections from other clients.

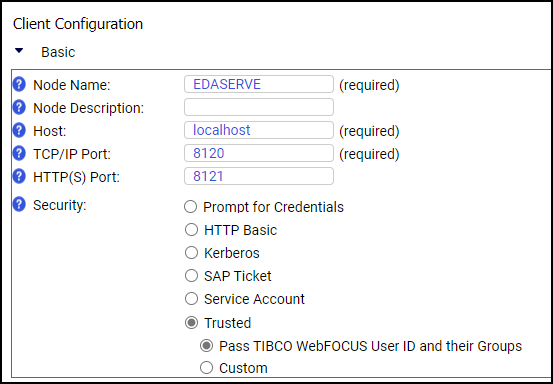
  5. Review your configuration to ensure that it resembles the following image:
    The Client Configuration page with localhost in the Host field and Trusted Pass WebFOCUS User ID and their Groups option selected.

    Note: Ensure that localhost has been replaced by the Host Name of the WebFOCUS Server, if the WebFOCUS Client and WebFOCUS Server are on different machines.

  6. Click Save.
  7. When you receive a message that the WebFOCUS Server update was saved successfully, click OK.
  8. On the Administration Console Menu bar, click Clear Cache.
  9. When you receive a message that all caches are cleared, click OK.
  10. Sign out of your current session.

Procedure: How to Identify the Security Provider as a Trusted Security Provider

In order for the Access Control features to function, you must run the WebFOCUS Server with a Security Provider. This provider could be PTH<Internal>, LDAP, OPSYS, DBMS, or a CUSTOM provider, such as one that authorizes users to access a relational database management system (RDBMS).

  1. From the Hub side navigation pane, select Management Center, and Access Control.

    Or

    From the WebFOCUS Home Page, select Settings and WebFOCUS Server to open the Reporting Server Browser interface. On the Menu bar, select Tools and Access Control to open the Access Control page.

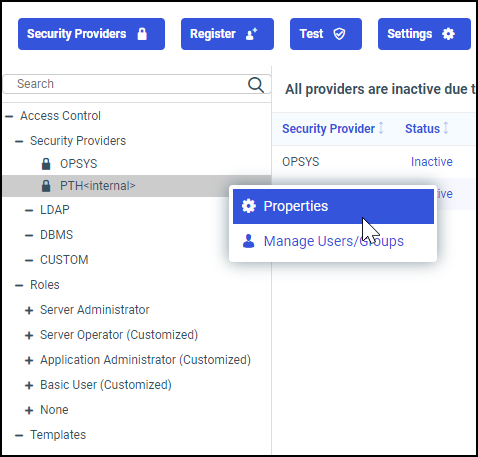
  2. Under the Access Control folder, right-click the node of the current security provider for the WebFOCUS Server, and then click Properties.

    For example, right-click PTH <internal> , and then click Properties, as shown in the following image.

    The Access Control folders with the PTH Internal active folder shortcut menu and the Properties command.

    Note: The OPSYS provider does not allow trusted communications on Windows platforms.

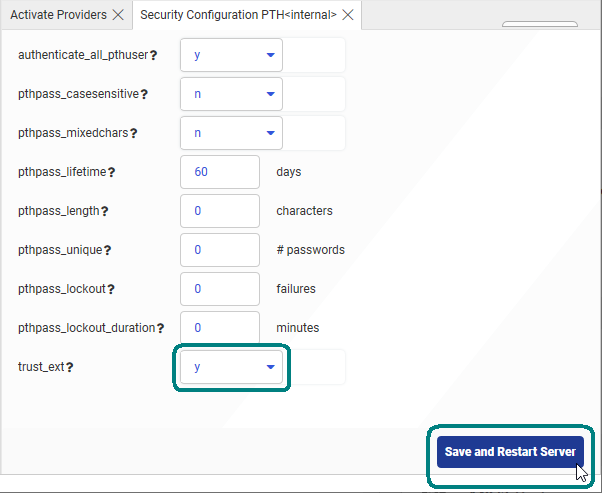
  3. On the configuration page of your selected security provider, scroll down to the trust_ext list and confirm that the value y appears. If not, click y in the trust_ext list, and then click Save.

    For example, on the Security Configuration PTH<internal> page, click y in the trust_ext list, and then click Save. When the properties panel closes, click Save and Restart Server, as shown in the following image.

    The Security Configuration page on the WebFOCUS Reporting Server browser interface Access Control tab with the trust_ext field set to y.

    The WebFOCUS Server stops and restarts automatically.

    Note: The PTH<Internal> security provider is configured as a trusted security provider, by default. If you select a different security provider that has not been configured, you must complete the configuration first. For more information see the Configuring Authentication section of the TIBCO WebFOCUS® Reporting Server Administration Manual.

  4. When you receive the Workplace Restarting message, stand by.
  5. Select Tools and Access Control, right-click PTH<Internal>, and review the new trusted configuration.

Procedure: How to Restrict Trusted Access to Specific Hosts

  1. Open the Server browser interface, and open the Workspace page.
  2. In the Workspaces tree, expand Special Services and Listeners.
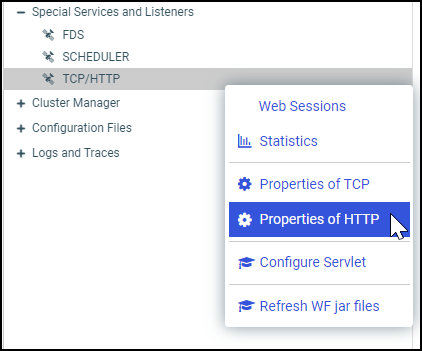
  3. Right-click the TCP/HTTP node, and then click Properties of TCP, as shown in the following image.
    The TCP/HTTP node shortcut menu, with Properties of TCP highlighted.
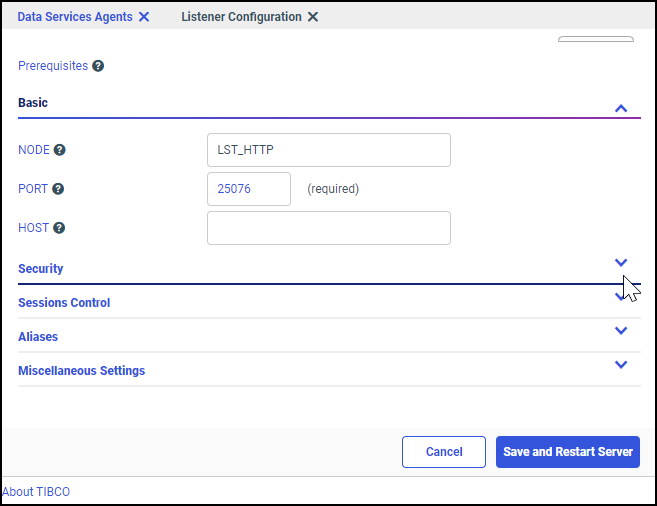
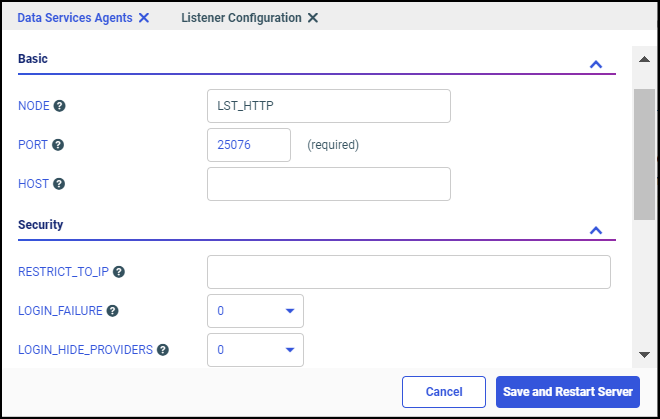
  4. Expand the Security header, as shown in the following image.
    The Listener Configuration page with the Security tab expanded and the Restrict to IP field visible.
  5. If the WebFOCUS Server is on the same host machine as the WebFOCUS Client and Distribution server, type localhost in the RESTRICT_TO_IP field.

    If the WebFOCUS Server is not on the same host machine as the WebFOCUS Client and Distribution server, type the TCP/IP addresses or names of all of the WebFOCUS Clients and the Distribution Servers that will be used to access this WebFOCUS Server.

  6. Click Save and Restart Server, as shown in the following image.
    The Listener Configuration page with the name localhost assigned to the HOST field.
  7. When the Sign in page opens with the session lost due to server restart message, type the server ID and password used in the installation, typically, srvadmin for both, and then click Sign In.

    The Server browser interface reopens and displays the Applications tab.

Procedure: How to Disable Primary Security Provider Name Prepending to Group or User Names

By disabling this setting, you can switch to another primary security provider later if, for example, you want to authenticate users to the Active Directory instead of Internal Authentication, without re-registering those users or group roles.

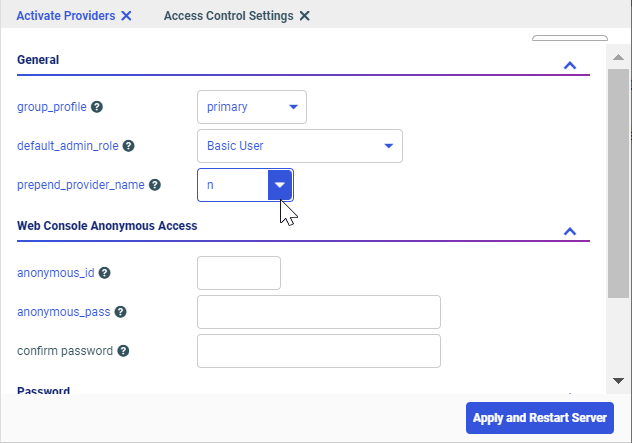
  1. On the Access Control Page, select Settings and Access Control to open the Access Control Settings tab. Select n from the prepend_provider_name list, as shown in the following image.
    The Access Control Settings page with the prepend provider name field set to n.

    This setting specifies that when registering groups or users for the primary provider, the provider name is not prepended to the group or user name. This configuration change will allow an administrator to enable a different security Provider, such as Active Directory or LDAP, at a later date, without breaking the connection of the already registered users and groups.

  2. Click Apply and Restart Server.

    After you receive the Workspace restarting please wait message, the WebFOCUS Server restarts, and the Server browser interface returns you to the Applications tab.

    If the Sign in page opens with the Session lost due to server restart message, type the server ID and password used in the installation, typically, srvadmin for both, and then click Sign In.

  3. Close the Server browser interface, and sign out.

Choosing an Access Control Template Creation Method

When the prerequisites are configured, you can use one of two methods to create an access control template.

To create a template by copying and pasting text that is provided in this section, continue with the topic, Creating Access Control Templates by Copying and Pasting.

To create a template by directly configuring and registering all of the groups it will contain, continue with the topic, Creating Access Control Templates by Manual Configuration.

Creating Access Control Templates by Copying and Pasting

How to:

As of Release 8.2 Version 01, the WebFOCUS Server installation automatically creates an administration configuration file, identified as admin.cfg. The following sample of the text in the admin.cfg file, located in drive:\ibi\profiles, includes the default configuration, with an operating system userid, and the default PTH<internal> security provider.

Sample default admin.cfg

admin_id = OPSYS\DOMAIN\operatingsystemuserid
BEGIN
  admin_level = SRV
END
admin_id = PTH\srvadmin
BEGIN
  admin_password = {AES}encrytpedpassword
  admin_level = SRV
END
admin_level = APP
BEGIN
  admin_privilege = NODPT,NOSYS,METAP,DATMG,PRSAV,PRDFR,PRRPT,
                    PROUT,MONIT,CHGPW,MONUS,MONGR,KILT3,KILGR,
                    APATH,DBMSC,UPROF,APROF          
  admin_privilege = *;ANONE
  admin_privilege = (APPROOT);AREAD,ARWRT,PRRUN,ALIST
END
admin_level = USR
BEGIN
  admin_privilege = NODPT,NOSYS,PROUT,CHGPW,MONUS,KILT3,APATH,
                    DBMSC,UPROF
  admin_privilege = *;ANONE
  admin_privilege = (APPROOT);AREAD,ARWRT,PRRUN,ALIST
END
admin_level = OPR
BEGIN
  admin_privilege = NODPT,NOSYS,MONIT,KILAL,STPSV,CHGPW,MONUS,
                    MONGR,KILT3,KILGR
  admin_privilege = *;ANONE
  admin_privilege = (APPROOT);AREAD,ARWRT,ALIST
END
>>>Replace this line with all lines from the WebFOCUS 
Access Control Template Text.<<<
[Access Control]
authenticate_all_pthuser = y
prepend_provider_name = n

where:

operatingsystemuserid

Is the actual operating system user ID.

encrytpedpassword

Is the userid password that is encrypted by the WebFOCUS Server using the key specified in the cfgfile_cipher.

By default, the template assigns the USR role to all users assigned to the BasicUsers, AdvancedUsers, and GroupAdmins groups of individual workspaces. These groups are usually referred to as Workspace\BasicUsers, Workspace\AdvancedUsers, and Workspace\GroupAdmins, where Workspace is the name of the individual workspace to which they are assigned. For example, Finance\BasicUsers. When users from those groups connect to the WebFOCUS Server, they have Read, Execute, and List privileges to resources within their workspace application folder.

The template also assigns the APP role to the Workspace\Developers group. When users from this group connect to the WebFOCUS Server, they have Read, Write, List, and Run privileges for resources within their workspace application folder, as well as additional privileges that support their role as developers.

To replace this generalized configuration of access control settings with an access control template, copy the text from the following section, Access Control Template Text, and paste it into an existing admin.cfg file. This addition creates an access control template that grants proper authorization to the Administrators group, Managers group, and any workspace group that connects to the WebFOCUS Server through the trusted connection defined in How to Establish a Trusted Connection to the WebFOCUS Server From the WebFOCUS Client.

Access Control Template Text

The access control template that appears in this section applies to all trusted users and groups that connect to the WebFOCUS Server to which this template is assigned. It uses Group ID patterns and regular expressions to establish a configuration that serves most installations effectively. This template is based on an access model that grants all users Read, List, and Run privileges in the ibisamp and baseapp directories.

admin_group = Administrators
BEGIN
  admin_level = SRV
  admin_description = WebFOCUS Administrators
END
admin_group = Managers
BEGIN
  admin_level = SRV
  admin_description = WebFOCUS Managers
END
admin_group = modelgrp/Developers
BEGIN
  admin_level = APP
  admin_privilege = *;ANONE
  admin_privilege = (APPROOT)/baseapp;AREAD,PRRUN,ALIST
  admin_privilege = (APPROOT)/modelapp;AREAD,ARWRT,PRRUN,ALIST
  admin_privilege = (APPROOT);ANONE
  admin_privilege = ADPTP,NODPT,NOSYS,METAP,DATMG,PRSAV,PRDFR,
                    PRRPT,PROUT,MONIT,SRVLG,KILT3,APATH
  admin_privilege = (APPROOT)/ibisamp;AREAD,PRRUN,ALIST
END
admin_group = modelgrp
BEGIN
  admin_level = USR
  admin_privilege = NODPT,NOSYS,PRDFR,PRRPT,PROUT,KILT3,APATH
  admin_privilege = *;ANONE
  admin_privilege = (APPROOT)/baseapp;AREAD,PRRUN,ALIST
  admin_privilege = (APPROOT)/modelapp;AREAD,PRRUN,ALIST
  admin_privilege = (APPROOT);ANONE
  admin_privilege = (APPROOT)/ibisamp;AREAD,PRRUN,ALIST
END
admin_group_template = (.+)/Developers
BEGIN
  model_group = modelgrp/Developers
  file_replace_pattern = (modelapp)
END
admin_group_template = (.+)
BEGIN
  model_group = modelgrp
  file_replace_pattern = (modelapp)
  exclude_groups = (/)
END
Procedure: How to Copy and Paste an Access Control Template

  1. On the WebFOCUS Client, navigate to the drive:\ibi\profiles directory.
  2. Open the file admin.cfg with a text editor.
  3. Scroll down to the line:
    [Access Control]
    authenticate_all_pthuser = y
    prepend_provider_name = n
    
  4. Copy the following text and paste it after the last statement in the admin_level = OPR section and before the title [Access Control].
    admin_group = Administrators
    BEGIN
      admin_level = SRV
      admin_description = WebFOCUS Administrators
    END
    admin_group = Managers
    BEGIN
      admin_level = SRV
      admin_description = WebFOCUS Managers
    END
    admin_group = modelgrp/Developers
    BEGIN
      admin_level = APP
      admin_privilege = *;ANONE
      admin_privilege = (APPROOT)/baseapp;AREAD,PRRUN,ALIST
      admin_privilege = (APPROOT)/modelapp;AREAD,ARWRT,PRRUN,ALIST
      admin_privilege = (APPROOT);ANONE
      admin_privilege = ADPTP,NODPT,NOSYS,METAP,DATMG,PRSAV,PRDFR,
                        PRRPT,PROUT,MONIT,SRVLG,KILT3,APATH
      admin_privilege = (APPROOT)/ibisamp;AREAD,PRRUN,ALIST
    END
    admin_group = modelgrp
    BEGIN
      admin_level = USR
      admin_privilege = NODPT,NOSYS,PRDFR,PRRPT,PROUT,KILT3,APATH
      admin_privilege = *;ANONE
      admin_privilege = (APPROOT)/baseapp;AREAD,PRRUN,ALIST
      admin_privilege = (APPROOT)/modelapp;AREAD,PRRUN,ALIST
      admin_privilege = (APPROOT);ANONE
      admin_privilege = (APPROOT)/ibisamp;AREAD,PRRUN,ALIST
    END
    admin_group_template = (.+)/Developers
    BEGIN
      model_group = modelgrp/Developers
      file_replace_pattern = (modelapp)
    END
    admin_group_template = (.+)
    BEGIN
      model_group = modelgrp
      file_replace_pattern = (modelapp)
      exclude_groups = (/)
    END
    
  5. Optional: If users do not need to access the ibisamp or baseapp application directories, delete the lines pertaining to them from the admin_group = modelgrp and admin_group = modelgrp/Developers sections of the Application Control section text.
  6. Save and close the admin.cfg file.

    Continue the configuration by limiting the range of available resources, if necessary. You can then test the entire solution as described in the topic, Testing the Combined Resource Template and Access Control Template Solution.

Creating Access Control Templates by Manual Configuration

In this section:

The manual method of creating an access control template requires an administrator to use the Server browser interface to create a template model and then register access control templates based on that model. When the template model is configured, the administrator registers individual templates based on it to groups. The registration identifies the access control template to use when users from a specific group deliver a request to the WebFOCUS Server through a trusted connection.

Creating a Template Model

How to:

A template model represents the configuration of groups that can connect to the WebFOCUS Server and the privileges those groups can maintain. It incorporates your access control policy directly into WebFOCUS Server settings.

To create a template model:

  1. Create an Administrators group and register it to the Server Administrators Role on the WebFOCUS Server.
  2. Create a Managers group and register it to the Server Administrators Role on the WebFOCUS Server.
  3. Create a model application.
  4. Create a model group and register it to the Basic Users Role.
  5. Create a model/developers group and register it to the Application Administrator Role.

The Administrator and Managers groups enable anyone in the Administrators group, as well as the Managers group, to access the WebFOCUS Server and Server browser interface with single sign on as a Server Administrator.

The model group and model developers group represent workspace groups. They enable users in workspace sub-groups to connect to the WebFOCUS Server as a user or developer with single sign on access. The model application represents application folders that users who are connected to the WebFOCUS Server through the trusted connection can create. As described in these topics, this template model applies the familiar default configuration of permissions. However, the Server browser interface gives administrators the tools to create any kind of access control template that conforms to the security requirements of their installation.

Procedure: How to Sign in to the TIBCO WebFOCUS Server Browser Interface

To be able to open, review, and update group privileges, ensure that the WebFOCUS Server is running in the Security On mode before you begin the access control template configuration.

  1. Sign in as an administrator.
  2. On the Hub, select Management Center and Access Control from the side navigation pane.

    Or

    Open the WebFOCUS Home Page, and select Settings and WebFOCUS Server.

    Or

    Open the Plus menu and then select Prepare and Manage Data.

    Or

    Type the following URL in the browser address bar:

    http(s)://host:port/context/admin								

    where:

    host

    Is the name or IP address of the host used to access WebFOCUS.

    port

    Is the number of the port on which the WebFOCUS Server or Application Server listens.

    This value is optional, and it should be excluded if the URL uses the default port for the protocol it uses in the scheme, which is port 80 for URLs using the http protocol or port 443 for URLs using the https protocol.

    context

    Is the specific context used for WebFOCUS. For example, ibi_apps.

    Note: If you are signed in, and the machine id, port, and context already appear in the address bar, you only need to type over that part of the path that follows the context with the term /admin.

Procedure: How to Create and Register the WebFOCUS Administrators and Managers Groups to the Server Administration Role

  1. Open the Server browser interface, select Settings, and then select Access Control.
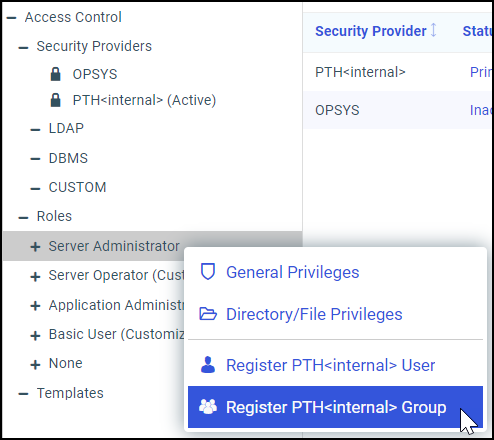
  2. In the Access Control tree, under the Roles folder, right-click Server Administrator, and then click Register PTH <Internal> Group, as shown in the following image.
    The Server Administrator role shortcut menu with the Register Group command highlighted.
  3. On the Group Registration tab, click Manual.
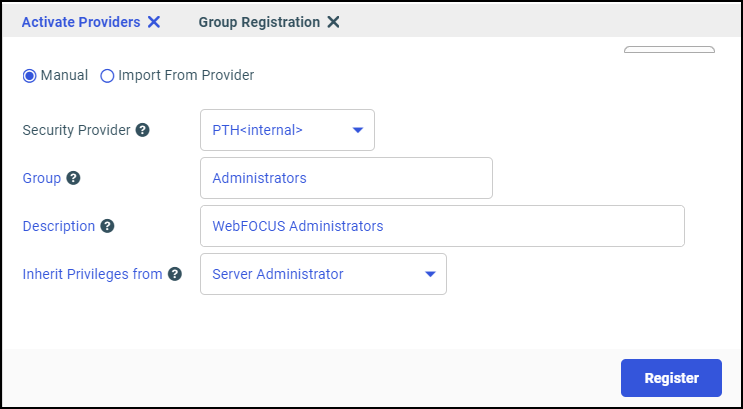
  4. When the Group Registration tab refreshes, type Administrators in the Group field, type WebFOCUS Administrators in the Description field, and then click Register, as shown in the following image.
    The Group Registration page configured for the Administration Group, with a description of WebFOCUS Administrators
  5. When you receive a confirmation message, click OK.

    The Server browser interface screen refreshes.

  6. Repeat steps 2 through 5 to create and register a second group to the Server Administrator role, but this time, type Managers in the Group field, and then type WebFOCUS Managers in the Description field.
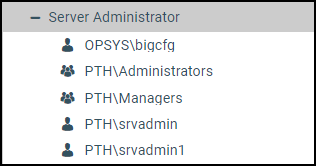
  7. After you have created and registered the second group, under the Roles folder, expand the Server Administrator role and ensure that the new groups appear under it, as shown in the following image.
    The user groups administrators and managers under the server administrator role.

    These two groups enable anyone in the WebFOCUS Administrators group, as well as the WebFOCUS Managers group, to use a single sign-on to access the WebFOCUS Server and Server browser interface as a Server Administrator.

    Note: The product installation automatically adds the OPSYS\IBI\username and PTH\srvadmin users that appear under the Server Administrator role.

Procedure: How to Create and Register the Modelapp Application

The modelapp application is a placeholder for all applications and application directories assigned to workspaces on the WebFOCUS Server.

  1. On the Hub, in the left navigation pane, select Application Directories to open the Application Directories area.

    Or

    Open the Server browser interface. The Applications area appears, by default.

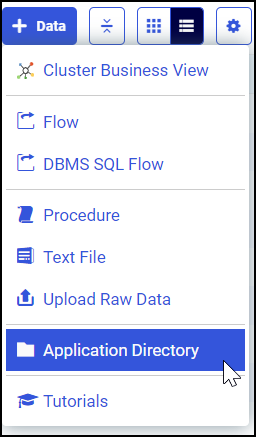
  2. Select Data and Application Directory, as shown in the following image.
    The New menu as it appears on the Applications Directory tab of the Reporting Server browser interface.
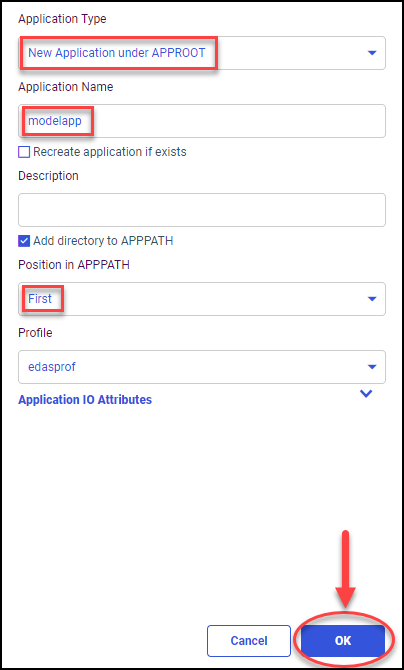
  3. On the Create New Application tab, perform the following steps:
    1. Ensure that the value New Application under APPROOT appears in the Application type field.
    2. Type modelapp in the Application Name field.
    3. Click First in the Position in APPPATH list, as shown in the following image, and then click OK.
      The Create New Application page with the New Application under APP ROOT Application Type, the modelapp Application Name, and the First Position in APP PATH.

      The Server browser interface refreshes the screen, and displays the Status page.

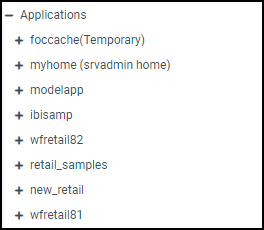
      The folder for the new sub-application appears under the Application Directories folder, as shown in the following image.

      The folder for the new modelapp application directory on the Application Directories tab of the Reporting Server browser interface.

Procedure: How to Register the New Group, ModelGrp

  1. Server

    On the Hub, in the left navigation pane, select Management Center and Access Control.

    Navigate to the Server browser interface, select Tools, and then select Access Control.

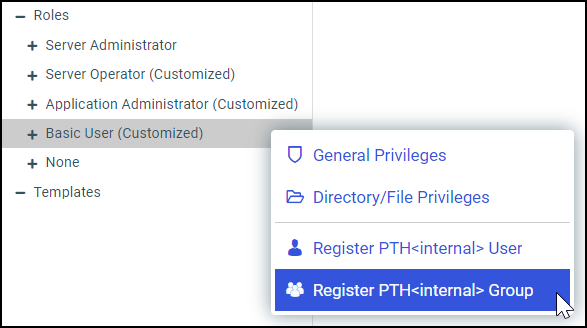
  2. In the Access Control tree, under the Roles folder, right-click the Basic User role, and then click Register PTH<internal>Group, as shown in the following image.
    The Basic User (Customized) Role with the shortcut menu and the Register Group command highlighted.
  3. On the Group Registration tab, click Manual.
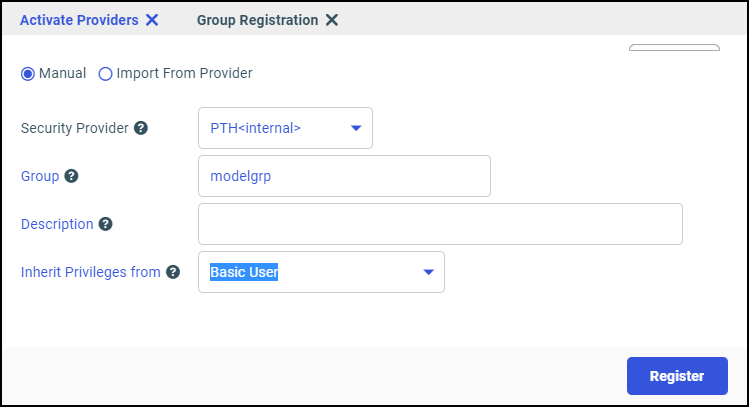
  4. When the tab refreshes, in the Group field, type modelgrp, and then click Register, as shown in the following image.
    Group Registration tab showing the modelgrp group configured for registration.
  5. When you receive a message that a new group will be registered, click OK.
  6. In the Access Control Tree, under the Roles folder, right-click the Application Administrator role, and then click Register Group.
  7. On the Group Registration page, click Manual.
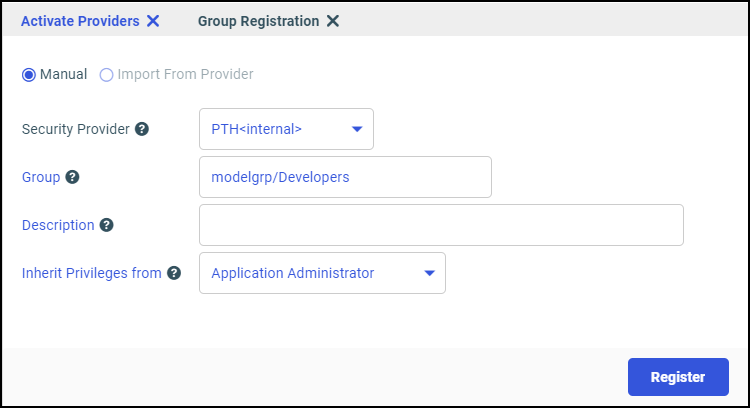
  8. When the page refreshes, type modelgrp/Developers in the Group field, and then click Register, as shown in the following image.
    roup Registration tab showing the modelgrp group configured for registration.
  9. When you receive a message that a new group will be registered, click OK.

    The Server browser interface displays the Activate Providers list.

  10. In the Access Control Tree, under the Roles folder, expand the Application Administrator and Basic User roles.

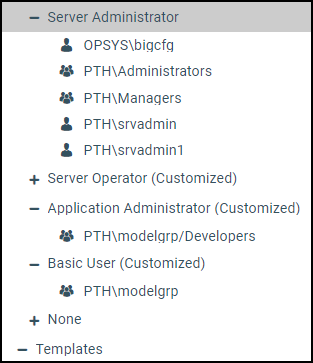
    Icons for the Administrators and the Managers Groups appear under the Server Administrator role. An icon for the modelgrp/Developers group appears under the Application Administrator role, and an icon for the modelgrp appears under the Basic User role, as shown in the following image.

    The Server Administrator Role with the Administrators, Managers, OPSYS\IBI and PTH\srvadmin groups assigned to it. The Application Administrator rule with the model group developers group assigned to it, and the basic user group with the model group assigned to it.

    Important: Before continuing, review the spelling and capitalization of the names of the users and groups you just registered. Group names are case-sensitive on the WebFOCUS Server. Therefore, you must spell and capitalize modelgrp/Developers exactly as shown in these examples, including the uppercase D.

Procedure: How to Configure Group Privilege Assignments

  1. Server

    On the Hub, in the left navigation pane, select Application Directories.

    Or

    Navigate to the Server browser interface. The Applications page opens, by default.

  2. Right-click modelapp, and then click Privileges.
  3. On the Manage Privileges page, in the Subject column of the Customized list:
    1. Under Application Administrator, in the Group - modelgrp/Developers entry, ensure that the Read, Write, Execute, and List check boxes are selected.
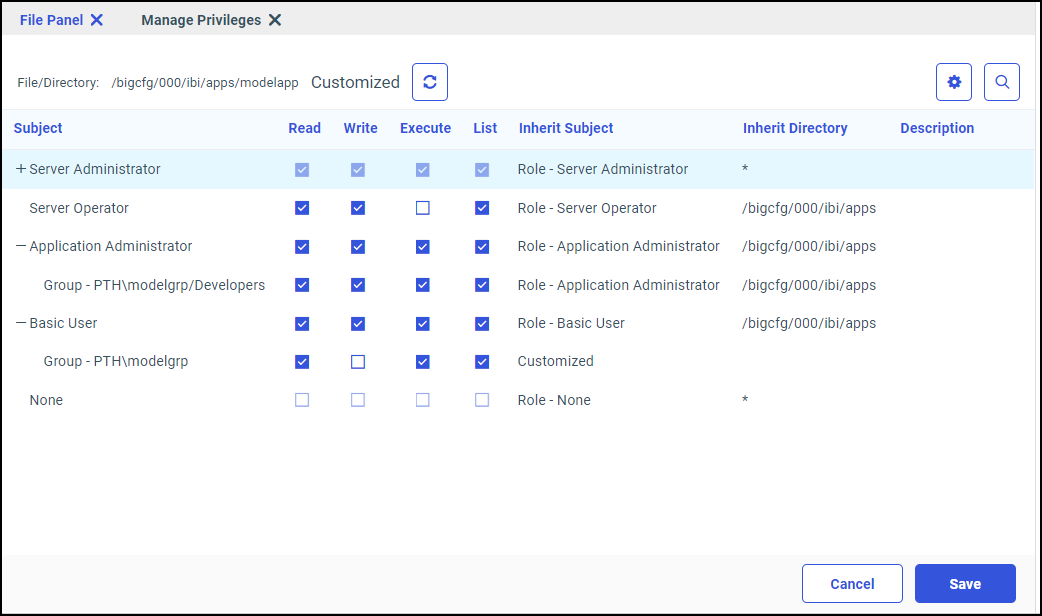
    2. Under Basic User, in the Group - PTH\modelgrp entry, ensure that the Read, Execute, and List check boxes are selected. Clear the Write check box if it is not cleared, by default.

    Review the page to ensure that seven (7) checkmarks are defined on the rows, as shown in the following image.

    The Managed Privileges page with privilege check boxes for the Application Administrator and Basic User selected.

    This configuration conforms to the business requirements stated in the topic Developing Business Requirements for Server Access Control Templates. Developers have read/write access to their application, and Basic and Advanced users have read only access to their application.

    Note: If you were required to select or clear any of these check boxes to ensure that they conform to this configuration, click Save.

Procedure: How to Review Permissions Assigned to the ibisamp and baseapp Application

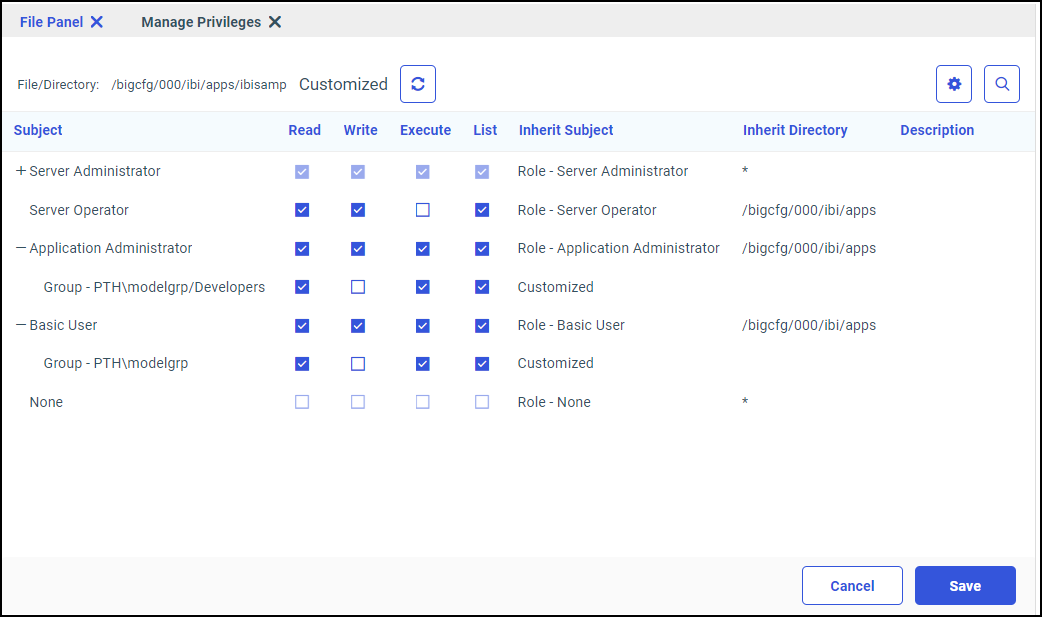
  1. In the Server browser interface, on the Applications tab, under the Applications folder, right-click the ibisamp folder, and then click Privileges.
  2. On the Manage Privileges page, in the Customized list Subject column:
    1. Under Application Administrator, in the Group - PTH\modelgrp/Developers entry, ensure that the Read, Execute, and List check boxes are selected. Ensure that the Write check box is cleared.
    2. Under Basic User, in the Group - PTH\modelgrp entry, ensure that the Read, Execute, and List check boxes are selected. Ensure that the Write check box is cleared, as shown in the following image.
    The Managed Privileges page for the ibisamp application with the Application Administrator and Basic User privileges shown.
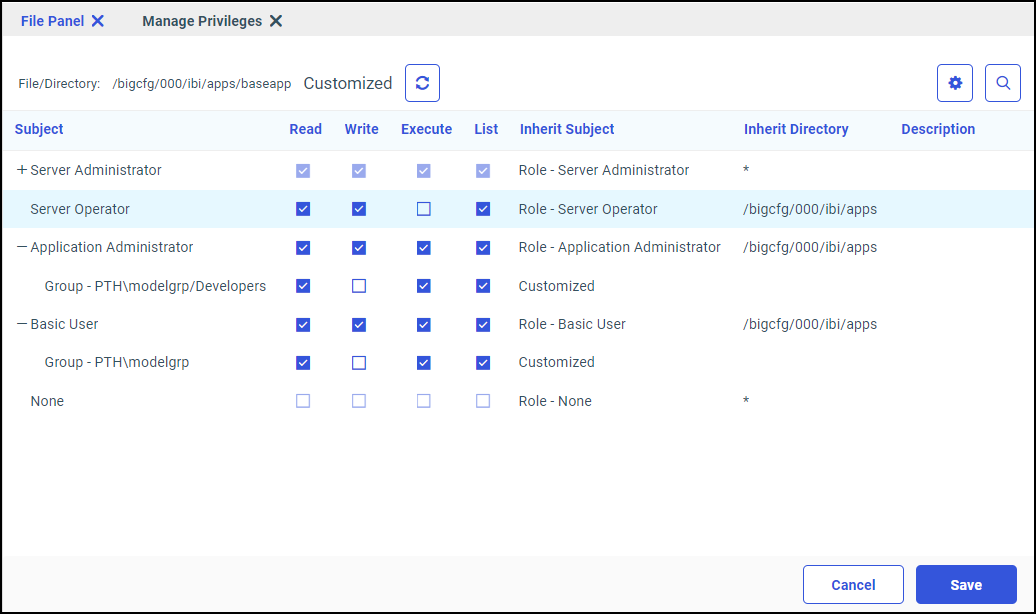
  3. On the Applications tab, under the Applications folder, right-click the baseapp folder, and then click Privileges.
  4. On the Manage Privileges page, in the Customized list Subject column:
    1. Under Application Administrator, in the Group - PTH\modelgrp/Developers entry, ensure that the Read, Execute, and List check boxes are selected. Ensure that the Write check box is cleared.
    2. Under Basic User, in the Group - PTH\modelgrp entry, ensure that the Read, Execute, and List check boxes are selected. Ensure that the Write check box is cleared, as shown in the following image.
    The Managed Privileges page for the baseapp application with the Application Administrator and Basic User privileges shown.

    Note: To update these settings to conform to your requirements, you can also clear the Read/Write/Execute and List privileges for the modelgrp/Developers and modelgrp Roles.

Creating and Registering Server Access Control Templates

How to:

Access control templates dynamically apply the access control policies defined on the modelapp applications to every connection.

To create a server access control template, identify the range of groups to which the template will be applied dynamically.

Procedure: How to Create and Register the modelgrp/developers Access Control Template

  1. Server
  2. Right-click the Templates folder, and then click Register Group Template, as shown in the following image.
    The Register Group Template command on the Templates folder short-cut menu.
  3. On the Group Template Registration page, in the Template Group ID field, type, (.+)/Developers.

    This value identifies the template on the tree and also defines the pattern matching logic that will be associated with this template. In this case, the template defines a connection to the server that is accompanied by a group whose name follows the convention, <Group>/Developers.

    This value identifies the privileges automatically assigned to the Developers sub-group of any workspace group created after this access control template is activated.

  4. Click modelgrp/Developers in the Model Group list.

    Connections matched to this template are assigned the access privileges of this group.

  5. Bypass the Exclude Group IDs field.
  6. In the Replace Pattern field, type (modelapp).

    This value specifies that access privileges assigned to the modelapp group will be assigned to any basic user group whose name fits the modelapp pattern.

    Note: When the WebFOCUS Server runs on Windows, the directory delimiter is a backslash (\). Therefore, you are required to escape each backslash with an additional backslash. For example, (\\).

  7. Confirm that you have typed the correct settings.
  8. Click Register.

    The Group Template Registration page refreshes and an entry for the template appears underneath the Templates node on the Access Control page.

Procedure: How to Create and Register the modelgrp Access Control Template

  1. On the Access Control tab, right-click the Templates node, and then click Register Group Template, as shown in the following image.
    Register Group template.
  2. In the Template Group ID field, type, (.+).

    This value identifies the privileges automatically assigned to the Basic User and Advanced User sub-groups of any workspace group created after this access control template is activated.

  3. Click modelgrp in the Model Group list.

    Connections matched to this template are assigned the access privileges of this group.

  4. Type (/) in the Exclude Group IDs field.

    This value helps prevent groups whose name uses the anygroup/GroupName format from being assigned to the (.+) template.

  5. In the Replace Pattern field, type (modelapp).

    This value specifies that the dynamically assigned access privileges will be switched from (modelapp) to the name of the trusted group. For example, (modelapp) will be replaced with sales for users in the sales\advancedusers group.

  6. Confirm that you have typed the correct settings.
  7. Click Register.

    Entries for both templates appear underneath the Templates node on the Access Control page.

    Listings for the model group and model developers group templates on the reporting server access control page tree.

Procedure: How to Test the modelgrp and modelgrp/developers Access Control Templates

  1. In the Server browser interface, on the Access Control tab, under the Templates folder, right-click the template (.+)/Developers, and then click Test.
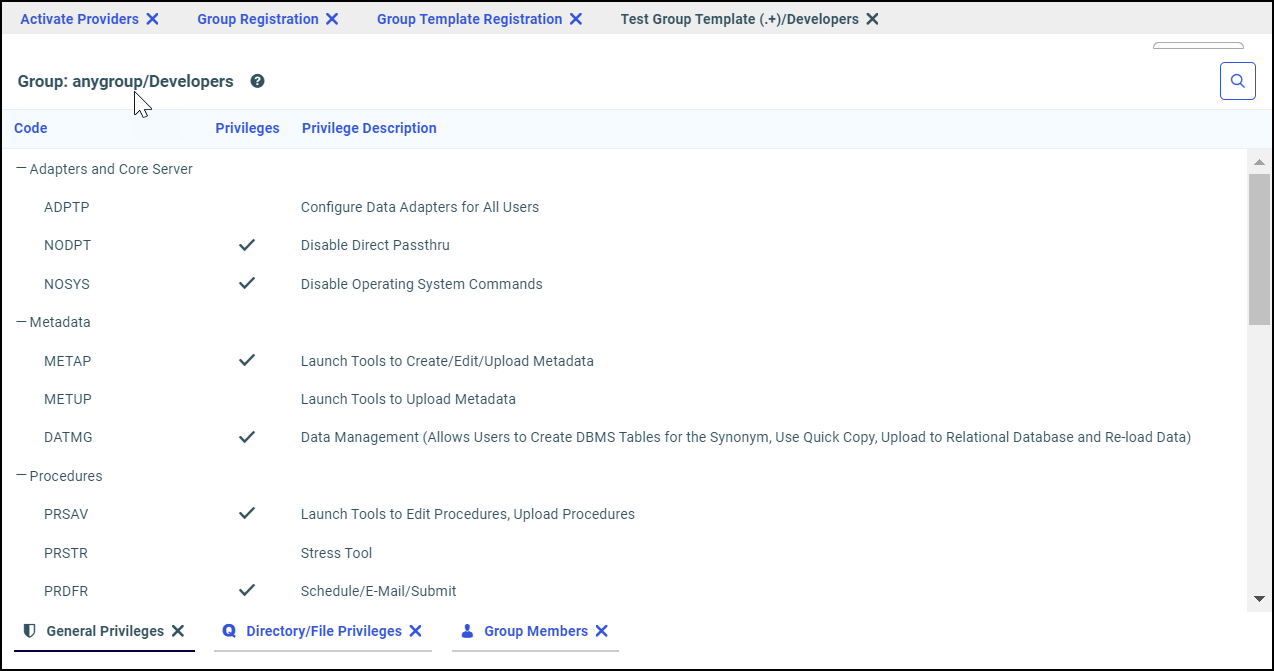
  2. In the Group ID field, type anygroup/Developers, and then click Next.

    The Test Results window opens, displaying the General Privilege page with the name of the group typed in the Group ID field, as shown in the following image.

    The Test Results General Privileges tab with expected privileges displayed.

    The list of general privileges demonstrates that anyone belonging to a group with a name that conforms to the pattern anygroup/Developers will be associated with the modelgrp/Developers server role, as expected.

  3. Click the Directory/File Privileges tab.

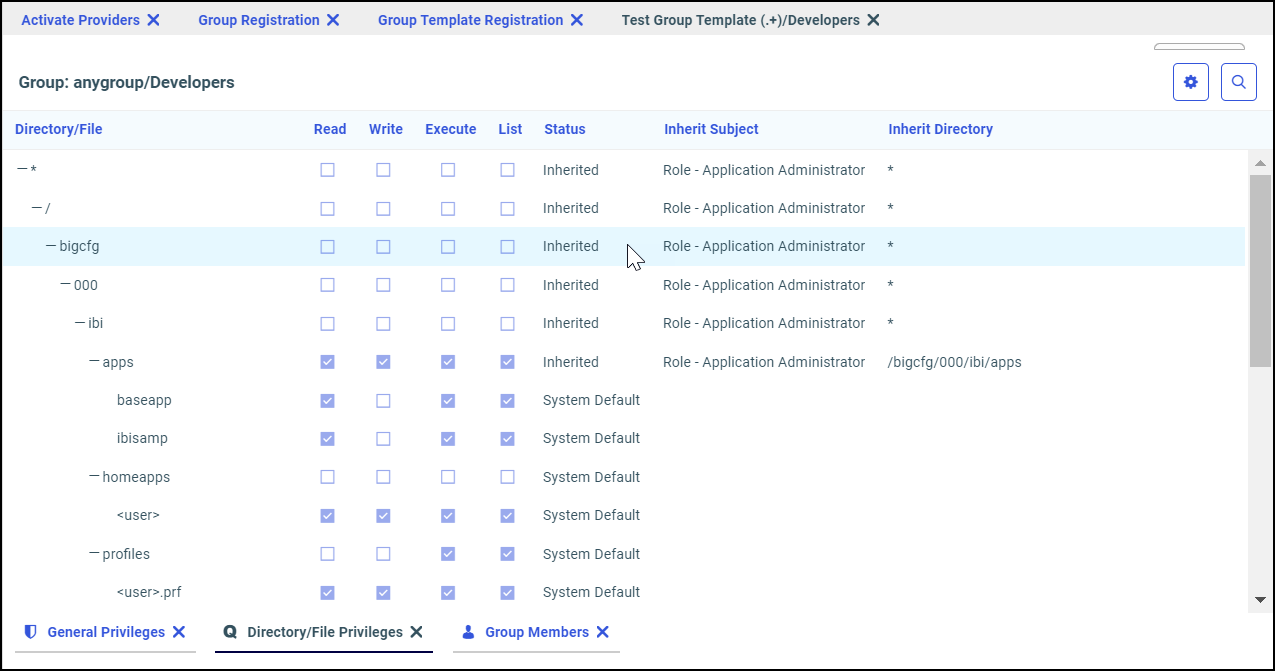
    The Directory/File Privileges list shows that the expected access privileges are defined for members of the anygroup/Developers group. Specifically, it shows those privileges on the anygroup application folder that are assigned to any workspace group to which the user belongs.

    The Test Results window Directory and File Privileges tab displaying the privileges granted to members of a domain/workspace group.

    Even though the anygroup application does not yet exist, the access control template defines the privileges and role assignments attached to any incoming request that matches this particular template.

Procedure: How to Restart the WebFOCUS Server

You must restart the WebFOCUS Server after adding or updating access control templates to make the new or updated templates available to future connections.

  1. On the Server browser interface, open the Workspace tab.
  2. In the Operations group, click Restart.
  3. When you receive a confirmation message, click OK.

    The Server browser interface displays a message indicating that the Workspace is restarting.

  4. When the Server browser interface refreshes and returns you to the Applications tab, close the Server browser interface.

    Continue the Server browser interface configuration by limiting the range of available resources, if necessary. You can then test the entire solution as described in the topic, Testing the Combined Resource Template and Access Control Template Solution.

Testing the Combined Resource Template and Access Control Template Solution

In this section:

How to:

Tests of the resource template and access control template solution help you ensure that new workspaces and groups maintain a level of access that conforms to your original design. By creating new workspaces and new users, and then assigning them to workspace groups, you can test the range of features provided to users. You can ensure that the privileges assigned to new users and groups match the expected range of capabilities, and that they conform to the requirements and responsibilities of users in their group.

To test the combined solution:

Procedure: How to Create Workspaces for the Access Control and Resource Template Solution Test

This feature is only available from the Legacy Home Page.

  1. Sign in as an administrator.
  2. Open the Legacy Home Page.
  3. In the Resources tree, right-click the Workspaces node, point to New, and then click Enterprise Workspace.
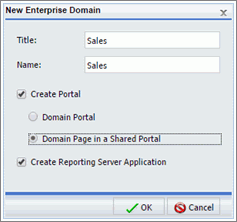
  4. In the New Enterprise Workspace dialog box, select the Create Portal check box, select the Domain Page in Shared Portal option, and then select the Create Reporting Server Application check box.
  5. In the Title field, type Sales. The same value is assigned to the Name field automatically, as shown in the following image.
    The New Enterprise Domain/Workspace dialog box with Sales as the Title and Name and with the Create Portal, Domain page in a Shared Portal, and Create Reporting Server/Server Applications options selected.

    In this example, the resource template was designed to create tenant applications through the WebFOCUS Client node named EDASERVE. This node must be configured to point to the WebFOCUS Server with the access control template you just created and the WebFOCUS Server it points to must be running when you conduct this test.

  6. Click OK.
  7. When you receive the Resource template processing complete message, click OK, as shown in the following image.
    Resource template processing complete message box
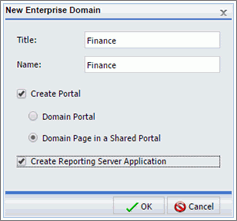
  8. Repeat steps 2 through 6 to create another workspace. For this second workspace, type Finance in the Title field, as shown in the following image
    The New Enterprise Domain dialog box with Finance as the Title and Name and with the Create Portal, Domain page in a Shared Portal, and Create Reporting Server/Server Applications options selected.
  9. Ensure that folders for the Finance and Sales workspaces appear on the Resources tree, under the Workspaces node, under the Reporting Servers node, and under the Portals node, as shown in the following image.
    A composite image of the Domains node and the Finance and Sales folders, the Reporting Servers node and the finance and sales application directories, and the Portals node with the finance and sales pages.

Procedure: How to Create Users for the Access Control and Resource Template Solution Test

  1. Open the Security Center.
  2. In the Users pane, click New User.
  3. Type fdev, in the User Name field.
  4. Click Finance/Developers in the Create in Group list.
  5. Click OK.
  6. Repeat steps 2 though 5 to create another user. For this second user, type sdev in the User Name field, and click Sales/Developers in the Create in Group list.
  7. When you are finished, exit the Security Center, and sign out.

Procedure: How to Add Metadata to the Test Workspaces

This topic calls for you to copy the car.foc file from the ibisamp application folder and paste it into the application directories of your new workspaces. However, you can substitute any metadata file for the car.foc file to conduct this test.

This feature is only available from the Legacy Home Page.

  1. Open the Legacy Home Page.
  2. In the Resources tree, expand the Reporting Servers node, and then expand the EDASERVE node.
  3. Expand the ibisamp folder, right-click car.foc, and then click Copy.
  4. Under the EDASERVE node, right-click the finance folder, and then click Paste.
  5. Rename the car.foc file to finance.foc.
  6. In the ibisamp folder, right-click Legacy Metadata Sample: car.mas, and then click Copy.
  7. Right-click the finance folder, and then click Paste.
  8. Repeat steps 2 through 6. This time copy the car.foc and Legacy Metadata Sample: Car.mas files to the Sales folder under the EDASERVE node.

Procedure: How to Test the Privileges of a Workspace Developer Group Member

This feature is only available from the Legacy Home Page.

  1. Sign out, and sign in with the fdev User Name.
  2. Open the Legacy Home Page.
  3. In the Resources tree, expand the Reporting Servers node.
  4. Expand the EDASERVE node, and ensure that the finance application folder appears.
  5. If you gave this workspace developer group Read, Execute, and List privileges for the ibisamp and baseapp application directories, ensure that these two folders also appear under the EDASERVE node.
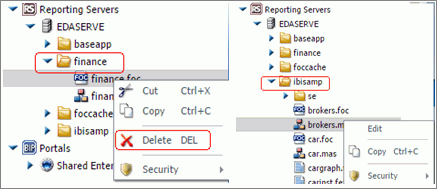
  6. Right-click the finance folder, and review the shortcut menu. Determine if the Delete command appears.
  7. Right-click the ibisamp or baseapp application folder, and review the shortcut menu. Compare the list of available commands to those on the finance folder shortcut menu, as shown in the following image.

    Notice that WebFOCUS knows that the fdev user does not have Write privileges on the ibisamp application so the Delete command is not available on the shortcut menu for these folders. The access control templates dynamically assign privileges to the folders according to the privileges defined in the template.

    However, notice that the Edit command is available on the shortcut menu for the Legacy Metadata Sample: brokers.mas file in the ibisamp folder.

  8. Right-click the Legacy metadata Sample: brokers.mas node under the ibisamp folder, and then click Edit.
  9. Make some edits to the file, and then click Save.
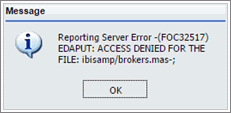
  10. If you receive a message from the WebFOCUS Server, as shown in the following image, click OK.
    Reporting Server Access Denied for the file error message.

    This message indicates that the fdev user does not have sufficient access privileges on the WebFOCUS Server to edit the file.

    The Edit command appears in the shortcut menu for the folder because, in the Resources tree, the Edit command is synonymous with the Open command. As in other software systems, the Edit command is used for both viewing and editing.

  11. Close the Editor.
  12. When you receive a message asking to save your changes, click No.

Procedure: How to Test the Range of Folders Accessible to a Workspace Developer Group Member

This feature is only available from the Legacy Home Page.

  1. Open the Legacy Home Page.
  2. In the Resources Tree, under the Workspaces node, right-click the Finance folder, point to New, and then click Report as shown in the following image.
    The Finance domain/workspace folder shortcut menu, highlighting the New submenu Report command.

    The Open dialog box displays the finance application directory folder as the default application, as shown in the following image.

    The Open dialog box displaying the finance folder under the EDASERVE node.

    The foccache and baseapp application directory folders are special cases, and the Open dialog box will always display them, if the access control template assigned to the WebFOCUS allows the user to list those applications. Although this user in the Developer group has access to ibisamp application, it is not shown within InfoAssist, because that application is not part of the application path when the Workspace was created with the Enterprise Resource Template.

    You can add Descriptions to your MFDs with the DESCRIPTION keyword, as shown in the following example for the finance Master File:

    FILENAME=WMDATA,DESCRIPTION='Finance Data',SUFFIX=FOC
    SEGNAME=ORIGIN,SEGTYPE=S1
  3. Click Cancel to close the Open dialog box without creating a report.
  4. Close the InfoAssist window.

Assess Your Test Results

If one or more of these tests did not produce the expected results, return to the access control template configuration topics and address the issue. However, if the results of the tests conform to expected behavior, you can confirm that your access control template and resource template solution is ready for implementation.