Changing a Field Format

How to:

You can change the format of any field except a Sort field. You can change the format of measure fields, as well as any calculated fields. For more information, see Binning.

You can access the Field Format Options dialog box from the following locations:

The following image shows the Field Format Options dialog box.
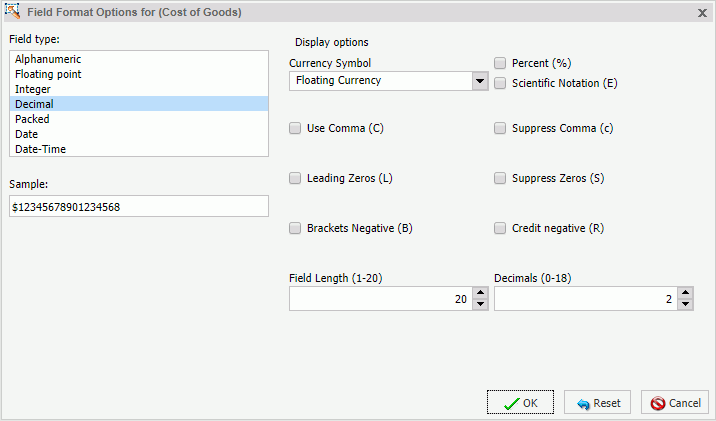
The Field Format Options dialog box enables you to choose from a variety of Field types. Display options are enabled based on the Field type you select. For example, the default Field type selection is Decimal. The first Display option, Currency Symbol, provides the following list of currency symbol options:

The default value for Currency Symbol is set to None, unless the Field Format dialog box was invoked when changing the format of a field that already contains a currency symbol from the Master File. Accordingly, the currency symbol will default to that which is defined in the Master File.

Charts work with floating currency symbols to allow the placement of the currency symbol to work within the different elements of the chart. In a chart, any fixed currency designations will automatically be presented with a floating currency symbol. Floating and fixed currency formats are supported for Reports only.

When working with charts, the axis label formats are defined separately from the field format. To set the format of the axis label, use the option in the Labels group on the Format tab. Click Axes, point to Vertical Axis, and click More Vertical Axis Options. In the Format Vertical Axis dialog box, click Labels, open the Format Labels drop-down menu, and select a currency format.

The following procedures show how to change a field format from the Field Format Options dialog box. For more information on how to use the Format group options, see Field Tab.

Procedure: How to Assign an Alphanumeric Format

  1. With a report open in Live Preview, right-click a virtual field or column measure field, and select Edit Format.

    The Field Format Options dialog box opens.

  2. From the Field type list, select Alphanumeric.
  3. To assign a different length, specify a number between 1 and 4095 in the Total length field. The default value is 20.
  4. Click OK to close the Field Format Options dialog box and return to the canvas.

    The new format appears in the previously selected column.

Procedure: How to Assign a Numeric Format

  1. With a report open in Live Preview, right-click a virtual or column measure field, and click Edit Format.

    The Field Format Options dialog box opens.

  2. From the Field type list, click one of the following options:
    • Floating Point (default length 7.2)
    • Integer (default length 5)
    • Decimal (default length 12.2)
    • Packed (default length 12.2)

    If the selected field matches the selected format type, its current length appears in the Field Length field. Otherwise, the default length appears in the Field Length field. The Decimals field shows the numbers of decimal places for Floating Point, Decimal, and Packed.

    • To assign a different length, specify it in the Field Length field for format types as follows: 1-9 for Floating Point, 1-11 for Integer, 1-20 for Decimal, and 1-33 for Packed.
    • To assign a different number of decimal places for Floating Point, Decimal, or Packed, specify the number in the Decimals field.
  3. Click OK to close the Field Format Options dialog box and return to the canvas.

    The new format appears in the previously selected column.

Procedure: How to Assign a Date Format

  1. With a report open in Live Preview, right-click a virtual or column measure field, and select Edit Format.

    The Field Format Options dialog box opens.

  2. To assign a different date display format, select a date format from the Display options list.

    The default date display format is MDY.

  3. Optionally, select a separator for the date format.
  4. Click OK to close the Field Format Options dialog box and return to the canvas.

    The new format appears in the previously selected column.

Procedure: How to Assign a Date-Time Format

  1. With a report open in Live Preview, right-click a virtual or column measure field, and select Edit Format.

    The Field Format Options dialog box opens.

  2. To assign a different date-time format, select the date format you want to use from the Date Format list. Expand Year First, Month First, or Day First to see the available options.
  3. Select a time format (if applicable) from the Time Format list.

    If you select the Time Only check box then you can only set a time format. Expand Hour First, Minute First, or Seconds First to see the available options.

    Note: These expansion options are only visible when you select Time Only.

  4. Optionally select a separator for the date format.

    The default is /, but you can select . (period), - (hyphen), (space) or None.

  5. Click the Use AM/PM check box if you are indicating a time format.

    The format of the time selection displays in the text box at the bottom of the dialog box. A preview displays in the Sample text box in the left pane, showing you the exact format of your time-based selection.

  6. Click OK to close the Field Format Options dialog box and return to the canvas.

    The new format appears in the previously selected column.

Procedure: How to Add a Percent Sign to a Numeric Field

You can add a percent sign to the end of a numeric value (Decimal, Integer, Packed, and Floating Point formats). This numeric display option includes a percent sign along with the numeric data, but does not calculate the percent.

  1. With a report open in Live Preview, right-click a virtual or column measure field, and select Edit Format.

    The Field Format Options dialog box opens.

  2. From the Field type list, click a numeric value format (Floating point, Integer, Decimal, or Packed), and then select the Percent (%) check box.
  3. Click OK to close the Field Format Options dialog box and return to the canvas.

    The new format appears in the previously selected column.