Workspaces Area

In this section:

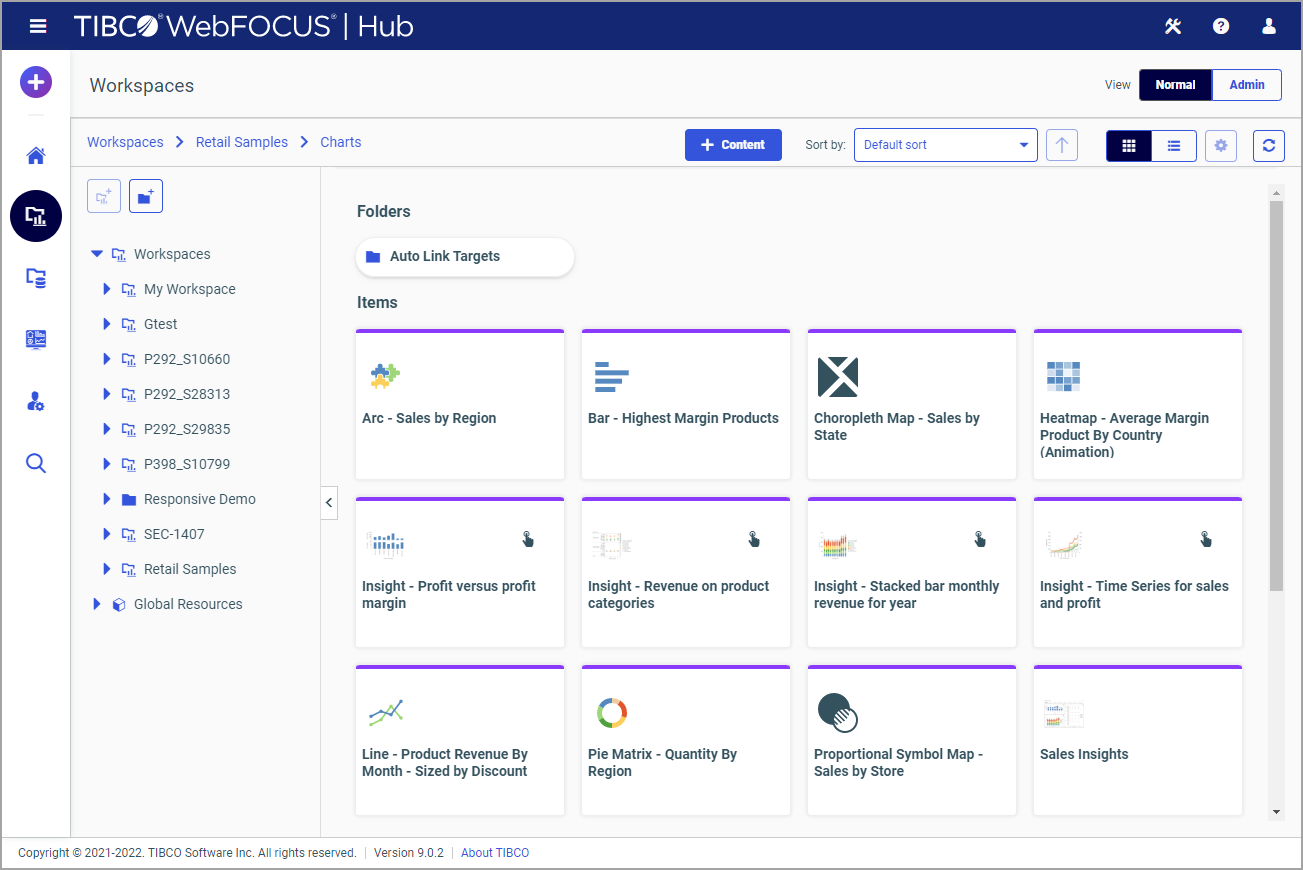
The Workspaces area is where most of your content management takes place. Here, you can organize your repository structure, create and interact with content items, create sample content, work with data, and perform other tasks. The Workspaces area is shown in the following image.

Page Toolbar

The page toolbar is shown in the following image.

You can use the page toolbar to move between folders in your repository, create and sort content, search the contents of a workspace or folder, change the view of items in the content section, and refresh content in a workspace or folder you select.

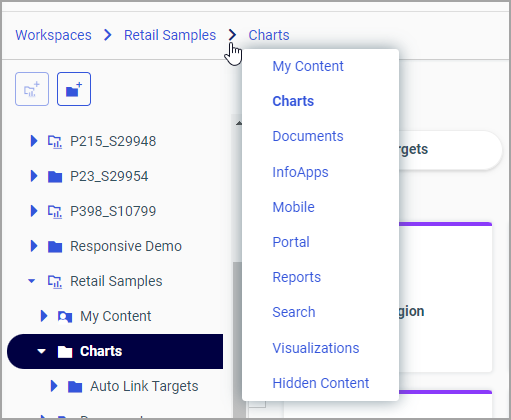
When you drill into the folders in your repository, the page toolbar generates a breadcrumb trail that you can use to move between folders. You can move back one folder or multiple folders in a single click. You can click a folder name to view the contents of that folder. You can also click arrows between the folders, to see the file structure that is currently displaying, as shown in the following image. In this example, the selected folder appears in bold.

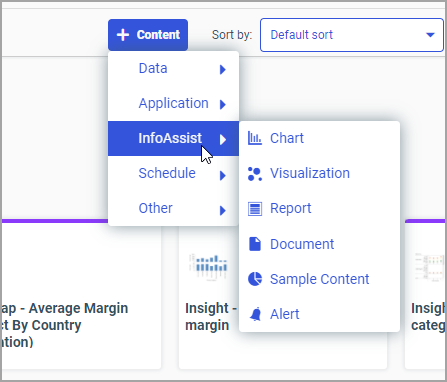
You can use the +Content button to create analytical content with InfoAssist, upload files and spreadsheets, connect to data, build portals and pages, schedule procedures, and generate sample content using the options available to you for a workspace or folder. The following image shows an example of the +Content menu an advanced or basic user has access to for a workspace or folder.

The +Content menu only displays the items that you can create for the workspace or folder that is currently selected. The items displayed in the +Content menu are also subject to permissions. You can only see the items that are available to you based on your role. To learn more about roles, see the WebFOCUS Security and Administration technical content.

You also can toggle the view of your content between tile view and list view in a workspace or folder. By default, content displays in tile view. Click the Tile view icon or List view icon to change your view.

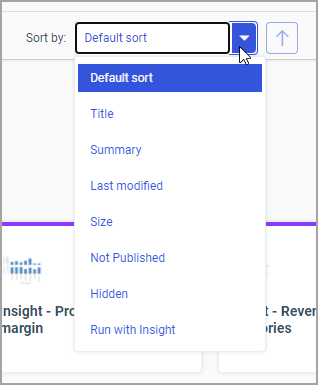
The tile view allows you to see the thumbnails of your items, which you can customize to add transparency to your display. You can sort the items in the tile view by using the Sort by drop-down list shown in the following image. Once you select a sort option other than the default one, you can reverse the sort order by clicking the Reverse sort order button.

Note: You can also create a customized sorting order, by configuring the Sort Order property for the item.

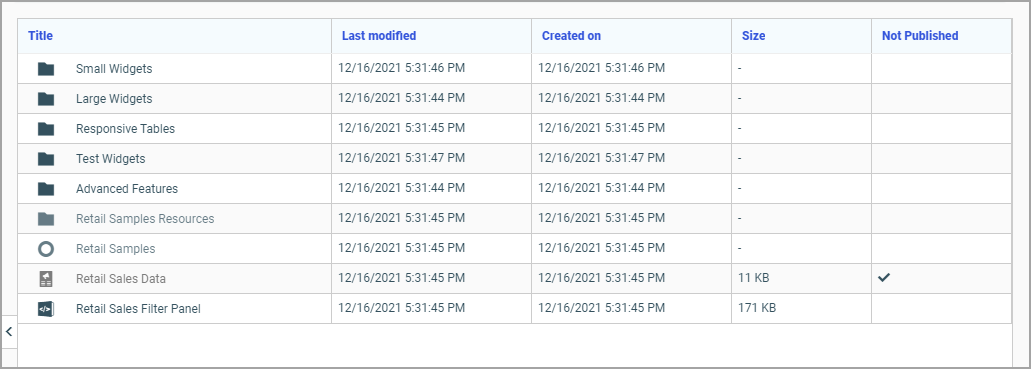
The list view is useful when you need to see a large number of items at a glance. You can easily identify the item types by their icons, which mirror the icons in the +Content menu. An example of a list view is shown in the following image.

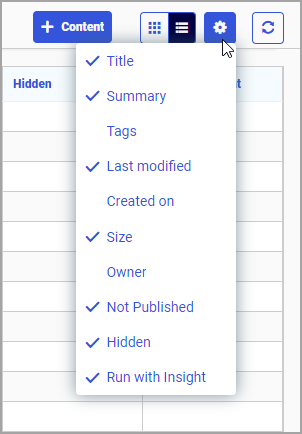
In this view, you can sort your items by clicking any column title. Each column features a three-step toggle sorting: ascending, descending, and return to the default. You can also specify which columns display in the content section by clicking the Select Display Columns button, and selecting the columns you want to view from the list. An example of an expanded columns menu is shown in the following image.

When you hover over an item that contains a summary, this summary displays as a tooltip in both tile and list views.

Finally, to refresh all content in a selected workspace or folder, click the Refresh button.
Resources Tree

In this section:

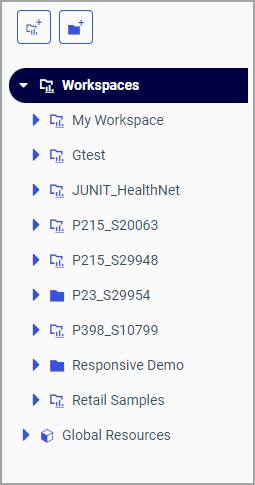
The Resources tree provides a way to view your repository structure and navigate between workspaces and folders that are available to you. The following image shows an example of a Resources tree.

You can use the New workspace button and New folder button on top of the Resources tree to add new workspaces and folders to your repository. These buttons mirror the icons for workspaces and folders that display inside the tree.
You can expand or collapse workspaces and folders by clicking the arrows next to them. When you click a folder, its contents display in the content section. You can also right-click a folder to access a shortcut menu of available options. From the shortcut menu, you can perform the following actions:

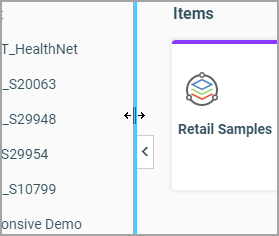
You can also customize the width of the Resources tree. To do so, place your cursor on top of the right edge of the Resources tree area, as shown in the following image, and drag the edge to achieve the desired width. Your new width is remembered, and displays the next time you sign in to WebFOCUS.

You can also collapse the Resources tree to allow more room for the content section. To collapse the Resources tree, click the arrow on the right side of the tree. Click the arrow again to expand the Resources tree.

My Workspace

My Workspace is the default workspace where all your newly created content will reside, unless you specify an alternative location.

Note: Multiple workspaces are available in the full version of WebFOCUS. Optionally, you can make a different workspace or top-level folder a default saving location by configuring the Default Workspace Repository Path setting in the Administration Console. See the WebFOCUS® Security and Administration technical content for more details.

Content that you create in My Workspace will automatically display in My Workspace view along with other private content you might have.

Use the Plus button or the +Content menu to create content.

Note: To access the +Content menu inside My Workspace, navigate to the My Content folder inside it.

Global Resources

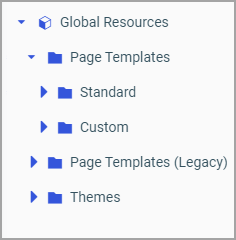
Administrators have access to a Global Resources folder on the Workspaces level in the Resources tree. The Global Resources folder, identified by the distinct icon , contains three subfolders: Page Templates, Page Templates (Legacy), and Themes. These subfolders contain files that are used to style and format your portals and content in WebFOCUS Designer and Portal Page Designer. The Global Resources folder is shown in the following image.

Content Section

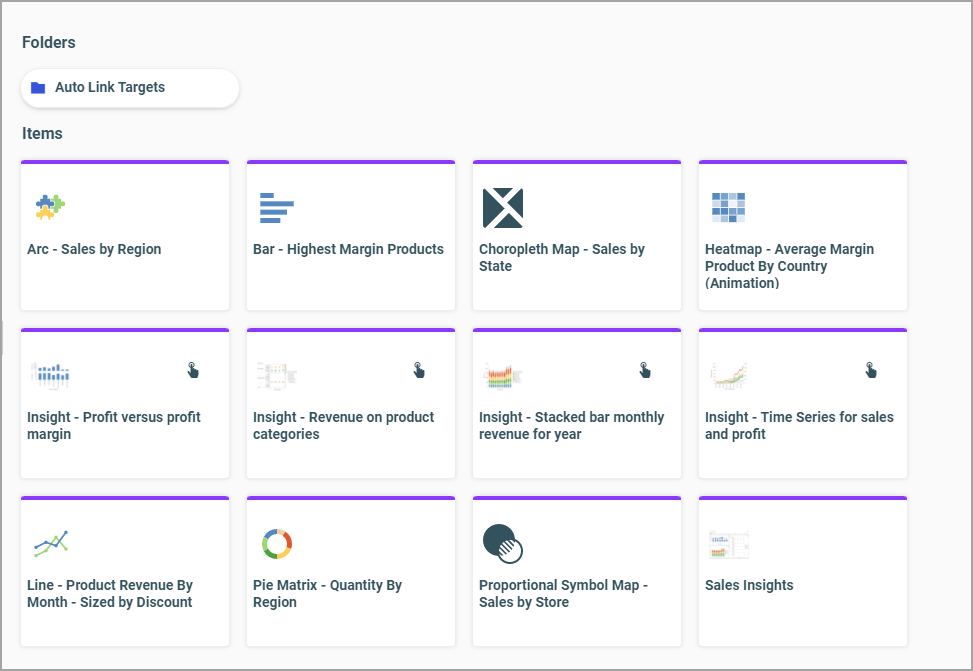
The content section displays the items contained within a workspace or folder that is currently selected. An example of the content section is shown in the following image.

If a resource contains folders and items, the folders are always displayed first, followed by the items. Items shown in the content section include reports, charts, pages, portals, and more.

You can right-click any folder or item to access the shortcut menu of options. The following options are available when you right-click a folder or item in the content section.

Expand/Collapse

Expands or collapses a folder. This option is only available for folders.

Run

Runs the report procedure or schedule.

Run in new window

Runs the selected item in a new browser window or tab.

Run deferred

Submits a report procedure or a schedule for deferred execution.

Run with SQL trace

Runs a report and includes an SQL trace of the report results.

Note: The Run with SQL Trace option is not available for visualizations.

Run with different connection credentials

Prompts for database credentials prior to running an item.

Note: This option is only available to users who have been granted the Run Procedures with Different Connection Credentials privilege. It is used when running items that draw data from databases that are configured to use individual credentials. For more information, see the WebFOCUS Security and Administration content.

Schedule

Launches the scheduling tool, where you can schedule a report procedure to be run. Scheduling options include Email, FTP, Printer, Report Library, and Repository.

View log

Launches the Schedule Log Options dialog box, where you can select whether to view the most recent log report for the schedule, or specify a time range for which to obtain log reports. This option is only available for schedules.

View

Enables you to launch the URL or download a copy of the file to your browser. This option is available for URLs, Excel Workbooks, PDF, HTML, and Image Files.

Edit

Edits an item with the tool that was used to create it.

Edit with text editor

Edits an item in the Text Editor.

Create shortcut

Creates a shortcut to this item.

Duplicate

Makes a copy of the folder or item with an underscore and number appended to the title, for example, duplicating Sales_Report creates Sales_Report_1 in the same location. The number is incremented each time a duplicate is created.

Cut, Copy, and Paste

Cuts, copies, or pastes the folder and its contents or item.

Copy and update paths

Copies one or more items from one location to another with the internal path references automatically updated to be consistent with the target location. This option is available for charts, reports, documents, visualizations, pages, workbooks, schedules, and HTML files created in TIBCO WebFOCUS® App Studio.

Note: This feature only works when copying items between the folders that reside on the same hierarchical level in the repository.

Note: When you run the item that has been moved using this option, a warning might appear alerting you that the item has been modified outside of InfoAssist. This does not affect the behavior of the item at run time. Save the item in InfoAssist to prevent this warning from reappearing.

Delete
Deletes the folder and its contents or item.
Publish/Unpublish

Allows or suppresses public access to the content.

Show/Hide

Shows or hides the folder or item.

Share/Unshare

Shares content with all users that are permitted to access this content. Unshare stops sharing content with all users.

Security
Provides access to the following options:
Rules

Opens the rules defined for the folder or item. Here you can modify the rules for a given item.

Rules on this resource

Shows the security rules for the folder or item.

Effective policy

Shows the defined rules that specify the permitted functionality on the folder or item.

Owner

Allows you to set the resource owner, either Published (no specific owner), or a specific group or user.

Customizations

Provides access to the following options:

Remove my customizations

Removes your own customizations from a portal and its pages.

Remove customizations for all users

Removes all user customizations and custom pages created at run time.

Note: These options are only available for portals and portal pages.

Manage alias

Opens the Manage Alias dialog box, where you can create an alias for the selected portal. This feature is only available to Administrators. This option is only available for portals.

Open item location

Redirects to the folder where the item is located. This option is only available for portals in the Portals view.

Comments

Provides access to the following options:

View comments

Opens the blog item and expands all comments.

Remove all comments

Clears all comments from the blog.

Note: These options are only available for blogs.

Unlink

Removes the page from all portals. This option is only available for portal pages.

Add to Favorites

Adds the item to the Favorites folder.

Remove favorite

Removes the Favorite from the list. This option is only available for Favorites.

Properties

Opens the Properties panel to display the properties of the folder or item.

Folder and Item Properties

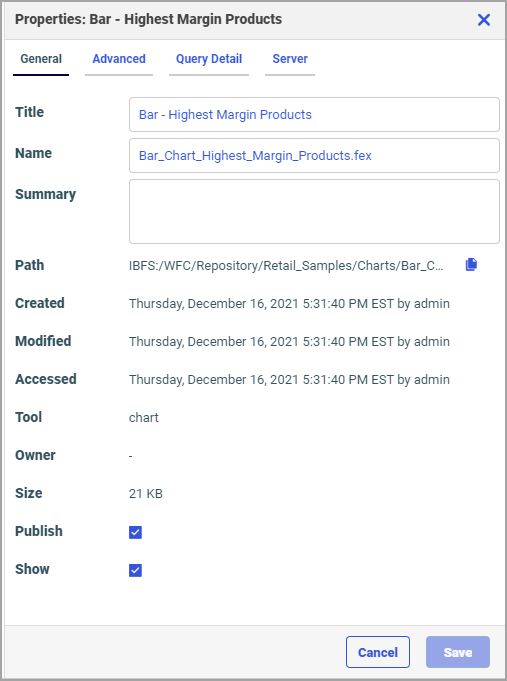
Authorized users can select the Properties option to review information about a folder or item, including when it was created, the date it was last modified, title, name, and settings that control the WebFOCUS Reporting Server and applications it will access. There are also settings that control the functionality available to users when they access the folder, run, or schedule an item.

The following image shows the Properties panel for a bar chart.

The General Properties tab includes the following settings:

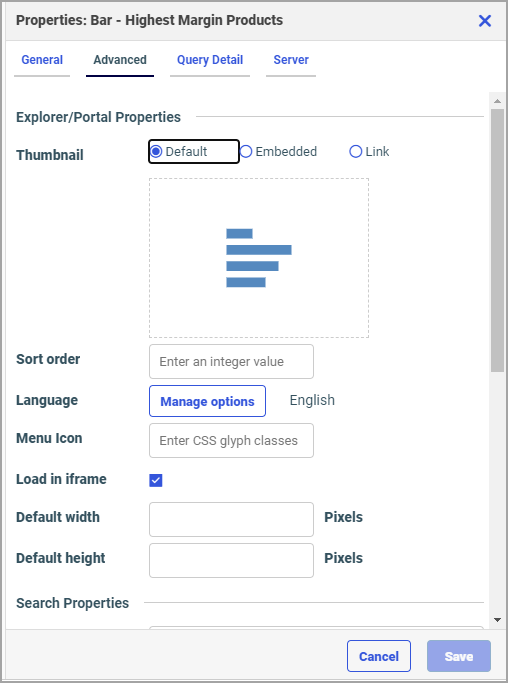
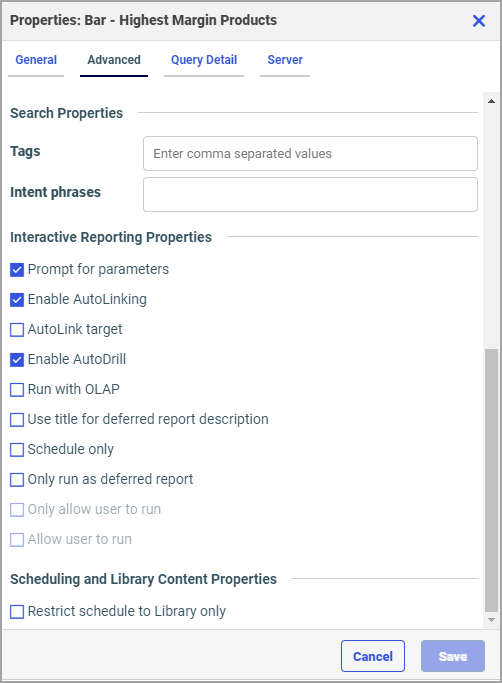
The Advanced tab, which is shown in the following images, allows you to customize the functionality and behavior of the folder or item.

The Advanced Properties tab includes the following properties.

Explorer/Portal Properties:

Search Properties:

Interactive Reporting Properties:

Scheduling and Library Content Properties:

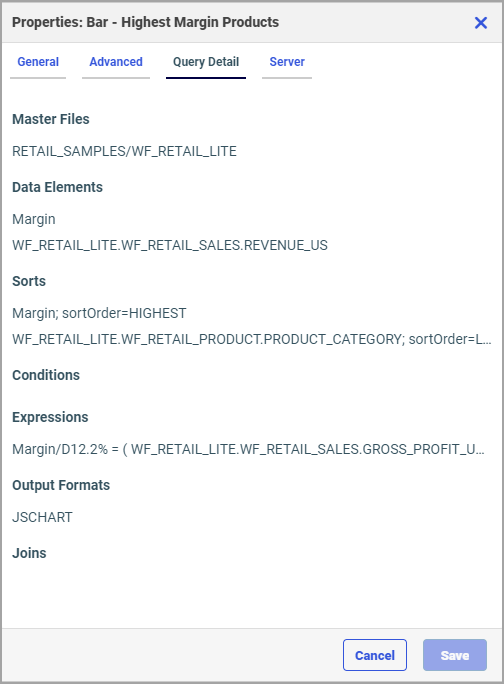
The Query Detail Properties tab, which is shown in the following image, is only available for reports, charts, and visualizations. It shows which data elements, parameters, and conditions were used in an item.

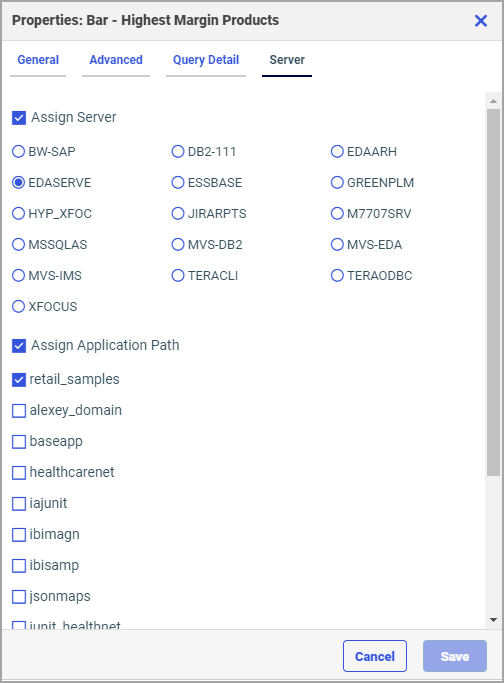
The Server Properties tab, which is shown in the following image, allows you to manage the server and application path settings.

To change the server, select the Assign Server check box, and then select a server from the list. You can also change the application path in the same way.

By default, the Properties panel remains open while you browse between folders and items, allowing you to configure several resources quickly without closing the panel. To close the Properties panel, click the Close button in the upper-right corner of the panel.