Working With Interactions

In this section:

You can use interactions in WebFOCUS Designer to program various objects to perform specific actions on the page. This feature allows you to go beyond simply displaying content on the assembled page and lets you configure an object, such as container, button, or control, to interact with other objects or content. The procedure of creating an interaction is done in the Interactions panel and requires no coding or syntax changes. A single page can have multiple interactions defined.

Examples of possible actions an interaction can perform include but not limited to the following:

Accessing the Interactions Panel

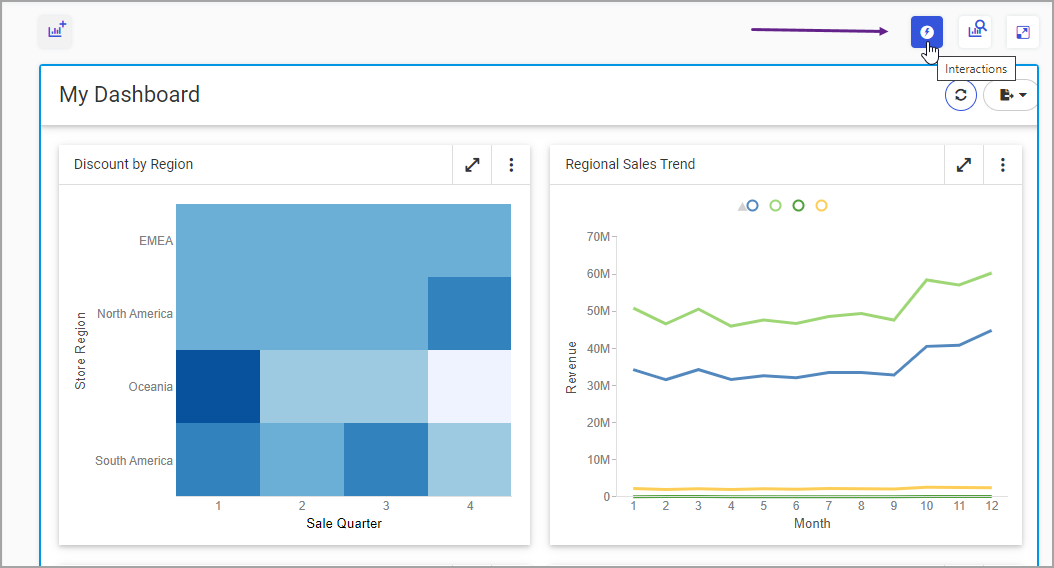
You can open the Interactions panel in WebFOCUS Designer by clicking the Interactions button above the canvas, as shown in the following image.
Another way to access interactions is through the shortcut menu of most objects that could reside on the canvas. You can right-click a container, filter control, button, or any other control, point to Interaction and click Add. The Interaction panel opens prompting you to create an event for your interaction scenario.

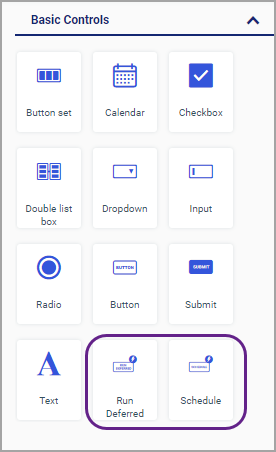
Finally, you can add the Run Deferred and Schedule interactions directly from the Resources panel. On the sidebar, click Controls and then drag either Run Deferred or Schedule onto the canvas. Either of these controls adds an item on the canvas and simultaneously opens the Interactions panel where you can proceed with configuring your interaction. The Run Deferred and Schedule controls are shown in the following image.
Adding Interactions to a Page

In this section:

How to:

When adding interactions to a page, it is important to keep in mind several basic principles.
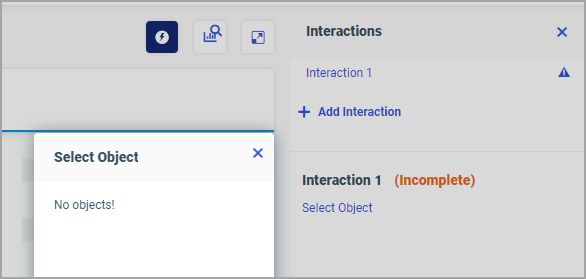
  1. You can only create interactions when the page canvas is populated by objects. If you open the Interactions panel, and your canvas is empty, the No Objects! warning appears and your interaction is saved as incomplete, as shown in the following image.
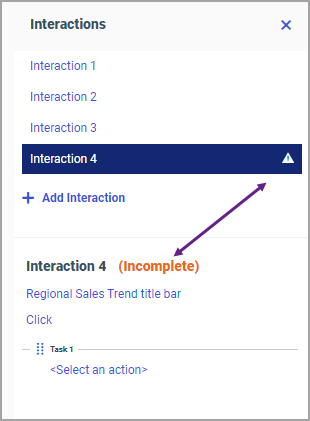
  2. As you configure your interaction, the user interface guides you by showing available choices in the order in which they must be made. An interaction is marked incomplete until all your selections amount to a valid interaction scenario. An incomplete interaction is identified by the Incomplete label next to its name and by the warning icon in the interactions list, as shown in the following image.
    Once you complete all levels of a task, the interaction is deemed complete and the warnings disappear. There must be at least one complete task within an interaction for it to be complete.

  3. The following elements cannot be part of an interaction:
    • Panel Group

      Note: You can still add an interaction to a container inside a panel group.

    • Link Tile container
    • Grid container
    • Explorer container
    • Explore Data container
  4. You can delete or disable interactions after they have been saved. There is no warning or confirmation message shown when an interaction is being deleted. Use the Undo/Redo buttons if you deleted an interaction by mistake.
  5. When executing an interaction on filter controls that have the Global Name option configured, the Global Name value is executed independently of the interaction scenario.

Procedure: How to Add Interactions to a Content Item

In this example, we will add a simple single-task interaction to a content item.

  1. On the WebFOCUS Hub, click the Plus menu, then click Assemble Visualization.

    WebFOCUS Designer opens and prompts you to select a template.

  2. Select a template.
  3. Populate the canvas with the content of your choice.
  4. Right-click an item, point to Interaction and click Add.

    The Interactions panel opens, and the Select Event dialog box displays with the single option, Click, highlighted.

  5. Click OK.

    The Task 1 node is added to the interaction tree, and the Select an action level appears underneath the Task 1 node.

  6. Click Select an action.
    The Select Action dialog box opens with a list of possible actions, which include:
    • Run content. Runs a content item of your choice.
    • Show object. Displays a previously hidden object on the canvas.
    • Hide object. Hides an object from the canvas.
    • Run deferred. Submits a report procedure or a schedule for deferred execution.
    • Schedule content. Opens the ReportCaster where you can configure scheduled distribution of the specified content.

    In this example, we will run another item in a page overlay.

  7. Keep the Run content selected and click OK.

    The Select content level displays.

  8. Click Select content.

    The Select Content dialog box opens displaying the Resources tree.

  9. Navigate to the content item that you wish to run and click OK.

    The Select a target level is added to the task.

  10. Click Select a target.

    The Select Target dialog box opens where you can choose the location for running your content. The options include: Container, Page overlay, New window, and Same window.

  11. Click Page overlay, and then click OK.

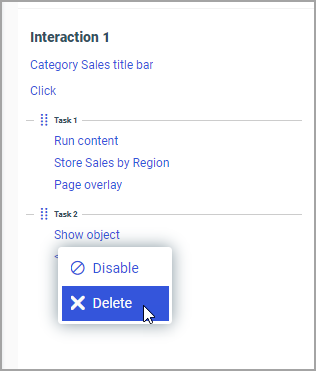
    Your interaction is complete. Notice that it no longer displays as incomplete, and there are no more levels added to the interaction tree. Optionally, you can add more tasks to the interaction by clicking Add Task. If you do that, the Task 2 node will be added to the interaction tree. To disable or delete a task, right-click anywhere within the task node and select an option, as shown in the following image.
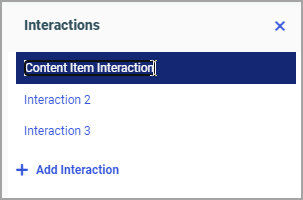
  12. Optionally, change the name of your interaction by double-clicking it in the list and typing a new name, as shown in the following image.
  13. Finally, click the preview button to test the behavior.

    The page runs in a new window.

  14. Click the content item you configured.

    The target item runs in the page overlay, as configured.

  15. Save your page.

Procedure: How to Add Interactions to a Control

In this example, we will add multi-task interactions to a button set.

  1. Launch WebFOCUS Designer in the Assembled mode.
  2. Choose a page template.

    In this example, we are choosing the Blank page template.

  3. On the sidebar, click Controls, then drag the Button control onto the canvas.

    The grid container with a single button is added to your page.

  4. Drag another button to the next cell of the grid.
  5. Multi-select other cells of the grid by holding the Shift key, right-click one of them, and then click Delete cell.

    You are left with the grid container with two buttons.

  6. Optionally, stretch the container to fill the width of the page for a more symmetrical display.

    You can also remove the container title and toolbar by clicking the container and clearing the Show title and Enable toolbar checkmarks on the Settings panel.

  7. On the sidebar, click Containers, and then drag the basic container onto the canvas underneath the buttons.
  8. Optionally stretch your container to achieve symmetry.

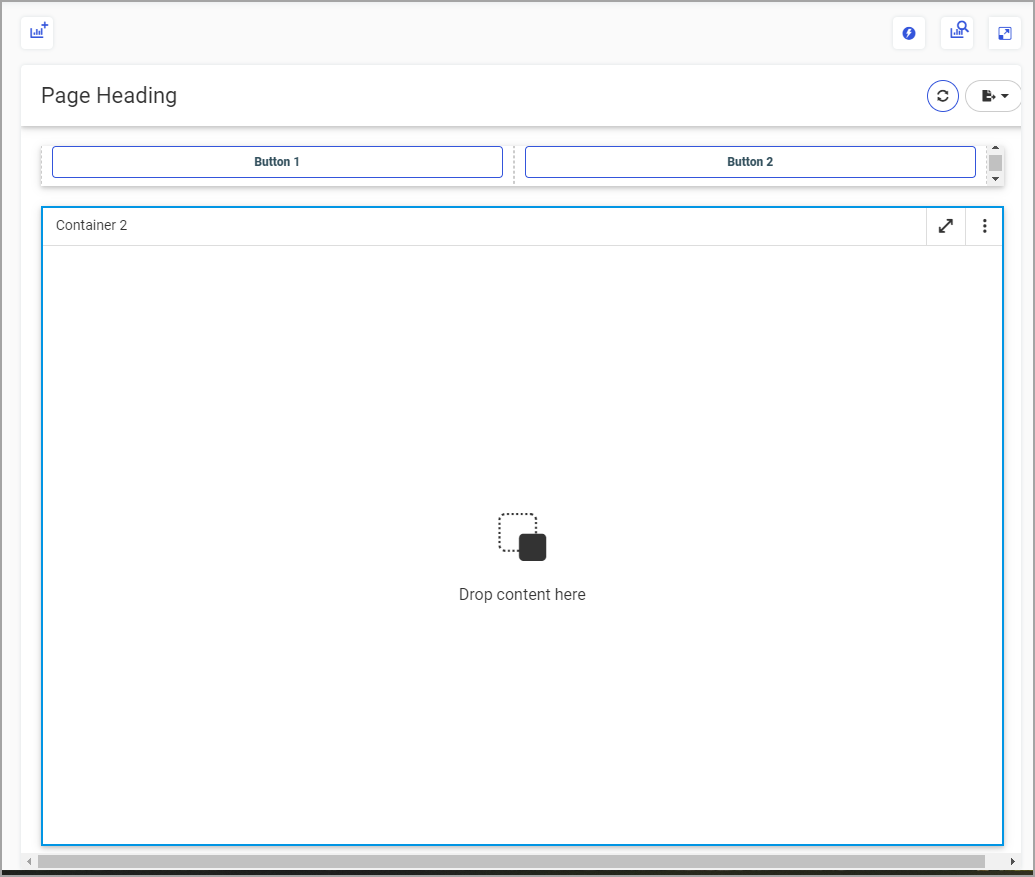
    An example of what your display should look like is shown in the following image.
  9. Click the Interactions button above the canvas.

    The Interactions panel opens.

  10. Click Add Interaction.

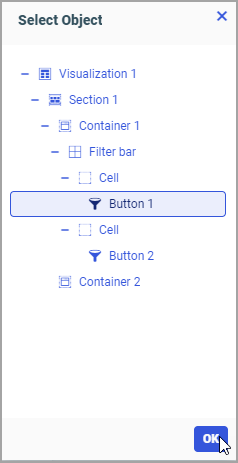
    The Select Object dialog box opens. We will start by programming the first button to display a container and to run content.

  11. Click Button 1 and then click OK, as shown in the following image.
    Note: Notice that when you click an element in the Select Object dialog box, the same element gets selected on the canvas for easy navigation.

  12. Click Select Event.

    The Select Event dialog box opens.

  13. Leave Click selected and click OK.

    The Task 1 node is added to the interaction.

  14. Click Select an action.

    The Select Action dialog box opens.

  15. Click Show object and then click OK.
  16. Click Select an object.

    The Select Object dialog box opens.

  17. Click Container 2 and then click OK.

    The Task 1 node is complete.

  18. In the same interaction, click Add Task.

    The Select Action dialog box opens.

  19. Leave Run content selected and click OK.

    The Select Content dialog box opens displaying the Resources tree.

  20. Navigate to the content item that you wish to run and click OK.

    The Select a target level is added to the task.

  21. Click Select a target.

    The Select Target dialog box opens.

  22. Leave Container selected and click OK.
  23. Click Container content area name.

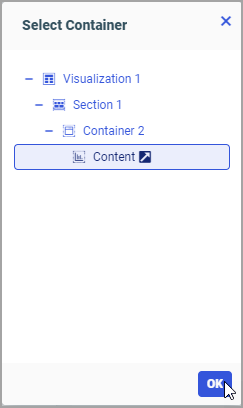
    The Select Container dialog box opens.

  24. Click Content and click OK, as shown in the following image.
    The interaction for the first button is complete. Now we will program the second button to hide content.

  25. In the Interactions panel, click Add Interaction.
  26. In the Select Object dialog box, click Button 2 and then click OK.
  27. Click Select Event, and, in the Select Event dialog box, leave Click selected and click OK.
  28. Click Select an action.
  29. In the Select Action dialog box, click Hide object and click OK.
  30. Click Select an object.
  31. In the Select Object dialog box, click Container 2 and then click OK.

    The interaction for the second button is complete.

  32. Optionally, rename the buttons to convey the actions they now perform by double-clicking them on the canvas and typing new names.

    In our example we are renaming Button 1 to Show Content and Button 2 to Hide Content.

  33. Optionally, rename the interactions to match the new names of your buttons for easy identification.

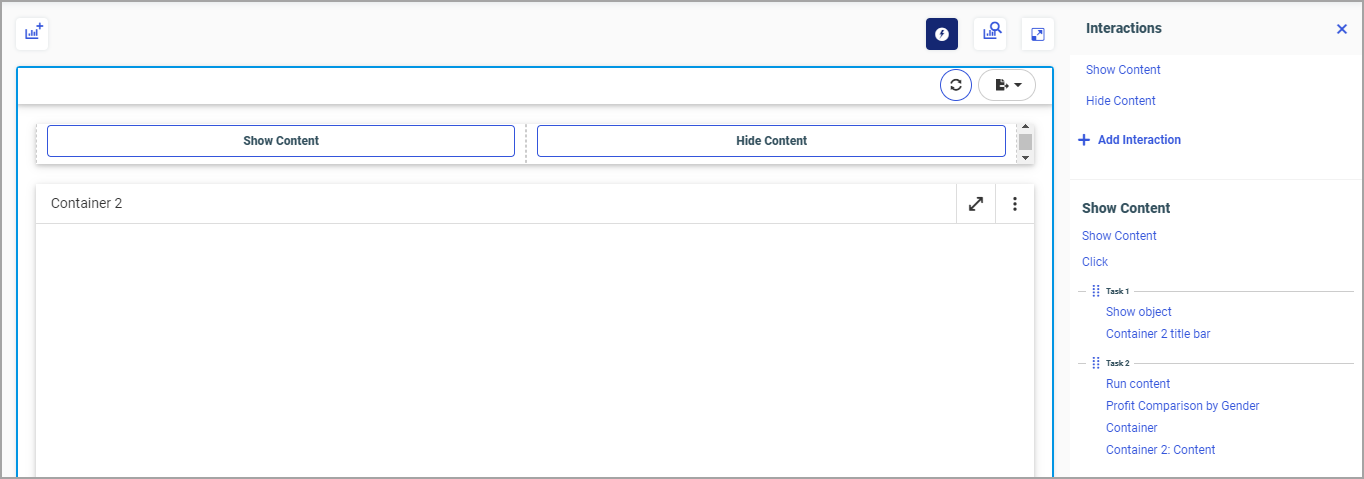
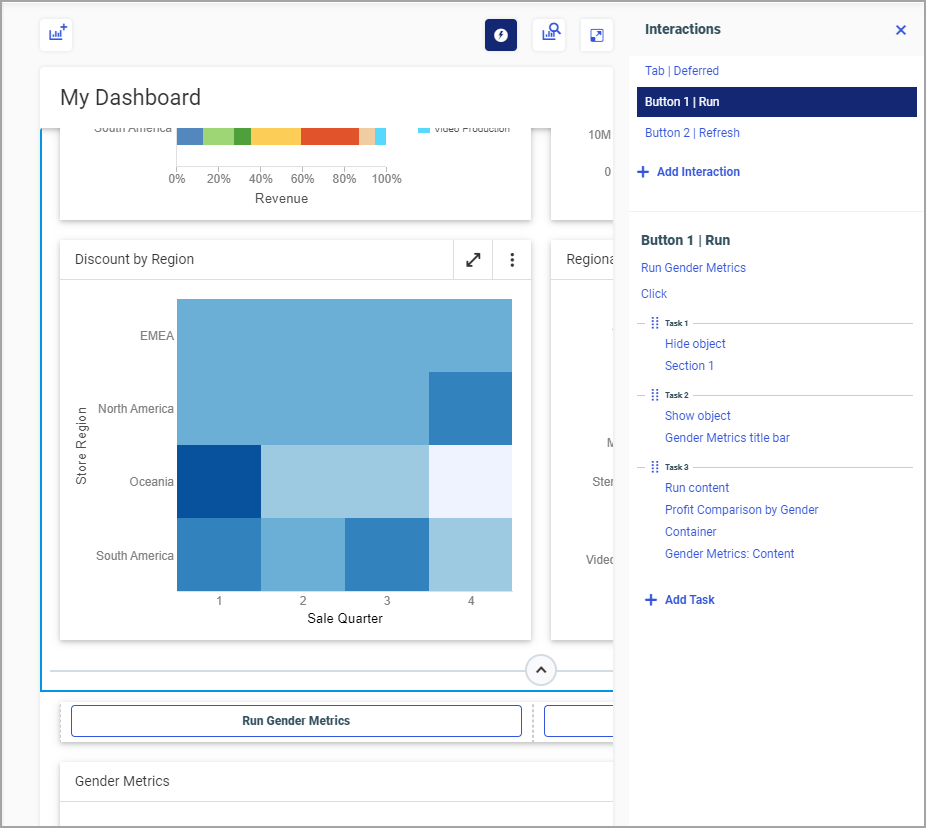
    An example of the completed interactions for a button set is shown in the following image.
  34. Click the preview button to check the behavior.

    The page runs in the new browser window. Clicking the Show Content button runs the content, and clicking the Hide Content button hides the container. Finally, clicking the Show Content again displays the hidden container and runs the content inside it.

    This scenario or its variations can be used as part of a larger structure with multiple interactions on a page.

Procedure: How to Add Interactions to a Filter Control

In this example, we will add an interaction to a filter control.

  1. Launch WebFOCUS Designer in an Assembled mode and select a page template.
  2. Add parameterized content to the canvas.
  3. On the sidebar, click Filters, and add one or more filters to the page.

    Filters are added to the filter toolbar. We will program a filter to schedule content when used to change a selection.

  4. Right-click a filter control to which you want to add an interaction, point to Interaction, and then click Add.

    The Interactions panel opens, and the Select Event dialog box appears.

  5. Leave the Selection change selected and click OK.

    The Task 1 node is added to the interaction.

  6. Click Select an action.
  7. In the Select Action dialog box, click Schedule content and click OK.
  8. Click Select content.

    The Select Content dialog box opens displaying the Resources tree.

  9. Navigate to the content item that you wish to schedule and click OK.

    The Select a mode level is added to the task.

  10. Click Select a mode.

    The Select Schedule mode dialog box opens where you can choose the mode in which your scheduled content is shared. The options include: All, Email Library FTP, Email, FTP, Printer, Report Library, and Repository.

  11. Click Email and then click OK.
  12. Click Select a target.

    The Select Target dialog box opens where you can choose the location for the ReportCaster to run. The options include: Page overlay, New window, and Same window.

  13. Click New Window and click OK.

    Your interaction is complete.

  14. Click the preview button to check the behavior.

    The page runs in the new browser window.

  15. Make a selection in the filter control for which you configured an interaction.

    ReportCaster opens in the new browser window where you can configure the options for scheduling an email. To learn more about scheduling in WebFOCUS, see the ReportCaster technical content.

Procedure: How to Add Interactions to Multi-Content Containers

You can add interactions to the multi-content containers as a whole as well as individual content items within the container.

  1. Launch WebFOCUS Designer in the Assembled mode and select a page template.
  2. On the sidebar, click Containers and drag a multi-content container, such as Tab, Carousel, or Accordion, to the canvas.
  3. Depending on your intended interaction scenario, add content to your multi-content container, or simply add tabs, slides, or areas.
  4. Click the Interactions button above the canvas.

    The Interactions panel opens.

  5. Click Add Interaction.

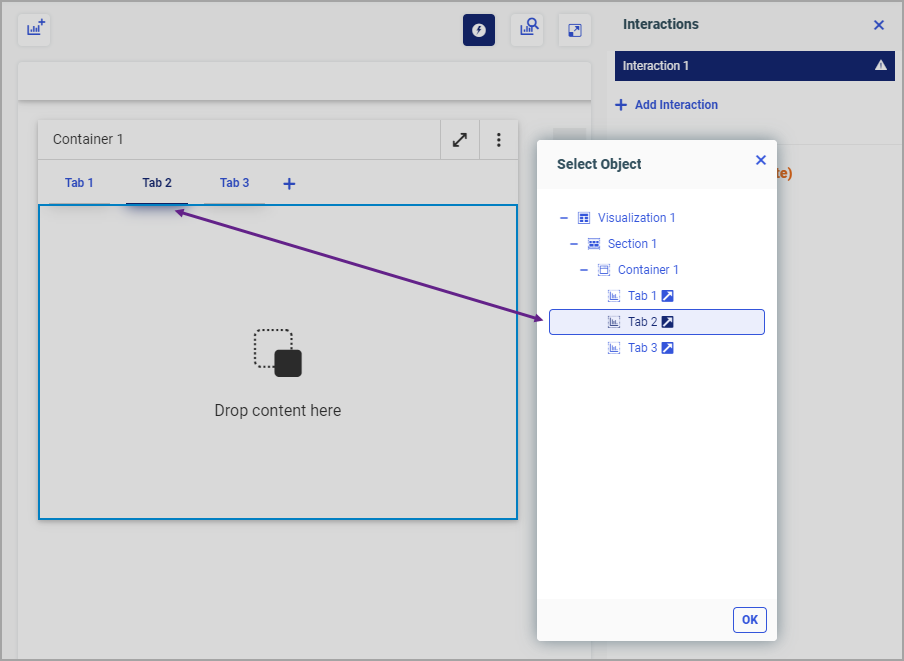
    The Select Object dialog box opens. Notice that you can select an entire container or one of its sub-elements. The following image shows how to target a specific tab of the tabbed container for an interaction.

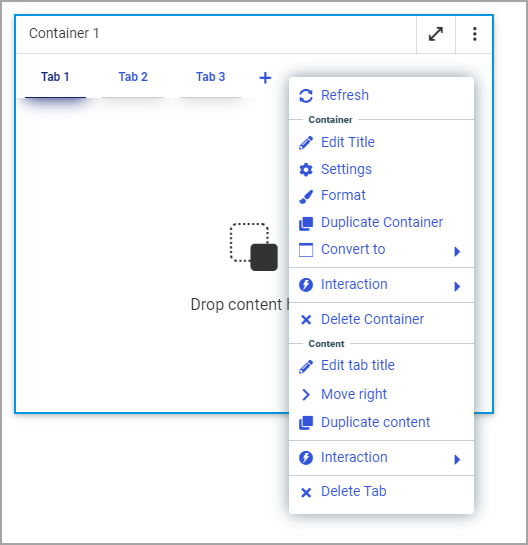
    Another way to see the distinction between these elements is to right-click a multi-content container. The shortcut menu is divided into two sections, Container and Content, each featuring the Interaction option, as shown in the following image.

  6. Once you select an object, you can proceed with completing your interaction, as described in How to Add Interactions to a Content Item.

Adding Conditions to Interactions

How to:

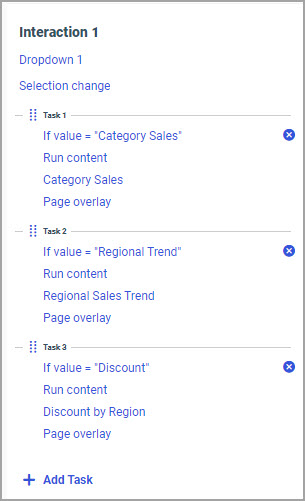
Interactions created with filter controls and certain unbound controls can be configured to use conditions. Whenever an interaction event is set to Selection Change, you can add conditions to the tasks within your interaction. There could be as many conditions as there are tasks inside an interaction, each set to perform a different action whenever a different value is selected. This adds a new layer of flexibility to your page.

Procedure: How to Add Conditions to an Interaction

In this example, we will add conditions to an interaction for a static unbound control.

  1. Launch WebFOCUS Designer in an Assembled mode and select a page template.
  2. Populate your page with elements of your choice.
  3. On the sidebar, click Controls and drag the Dropdown control to your page.

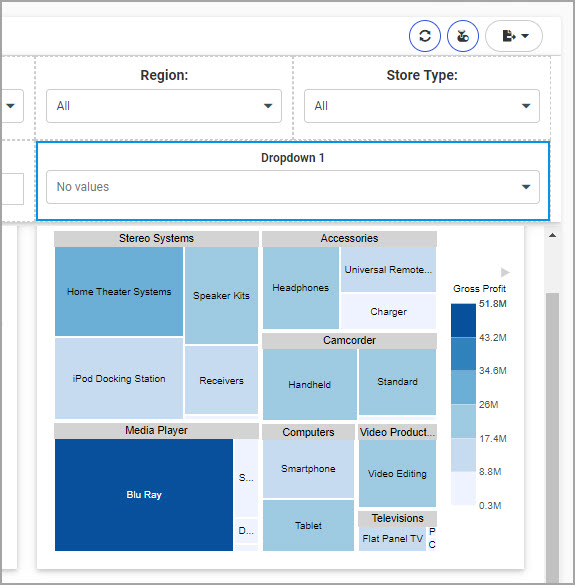
    In this example, we placed the unbound Dropdown control inside the unused cell of the filter toolbar, as shown in the following image.

  4. Click the control inside the cell, and, on the Settings panel, in the Control Source section, click the Edit button.

    The Edit Source dialog box opens.

  5. Configure the static list for the control.

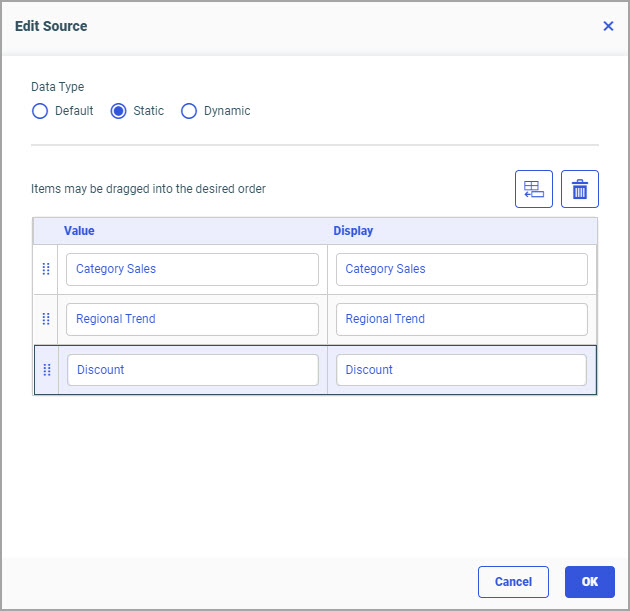
    In this example, we will add three items to represent three charts that the interaction will run.

    1. In the Data Type section, select Static.
    2. Click the Add row button three times.
    3. Populate the three Value fields with the following entries: Category Sales, Regional Trend, and Discount.
    4. Repeat the same entries for the Display fields.

    An example of the populated Edit Source dialog box is shown in the following image.

  6. Click OK.
  7. Right-click the Dropdown control, point to Interaction and click Add.
  8. Leave the Selection change selected and click OK.

    The Task 1 node is added to the interaction.

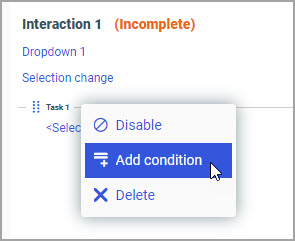
  9. Right-click the Task 1 node and click Add condition, as shown in the following image.
  10. In the Condition dialog box, type the first value from the drop-down list, Category Sales, and click OK.
  11. Click Select an action.
  12. In the Select Action dialog box, leave the Run content option selected and click OK.
  13. Click Select Content.
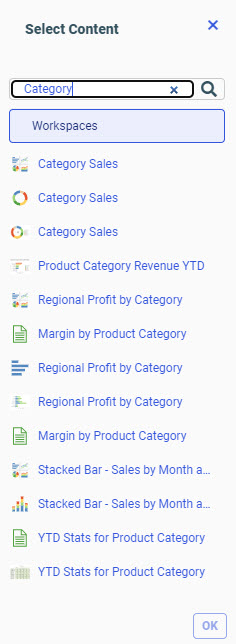
  14. In the Select Content dialog box, navigate to the Category Sales chart inside the Retail Samples workspace, or use the Search feature to locate the item, as shown in the following image, and click OK.
  15. Click Select a target.
  16. In the Select Target dialog box, click Page overlay and click OK.

    The first of the three tasks is complete.

  17. Click Add Task.

    The Select Action dialog box opens.

  18. Close the Select Action dialog box without making a selection.
  19. Right-click the Task 2 node and click Add condition.
  20. Repeat the steps you performed configuring the Task 1 node, only this time, condition the Regional Trend value to run the Regional Sales Trend chart.
  21. Add the Task 3 and condition the Discount value to run the Discount by Region chart.

    An example of a completed interaction is shown in the following image.

  22. Optionally, rename your interaction to reflect the interaction scenario.
  23. Optionally, rename your Dropdown control to reflect the interaction scenario.
  24. Click the preview button to check the behavior.

    The page runs in the new browser window.

  25. Select different values in the drop-down list.

    The charts that correspond to the values run in the page overlay, as configured.

Editing Interactions

There could be a large number of interactions on any given page, which is why the best practice is to give each interaction a distinct name for easy editing. To edit an interaction, click the Interactions button above the canvas and, in the Interactions panel, select an interaction from the list. All tasks that belong to this interaction display below the list, as shown in the following image.

You can click any node to edit it by performing the prompted steps as described in the procedures above.

You can also add, delete, or disable tasks. If you disable a task, it is removed from the queue for execution while remaining in the interaction tree. The Disabled label and icon are added to the task, as shown in the following image.

Finally, you can right-click an interaction in the list to access its shortcut menu options, which include: Duplicate, Rename, Disable, and Delete.