The Deferred Report Status Interface enables you to obtain information about deferred reports. From this Interface, you can perform the following actions on a deferred report:
Note: Selecting new parameters generates a new deferred report, which will appear in the Deferred Report Status Interface.
The Deferred Report Status Interface includes:
You can access the Deferred Status Report Interface from:
Note: The Deferred Report Submit Notification feature is enabled by default. To disable this feature, in the Administration Console, click Configuration. Under Application Settings, click Deferred Reporting, and then set the IBI_Deferred_Notify_Submitted setting to False.
The sorting feature pertains to the entire report. When the default sort value (Date/Time Submitted) is changed, the new primary sort becomes your choice, but the secondary sort is always fixed as Date/Time Submitted. To resort the list, select the Sort by option:
You can optionally change the sort order (ascending or descending) by clicking the Reverse Sort Order button, which toggles between A to Z and Z to A.
Note: When the sort value is Date, the sort order option A to Z means from new to old and not alphabetical from A to Z.
To see the results of the new sort options, click Refresh.
The status of deferred requests are organized under the following sections within the Interface:
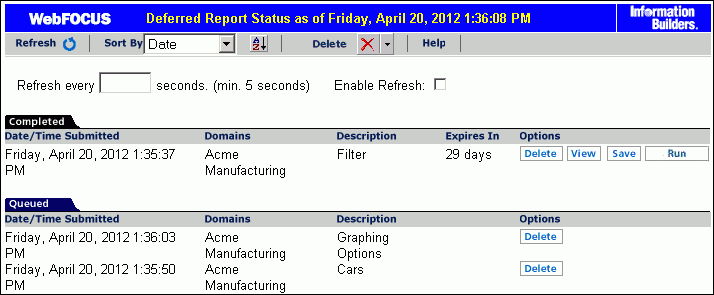
The following image shows a sample Deferred Report Status window with one completed report and two queued reports.
Column headings provide information about the published content including the date and time the published content was submitted, the domain of origin, a description of the report (the report name), an expiration indicator, and an Options heading for options within the Deferred Report Status Interface.
When you select the Deferred Status option, the status for all the deferred requests submitted by your Managed Reporting user ID is retrieved. Depending on how Managed Reporting is configured, deferred status may be coming from multiple WebFOCUS Reporting Servers on various platforms. If credentials are required for the connections, you are prompted by the WebFOCUS Dynamic Server System Signon feature. You can view the status of all the deferred requests submitted by your Managed Reporting user ID, but can only delete, view, save, stop, or review parameters for deferred requests submitted with an identical WebFOCUS Reporting Server user ID.
Caution: Sharing Managed Reporting user IDs is not recommended.
The options available in the Deferred Report Status Interface are based upon the status of the report request and security validation. You can perform various functions by clicking the buttons under the following options.
For more information on configuring Deferred Report Status options and buttons, see Technical Memo 4719: Managed Reporting - Deferred Status Interface How to Hide Deferred Report Options (Buttons).
Note: The Delete drop-down list in the toolbar at the top of the Interface provides options to delete All, All Completed, All Running, All Queued, All Expired, or All Unknown reports, depending on which report status types exist in the Interface.
The View option displays the completed report in a new browser session, or the report format may result in the opening of a Windows dialog box that prompts you to save the report to disk or open the report within an application (such as Microsoft® Excel®, Microsoft® Word, or Adobe® Acrobat®).
Save. Available when the report status is Completed.
The Save option allows you to save Deferred Receipt reports to the WebFOCUS Repository, if your administrator has authorized you to save deferred reports and to create private content. You can save the report output to your My Content folder or a folder you are authorized to create content in and write to. When your deferred report is saved to the WebFOCUS Repository, it is removed from the Deferred Report Status Interface. For more information on security privileges, see the TIBCO WebFOCUS® Security and Administration manual.
Note: This option appears for users authorized to save deferred reports.
Note: The Custom Deferred Report Description feature is disabled by default. To enable this feature, in the Administration Console, click Configuration. Under Application Settings, click Deferred Reporting, and then set the IBI_Deferred_Custom_Description setting to True.
Note: Deferred reports run from within any report development tool do not have an option to view or change amper variable parameter values in the Deferred Status Interface window.
Under certain circumstances, WebFOCUS is unable to submit the request to run in deferred mode. This can occur, for example, when the WebFOCUS Reporting Server is unavailable. When WebFOCUS is unable to submit a deferred request, a Deferred Receipt Notification window opens, notifying you of the failure.
Note: The Deferred Report Submit Notification feature is enabled by default. To disable this feature, in the Administration Console, click Configuration. Under Application Settings, click Deferred Reporting, and then set the IBI_Deferred_Notify_Submitted setting to False.
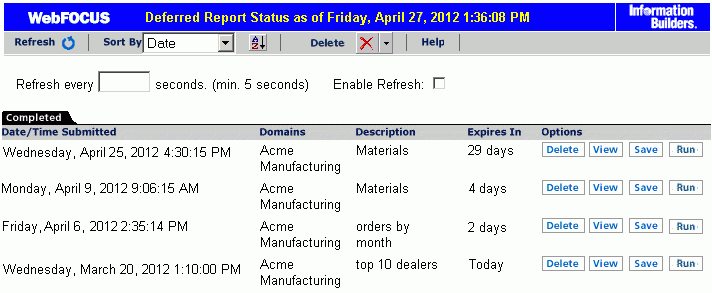
The number of days until expiration appears next to each report. On the last day, the value Today appears.
The following image shows the results of a deferred status request, run on the afternoon of Friday, April 27. (The current date appears in the status bar at the top of the page.) Each report is listed with the time remaining before it is deleted from the WebFOCUS Reporting Server. The time remaining is based on 24-hour intervals (rather than whole days), beginning with the time that the report was submitted. For example, the last report shown on the list will be deleted shortly after 1:10 pm on April 28, not at midnight on April 27.
If a deferred report is not saved or deleted prior to its expiration, the output is automatically deleted from the WebFOCUS Reporting Server dfm_dir directory and the deferred report is moved to the Unknown status tab in the Deferred Report Status Interface. From here, you can only delete the orphaned report.
If deferred output expiration is not configured on your WebFOCUS Reporting Server, then the value Never appears next to each report under the Expires In column.
Note: This setting does not affect deferred output saved to your private content area.
Saved Deferred Reports that utilize WebFOCUS features that create temporary files, such as OLAP, On-demand paging, and redirected formats are subject to expiration as defined by the WebFOCUS Client parameter, EXPIRE_REPORTS (located in cgivars.wfs). See the WebFOCUS Security and Administration manual for information on the EXPIRE_REPORTS parameter that controls temporary file expiration and the mime.wfs file that defines reports formats and whether they use redirection.
Sorting by WebFOCUS Reporting Server user ID enables you to bring deferred reports you want to interact with to the top of the list. At the same time, the deferred reports that you cannot interact with are pushed to the bottom of the list and sorted alphabetically.
This is a special sort. Regardless of the setting for A to Z or Z to A when the sort value is Server ID, deferred reports for the current ID appear at the top. These are followed, in sort order, by deferred reports for other Server IDs, if any exist. The Server ID automatically appears in the Options column.
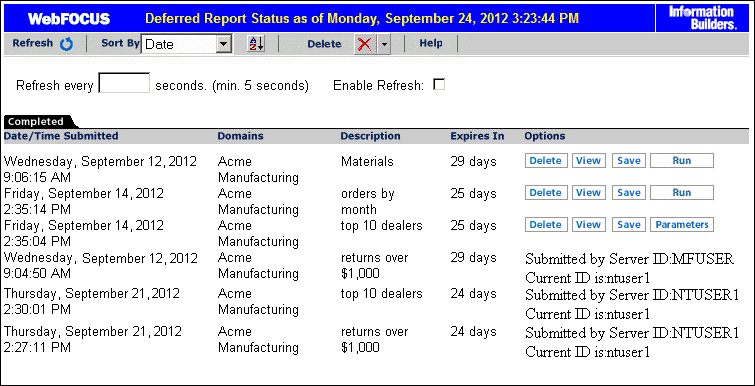
You may see deferred reports listed that you are not allowed to interact with if they:
The following image shows a sample Deferred Report Status window with three reports that have no options for interaction.
How to: |
You can set the automatic refresh interval to any value. The default is 5 seconds and there is no maximum value.
The default value is 5 seconds. There is no maximum value.
How to: |
You must access the Deferred Report Status Interface to view deferred reports.
The output appears in a new window.
How to: |
The Deferred Report Status Interface enables you to retrieve parameters submitted with a deferred request. You access parameters by opening the Deferred Report Status Interface and clicking the parameters button for the report of your choice. The parameters button is not available when the deferred request is submitted from within a report development tool, such as InfoAssist.
You can also change the parameters associated with a report and submit the report to run deferred with the new parameters you specified. WebFOCUS generates your report again using the new parameters and does not overwrite your original report request. If the Custom Deferred Report Description feature is enabled, you are also prompted for a new deferred report description.
The Parameters prompt window opens. If the Custom Deferred Report Description feature is enabled, the Deferred Report Description field displays in the Parameters prompt window.
The Deferred Report Notification window opens.
Note: The Deferred Report Submit Notification feature is enabled by default. To disable this feature, in the Administration Console, click Configuration. Under Application Settings, click Deferred Reporting, and then set the IBI_Deferred_Notify_Submitted setting to False.
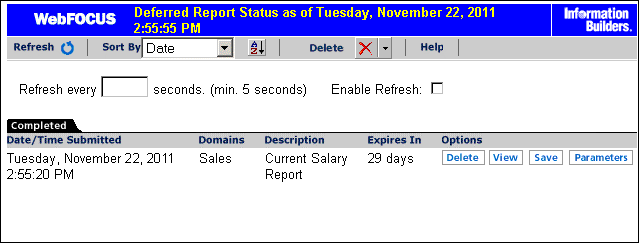
In the following example, you will manipulate a report called Current Salary Report that has been submitted as a deferred request. This example is based on a report developed using the Employee Master File and is intended to offer a practical demonstration of some of the options available in the Deferred Report Status Interface. You should note that an Administrator can develop a similar file for training purposes.
The Parameters prompt window opens. If the Custom Deferred Report Description feature is enabled, the Deferred Report Desctiption field displays in the Parameters prompt window.
The Deferred Report Notification window opens confirming receipt of your request.
Note: The Deferred Report Submit Notification feature is enabled by default. To disable this feature, in the Administration Console, click Configuration. Under Application Settings, click Deferred Reporting, and then set the IBI_Deferred_Notify_Submitted setting to False.
To view Current Salary Report:
WebFOCUS displays Current Salary Report in a separate browser window, as shown in the following image.
WebFOCUS saves Current Salary Report to the Managed Reporting Repository as private content.
How to: |
You can save Deferred Receipt reports to the WebFOCUS Repository, if your administrator has authorized you to save deferred reports. You can save the report output to your My Content folder or a folder you are authorized to create content in and write to. When your deferred report is saved to the WebFOCUS Repository, it is removed from the Deferred Report Status Interface. For more information on security privileges, see the TIBCO WebFOCUS® Security and Administration manual.
Note: Only users authorized to save deferred reports will see the Save button.
The Save File Content dialog box opens.
To return to your reporting environment, close the Deferred Report Status Interface.
How to: |
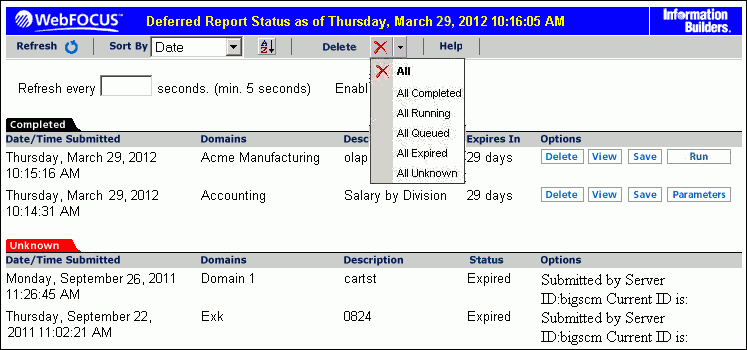
From the Deferred Status Interface, you can delete tickets for all report status types using the Delete drop-down list located in the toolbar at the top of the Interface. The drop-down list provides options to delete All, All Completed, All Running, All Queued, All Expired, and All Unknown reports, but only when one or more reports exist for that status type in the Deferred Status Interface. If a report status type is not displayed in the Interface, the corresponding status option does not appear in the Delete drop-down list.
You can also delete individual tickets using the Delete button, located in the Options column next to each report.
The following image shows the Deferred Status Interface with the Delete drop-down list expanded showing the available options.
For unknown tickets, the status column shows:
Note: For Unknown reports, the Options column displays the Server ID that submitted the report along with the Current ID.
You are prompted to confirm the deletion.
The Deferred Status Interface presents the user with a delete confirmation message before deleting a deferred report that is in Completed, Running, or Queued states. A confirmation message is already displayed for deferred reports in Unknown status.
Note: The deletion confirmation message is controlled by the IBI_Deferred_Ticket_Delete_Confirm setting, which you can configure in the Administration Console. To disable the deletion confirmation message feature, in the Administration Console, click Configuration. Under Application Settings, click Deferred Reporting, and then set the IBI_Deferred_Ticket_Delete_Confirm setting to False.
When you click the delete button from the Deferred Status page, you are prompted to confirm the delete before the deferred report is actually deleted. A similar confirmation message is used for all deferred reports, but the message varies depending on the conditions.
The following are the confirmation messages and the associated conditions:
Each of the deletion confirmation messages also displays the date and time the deferred report was submitted, and the description that is displayed in the Deferred Status Interface.