In this section: |
A workspace can contain a wide range of items, including report procedures (FEX), Reporting Objects (special type of report procedure), Alert procedures, documents, and Internet hyperlinks. It can also include ReportCaster items if you are licensed for ReportCaster. For more information, see the TIBCO WebFOCUS® ReportCaster Guide.
These items are located in folders. Both the items and the containing folder may be private, published, or shared. If you have migrated from an earlier release of WebFOCUS, you will have the Standards Reports, Reporting Objects, and Other Files folders. If you were permitted to create your own reports, you will have the My Content folder, which was the My Reports folder in prior releases. My Content may contain the Custom Reports, Shared Reports, and folders for each My Report report you created.
Note: Shared resources appear in a Shared Content folder and are marked with share icons for users with which you shared the resources.
When you create a folder, it is private content. Private content appears as a gray folder in the tree. If you share a folder, the folder includes a link icon and is available either to all users, specific groups, or users permitted to access the folder location. If you publish the folder, it appears as a manila-colored folder in the tree and is available to all users.
Icon |
Identifies |
---|---|
|
Folder. Allows users to organize their private or published application content. |
|
Shared folder. Contains private content a user has given access to all users permitted to access the folder or is shared with specific groups of users. |
|
My Content folder. Provides the user with a location to create private reports, output, and schedules. This is created when the parent folder has the Auto create My Reports folder property selected and the user is permitted to create private content in a My Content folder. The private content within this folder cannot be published. |
|
Report procedure. Contains the core language commands to tell the TIBCO WebFOCUS® Reporting Server how to create the report. |
|
Shared reports procedure. Contains report procedures to which the user has given access to all users or a specific group of users who are authorized to access the folder the shared report is located in. |
|
Visualization. A graphical representation of your data, comprised of one or more visuals. Visuals can be charts, maps, or grids. |
|
Reporting Object. A report procedure (FEX) that is a tailored view of a set of data that groups or individual users use to create personal reports quickly and in compliance with the reporting rules and guidelines of your company. |
|
Chart procedure. Contains the core language commands to tell the WebFOCUS® Reporting Server how to create a chart. |
|
Document. Customized document created in InfoAssist. |
|
Collaborative portal. An analytical content management and deployment system that provides a flexible environment for users to access BI content, including visualizations, reports, charts, maps, and interactive InfoApps. |
|
Page. An item that is used to organize a wide array of dynamic content. A page can be created as part of a portal, in which case it resides in the Resources folder of that portal by default, but can be moved to another workspace or folder. A page can also be created as a stand-alone item. Pages can only be viewed inside a portal. |
|
Schedule. Specifies when to run a report procedure, how to distribute the report (Email, FTP, Managed Reporting, Report Library, Printer), and the destination to which the report will be distributed. This is available when licensed for ReportCaster. |
|
Alert procedure. A report procedure that evaluates whether a defined condition is true or a file exists to determine whether to run (trigger) the specified or referenced report request. ReportCaster can be used to schedule and distribute an Alert report and specify how the Alert test should be evaluated after it has been triggered. |
|
Distribution List. Used with a ReportCaster schedule (Email, FTP, or Printer) to specify the email addresses, directory locations, or printers to distribute. |
|
Library Access List. Used with a ReportCaster Library schedule to specify the groups and users that the private Library report will be shared with. |
|
Library Report. Library reports can contain links to web resources (live links) and to other reports (drill-downs). The Report Library provides secure access to library content and it allows the user to save multiple versions of the same report output, set an expiration date, and keep a specified number of versions. The Report Library is only available to ReportCaster users who have been granted library privileges. |
|
Watch List Report. A report of particular interest that the user subscribes to in the Report Library. Each time a new version of the report is distributed, the user receives an email notification. |
|
Stylesheet file. Specifies how to apply WebFOCUS styling to a report or chart created by the WebFOCUS Reporting Server. |
|
Cascading Style Sheet (CSS) file. |
|
Microsoft® Office Excel Worksheet. |
|
Adobe® Acrobat PDF file. |
|
GIF image file. |
|
HTML file. |
|
JPG image file. |
|
PNG image file. |
|
SVG image file. |
|
Webpage or a URL to run a report. |
|
Blog. An interactive item that operates as commonly seen blogs on the internet and allows users to post and view comments. |
The following topics describe the shortcut menu options for each type of item.
When you right-click an item in the Resources tree on the Legacy Home Page, the options displayed in the shortcut menu are determined by the selected item type and the tools and features you are permitted to access. For more information, see the TIBCO WebFOCUS® Security and Administration technical content.
For details about using the Schedule option to schedule reports, see the TIBCO WebFOCUS® ReportCaster Guide.
Provides access to the following options:
Opens InfoAssist, where you can create a report.
Enables you to create a chart in InfoAssist.
Enables you to create a document in InfoAssist.
Enables you to create a visualization in InfoAssist.
Enables you to create a stand-alone page using the WebFOCUS Designer.
Opens the Open dialog box, where you can select a Master File for generating sample content.
Enables you to create a shortcut to a repository resource or a Master File.
Enables you to create an Alert in Alert Assist.
Enables you to create a Reporting Object in the Reporting Object tool.
Enables you to create a procedure with the Text Editor.
Enables you to create a link to a URL with the Create URL dialog box.
Enables you to create a collaborative portal, an analytical content management and deployment system.
Enables you to create a portal page, which is a feature that is used to organize a wide array of dynamic content. Portal pages can only be viewed inside a portal.
Enables you to create a schedule with the Advanced Scheduling tool.
Enables you to create a Distribution List with the Distribution List tool.
Enables you to create a Library Access List with the Library Access List tool.
Creates a new folder.
Note: On the WebFOCUS Home Page, the New Folder dialog box shows Title and Name fields. On the Legacy Home Page, the New Folder dialog box shows Title and Summary fields.
Enables you to create a blog, where users post and view comments.
Makes a copy of the item with an underscore and number appended to the title, for example, duplicating Sales_Report creates Sales_Report_1 in the same location. The number is incremented each time a duplicate is created.
Cuts, copies, or pastes the folder and its contents, or individual folder items. When you cut or copy and then paste an item within a folder, the new item displays with an underscore and incremental number. For example, if you copy Report1, then paste it within the same folder, the new report is titled Report1_1. You can also cut or copy and paste a folder item into a different folder.
Deletes the folder and its contents.
Enables you to change the folder title. The Title is the value that displays in the tree.
Note: Changing the folder Title value does not change the folder Name value.
Refreshes the content of the folder.
Enables you to upload a data file, document, or image.
Enables you to create or edit a synonym using the Reporting Server browser interface.
Launches the Search tool.
Allows or suppresses public access to the content.
Shows or hides the item.
Enables you to share or unshare the folder with all users that are permitted to access the folder where the item is located.
Provides access to the following options:
Provides access to the security rules defined on the folder.
Shows the security rules for the folder.
Shows the defined rules that specify the permitted functionality on the folder.
Allows you to set the resource owner, either Published (no specific owner), or a specific group or user.
Shows the properties of the folder.
Launches the ReportCaster Explorer, passing the selected folder location for which the ReportCaster Explorer will obtain and display information.
Note: The options available for a folder are also available for many other types of items.
Report and graph procedures also include the following shortcut menu options:
Runs the report procedure or schedule.
Submits a report procedure or a schedule for deferred execution.
Runs a report and includes an SQL trace of the report results.
Note: The Run with SQL Trace option is not available for visualizations.
Schedules a report procedure. Scheduling options include Email, FTP, Printer, Report Library, and Repository.
Edits an item with the tool that was used to create it.
Provides the options of editing an item in InfoAssist or in the Text Editor.
Creates a shortcut to this item.
Adds the item to the Favorites folder.
Note: The options available for report and graph procedures are also available for many other item types.
Like report procedures, Reporting Object options include the Run, Run Deferred, Edit, and Add to Favorites options, as described in Options for Reports and Charts.
Reporting Objects also include the following shortcut menu option:
Enables you to create a new report, chart, or document using InfoAssist.
There are two types of Save Parameter reports. One can be a procedure (FEX) created from the Autoprompt page, described here. The second type, a Save Parameter report created from an HTML page created using the TIBCO WebFOCUS® App Studio HTML canvas, is described in the following reference.
Like folders, Save Parameter report options include the Duplicate, Cut, Copy, Delete, Change Title, and Properties options, as described in Options for Folders.
Save Parameter reports also include the following shortcut menu option:
Enables you to edit report parameters previously saved from the Autoprompt page before running the request.
The Edit option will display the HTML page with the report parameter values previously saved from the HTML page.
Like procedures, these options include the Run, Edit, Delete, Change Title, Add to Favorites, Publish/Unpublish, Show/Hide and Security options, as described in Options for Procedures (FEX).
Collaborative portals also include the following shortcut menu options:
Runs the portal in a new browser window.
Note: If the browser is configured to run links in a new tab, the portal runs in a new tab.
Provides access to the following options:
Opens the Manage Alias dialog box, where you can create an alias for the selected collaborative portal. This feature is only available to Administrators.
Like procedures, these options include the Edit, Delete, Change Title, Publish/Unpublish, Show/Hide and Security options, as described in Options for Procedures (FEX).
Like folders, these options include the Duplicate, Cut, Copy, and Properties options, as described in Options for Folders.
Portal pages also include the following shortcut menu option:
Removes the portal page from all portals.
Like report procedures, Schedule options include the Edit, Create Shortcut, and Run options, as described in Options for Reports and Charts.
Schedules also include the following shortcut menu option:
Launches the Schedule Log Options dialog box, where you can select whether to view the most recent log report for the schedule or specify a time range for which to obtain log reports.
Like report procedures, Distribution List and Library Access List options include the Edit option, as described in Options for Reports and Charts. The Edit option invokes the Distribution List and Access List tools.
Like report procedures, StyleSheet options include the Edit and Add to Favorites options, as described in Options for Procedures (FEX). The Edit option invokes the Text Editor.
Like report procedures, URL options include the Edit, and Add to Favorites options, as described in Options for Reports and Charts.
URLs also include the following shortcut menu option:
Enables you to launch the URL link.
These files also include the following shortcut menu option:
Enables you to download a copy of the file to your browser, which launches the File Download dialog box to allow you to open or save the file. If you select Open, the file will open in its corresponding application.
Note: Edit, which is available for HTML files, launches the Text Editor.
Like procedures, these options include the Edit, Delete, Change Title, Share, Share with, and Properties options, as described in Options for Procedures (FEX).
Like folders, these options include the Duplicate, Cut, Copy, and Properties options, as described in Options for Folders.
Blogs also include the following shortcut menu option:
Provides access to the following options:
Removes the Favorite from the list.
These files also include the following shortcut menu option:
Enables you to sign in to the WebFOCUS Reporting Server.
Like folders, these options include the Refresh option, as described in Folder Properties
Like collaborative portals, these options include the Run in New Window and Customizations options, as described in Options for Collaborative Portals.
Portals also include the following shortcut menu option:
Displays the language selected for the portal.
Authorized users can select the Properties option to review information about a folder or item, including when it was created, last modified, title, name, and settings that control the WebFOCUS Reporting Server and applications it will access. There are also settings that control the functionality available to users when accessing the folder or running or scheduling an item.
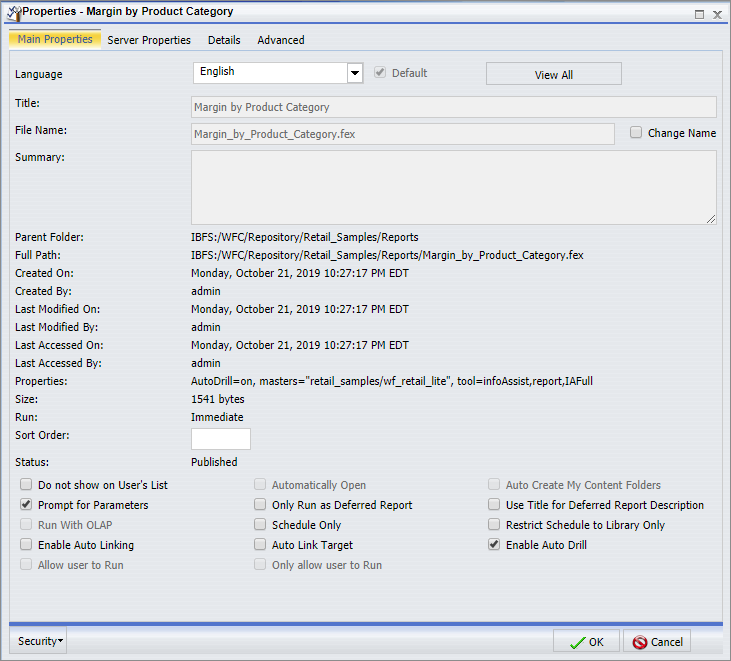
The following image displays the Properties dialog box for an item that opens when you view the properties of an item from the Legacy Home Page.
The Main Properties tab includes:
In addition, the following options are available to control the usage of content:
Note: The Auto Linking between reports will only work if it the target report contains a parameterized field that corresponds to one of the fields in the primary Auto Link report. For more information on Auto Linking, see the TIBCO WebFOCUS® InfoAssist User’s Manual.
Authorized users can view or edit the access rules, effective policy, or sharing permissions by clicking Security.
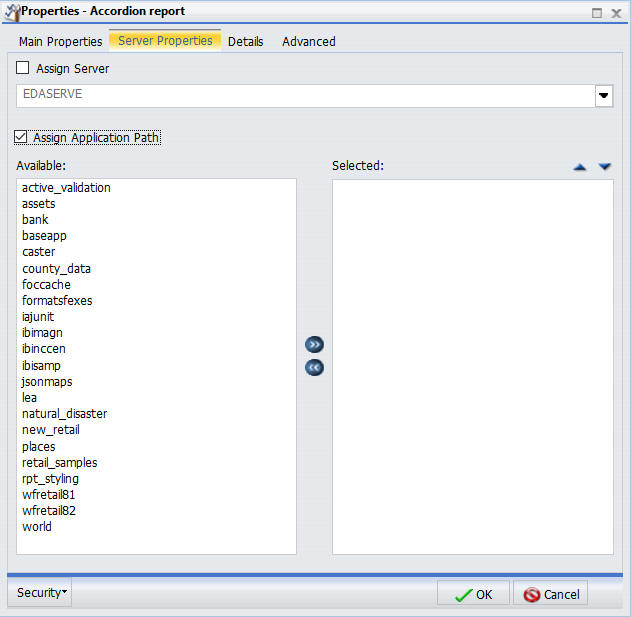
The Server Properties tab, shown in the following image, allows you to manage the server and application path settings.
To change the server, check Assign Server and select one of the available servers. Move application paths from the Available box to the Selected box by double-clicking them or by selecting them and using the double arrow buttons. Use the up and down arrows to change the preferred order of the application paths.
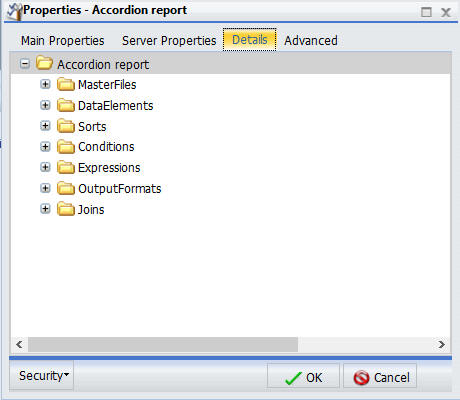
The Details tab, shown in the following image, displays the components of the item in a tree structure to allow a user to review the request information prior to running or opening the item in a tool. The tree structure displays the components of a request, such as Master Files, data elements, sorts, conditions, expressions, output formats, and joins. These components can be opened to show the fields referenced. The displayed component folders are specific to each request.
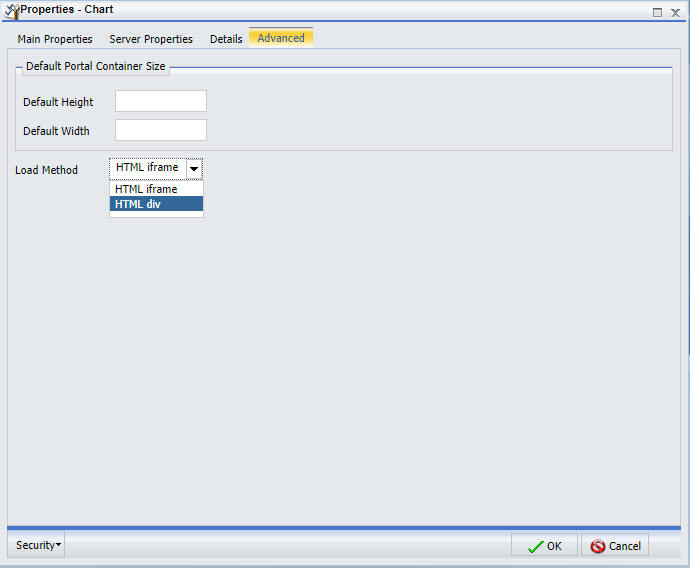
The Advanced tab, which is shown in the following image, allows you to set default height and width values for the item, when it is displayed inside a portal at run time. You can also select an HTML iframe or HTML div load method for InfoAssist charts that have the new attribute syntax applied.
How to: |
You can select the container load method for InfoAssist charts by using the Advanced tab of the Properties Dialog box. The two load methods are:
The option to select a load method is available for InfoAssist charts that run in basic or collaborative portal pages, and have the new attribute syntax applied. The new attribute syntax adds additional relevant field containers for these chart types. Chart attribute syntax differs, depending on the chart type.
You can use field containers to specify fields in a specific area of the chart, based on the function that you want performed. Horizontal Axis, Color, and Tooltip are examples of field containers that are part of the new chart attribute syntax.
The Properties Dialog box opens.
Changing the load method affects the container type that is created when content is added to a portal page canvas. It does not affect previously created containers. If you change a load method from HTML iframe to HTML div, previously created iframe containers will not become div containers. For more information on InfoAssist charts, see the TIBCO WebFOCUS® InfoAssist User’s Manual.